9
Aerial connection
Note:
Before you connect other appliances:
• To avoid potentially damaging your set, make sure all items are switched off and disconnected from the mains power when
you make the connections.
• Arrange the desired connection.
• When you have finished making the connections, reconnect the mains power to the unit and switch it back on.
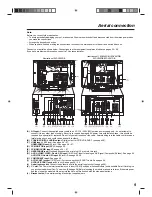
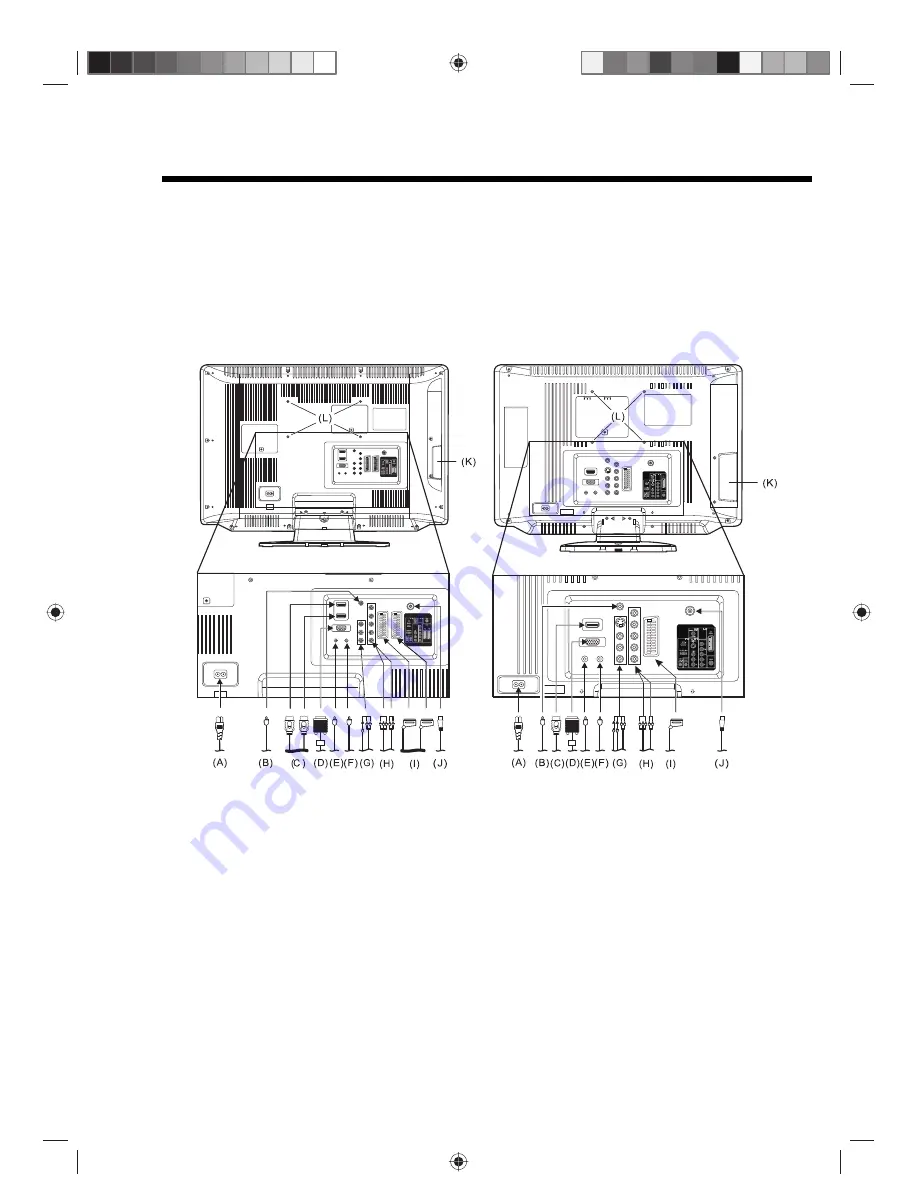
Connect your aerial as shown below. Connections to other equipment is explained further on pages 56 ~ 59.
If you have problems with reception, consult a TV antenna installer.
(A) AC input:
Connect the supplied power cable to an AC 110 ~ 240V/50Hz mains power supply only - do not attempt to
connect it to any other type of supply. Never try to repair a damaged AC power cord with isolation-tape - this should be
repaired by a specialist or replaced. Do not let your pet loose near the cable. Animals biting into the cable could receive a
fatal electric shock, and could cause a hazard to others.
(B) COAXIAL DIGITAL AUDIO output:
Digital output for CD/DVD & DVB-T (see page 58).
(C) HDMI input
(19/22 inch)
:
See page 56 ~ 57.
HDMI1/HDMI2 input
(26 inch)
:
See page 56 ~ 57
(D) PC MONITOR input (PC):
See page 56.
(E) PC/HDMI AUDIO input:
See page 56 ~ 57.
(F)
HEADPHONE jack:
Plug headphones with a mini plug (3.5 mm) into this jack.
(G) AV2 (S-VIDEO, VIDEO, Audio L/R) input
(19/22 inch)
:
Input for analogue A/V-Signal (Composite/S-Video). See page 59.
AV3 (VIDEO, Audio L/R) input
(26 inch)
:
See page 58, 59.
(H) COMPONENT input:
See page 59.
(I)
AV1 (SCART) socket
(19/22 inch)
:
For the connection of SCART cable. See pages 58.
AV1/AV2 (SCART) socket
(26 inch)
:
See pages 58 ~ 59
(J)
Aerial input socket:
Connect the outdoor aerial to the aerial input socket (see page 58).
(K) C.I. slot:
The Common Interface allows you to insert CAM (Conditional Access Module) and a suitable Smart Card to give
you access to additional Pay-TV services. (See page 28) Before inserting the module, make sure to turn off the main power
and then insert the module all the way into the slot until it is flushed with the side panel buttons.
(L)
Bracket holes:
Fix a wall mounting bracket (not supplied) here.
Illustration of 26DV665DB
Illustration of 19DV665DB/19DV667DB/
22DV665DB/22DV667DB


