background image

© 2010 TOSHIBA CORPORATION 

All Rights Reserved

LCD COLOUR TV

O

WNER’S

M

ANUAL

(-6

22EV700E

22EV700T

22EV700V

26EV700E

26EV700T

26EV700V

Summary of Contents for 22EV700E

Page 1: ... 2010 TOSHIBA CORPORATION All Rights Reserved LCD COLOUR TV OWNER S MANUAL 6 22EV700E 22EV700T 22EV700V 26EV700E 26EV700T 26EV700V ...

Page 2: ...TV Programmes 13 Programming channels into the TV s channel memory 14 Picture adjustment 16 Using the TV s features General 16 Available Picture Size and Position Control 16 Sound adjustment 17 Other features settings 18 Selecting the video input source to view 19 Teletext 20 Side and back connections 22 Setting the HDMI1 audio mode 23 Setting the Ext1 Input 24 Connecting a computer 24 Acceptable ...

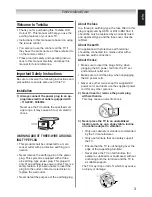
Page 3: ...the plug into the outlet contact an electrician to replace the wall outlet Never defeat the purpose of the earthing plug About the fuse In a three pin earthing type the fuse fitted in this plug is approved by ASTA or BSI to BS1362 It should be only be replaced by a correctly rated and approved type and the fuse cover must be refitted About the earth An appliance with protective earth terminal shou...

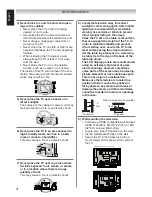
Page 4: ... 20kg Locate your ideal TV position on the wall Fix the wall bracket firmly on the wall Secure the TV to the bracket using the 4 mount screws on the back and the centre of the TV 26EV700E 26EV700T TV back view 22EV700E 22EV700T TV back view 4 Never block or cover the slots and open ings in the cabinet Never place the TV so that it is facing upward or on its side Never place the TV in a closet book...

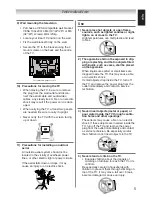
Page 5: ...hildren about the dangers of climbing on furniture to reach the TV or its controls Be especially careful in households with children to prevent them through climbing on top of the TV It may move fall over break become damaged or cause an injury 9 Wall mounting the television Purchase a VESA compatible wall bracket VESA 100x200 4 M4 19 22 26 or M6 32 40 screws 8mm 20kg Locate your ideal TV position...

Page 6: ...ou may suffer an electric shock Service 1 Never repair modify or disassemble the TV by yourself It may cause a fire or an electric shock Consult a service technician for inspection and repairs 2 When a malfunction occurs or if smoke or an unusual odor comes from the TV turn off the TV and remove the power plug from the outlet immediately Make sure that the smoke or smell has stopped then contact a...

Page 7: ...high level of precision technol ogy however sometimes some pixels of the screen may be missing picture elements or have luminous spots This is not sign of malfunction 4 About interference The LCD display may cause interference in image sound etc of other electronic equip ment that receives electromagnetic waves Ex AM radios and video equipment 5 About using under the low temperature places If you ...

Page 8: ...ol batteries Remove the battery cover Insert two R03 AAA 1 5V batteries matching the polarities of the battery to the marks inside the battery compartment Cautions Dispose of batteries in a designated dis posal area Batteries must not be exposed to excessive heat such as sunshine fire or the like Attention should be drawn to the environ mental aspects of battery disposal Always dispose of batterie...

Page 9: ...d uncompressed digital video from an HDMI device or uncompressed digital video from a DVI device 6 POWER Press to turn the TV on and off If the TV stops responding to the controls on the remote control or TV control panel and you cannot turn off the TV unplug the power cord until the power LED extin guished and then plugin the power cord again to reset the TV 7 pq Programme position When no menu i...

Page 10: ...nnection 17 2 COMPONENT The component video inputs with standard stereo audio in puts for connecting devices with component video output such as a Toshiba DVD player with component video Note Component video cables carry only video information separate audio cables are required for a complete connection 18 PC HDMI1 AUDIO PC audio input ter minals are shared with HDMI1 analogue audio input terminal...

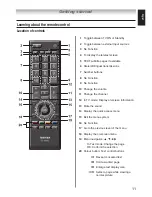
Page 11: ...unction 10 Change the volume 11 Change the channel 12 In TV mode Display on screen information 13 Mute the sound 14 Display the quick access menu 15 Exit the menu system 16 No Function 17 Go to the previous level of the menu 18 Display the on screen menu 19 Menu navigation In Text mode Change the page OK Confirm the selection 20 Colour button Text control buttons Reveal concealed text Hold a wante...

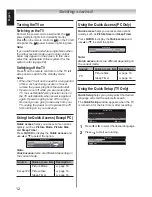
Page 12: ...Using the Quick Access Except PC Quick access helps you access some options quickly such as Picture Mode Picture Size and Sleep Timer Press QUICK to display the Quick access and use p or q to select the option Picture Mode Dynamic Quick access Note Quick access items are different depending on the current mode Source Quick access item Description Except PC Picture Mode page 16 Picture Size page 16...

Page 13: ...ue screen Wide 1 Off On Picture Size Teletext language Panel lock Blue screen Wide 1 Off On Sleep Timer On Timer On Timer Position Off 00 00 1 Language Automatic Power Down AV connection Auto tuning Manual tuning Quick Setup Reset TV English Off OK OK OK OK OK Language Automatic Power Down AV connection Auto tuning Manual tuning Quick Setup Reset TV English Off OK OK OK OK OK Note In the video inp...

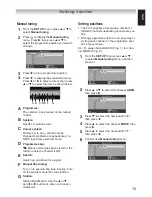
Page 14: ... connection Auto tuning Manual tuning Quick Setup Reset TV English Off OK OK OK OK OK Enter OK 2 Press to display the Auto tuning menu Auto tuning Previoous settings will be lost Press EXIT for no change Press OK key to start Auto tune 3 Press to start the automatic search The search will begin for all available sta tions Searching Found 2 Auto tuning Stop 4 When the automatic search is completed ...

Page 15: ... E Search Search up and down for a signal F Manual fine tuning Turn on to execute fine tune function Turn off to execute manual fine tune funftion G Station Station identification Use the p or q and t or u buttons to enter up to seven characters Getting started Sorting positions The TV is capable of receiving a number of different channels depending upon where you live Sorting programme position i...

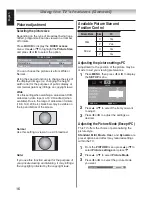
Page 16: ...ect Picture Mode 3 Press t or u to select the picture mode you want Picture adjustment Selecting the picture size Depending on the type of broadcast being trans mitted programmes can be viewed in a number of formats Press QUICK to display the QUICK access menu Use p or q to highlight the Picture Size and press t or u to select the option d r a d n a t S e d o M e r u t c i P Wide Picture Size Slee...

Page 17: ...to select Auto or Mono Using the TV s features General Mono mode If you experience noise or poor reception of any stereo bilingual programme set the MTS mode to Mono Noise will be reduced and reception may improve Note If you experience noise with a particular programme on whose channel reception is usually good try setting MTS mode to Auto then switch to Mono monaural Selecting the dual1 or dual2...

Page 18: ...eaker Other features settings Selecting the Sleep Timer The Sleep Timer is especially useful if you want the TV to turn itself off after a selected period of time 1 Press MENU and then press t or u to display the TIMER menu Edit TIMER Sleep Timer On Timer On Timer Position Off 00 00 1 RETURN Back 2 Press p or q to select Sleep Timer Turn off the TV 3 The timer display will set by off 15 30 45 or 6...

Page 19: ...DPHONE output terminals output analogue audio signal only Setting the manual setting menu Except TV and PC 1 Press MENU then press t or u to display the SET UP menu SET UP Language Manual setting AV connection Picture position Automatic Power Down Location English OK OK OK On Home EXIT Watch TV OK Enter 2 Press p or q to select Manual setting then press 3 Press t or u to select an item and then pr...

Page 20: ...change the setting Note If Subtitle is On the TV will always display subtitles whenever such information is available for the channel you are viewing Teletext buttons on the remote control Below is an introduction to the teletext buttons on your remote control and their functions To display a page of teletext Press to display teletext Press again to superimpose the teletext over a normal broadcast...

Page 21: ... select the time display If you press while watching a normal TV broadcast you will see a time display from the broadcaster It will remain on the screen for about 5 seconds Note If you press while this mode is activated this mode will be cancelled ...

Page 22: ...ices such as a set top box or DVD player with HDMI or DVI output Connecting your TV Side and back connections Please always refer to the owner s manual of the equipment to be connected for full details Connection examples TV back view Side view Video Games Before connecting any external equipment turn off all main power switches To select desired input press until the input list appears on the scr...

Page 23: ...you connect this unit to your PC the compressed image is displayed in S XGA mode therefore the picture quality may deteriorate and characters may not be read Connecting an HDMI device One HDMI cable type A connector TV back view HDMI device For proper operation it is recommended that you use a short HDMI cable HDMI cable transfers both video and audio Connecting a DVI device One HDMI type A connec...

Page 24: ...ending on some signals This is not the malfunction If the edges of the picture are stretched read just the picture position adjustments in the PC Setting menu Depending on the specification of the PC you are playing the DVD Video on and the DVD s title some scenes may be skipped or you may not be able to pause during multi angle scenes Signal names for mini D sub 15 pin connector Pin assignment fo...

Page 25: ...z 60Hz 67 432KHz 67 5KHz 148 35MHz 148 5MHz Acceptable PC signals through HDMI 1 D SUB terminals Format Resolution V Frequency H Frequency Pixel Clock Frequency VGA 640 x 480 59 9Hz 31 469KHz 25 175MHz SVGA 800 x 600 60 3Hz 37 879KHz 40MHz XGA 1024 x 768 60Hz 48 363KHz 65MHz WXGA 1280 x 768 59 9Hz 47 396KHz 68 25MHz WXGA 1280 x 768 59 8Hz 47 776KHz 79 5MHz WXGA 1360 x 768 60Hz 47 712KHz 85 5MHz SX...

Page 26: ...q to select Auto Adjust 2 Press The Auto Adjust window ap pears Note In the HDMI1 2 input mode Auto Adjust is not available Adjusting the picture position An analogue RGB 15 pin computer cable can be connected 1 Press MENU then press t or u to display the SET UP menu 2 Press p or q to select the item you want to adjust SET UP Language Automatic Power Down AV connection Horizontal position Vertical...

Page 27: ...caused in the screen In this case switch off the TV then switch on it again to cure the condition The cold cathode fluorescent lamp used for the back light on this TV has longevity When the brightness of the screen comes down or the flickers of the screen are caused or some parts of the screen do not light up it may reach the end of its life contact a service technician Some pixels of the screen d...

Page 28: ... G Russian Federation etc SECAM D K Myanmar etc NTSC M Oceania Country or region Colour Sound Australia New Zealand etc PAL B G Africa Country or region Colour Sound Republic of South Africa etc PAL I South America Country or region Colour Sound Brazil PAL M Chile Colombia etc NTSC M Note PAL SECAM and NTSC 3 58 MHz are different colour signal broadcast transmission systems applicable to different...

Page 29: ...system COMPONENT VIDEO INPUT terminals the signal format 576i 576p 720p 1080i 50Hz 480i 480p 720p 1080i 60Hz These signal formats are converted to match the number of pixels of the LCD panel Aspect ratio 16 9 Visible size 22EV700 55cm 26EV700 66cm Number of pixels 1 366 H dots x 768 V dots Audio power 22EV700 3W 3W 26EV700 5W 5W Input Output terminals 1 Input 2 Input S Video Component video Y PB C...

Page 30: ......

Page 31: ......

Page 32: ......

Reviews: