background image

To conserve energy it is best to turn your TV off and not to leave it in Standby, unless the timer has been set.

5

SETTING UP

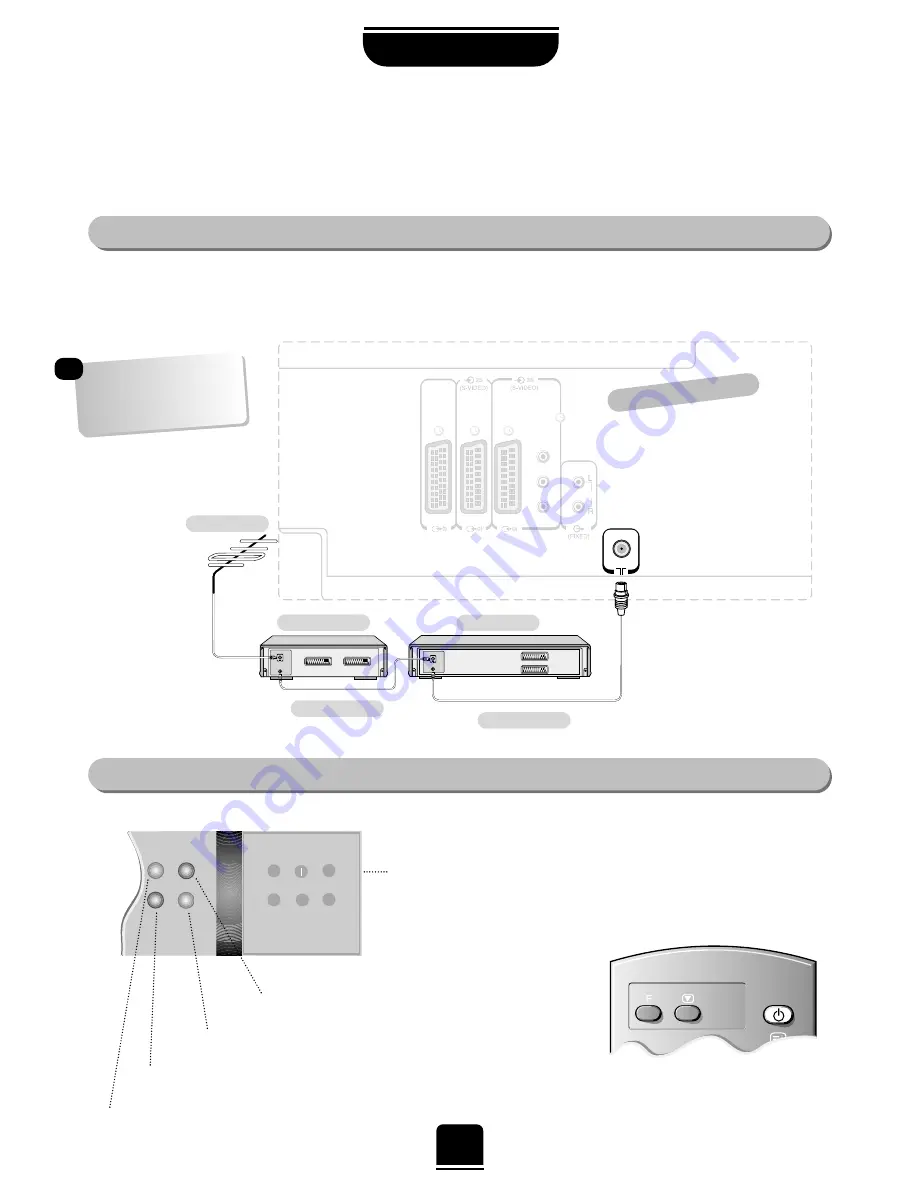
The TV back connections…

…and switching your new TV on…

Connect the aerial to the socket on the rear of the television. If you use a Set Top Box and/or a video recorder it is essential that the
aerial cable is connected through the Set Top Box and/or through the video recorder to the television. 

DO NOT CONNECT SCART LEADS UNTIL THE TELEVISION IS FULLY TUNED. 

On the front of the TV…

If the red power-on light is unlit, press the POWER button on the front of
the TV to switch the set on and then press a number button on the remote
control to see the screen.

…and with the remote control:

Press the Standby Button

i

This allows you to put the set into

standby mode when leaving the TV

unattended for short periods of time. To

return to TV mode press the 

i

button,

or any of the numbered buttons on the

remote control. The picture  may take 

a few seconds to appear.

To conserve energy, do not leave the
set in Standby for long periods of time.

Aerial

Video Recorder

SET TOP BOX

*

Aerial Cable

Aerial Cable

Connecting and turning on 

your new TV

*

a SET TOP BOX co

uld be:

Digital Satellite, A

nalogue

Satellite, or any o

ther 

compatible decod

er.

ORANGE = Dual language

being received

GREEN = Stereo signal being received

RED = Power On

GREEN = On Timer is set

P

B

/C

B

P

R

/C

R

Y

(AUDIO/VIDEO) (AUDIO/VIDEO)

COMPONENT
VIDEO INPUT

AUDIO

IN

OUT

IN

OUT

P

B

/C

B

P

R

/C

R

Y

(AUDIO/VIDEO) (AUDIO/VIDEO)

COMPONENT
VIDEO INPUT

AUDIO

the back of your TV

Summary of Contents for 28ZD06G

Page 1: ...OWNER S MANUAL 28ZD06G 32ZD06G Nicam MPX Stereo Flat Tube Colour Television with Fastext ...

Page 2: ... hot objects such as candles or nightlights on or close to the equipment High temperatures can melt plastic and lead to fires DON T use makeshift stands and NEVER fix legs with wood screws to ensure complete safety always fit the manufacturer s approved stand with the fixings provided according to the instructions DON T allow electrical equipment to be exposed to rain or moisture ABOVE ALL NEVER l...

Page 3: ...ences scan mode Digital Noise Reduction DNR picture still blue screen 11 Widescreen viewing Super Live Cinema Subtitle 14 9 Wide 4 3 12 Picture position picture size position settings Widescreen Signalling 13 Teletext selecting character sets and modes 14 Teletext Auto and List modes 15 Teletext control buttons explaining the relevant buttons on the remote control 16 Timer time display and panel l...

Page 4: ...me positions and teletext pages To bring up on screen information and for the teletext initial index function To select external sources Menu selection confirmation buttons the arrows to move the cursor on the screen up down left or right and ENTER to confirm your selection Selecting teletext pages Stereo bilingual reception On screen Menus 1 or 2 digit channel selection Widescreen format selectio...

Page 5: ...ol to see the screen and with the remote control Press the Standby Button i This allows you to put the set into standby mode when leaving the TV unattended for short periods of time To return to TV mode press the ibutton or any of the numbered buttons on the remote control The picture may take a few seconds to appear To conserve energy do not leave the set in Standby for long periods of time Aeria...

Page 6: ...ct your SYSTEM read on 1 2 3 B G Continental Europe D K Eastern Europe I UK L1 12 L 2 8 France SET UP SET UP EXIT To exit Colour AUTO System I Auto tune Manual tune Programme swap Manual fine tuning Programme skip OFF EXIT To exit Before running Auto tune which is described on page 7 it is important that you select your desired System as described here Should you also wish to tune to alternative S...

Page 7: ...you experience interference or a weak signal see Questions and Answers starting on page 22 EXIT To exit Allow the television to complete the search SET UP Colour AUTO System I Auto tune Manual tune Programme swap Manual fine tuning Programme skip OFF EXIT To exit YOU MAY NOW CONNECT YOUR SCART LEADS 4 5 6 7 Press the Q and P buttons to move through the list to select the channel you wish to alloca...

Page 8: ...n whilst your are out for the evening you can skip the programme position and take the remote control with you The television will still function as normal using the controls on the front of it but the set will not show the skipped programme position Using the remote control select the channel to be skipped Select theSET UP menu and then Programme skip Press R to turn Programme skip ON 1 2 3 3 4 5...

Page 9: ...ed Press the R button twice to start the search RRR Search will flash and the television will show the channel numbers whilst the search is progressing On finding a station it will show on the television 1 2 3 4 5 6 7 8 If you cannot connect your television to the video recorder using Scart Leads you will need to allocate a programme position on the television for the video recorder Insert a pre r...

Page 10: ...ramme positions above 9 press the button to select Enter the desired two digit programme position number 10 99 You can also change the programme position by using the eP fbutton or the Q and P buttons The programme position will be displayed on the screen with the Stereo Mono indicator described on page 17 SOUND Bass 01 Treble 00 Balance 00 Press the MENU button on the remote control and the S or ...

Page 11: ...M is for your own settings So to set your own choose PICTURE from the top menu bar 1 PICTURE EXIT To exit Picture preferences Within this PICTUREmenuyou have the options to adjust the Contrast Brightness Colour Tint and Sharpness Using theS or R button alter to suit your taste The Tint can only be adjusted on a signal from an NTSC video recorder or DVD player when the television is in AUTO colour ...

Page 12: ...itles are included on a letterbox format broadcast this setting will raise the picture to ensure that all the text is displayed Use this setting when watching a 14 9 broadcast Use this setting when watching a widescreen DVD widescreen video tape or a 16 9 broadcast when available Due to the range of widescreen formats 16 9 14 9 20 9 etc you may see black bars on the top and bottom of the screen Us...

Page 13: ...the settings depending upon the picture type SUPER LIVE 14 9 etc selected previously In SUPER LIVE 2 3 1 FEATURE MENU When WSS is ON and this TV is connected to equipment such as a DVD player Widescreen images will automatically be displayed in Widescreen format irrespective of the TV s previous setting Press the MENU button and use theR button to select the FEATURE MENU Use Q to move down to WSS ...

Page 14: ...ss the text service the first page you see will be the initial page in AUTO mode or your first chosen page in LIST mode To access any teletext page enter the 3 digit page number using the numbered buttons on the remote control e g Travel 430 2 3 4 5 TELETEXT To select the Mode with the the Q button highlight Mode With the S or R button choose Auto or List Press EXIT to finish Character 1 for Engli...

Page 15: ...sired INITIAL page for example page 220 the numbers will replace the Whenever text is first selected on this programme position this INITIAL page will be displayed In both Auto and List modes Use the P and Q buttons or the eP fbutton to go to the next or previous main page Press the TEXT TV button to access teletext In Auto mode if FASTEXT is available you will see four coloured titles at the base...

Page 16: ...es until you return to normal TV p q TEXT TV 1 2 F and To enlarge the teletext display size Press the F and the sbuttons once to enlarge the top half of the page press again to enlarge the bottom half of the page Press again to revert to the normal size 5 3 6 4 F and To select a page whilst viewing a normal picture When in teletext mode if a page selection is made and then the F and the tbuttons a...

Page 17: ...utton When the On timer has been set the GREEN On timer indicator on the front of the TV will be lit see page 5 1 2 3 Off timer 01 30 On timer 00 00 P02 0 9 To set EXIT To exit TIMER If the On timer has been set you do not have to wait for the time period to elapse before being able to watch the television You can bring the set back to life by pressing the ibutton However the GREEN timer light wil...

Page 18: ...the stereo Set Top Box transmission in stereo Again from the FEATURE MENU select AV connection Using the S or R button change the EXT2 output option to either Monitor TV or EXT1 Monitor The picture on screen TV The last television programme selection EXT1 the picture from equipment connected to Scart 1 Selecting the OUTPUT signal forScart 2 Selecting the OUTPUT signal forScart 2 Please see page 20...

Page 19: ...urn off all main power switches Please note Inserting the headphone jack will mute the sound from all speakers Whilst all the necessary adjustments and controls for your new TV are made using the remote control the buttons on the front of the TV may be used for some functions For example to alter the volume press the _ j buttons To alter the programme position press the e e P f f buttons Press the...

Page 20: ...COAXIAL LEAD If your TV automatically switches over to monitor the connected equipment you can return to normal TV simply by pressing the desired programme position button To recall the connected equipment press the Bbutton repeatedly to select between EXT1 EXT2 and EXT3 For example Toviewavideo recorderpresstheBbutton repeatedly to select EXT1 EXT2 or EXT3 To return to normal TV press one of the ...

Page 21: ...you select each symbol by pressing the SorR button its respective options will appear below To use the options press the Q button on the remote control to move you down through them EXIT To exit Contrast 100 Brightness 50 Colour 50 Tint 00 Sharpness 00 Scan mode NATURAL DNR OFF Off timer 00 00 On timer 00 00 P02 The SET UP Menu SET UP TIMER FEATURE MENU AV connection Picture size position Teletext...

Page 22: ...our AUTO System I Auto tune Manual tune Programme swap Manual fine tuning Programme skip OFF EXIT To exit These are often caused by magnetic field interference Turn off the TV by the ON OFF button on the front of the TV for ten minutes and then turn it on again If there are any speakers nearby reposition them away from the TV before turning the TV off A Q Why are there coloured patches on the scre...

Page 23: ... section A Why am I having problems with teletext Q Check that Panel lock is not ON in the FEATURE MENU A Why don t the controls on the front of the TV work Q Cleaning the screen and cabinet After turning off the power clean the screen and cabinet with a soft dry cloth We recommend that you do not use any proprietary polishes or solvents on the screen or cabinet as this may cause damage Disposal W...

Page 24: ...e Admiralty Way Camberley Surrey GU15 3DT England Specification is subject to change without notice Originated by Kensa Creative Solutions Saltash Cornwall Toshiba Information Systems U K Limited All rights reserved Reproduction in whole or part without written permission is strictly prohibited Broadcast system channels PAL I UHF UK21 UK69 PAL B G UHF E21 E69 VHF E2 E12 S1 S41 SECAM L UHF F21 F69 ...

Reviews: