background image

ENGLISH 

  - 5 -

Features

• Infra red remote control
• 100Hz flicker free
• User friendly menu system
• On-screen functional display
• Frequency synthesis tuning
• Comb filter
• Sleep timer
• 100 program storage locations
• S-band (S1-S20)
• Hyper band reception (S21-S41)
• Digital-CTI (Color Transient Improvement)
• Digital noise reduction
• Auto, 4:3, 16:9
• Built-in 2 speakers
• Volume controlled Headphone output, and headphone termi-

nals (jacks)

• Balance control
• 5-Band equaliser
• 3 x Euro AV plug (Scart)
• 75 Ohm Aerial socket
• Fastext
• Nicam Stereo
• Real Flat (Dynamic Focus)
• S-VHS (via SCART or SVHS connector)
• Front-AV
• Multi system reception (PAL SECAM B/G D/K L/L’)
• NTSC Playback
• Automatically switch off after 5 minutes when no signal.
• Automatic VCR detection
• Digital Scan

Switching  the  TV  ON/OFF

You can operate your TV either using the remote control

handset or directly using the TV onset buttons.

To switch the TV on

Your TV will switch on in two steps:

1-

 Press the power button located on the front of the TV. Then

the TV switches itself to standby mode and the 

RED LED

located below the TV turns on.

2-

 To switch on the TV from stand-by mode either:

Press a digit button on the remote control so that a program-

me number is selected,
or,
Press Standby / Power Button or Programme Up and Down

buttons on the front of the TV or on the remote control re-

spectively, so the TV will switch on and the 

RED

 Led will turn

GREEN

.

IMPORTANT:

• 

If no aerial signal is received at the selected program for a

period  of  5  minutes  then  your  TV  automatically  switches

into stand-by mode.

To switch the TV off

• Press the stand-by button on the remote control, so the TV

will switch to stand-by mode and the 

GREEN LED

 will be-

come 

RED

,    or,

• Press the power button located on the front of the TV.

NOTE:

 If you have switched off the TV set from the power but-

ton  instead  of  the  remote  control,  next  time  you  press  the

power button, the TV set will switch on without going to the

stand-by mode.

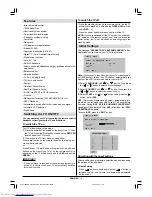
Initial  Settings

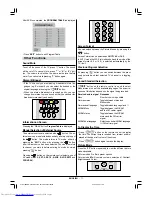
The message “

PLEASE CHECK ANTENNA CABLE!

” will be

displayed when you turn on your TV for the first time.

3/($6(&+(&.$17(11$&$%/(

/$1*8$*(

(1*/,6+

&28175<

8.

67$57

(;,7&$1&(/

(;(&87,21$36

Note:

 If you connect Video Recorder to your TV via antenna in-

put (ANT socket); to tune the VCR channel automatically you

must set the VCR in play mode before you start APS.

1-

Select 

LANGUAGE

 with “ “ or “ ” button, then press

the “ ” or “ ” button to select a menu language.

2-

Select 

COUNTRY

 with “ “ or “ ” button, then press the

“ ” or “ ” button to select the correct country.

3-

Select 

START

 with “ “ or “ ” button, then press the “ ”

button to start 

APS

.

APS

,  (Automatic  Programming  System)  automatically  pro-

grammes  the  received  channels  in  your  TV’s  programme

numbers. During 

APS

, “

APS IS RUNNING PLEASE WAIT

”

message will be displayed. After 

APS

 is finalized, the “

PRO-

GRAM TABLE

” appears.

To cancel 

APS

, press the “

EXIT

” button.

(;(&87,21$36

$36,65811,1*3/($6(:$,7

352*5(66

&+$11(/


(;,7&$1&(/

Operating with the onset buttons

Volume setting and programme selection can be made using

the buttons on the front panel.

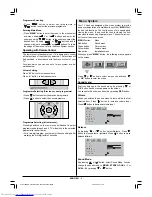
Volume Setting

• Press “

” button to decrease volume or “

 +

” button to

increase volume, so a volume level scale will be displayed

on the screen.

01-2919&ENG-2143-AK53-RF-ST10P-50051716.p65

27.04.2004, 11:44

5

Summary of Contents for 29VH36

Page 1: ...Owners Manual TOSHIBA The power to open people s eyes 29VH36 37 ...

Page 2: ...ver in doubt about the in stallation operation or safety of your equipment DO be careful with glass panels or doors on equipment DO NOT DON T remove any fixed cover as this may expose danger ous voltages DON T obstruct the ventilation openings of the equipment with items such as newspapers table cloths curtains etc Overheating will cause damage and shorten the life of the equipment DON T allow ele...

Page 3: ...ldren push anything into holes slots or any other openings in the case this could result in a fatal electric shock NEVER guess or take chances with electrical equipment of any kind it is better to be safe than sorry Installation of TV Set Preparation Place the TV on a solid surface For ventilation leave a space of at least 100mm Free all around the set To prevent any fault and unsafe situations pl...

Page 4: ...ontrol Panel Buttons Antenna Connections 8 2 5 9 2 6 9 2 0 18 3RZHU 0HQX 3URJUDP 9ROXPH XGLR QSXW 7HUPLQDO 9LGHR QSXW 7HUPLQDO HDGSKRQH 69 6 5217 9 3 01 2919 ENG 2143 AK53 RF ST10P 50051716 p65 27 04 2004 11 44 3 ...

Page 5: ... V V Volume Down Volume Up Cursor Left Cursor Right Yellow Feature Menu Blue Install Menu Teletext Mix Teletext Quit Time Update Hold Index Page TV Status No Function No Function Reveal Expand Picture Mode Auto 4 3 16 9 Stereo Mono Dual I II Red Sound Menu Green Picture Menu Volume Down Cursor Left OK Ok MENU Menu Programme Swap Mute Functions of the and V V buttons are the same 01 2919 ENG 2143 A...

Page 6: ...d of 5 minutes then your TV automatically switches into stand by mode To switch the TV off Press the stand by button on the remote control so the TV will switch to stand by mode and the GREEN LED will be come RED or Press the power button located on the front of the TV NOTE If you have switched off the TV set from the power but ton instead of the remote control next time you press the power button...

Page 7: ...pressing the first digit within 2 seconds Menu System Your TV has been designed with a menu system to provide an easy manipulation of a multifunction system MENU but ton has two functions The first function of it is opening and closing the menu the second function is closing the sub menu and then opening its parent menu The short way in or der to enter the menus press MENU button Menu Red button S...

Page 8: ...2 3 21 66 2267 2 9 2 2 Volume By pressing or button select Volume Press button to increase headphone volume level Press button to decrease headphone volume level 3 21 92 80 1 6281 02 0212 Balance By pressing or button select Balance Press button to move headphone balance rightward Press but ton to move headphone balance leftward Sound Mode By pressing or button select Sound Mode You can change the...

Page 9: ...sharpness level 3 785 5 71 66 2175 67 2 25 6 531 66 7 7 Setting Tilt Using or button select Tilt Press button to increase tilt level Press button to decrease tilt level 3 785 5 71 66 2175 67 2 25 6 531 66 7 7 Setting Tint This item is used to change the Color Temperature By press ing or button you may select one of these options COOL WARM NORMAL 3 785 7 7 7 17 15 6 5 1 250 7 1250 2 6 531 66 DNR By...

Page 10: ...buttons except the Power On Off button will not work 785 6 3 7 0 5 2 2 2 79 2 8 6 5 1 7 287387 While the CHILD LOCK is ON pressing any of the front right panel buttons except Power on off button causes the warn ing menu to appear on the middle of the screen 2 Blue Screen In case no valid signal is detected in TV or AV mode Blue Screen is activated During search process Blue Screen is not active Th...

Page 11: ...when a channel is found which has been searched FOUND mes sage is written across the Search item in the menu above Channel By pressing or button select Channel By pressing or digit buttons you can change the channel num ber Band By pressing or button select Band By pressing or button you can change the Band to C or S To exit the Search menu press MENU button To Store the Settings Press OK button t...

Page 12: ...You can switch between the Picture Modes by pressing the button Screen Format can be selected as AUTO 4 3 or 16 9 In AUTO mode the WSS info is decoded and the mode of the screen format 4 3 or 16 9 is selected automatically by the TV itself Previous Program Selection By pressing button you can switch between the previ ously selected and last selected TV channel in a toggling mode Sound Standard Sel...

Page 13: ...creen until the re quested page is found Then the the page number entered will stop blinking to indicate that page has been found Now you can display this teletext page pressing but ton To Select Double Height Text Press button for the top half of the information page to be displayed in double height text Press button again for the bottom half of the informa tion page to be displayed in double hei...

Page 14: ...er Video input Audio L R inputs and RGB inputs are available TV broadcast outputs Video and Audio L R are available EXT 2 terminal Euroconnector 21 pin SCART DVB DVD Video and Audio L R outputs are available Video input S VIDEO Y C input and Audio L R inputs are available EXT 3 terminal Euroconnector 21 pin SCART Decoder TV broadcast outputs Video and Audio L R are available Front AV terminal RCA ...

Page 15: ...ck Connect a NTSC video recorder to a terminal Then press button to select the corresponding AV mode NTSC 3 58 4 43 system is detected automatically in AV mode Copy Facility You can output the video and audio signals which inputs from TV EXT 1 EXT 3 FRONT AV terminal to the video recorder connected to the EXT 2 terminal To select the output source see EXT2 OUTPUT on page 9 Connecting Headphones Us...

Page 16: ...ll Toshiba be liable for any consequential loss and or damage including but not limited to the following loss of profit interruption of business the loss of recorded data whether caused during normal oper ation or misuse of the product WARNING NEVER LEAVE A STATIONARY IMAGE ON THE SCREEN If stationary images generated by TELETEXT CHANNEL IDENTIFICATION LOGOS COMPUTER DISPLAYS VIDEO GAMES ON SCREEN...

Reviews: