background image

(E) 32HLX84

32HLX84


LCD Color Television

O

WNER'S 

M

ANUAL

4

Owner's Record

The model number and serial number are on the back 
of your TV. Record these numbers in the spaces below. 
Refer to these numbers whenever you communicate 
with your Toshiba dealer about this TV.

Model number:                           

 32HLX84

Serial number:

E: ENGLISH

F: FRANÇAIS

S: ESPAÑOL

E

S

F

Connecting

y

our T

V

Using the

Remote Contr

ol

Setting up

y

our T

V

Using the T

V’s

F

eatur

es

Appendix

Index

Intr

oduction

#01E01_32HLX84

04.10.14, 1:33 AM

1

Black

Summary of Contents for 32HLX84

Page 1: ...r TV Record these numbers in the spaces below Refer to these numbers whenever you communicate with your Toshiba dealer about this TV Model number 32HLX84 Serial number E ENGLISH F FRANÇAIS S ESPAÑOL E S F Connecting your TV Using the Remote Control Setting up your TV Using the TV s Features Appendix Index Introduction ...

Page 2: ...ne to assure the safe use of your Receiver Tuner The Safety Instructions contained in this manual have been categorized in accordance with the seriousness of the potential hazards through the use of signal words Those Signal Words and their intended meanings are as follows DANGER Indicates that the failure to observe the Safety Instructions could result in death or catastrophic bodily injury WARNI...

Page 3: ... filled with liquids such as vases shall be placed on the apparatus ChildSafety It Makes A Difference Where Your TV Stands Congratulations on your purchase As you enjoy your new TV keep these safety tips in mind The Issue If you are like most consumers you have a TV in your home Many homes in fact have more than one TV The home theater entertainment experience is a growing trend and larger TVs are...

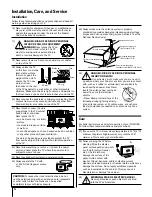
Page 4: ...ION To reduce the risk of electric shock do not use the polarized plug with an extension cord receptacle or other outlet unless the blades can be inserted completely to prevent blade exposure 25 Always make sure the antenna system is properly grounded to provide adequate protection against voltage surges and built up static charges see Section 810 of the National Electric Code 26 DANGER RISK OF SE...

Page 5: ...ondition 37 The cold cathode fluorescent lamp in the LCD panel contains a small amount of mercury When the TV reaches the end of its useful life dispose of the used TV by the approved method for your area or ask a qualified service technician to properly dispose of the TV Note The lamp unit contains mercury the disposal of which may be regulated due to environmental considerations For disposal or ...

Page 6: ...heaterWide picture TheaterWide 2 and 3 only 36 Using the AUTO ASPECT feature 37 Using the POP double window feature 38 Switching the main and POP pictures 39 Switching the speaker audio main or POP 39 Double Window aspect ratio 40 Using the programmed channel search function 40 Using the favorite channel search function 41 About the auto favorite feature 41 Using the LOCKS menu 42 Entering the PIN...

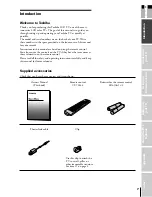
Page 7: ...e space provided on the front cover of this manual for your records Instructions in this manual are based on using the remote control You also can use the controls on the TV if they have the same name as those referred to on the remote control Please read all the safety and operating instructions carefully and keep this manual for future reference Supplied accessories Check that you have the acces...

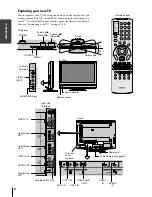
Page 8: ...enu yz MENU ANT 2 IN Remote sensor Remote control Exploring your new TV You can operate your TV by using the buttons on the top panel or the remote control The A V terminals for connecting other equipment to your TV are on the back panel and side panel see illustrations below Also see Connecting your TV on pages 9 18 VIDEO 3 INPUT TV VIDEO HEADPHONE jack Power indicator ANT 1 IN ANT OUT Cable clam...

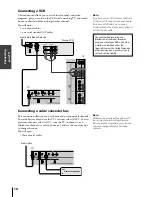
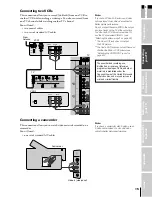
Page 9: ...te video cable Component video cables come in sets of three and are for use with video devices with component video output These cables are typically color coded red green and blue ColorStream is Toshiba s brand of component video Separate audio cables are required for a complete connection Note Component video cables provide better picture performance than a standard composite video or S video ca...

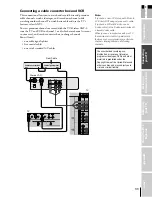
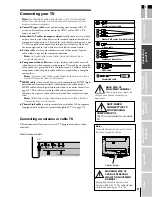
Page 10: ...your area and use the converter box to change channels You will need three coaxial cables OUT IN Cable converter box Note When you use a converter box with your TV the remote control will not operate some features such as programming your favorite channels labeling channels and locking channels Note If you have a mono VCR connect L Mono to VCR Audio OUT using only one audio cable If you have a VCR...

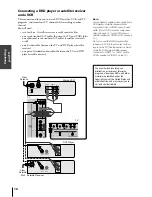
Page 11: ...e coaxial cables one set of standard A V cables Stereo VCR Note If you have a mono VCR connect L Mono to VCR Audio OUT using only one audio cable If you have a VCR with S video use an S video cable in the S video jacks instead of a standard video cable When you use a converter box with your TV the remote control will not operate some features such as programming your favorite channels labeling cha...

Page 12: ...t video or HDMI use an S video cable If your DVD player has component video see page 13 If your DVD player or satellite receiver has HDMI or DVI see page 16 Do not connect the DVD player satellite receiver and VCR to the same set of Video inputs on the TV See the illustration which shows the DVD player satellite receiver connected to VIDEO 1 on the TV and the VCR connected to VIDEO 2 on the TV The...

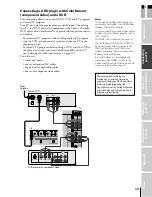
Page 13: ...o input source on page 52 You will need two coaxial cables one set of standard A V cables one pair of standard audio cables one set of component video cables DVD player with component video The unauthorized recording use distribution or revision of television programs videotapes DVDs and other materials is prohibited under the Copyright Laws of the United States and other countries and may subject...

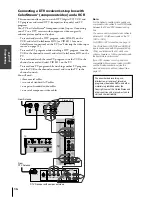
Page 14: ...er TV program tune the VCR to the channel to record and tune the TV to the channel to watch You will need three coaxial cables two sets of standard A V cables one pair of standard audio cables one set of component video cables Note For the highest possible picture quality use component video cables or an HDMI cable between the TV and DTV receiver set top box You can connect component video cables ...

Page 15: ...ideo cables instead of standard video cables for better picture performance Do not connect the same VCR to the output and input jacks on the TV at the same time To dub or edit VCR 2 must select Line IN and the TV must select VIDEO 1 see Selecting the antenna input on page 28 The Video OUT jack does not output the POP picture The Audio OUT jacks can output the sound of either the Main or POP pictur...

Page 16: ...you follow these procedures When turning on your electronic components turn on the TV first and then the HDMI or DVI device When turning off your electronic components turn off the HDMI or DVI device first and then the TV The HDMI 1 input on your TV receives digital audio and uncompressed digital video from an HDMI device or uncompressed digital video from a DVI 2 device This input is designed to ...

Page 17: ...eaterLink cable s infrared eye with the device s infrared sensor and attach it using double sided mounting tape included with the cable in the accessory pack Plug the other end of the TheaterLink cable into the TV s TheaterLink OUT terminal You will need one TheaterLink cable included one piece of double sided mounting tape included TheaterLink cable s infrared eye facing device s infrared sensor ...

Page 18: ...amplifier and turn off the built in speakers see Turning off the built in speakers on page 58 You will need one pair of standard audio cables Note To hear sound when using an external audio amplifier the volume of both the TV and the amplifier must be set above 0 zero For example if the volume of the TV is set to 0 you will not be able to hear any sound even the volume of the amplifier is at its h...

Page 19: ...on the batteries to the signs on the battery compartment 3 Slide the battery cover back on to the remote control until the lock snaps Note Your TV s remote control may not operate certain features on your VCR cable TV converter or other electronic device Refer to the owner s manuals for your other devices to determine their available features If your TV s remote control does not operate a specific...

Page 20: ...nu Menu 100 100 100 10 0 Digit 0 Digit 0 Digit 0 Digit 0 Digit 0 Digit 0 Digit 0 Digit 0 ENT CH Enter CH Enter GUIDE SETUP Guide DVD setup INFO TITLE INFO TITLE Top menu FAVORITE Favorites Favorites Subtitle SUBTITLE THEATERLINK TheaterLink Audio AUDIO MENU Menu Action Menu ACTION Menu yz FAV yz Menu select Menu select Menu select FAV yz x Menu select Menu select Menu select ENTER Enter Select Ent...

Page 21: ...V TV TV TV TV TV TV FREEZE Still picture TV TV TV TV TV TV TV SWAP POP Swap TV TV TV TV TV TV TV CH SCAN Ch scan TV TV TV TV TV TV TV SOURCE POP Source TV TV TV TV TV TV TV Note will send nothing TV will jump to TV VCR will jump to last active VCR or DVD Active VCR DVD is defined as the mode that remains for a minimum of 5 seconds or if a key is pressed in that mode The VOLUME and MUTE will jump t...

Page 22: ...gram mode To cycle through each available device code and sample its functions 1 Press MODE to select the mode you want to set up 2 While holding down the RECALL button press 8 5 0 0 The remote control will enter program mode 3 Point the remote control at the target device and press POWER or other function buttons that are available to be sampled 4 If the device responds to the remote control Pres...

Page 23: ...efault TV TV TV TV AUD1 AUD2 CBL SAT CBL SAT CBL SAT CBL SAT CBL SAT AUD1 AUD2 VCR VCR VCR VCR VCR AUD1 AUD2 DVD DVD DVD DVD DVD AUD1 AUD2 AUD1 AUD1 AUD1 AUD1 AUD1 AUD1 AUD1 AUD2 AUD2 AUD2 AUD2 AUD2 AUD2 AUD2 To reset the volume controls to the original device code 1 While holding down the RECALL button press 8 0 0 0 2 Press VOL z The Mode indicator will blink four times unlocked Operational featu...

Page 24: ...76 0183 REALISTIC 0124 0105 0136 0109 0140 0127 SAMSUNG 0137 0102 0104 0133 SAMTRON 0163 SANSUI 0139 0126 0120 0152 SANYO 0105 0109 0113 SCOTT 0101 0102 0104 0109 0138 0140 0147 0148 0126 0120 SEARS 0105 0106 0107 0108 0100 SHARP 0135 0136 0167 0162 SHINTOM 0117 SIGNATURE 2000 0127 0135 SINGER 0117 SONY 0128 0129 0130 0153 0154 0155 SV2000 0127 SYLVANIA 0131 0123 0124 0127 0178 SYMPHONIC 0127 0168...

Page 25: ...layer setup codes Brand Code AIWA 7123 7124 7125 DENON 7131 FISHER 7103 JENSEN 7114 JVC 7129 7130 7132 7133 KENWOOD 7100 7107 MARANTZ 7102 NAKAMICHI 7105 ONKYO 7108 7109 7113 PANASONIC 7116 7118 PHILIPS 7122 7121 PIONEER 7104 7106 RCA 7126 7127 7128 7134 7135 SANSUI 7105 7110 7112 SHARP 7131 SONY 7119 7120 TEAC 7110 7111 7115 TECHNICS 7116 7118 7117 YAMAHA 7101 7102 Laser Disc setup codes Brand Co...

Page 26: ... Natural TheaterWide 1 2 3 and Full page 34 FAVORITE allows access to the favorite channel search function page 41 MENU allows access to on screen programming menus page 27 ENTER sets programming menu information page 27 yz x select or adjust programming menus page 27 FAV yzcycles through favorite channels page 32 CH yz cycles through programmed channels page 29 VOL yz adjusts the volume level EXI...

Page 27: ...AVE COLOR T I NT SHARPNESS 5 0 5 0 0 5 0 BACK L I GHT I NG 1 0 0 SELECT END E X I T MTS AUDIO AUDIO SETTINGS STEREO WOW SRS 3D ON OFF OFF H I GH FOCUS T r u B a s s D o l b y V i r t u a l MOVE SELECT ENTER STABLE SOUND AUDIO SPEAKERS OFF MA I N ON AUD I O OUT MOVE ADJUST BASS AUD I O I SETT NGS TREBLE BALANCE RESET SAVE RESET AUD I O MENU 0 7 0 5 0 SELECT LANGUAGE SET UP ENGLISH ANT 1 2 ANT1 TV C...

Page 28: ...es ANT 1 or ANT 2 To select the antenna input using the INPUT or TV VIDEO button Press INPUT on the remote control or TV VIDEO on the TV SOURCE SELECTION menu appears and the current signal source displays in purple SOURCE 0 1 2 3 4 ANT 1 HDM I 1 V I DEO 1 V I DEO 2 V Color Stream 5 6 HDM I 2 7 ANT 2 8 I DEO HD1 Color Stream HD2 3 SELECT I ON 0 8 TO SELECT SOURCE ANT 1 HDM I 1 V I DEO 1 V I DEO 2 ...

Page 29: ...fter the channels are programmed automatically you can manually add or erase individual channels see page 30 To program channels automatically 1 Press MENU and then press x or until the SET UP menu appears 2 Press y or z until TV CABLE is highlighted and then press ENTER to display the pull down menu 3 Press y or z to highlight either TV or CABLE depending on which you use If you use an antenna hi...

Page 30: ...ENTER 4 Press y or z to select ADD or ERASE depending on the function you want to perform 5 Repeat steps 1 4 for other channels you want to add or erase Changing channels To change to a specific channel programmed or unprogrammed Press the Channel Number buttons 0 9 and 100 For channels 100 and higher press the 100 button and then the next two numbers For example to select channel 125 press 100 2 ...

Page 31: ...back and forth between the last two channels that were selected Switching between two channels using SurfLock The SurfLock feature temporarily stores one channel in the CH RTN button so you can return to that channel quickly from any other channel by pressing CH RTN To store a channel in the CH RTN button 1 Tune the TV to the channel you want to store in the CH RTN button 2 Press and hold CH RTN f...

Page 32: ... be highlighted SELECT SET ENTER 0 9 CH I NPUT FAVOR I TE CH CLEAR ALL TV CABLE CUSTOM MENU 4 Press the Channel Number buttons to enter one of your favorite channels 5 Press ENTER 6 Repeat steps 4 and 5 for your other favorite channels To select your favorite channels Press FAV y or z To quickly scan through your favorite channels in a twelve picture multi window Press FAVORITE see page 41 for det...

Page 33: ...annel Number buttons to select a channel you want to label 5 Press z to highlight LABEL 6 Press x or repeatedly to select a character for the first space and then press ENTER SELECT MOVE 0 9 CH I NPUT CH LABEL I NG 06 LABEL CLEAR CUSTOM MENU SELECT SET ENTER CH I NPUT CH LABEL I NG 0 6 LABEL A CLEAR CUSTOM MENU 7 Repeat step 6 to enter the rest of the characters If you would like a blank space in ...

Page 34: ...n view 480i 480p and 1080i format programs in a variety of picture sizes Natural TheaterWide 1 TheaterWide 2 TheaterWide 3 and Full The Full picture size is not selectable for 1080i format programs The way the image displays in any of the picture sizes will vary depending on the format of the program you are viewing Select the picture size that displays the current program the way that looks best ...

Page 35: ...den areas such as subtitles or captions see Scrolling the TheaterWide picture on page 36 Full picture size For 16 9 format programs The picture is non uniformly enlarged If you are receiving a 4 3 format program the picture is stretched wider to fill the width of the screen but not stretched taller None of the picture is hidden Note To select the picture size press PIC SIZE on the remote control o...

Page 36: ...erWide 3 10 to 20 Scrolling the TheaterWide picture TheaterWide 2 and 3 only 1 Press PIC SIZE to select the TheaterWide 2 or 3 mode 2 Press MENU and then press x or until PICTURE menu appears 3 Press y or z to highlight PICTURE SCROLL MOVE START ENTER P I CTURE S I ZE AUTO ASPECT OFF P I CTURE SCROLL RESET SAVE MODE P I CTURE P I CTURE SETT I NGS SPORTS V I DEO C I NEMA MODE 4 Press ENTER to displ...

Page 37: ... signal the picture size is automatically selected as described in the following table If the signal does not include aspect information the picture size you selected on pages 34 35 is displayed To turn on the AUTO ASPECT feature 1 Press MENU and then press x or until the PICTURE menu appears END SELECT EX I T MODE P I CTURE P I CTURE SETT I NGS SPORTS V I DEO RESET SAVE C I NEMA MODE P I CTURE S ...

Page 38: ...window ANT 1 POP 12 MAIN 6 2 Select POP channels in the following two ways To change to a specific channel press POP DIRECT CH While POP is on the screen press the Channel Number buttons 0 9 and 100 To change to the next programmed channel press POP CH yz If the V CHIP feature is active and you try to watch a TV program that exceeds your set rating limits the program will be blocked see Using the ...

Page 39: ...ll not display in the main window when you press SWAP The SAP channel will not be decoded when the speaker source is switched to POP Even if SAP is selected in the menu page 55 the main audio channel will be heard when the speaker sound is switched to POP The VARIABLE AUDIO OUT jacks will switch with the speaker sound however the source of the regular AUDIO OUT jacks is determined by the AUDIO OUT...

Page 40: ... function You can use the programmed channel search function to quickly scan the channels you programmed into the TV s memory page 29 1 Press CH SCAN The TV automatically enters multi window mode and begins a twelve picture scan of your programmed channels in the multi window Press CH SCAN again to return to a normal picture 10 2 3 4 5 6 7 8 9 10 11 12 13 2 Press the Channel Number buttons to sele...

Page 41: ... twelve pictures becomes a moving picture The selected channel number is in purple and the monaural sound of the selected channel is output 3 Press ENTER to display the channel you selected in step 2 as a normal picture 2 3 4 5 6 7 8 9 10 11 12 13 10 10 About the auto favorite feature If your TV is in the program lock mode page 45 after 4 seconds the TV starts the auto favorite channel search func...

Page 42: ...member your PIN code 1 While the PIN code entering screen is displayed press RECALL four times within five seconds The PIN code will be released Blocking Reset status restored 2 Enter a new 4 digit code and then press ENTER The LOCKS menu appears V CH I P LOCKS CH LOCK V I DEO LOCK NEW P I N CODE MOVE OFF START ENTER Continue to set each item following the steps on page 43 Using the V CHIP menu So...

Page 43: ...and therefore may be unsuitable for children under 17 L Crude or indecent language S Explicit sexual activity V Graphic violence 14 Parents Strongly Cautioned This program contains some material that many parents would find unsuitable for children under 14 years of age D Intensely suggestive dialog L Strong coarse language S Intense sexual situations V Intense violence PG Parental Guidance Suggest...

Page 44: ...I NG MPAA RAT I NG BLOCK I NG OPT I ON LOCKS MENU MOVE START ENTER MPAA UNRATED ON OFF BLOCK I NG OPT I ON TV NONE RAT I NG V CH I P MENU SELECT SET ENTER TV NONE RATING 1 Highlight TV NONE RATING and then press ENTER 2 Press y or z to select ON Lock or OFF Unlock for programs rated NONE in the TV PARENTAL GUIDELINES then press ENTER MPAA UNRATED NOTE ENABL I NG TH I S OPT I ON MAY BLOCK EMERGENCY...

Page 45: ... when the TV is turned on again Locking channels With the CH LOCK feature you can lock specific channels The TV will not be able to tune locked channels with the Channel y z buttons or Channel Number buttons unless you clear the setting You can lock a maximum of nine channels To lock channels 1 From the LOCKS menu press y or z to highlight CH LOCK and then press ENTER CH LOCK menu appears and CH I...

Page 46: ...H LOCK CLEAR ALL TV CABLE LOCKS MENU 33 SELECT CLEAR ENTER 3 Repeat step 2 for other channels To unlock all locked channels at once Press y or z to highlight CLEAR ALL and then press ENTER MOVE START ENTER CH I NPUT CH LOCK CLEAR ALL TV CABLE LOCKS MENU ENTER yzx TV CABLE SAT VCR DVD AUDIO1 AUDIO2 1 2 3 4 5 6 7 8 9 100 0 ENT POWER 10 ACTION MODE PIC SIZE MENU LIGHT SLEEP ENTER FAV CH VOL EXIT CH R...

Page 47: ... sure the POP is not on channel 3 or 4 OFF Unlocks all video input sources SET ENTER V CH I P LOCKS CH LOCK V I DEO LOCK V I DEO V I DEO OFF NEW P I N CODE SELECT 3 Press ENTER Changing the PIN code 1 From the LOCKS menu press y or z to highlight NEW PIN CODE 2 Press the Number buttons 0 9 to enter a 4 digit code The numbers you enter will replace the dashes in the display SELECT SET ENTER 0 9 V C...

Page 48: ...ness BACK LIGHTING 7 5 Mode Picture Quality Sports Bright and dynamic picture factory setting Standard Standard picture setting factory setting Movie Movie like picture setting factory setting Preference Your personal preference Note If you select one of the factory set picture modes SPORTS STANDARDS or MOVIE and then change a picture quality setting for example increase the contrast the picture m...

Page 49: ...HARPNESS 5 0 5 0 0 5 0 BACK L I GHT I NG 1 0 0 Selection x Pressing contrast lower higher brightness darker lighter color paler deeper tint reddish greenish sharpness softer sharper color temp cool medium warm CONTRAST 7 5 TV CABLE SAT VCR DVD AUDIO1 AUDIO2 1 2 3 4 5 6 7 8 9 100 0 ENT POWER 10 ACTION MODE PIC SIZE MENU LIGHT SLEEP ENTER FAV CH VOL EXIT CH RTN DVD RTN DVD CLEAR SLOW DIR SKIP SEARCH...

Page 50: ...rm reddish Using the CableClear DNR feature CableClear DNR reduces visible interference in your TV picture This is useful when receiving a broadcast with a weak signal especially a Cable channel or playing a video cassette or disc damaged by repeated use To turn on CableClear DNR 1 Press MENU and then press x or until the PICTURE menu appears 2 Press y or z to highlight PICTURE SETTINGS and then p...

Page 51: ... Press MENU and then press x or until the PICTURE menu appears 2 Press y or z to highlight CINEMA MODE and then press ENTER 3 Press y or z to select FILM auto V I DEO RESET SAVE F I LM SELECT SET ENTER P I CTURE S I ZE P I CTURE AUTO ASPECT P I CTURE SCROLL MODE P I CTURE SETT I NGS C I NEMA MODE To set the CINEMA MODE to VIDEO off Press y or z to select VIDEO in step 3 above Mode sports Contrast ...

Page 52: ... to label and then press ENTER 5 Press y or z to select the desired label for that input source 6 Finish labeling the other video sources as desired To return to the previous menu press y or z to highlight CUSTOM MENU and then press ENTER 7 To exit the menu press EXIT Note When HDMI1 HDMI2 ColorStream HD1 or ColorStream HD2 is selected the VIDEO OUT jack does not output a signal To receive a VIDEO...

Page 53: ...TE CH CH LABEL I NG V I DEO LABEL BACKGROUND SELECT SET ENTER To view captions highlight C1 C2 C3 or C4 C1 displays translation of the primary language in your area Note If the program or video you selected is not closed captioned no captions will display on the screen Giant pandas eat leaves To view text highlight T1 T2 T3 or T4 Note If text is not available in your area a black rectangle may app...

Page 54: ...play will increase by 10 minutes up to 3 hours 0h00m 0h10m 0h20m 2h50m 3h00m 0h00m To cancel the sleep timer Press SLEEP until it is set to 0h00m The timer also can be set using the on screen menu 1 Press MENU and then press x or until the CUSTOM menu appears 2 Press y or z to highlight SLEEP TIMER and then press ENTER 3 Press the Number buttons 0 9 to enter the length of time until the TV turns o...

Page 55: ...works only when the closed caption mode is set to OFF See Using the closed caption feature on page 53 for more information Selecting stereo SAP broadcasts The multi channel TV sound MTS feature allows you to listen to high fidelity stereo sound while watching TV MTS can also transmit a second audio program SAP containing a second language music or other audio information when provided by individua...

Page 56: ...tput to standard analog audio terminals on the TV and the input source is encoded with Dolby Surround sound or Dolby Digital sound the Dolby Virtual operates as Virtual Dolby Surround VDS VDS simulates Dolby Surround sound from the TV s speakers To turn on the Dolby Virtual sound feature 1 Press MENU and then press x or until the AUDIO menu appears 2 Press y or z to highlight Dolby Virtual and the...

Page 57: ...right channel depending on the item selected Resetting your audio adjustments The RESET function returns your audio adjustments to the following factory settings Bass center 50 Treble center 50 Balance center 0 To reset your audio adjustments 1 Press MENU and then press x or until the AUDIO menu appears 2 Press y or z to highlight AUDIO SETTINGS and then press ENTER The AUDIO SETTINGS menu appears...

Page 58: ...und feature Select OFF in step 3 above Turning off the built in speakers Use this feature to turn off the TV speakers when you connect an audio system see Connecting an audio system on page 18 To turn off the built in speakers 1 Press MENU then press x or until the AUDIO menu appears 2 Press y or z to highlight SPEAKERS and then press ENTER 3 Press y or z to select OFF and then press ENTER To turn...

Page 59: ...e sound of the POP right window program through the AUDIO OUT terminals Selecting the gray level of the side panels Select the gray level of the boundary lines between the side panels and picture in 4 3 mode To adjust the gray level 1 Press MENU and then press x or until the SET UP menu appears 2 Press y or z to highlight GRAY LEVEL and then press ENTER LANGUAGE SET UP 1 2 3 ANT 1 2 TV CABLE CH PR...

Page 60: ... ABCD FULL STEREO SAP TV ON T I MER 10h34m SLEEP T I MER 1h23m D L S V PG CABLE 1 6 1 2 3 4 5 6 7 8 9 10 11 12 13 14 15 16 17 18 33 34 35 33 34 35 HD1 DVD THEATER W I DE 1 TV D L S V PG ColorStream ON T I MER 10h34m SLEEP T I MER 1h23m Understanding the auto power off feature The TV will automatically turn itself off after approximately 15 minutes if it is tuned to a vacant channel or a station th...

Page 61: ...ion equivalent 2 2k ohms or less VARIABLE AUDIO OUTPUT 0 300 mV rms 30 modulation equivalent 2 2k ohms or less Appendix Specifications This model complies with the specifications listed below Designs and specifications are subject to change without notice This model may not be compatible with features and or specifications that may be added in the future HDMI INPUT HDMI compliant type A connector ...

Page 62: ...eceive above channel 13 Make sure the TV CABLE switch is set to the mode that corresponds with the signal source type cable company or outside antenna Black box appears on the screen The closed caption feature may be set to one of the Text modes T1 T2 T3 or T4 Turn closed captioning OFF Unable to select a certain channel The channel may be locked with the CH LOCK feature or erased with the ADD ERA...

Page 63: ... U S A AND USED IN CANADA ARE NOT COVERED BY THESE WARRANTIES PRODUCTS PURCHASED IN CANADA AND USED IN THE U S A ARE NOT COVERED BY THESE WARRANTIES Limited One 1 Year Warranty on Parts and Labor TACP warrants this LCD TV and its parts against defects in materials or workmanship for a period of one 1 year after the date of original retail purchase DURING THIS PERIOD TACP WILL AT TACP S OPTION REPA...

Page 64: ...mited above and do not extend to any LCD TV or parts that have been lost or discarded by you or to damage to the LCD TV or parts caused by fires misuse accident Acts of God such as lightning or fluctuations in electric power improper installation improper maintenance or use in violation of instructions furnished by TCL use or malfunction through simultaneous use of this product and connected equip...

Page 65: ...s 33 Labeling video inputs 52 Language selection 28 Last mode memory 60 Locking channels 45 Locking video inputs 47 LOCKS menu 42 Menu system 27 MTS 55 MUTE button 55 O P Q ON timer 54 Picture adjustments COLOR TEMPERATURE 50 Picture mode 48 Picture quality 49 Picture out picture POP CH SCAN button 40 POP CH yz buttons 38 POP DIRECT CH button 38 SOURCE button 38 SPLIT button 38 SWAP button 39 Pict...

Page 66: ...Index 66 Note ...
Page 67: ...67 E S F Connecting your TV Using the Remote Control Setting up your TV Using the TV s Features Appendix Index Introduction Note ...

Page 68: ...71 FRASERWOOD WAY RICHMOND B C V6W 1J5 CANADA TEL 604 303 2500 Printed in USA HEAD OFFICE 82 TOTOWA ROAD WAYNE NEW JERSEY 07470 U S A NATIONAL SERVICE DIVISION 1420B TOSHIBA DRIVE LEBANON TN 37087 U S A ColorStream StableSound and TheaterWide are registered trademarks of Toshiba America Consumer Products L L C CableClear SurfLock and TheaterLink are trademarks of Toshiba America Consumer Products ...

Reviews: