background image

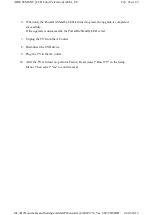
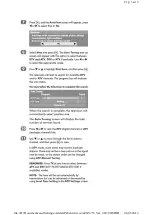
6. When only the PowerOn/Standby LED is turned to green, the upgrade is completed 

successfully. 

If the upgrade is unsuccessful, the PowerOn/Standby LED is red.  

7. Unplug the TV from the AC outlet.  

8. Disconnect the USB device.  

9. Plug the TV in the AC outlet.  

10. After the TV is turned on, perform Factory Reset (select "Reset TV" in the Setup 

Menu). Then select "Yes" to confirm reset.  


Стр. 23 из 23

ADJUSTMENT [LCD Color Television] ASIA_EU

06.05.2015

file://D:\Documents and Settings\Admin\Рабочий стол\40XV733 Ver. 2.00\TOSHIB...

Summary of Contents for 40XV733

Page 1: ...LCD Color Television 40XV733 Ver 2 00 Стр 1 из 1 07 05 2015 file D Documents and Settings Admin Рабочий стол 40XV733 Ver 2 00 TOSHIB ...

Page 2: ...on remote control 2 Press button again and hold button down Service Mode display 3 While holding the button press MENU button on TV set Стр 1 из 23 ADJUSTMENT LCD Color Television ASIA_EU 06 05 2015 file D Documents and Settings Admin Рабочий стол 40XV733 Ver 2 00 TOSHIB ...

Page 3: ...of adjustment menu provides special functions Service Mode Press Press Adjustment Mode CAUTION Never try to perform initialization unless you have changed the memory IC button on remote control Стр 2 из 23 ADJUSTMENT LCD Color Television ASIA_EU 06 05 2015 file D Documents and Settings Admin Рабочий стол 40XV733 Ver 2 00 TOSHIB ...

Page 4: ...itialization of the memory IC510 i PROGRAMME button on TV Turn off TV Micro I2C bus communication i Volume button on TV RCUT selection 1 button GCUT selection 2 button BCUT selection 3 button CNTX selection 4 button COLC selection 5 button UVTT selection 6 button Automatic A D Adjustment PC Component Composite PAL NTSC 7 button Self diagnostic display ON OFF 9 button Item Name of adjustment R CUT ...

Page 5: ...e for converting from bit D7 D0 to hex 0x BRTC BRIGHTNESS CENTER COLC COLOR CENTER UVTT BASE BAND TINT CNTX CONTRAST MAX MOID MODEL ID PLVN PANEL VENDOR PLSZ PANEL SIZE OPT5 OPTION DATA 5 OPT2 OPTION DATA 2 OPT6 OPTION DATA 6 OPT7 OPTION DATA 7 OPT8 OPTION DATA 8 HTLID HOTEL ID VOLX MAXIMUM VOLUME LEVEL BIT Binary High nibble D7 D6 D5 D4 Low nibble D3 D2 D1 D0 HEX 0 0 0 0 0 Стр 4 из 23 ADJUSTMENT ...

Page 6: ...t menu of MOID by pressing P or P during display of adjustment menu in the Service Mode 3 Change MOID data into MODEL ID to initialize by pressing or refer to 1 0 0 0 1 2 0 0 1 0 3 0 0 1 1 4 0 1 0 0 5 0 1 0 1 6 0 1 1 0 7 0 1 1 1 8 1 0 0 0 9 1 0 0 1 A 1 0 1 0 B 1 0 1 1 C 1 1 0 0 D 1 1 0 1 E 1 1 1 0 F 1 1 1 1 Стр 5 из 23 ADJUSTMENT LCD Color Television ASIA_EU 06 05 2015 file D Documents and Setting...

Page 7: ... to the model name is set correctly If not do over again from the start Note If the wrong MODEL ID is set abnormal display might appear MODEL ID TABLE Initializing Data setting flowchart after replacing the Signal Unit Model Name Model ID HEX Panel Vendor Panel Inch Size ID HEX Panel Vendor ID HEX Option Data OPT5 HEX 32XV733 0x0e LPL 0x05 0x01 0x20 37XV733 0x0f LPL 0x06 0x01 0x00 40XV733 0x10 SAM...

Page 8: ...control changes the built in test patterns on screen as described below in Service Mode Picture Signal Red raster Green raster Стр 7 из 23 ADJUSTMENT LCD Color Television ASIA_EU 06 05 2015 file D Documents and Settings Admin Рабочий стол 40XV733 Ver 2 00 TOSHIB ...

Page 9: ...d properly 2 During diagnosis the following displays are shown Self check displays and items are subject to the models Blue raster All Black All White Item Explanation Data Format 1 TV CPU SW Version information of TV MICRO Display 1 byte data Hex Стр 8 из 23 ADJUSTMENT LCD Color Television ASIA_EU 06 05 2015 file D Documents and Settings Admin Рабочий стол 40XV733 Ver 2 00 TOSHIB ...

Page 10: ...acklight failed to light Decimal 7 Block UV ATV reception mode V1 V8 VIDEO 1 8 input mode see Block table PC PC input mode DTV DTV mode For current input OK Signal Sync Detected NG No Sync Detected 8 Bus Errors IIC BUS status None is normal SCL GND Red indication SCL GND short circuit SDA GND Red indication SDA GND short circuit UV ATV V1 1 SCART FULL V2 2 SCART S AV V3 3 Component V4 3 Composite ...

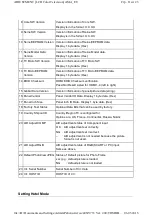
Page 11: ...mat xx xx xx xx xx xx Hex 4 Dynamic Addressing Status of Dynamic Host Configuration Protocol DHCP Configuration TRUE IP address will be automatically configured if the TV is connected to a network that supports DHCP false IP address must be manually set to a static IP address 5 IP Address Current Internet Protocol IP address Display format is decimal 6 Subnet mask Current Subnet Mask Display forma...

Page 12: ... 16 Panel Vendor Panel Vendor ID Data Display 1 byte data Hex 17 Panel Inch Size Panel Inch ID Data Display 1 byte data Hex 18 Factory Test Status Optional Data Bits that can be used by factory 19 Country Shipout ID Country Region TV is configured for Options are UK France Continental Russia Nordic 20 A D Adjust COMP A D adjustment status of Component input OK A D adjustment set correctly NG A D a...

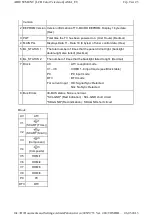
Page 13: ... while main power AC power is ON There are three ways to set up Hotel Mode Options via Service Mode Hotel Mode Settings menu and Hotel Clone menu Setting Hotel Mode via Service Mode Enter Service Mode and select Hotel Mode menu by pressing P or P After selecting Hotel Mode press to enter details setting in Hotel Mode To select menu press P or P and press OK to enter the adjustment menu of followin...

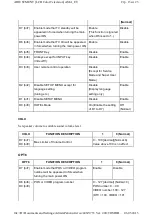
Page 14: ...except for language setting tuning etc Disable Display language setting only Enable D1 bit1 Disable SETUP MENU Disable Enable D0 bit0 HOTEL Mode On Enable the setting of D1 to D7 Off Normal VOLX FUNCTION DESCRIPTION 1 0 Normal D7 bit7 D0 bit0 Max Limiter of Volume Control 0 100 decimal Normal 0 Value above 100 is no effect OPT6 FUNCTION DESCRIPTION 1 0 Normal D7 bit7 Enable mode that POS or VIDEO ...

Page 15: ...IPTION 1 0 Normal D7 bit7 D4 bit4 No use D3 bit3 RF tuning operation by position up down on remote or front panel of the TV set number and previous key when HDMI or PC input Disable Enable D2 bit2 Enable mode that picture mode will be set in forced when turning the main power ON Enable Disable D1 bit1 D0 bit0 Forced picture mode 0 dec Auto View Normal 1 dec Dynamic 2 dec Standard 3 dec Movie 1 Pre...

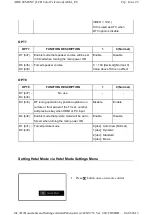
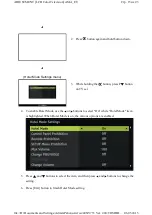
Page 16: ... select the item and then press and buttons to change the setting 6 Press Exit button to finish Hotel Mode setting 2 Press button again and hold button down Hotel Mode Settings menu 3 While holding the button press P button on TV set Стр 15 из 23 ADJUSTMENT LCD Color Television ASIA_EU 06 05 2015 file D Documents and Settings Admin Рабочий стол 40XV733 Ver 2 00 TOSHIB ...

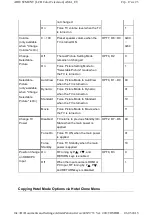
Page 17: ...e access to Setup menu except for Language Setting 10 Max Volume 0 100 Limited maximum volume level VOLX D7 D0 0x00 0x64 Change POS VIDEO Off TV Tunes to the last channel or input viewed when the TV is turned on OPT6 D7 0 On TV tunes to preset POS VIDEO channel input when the TV is turned on 1 POS VIDEO only available when Change POS VIDEO is On 0 99 0 99 ATV Channel Position OPT6 D6 D0 0x00 0x63 ...

Page 18: ... D0 00 Dynamic Force Picture Mode to Dynamic when the TV is turned on 01 Standard Force Picture Mode to Standard when the TV is turned on 10 Movie Force Picture Mode to Movie when the TV is turned on 11 Change TV Power Disabled TV returns to previous Standby On State when the main power is applied OPT2 D7 D6 00 Force On Force TV ON when the main power is applied 01 Force Standby Force TV Standby w...

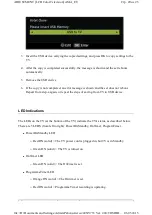
Page 19: ...lour System Programme Skip AFT Label Saving the Hotel Mode Settings of the TV to USB device 1 Configure the hotel mode settings via Service Mode or the Hotel Mode Settings menu 2 Enter Hotel Clone menu by following steps a c a Press button once on remote control Стр 18 из 23 ADJUSTMENT LCD Color Television ASIA_EU 06 05 2015 file D Documents and Settings Admin Рабочий стол 40XV733 Ver 2 00 TOSHIB ...

Page 20: ...ading the Hotel Mode Settings from USB device to TV 1 Enter Hotel Clone menu as shown in previous section 2 Select USB to TV by pressing or buttons b Press button again and hold button down Hotel Clone menu display c While holding the button press P button on TV set Стр 19 из 23 ADJUSTMENT LCD Color Television ASIA_EU 06 05 2015 file D Documents and Settings Admin Рабочий стол 40XV733 Ver 2 00 TOS...

Page 21: ...Indications The LEDs on the TV at the bottom of the TV indicate the TV s status as described below There are 3 LEDS from left to right PowerOn Standby OnTimer ProgramTimer PowerOn Standby LED Red ON solid The TV power cord is plugged in but TV is in Standby Green ON solid The TV is turned on OnTimer LED Green ON solid The OnTimer is set ProgrammeTimer LED Orange ON solid The On timer is set Red ON...

Page 22: ...he TV ON 2 PowerOn Standby LED Red blinks continuously Other LEDs OFF Digital Board Error Turn the TV OFF and unplug the TV from the AC outlet Plug the TV in the AC outlet again and turn the TV ON 3 PowerOn Standby LED Orange blinks continuously Other LEDs OFF Back Light Error Turn the TV OFF and unplug the TV from the AC outlet Plug the TV in the AC outlet again and turn the TV ON 4 OnTimer LED G...

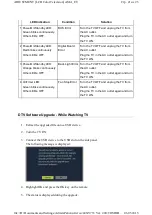
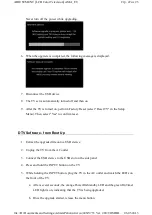
Page 23: ... device 2 Unplug the TV from the AC outlet 3 Connect the USB device to the USB slot on the side panel 4 Press and hold the INPUT button on the TV 5 While holding the INPUT button plug the TV in the AC outlet and watch the LEDs on the front of the TV a After several seconds the orange PowerOn Standby LED and the green OnTimer LED light is on indicating that the TV is being upgraded b Once the upgra...

Page 24: ...red 7 Unplug the TV from the AC outlet 8 Disconnect the USB device 9 Plug the TV in the AC outlet 10 After the TV is turned on perform Factory Reset select Reset TV in the Setup Menu Then select Yes to confirm reset Стр 23 из 23 ADJUSTMENT LCD Color Television ASIA_EU 06 05 2015 file D Documents and Settings Admin Рабочий стол 40XV733 Ver 2 00 TOSHIB ...

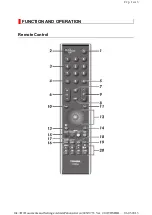
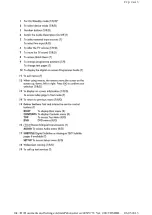
Page 25: ...FUNCTION AND OPERATION Remote Control Стр 1 из 3 06 05 2015 file D Documents and Settings Admin Рабочий стол 40XV733 Ver 2 00 TOSHIB ...

Page 26: ...Стр 2 из 3 06 05 2015 file D Documents and Settings Admin Рабочий стол 40XV733 Ver 2 00 TOSHIB ...

Page 27: ...Стр 3 из 3 06 05 2015 file D Documents and Settings Admin Рабочий стол 40XV733 Ver 2 00 TOSHIB ...

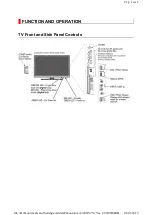
Page 28: ...FUNCTION AND OPERATION TV Front and Side Panel Controls Стр 1 из 1 06 05 2015 file D Documents and Settings Admin Рабочий стол 40XV733 Ver 2 00 TOSHIB ...

Page 29: ... Time Before switching on the television put your decoder and media recorder if applicable to Standby To set up the television use the buttons on the remote control Стр 1 из 3 06 05 2015 file D Documents and Settings Admin Рабочий стол 40XV733 Ver 2 00 TOSHIB ...

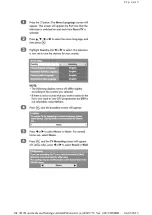
Page 30: ...Стр 2 из 3 06 05 2015 file D Documents and Settings Admin Рабочий стол 40XV733 Ver 2 00 TOSHIB ...

Page 31: ...Стр 3 из 3 06 05 2015 file D Documents and Settings Admin Рабочий стол 40XV733 Ver 2 00 TOSHIB ...

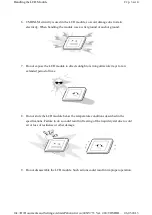
Page 32: ...can easily be damaged during disassembly or reassembly therefore always observe the following precautions when handling the module 1 When attaching the LCD module to the LCD cover position it appropriately and fasten at the position where the display can be viewed most conveniently 2 Carefully align the holes at all four corners of the LCD module with the corresponding holes in the LCD cover and f...

Page 33: ...Do not drop the cleaner on the panel Pay attention not to scratch the panel surface 4 Leaving water or other fluids on the panel screen for an extended period of time can result in discoloration or stripes Immediately remove any type of fluid from the screen 5 Glass is used in the panel so do not drop or strike with hard objects Such actions can damage the panel Стр 2 из 4 Handling the LCD Module ...

Page 34: ...tended period of time 8 Do not store the LCD module below the temperature conditions described in the specifications Failure to do so could result in freezing of the liquid crystal due to cold air or loss of resilience or other damage 9 Do not disassemble the LCD module Such actions could result in improper operation Стр 3 из 4 Handling the LCD Module 06 05 2015 file D Documents and Settings Admin...

Page 35: ...cking containing epoxy resin amine or silicon resin alcohol or oxim The gas generated by these materials can cause loss of polarity Стр 4 из 4 Handling the LCD Module 06 05 2015 file D Documents and Settings Admin Рабочий стол 40XV733 Ver 2 00 TOSHIB ...

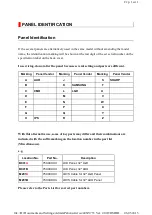
Page 36: ...differ and their combinations are indicated with the suffix marking on the location number in the part list Miscellaneous e g Please refer to the Parts List for correct part numbers Marking Panel Vendor Marking Panel Vendor Marking Panel Vendor A AUO J S SHARP B K SAMSUNG T C CMO L LGD U D M V E N W F P X G Q Y H IPS R Z Location No Part No Description B001A 75XXXXXX LCD Panel 32 LGD B001B 75XXXXX...

Page 37: ...LOGO U03B RMT AC SW U03A POWER MAIN U01A U03A LED KEY U02A ...

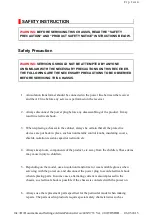
Page 38: ...tion transformer or wear suitable gloves when servicing with the power on and disconnect the power plug to avoid electrical shock when replacing parts In some cases alternating current is also impressed in the chassis so electrical shock is possible if the chassis is contacted with the power on 6 Always use the replacement parts specified for the particular model when making repairs The parts used...

Page 39: ...nce before re assembling the external casing after a repairing completed Do not allow internal wiring to be pinched by cabinets panels etc Any error in reassembly or wiring can result in electrical leakage flame etc and may be hazardous 9 NEVER remodel the product in any way Remodeling can result in improper operation malfunction or electrical leakage and flame which may be hazardous 10 Touch curr...

Page 40: ... curve as a function of frequency TOUCH CURRENT 500 peak value V Voltmeter or oscilloscope r m s or peak reading The part or contact of a TERMINAL is not HAZARDOUS LIVE if Note The limit values of 0 35 V peak for a c and 1 0 V for d c correspond to the values 0 7 mA peak a c and 2 0 mA d c a The open circuit voltage should not exceed 35 V peak a c or 60 V d c or if a is not met b The measurement o...

Page 41: ...cial safety characteristics are identified in this manual and its supplements electrical components having such features are identified by the international hazard symbols on the schematic diagram and the parts list Before replacing any of these components read the parts list in this manual carefully The use of substitute replacement parts which do not have the same safety characteristics as speci...

Page 42: ...SPECIFICATION Стр 1 из 2 06 05 2015 file D Documents and Settings Admin Рабочий стол 40XV733 Ver 2 00 TOSHIB ...

Page 43: ...Стр 2 из 2 06 05 2015 file D Documents and Settings Admin Рабочий стол 40XV733 Ver 2 00 TOSHIB ...

Page 44: ......

Page 45: ......

Page 46: ......

Page 47: ......

Page 48: ......

Page 49: ......

Page 50: ......

Page 51: ......

Page 52: ...MANUAL CAUTION The international hazard symbols in the schematic diagram and the parts list designate components which have special characteristics important for safety and should be replaced only with types identical to those in the original circuit or specified in the parts list The mounting position of replacements is to be identical with originals Before replacing any of these components read ...

Page 53: ...ssis ground using a color bar signal with all controls at normal line voltage at nominal AC volts 5 Waveforms are taken receiving color bar signal with enough sensitivity 6 Voltage reading shown are nominal values and may vary 20 except H V Electrolytic capacitor Mylar capacitor Стр 2 из 2 06 05 2015 file D Documents and Settings Admin Рабочий стол 40XV733 Ver 2 00 TOSHIB ...

Page 54: ......

Page 55: ......

Page 56: ......

Page 57: ......

Page 58: ......

Page 59: ......

Page 60: ......

Page 61: ......

Page 62: ......

Page 63: ......

Page 64: ......

Page 65: ......

Page 66: ......

Page 67: ......

Page 68: ......

Page 69: ......

Page 70: ......

Page 71: ......

Page 72: ......

Page 73: ......

Page 74: ......

Page 75: ......

Page 76: ......

Page 77: ......

Page 78: ......

Page 79: ......

Page 80: ......

Page 81: ......

Page 82: ......

Page 83: ......

Page 84: ......

Page 85: ......

Page 86: ......

Page 87: ......

Page 88: ......

Page 89: ......

Page 90: ......

Page 91: ......

Page 92: ......

Page 93: ......

Page 94: ......

Page 95: ......

Page 96: ......

Page 97: ......

Page 98: ......

Page 99: ......

Page 100: ......

Page 101: ......

Page 102: ......

Page 103: ......

Page 104: ......

Page 105: ......

Page 106: ......

Page 107: ......

Page 108: ......

Page 109: ......

Page 110: ......

Page 111: ......

Page 112: ......

Page 113: ......

Page 114: ......

Page 115: ......

Page 116: ......

Page 117: ......

Page 118: ......

Page 119: ......

Page 120: ......

Page 121: ......

Page 122: ......

Page 123: ......

Page 124: ......

Page 125: ......

Page 126: ......

Page 127: ......

Page 128: ......

Page 129: ......

Page 130: ......

Page 131: ......

Page 132: ......

Page 133: ......

Page 134: ......

Page 135: ......

Page 136: ......

Page 137: ......

Page 138: ......

Page 139: ......

Page 140: ......

Page 141: ......

Page 142: ......

Page 143: ......

Page 144: ......

Page 145: ......

Page 146: ......

Page 147: ......

Page 148: ......

Page 149: ......

Page 150: ......

Page 151: ......

Page 152: ......

Page 153: ......

Page 154: ......

Page 155: ......

Page 156: ......

Page 157: ......

Page 158: ......

Page 159: ......

Page 160: ......

Page 161: ......

Page 162: ......

Page 163: ......

Page 164: ......

Page 165: ......

Page 166: ......

Page 167: ......

Page 168: ......

Page 169: ......

Page 170: ......

Page 171: ......

Page 172: ......

Page 173: ......

Page 174: ......

Page 175: ......

Page 176: ......

Page 177: ...KT U01AS MAIN PE0840 C1030 75013662 CAPACITOR CERA CHIP 1005 25V JB 103K C1005JB1E103KT U01AS MAIN PE0840 C1032 75014633 CAPACITOR CERA CHIP 1608 6 3V JB 475K C1608JB0J475KT U01AS MAIN PE0840 C1033 75013662 CAPACITOR CERA CHIP 1005 25V JB 103K C1005JB1E103KT U01AS MAIN PE0840 C1035 75012557 CAPACITOR CERA CHIP 50V JB 102K 1005 SIZE C1005JB1H102KT U01AS MAIN PE0840 C1036 75012557 CAPACITOR CERA CHI...

Page 178: ...A104KT U01AS MAIN PE0840 C1030 75013662 CAPACITOR CERA CHIP 1005 25V JB 103K C1005JB1E103KT U01AS MAIN PE0840 C1032 75014633 CAPACITOR CERA CHIP 1608 6 3V JB 475K C1608JB0J475KT U01AS MAIN PE0840 C1033 75013662 CAPACITOR CERA CHIP 1005 25V JB 103K C1005JB1E103KT U01AS MAIN PE0840 C1035 75012557 CAPACITOR CERA CHIP 50V JB 102K 1005 SIZE C1005JB1H102KT U01AS MAIN PE0840 C1036 75012557 CAPACITOR CERA...

Page 179: ... U02A KEY PE0720 RB73 76011103 RESISTOR CHIP 1 20W 10K OHM J U02A KEY PE0720 RB77 76011103 RESISTOR CHIP 1 20W 10K OHM J U02A KEY PE0720 SA01 75014688 SWITCH KGS6N4252BT U02A KEY PE0720 SA02 75014688 SWITCH KGS6N4252BT U02A KEY PE0720 SA03 75014688 SWITCH KGS6N4252BT U02A KEY PE0720 SA04 75014688 SWITCH KGS6N4252BT U02A KEY PE0720 SA05 75014688 SWITCH KGS6N4252BT U02A KEY PE0720 SA06 75014688 SWIT...

Page 180: ...5010377 TRANSISTOR 2SC4116 Y TE85L F U03A LED PE0829 Q733 75010377 TRANSISTOR 2SC4116 Y TE85L F U03A LED PE0829 Q734 75010377 TRANSISTOR 2SC4116 Y TE85L F U03A LED PE0829 R733 75014717 RESISTOR CHIP 1608 1 10W 102J CR16 102JV U03A LED PE0829 R734 75014717 RESISTOR CHIP 1608 1 10W 102J CR16 102JV U03A LED PE0829 R735 75018006 RESISTOR CHIP RES 1 10W 821J 1608 CR16 821JV U03A LED PE0829 R736 7501800...

Page 181: ...ACITOR CERA CHIP 1608 50V JB 104K C1608JB1H104KT U03B RMT PE0829 IC740 75002236 IC GP1UE261RKVF U03B RMT PE0829 MT1 75017822 TRANSISITOR PHOTO BH1603FVC STR U03B RMT PE0829 PJ741 75018009 CONNECTOR S7B PH K S LF SN U03B RMT PE0829 R730 75014720 RESISTOR CHIP 1608 1 10W 472J CR16 472JV U03B RMT PE0829 R731 75014720 RESISTOR CHIP 1608 1 10W 472J CR16 472JV U03B RMT PE0829 R732 75014728 RESISTOR CHIP...

Page 182: ...2 POWER CORD UK NON PVC ECO FLOWER 093027 12 Miscellaneous P801 75018026 POWER CORD EU NON PVC ECO FLOWER 094929 Miscellaneous PP25 23974994 BAND KESSOKU Miscellaneous S801 75018012 SWITCH ROCKER SDDJF10900 Miscellaneous U500 75018011 LAMP LED LIGHTING MODULE SMOP B1 RZ01 Miscellaneous U800 75018115 P0WER UNIT SRV2209WW Miscellaneous W661 75016291 SPEAKER SPK1516AG 35X160 8 OHM 10W Miscellaneous Z...

Page 183: ... ENGLISH RV733 Accessory Y110E 75018027 MANUAL USER EURO RV733 MANUAL USER EURO RV733 Accessory Y112 75018024 MANUAL REGISTRATION CARD FOR U K REGISTRATION CARD FOR U K Accessory Y114 75018117 MANUAL ITA SCHEMATIC DIAGRAM WL753 ITA SCHEMA WL753 Accessory Y130 75018021 REMOCON HAND UNIT CT 90344 FOR RV733 CT 90344 Accessory Y135 75015010 MANUAL UK HELPLINE SHEET Accessory Y186 75009788 CLOTH CLEAN ...

Page 184: ...A201S 75018114 FRONT BEZEL ASSY FOR SERVICE Cabinet A401 75018040 CABINET RACK BACK COVER ASSY BACK COVER ASSY Cabinet A421 75014428 BRACKET ASSY STAND Cabinet A422 75018044 BASE ASSY STAND SW Cabinet A425 75010937 TOOL SET STAND Стр 1 из 1 07 05 2015 file D Documents and Settings Admin Рабочий стол 40XV733 Ver 2 00 TOSHIB ...

Page 185: ...TON CASE CASE Packing A702A 75018042 PAD TOP PACKING TOP PACKING Packing A702B 75018043 PAD BOTTOM PACKING BOTTOM PACKING Packing A702C 75018018 PAD CENTER PACKING T CENTER PACKING T Packing A702D 75018038 PAD CENTER PACKING BTM CENTER PACKING BTM Стр 1 из 1 07 05 2015 file D Documents and Settings Admin Рабочий стол 40XV733 Ver 2 00 TOSHIB ...

Page 186: ... have special characteristics important for safety and should be replaced only with types identical to those in the original circuit or specified in the parts list The mounting position of replacements is to be identical with originals Before replacing any of these components read carefully the SAFETY PRECAUTION and PRODUCT SAFETY NOTICE Do not degrade the safety of the receiver through improper s...

Page 187: ...All CD and PF capacitors are 5 50 V and all resistor 5 1 6 W unless otherwise noted FR Fusible Resistor Стр 2 из 2 07 05 2015 file D Documents and Settings Admin Рабочий стол 40XV733 Ver 2 00 TOSHIB ...

Reviews: