background image

8- 2

EO1-33038

8. ISSUING THE MEDIA

8. ISSUING THE MEDIA

1. Turn on the printer.

NOTES

:

1. For the GH30 model, pressing and holding the power button

causes the printer to automatically issue a label on which the
bar code indicating the Bluetooth device address is printed.

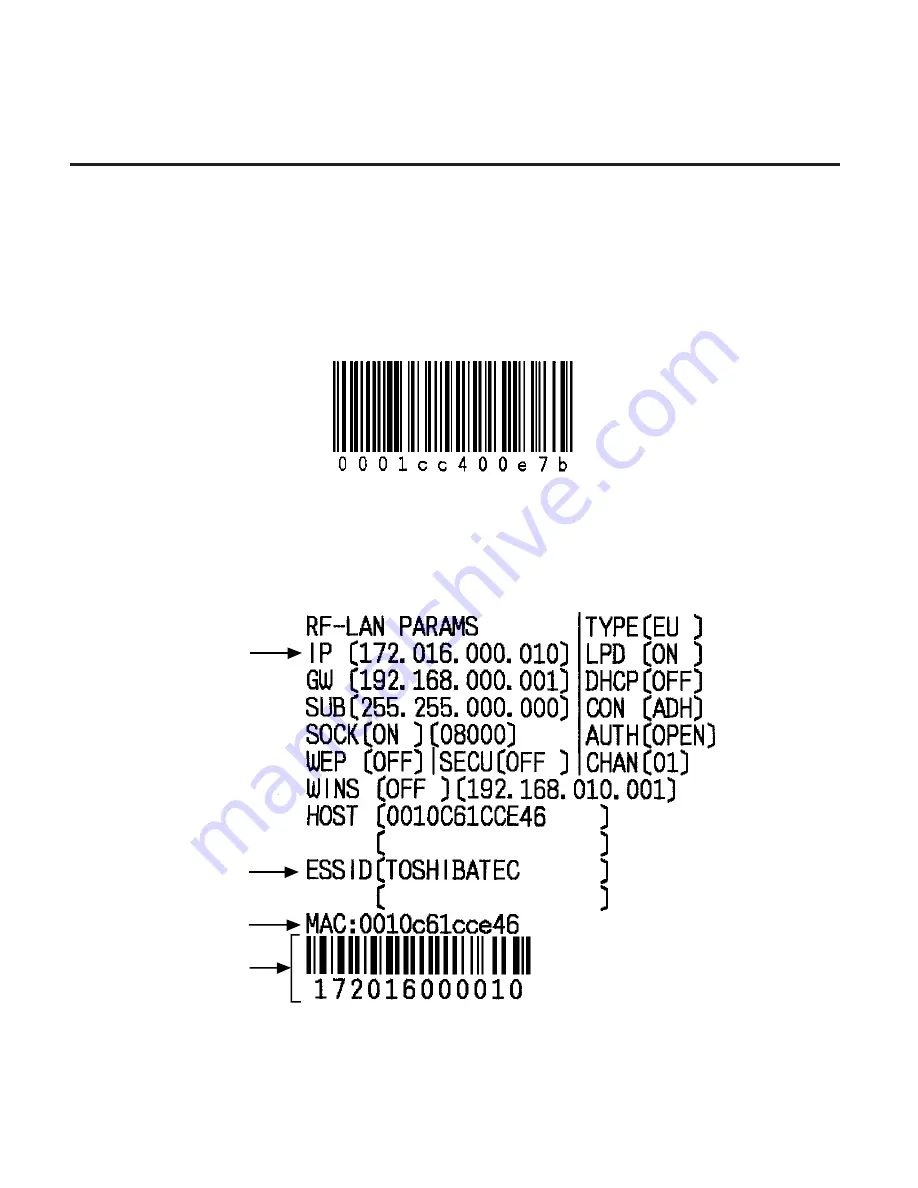
2.  For the GH40 model, pressing and holding the power button causes the

printer to automatically issue a label on which the parameters regarding
the wireless LAN, such as, IP address, MAC address, ESS-ID, etc. are
printed.

IP Address

ESS-ID

MAC Address

IP Address

Summary of Contents for B-SP2D Series

Page 1: ...TEC Portable Printer B SP2D SERIES Owner s Manual ...

Page 2: ...s for a Class B digital device pursuant to Part 15 of the FCC Rules These limits are designed to provide reasonable protection against harmful interference in a residential installation This equipment generates uses and can radiate radio frequency energy and if not installed and used in accordance with the instructions may cause harmful interference to radio communications However there is no guar...

Page 3: ...e laws of those countries or areas Japan USA Canada Austria Belgium Denmark Finland France Germany Greece Italy Ireland Luxembourg Portugal Spain Sweden The Netherlands United Kingdom Australia New Zealand Mexico Switzerland Norway Iceland Hungary Liechtenstein Applicable only to the Bluetooth Module For Europe Hereby TOSHIBA TEC CORPORATION declares that this TEC BTM is in compliance with the ess...

Page 4: ...tion of the device To prevent radio interference to the licensed service this device is intended to be operated indoors and away from windows to provide maximum shielding Equipment that is installed outdoors is subject to licensing For safety Do not use this product in locations where use may be forbidden for example in an aeroplane or a hospital If you do not know the forbidden areas please refer...

Page 5: ... Since the Bluetooth and wireless LAN use the same radio frequency band each radio wave may interfere with each other when they are used at the same time causing a deterioration of communication performance or a disconnection of network If there is any problem with connection please stop using either Bluetooth or wireless LAN Do not use the product on a metal table or near a metal object Communica...

Page 6: ...this manual All warnings and cautions contained in this manual and written inside or outside of the printer should be read and understoodbeforehandlingormaintainingtheequipment Do not attempt to effect repairs to this equipment If a fault occurs that cannot be rectified using the procedures described in this manual turn offthepower thencontactyourauthorisedTOSHIBATECrepresentative forassistance Sa...

Page 7: ...s may cause fire or electric shock Do not wipe the machine with a cloth moistened with thinner or other volatile solvent as this may cause fire or electric shock Usethespecifiedbatteryonly Failuretodothismaycausefireorelectric shock Danger of explosion if the battery is incorrectly replaced Replace the batteryonlywithTOSHIBATECCORPORATION BatteryPackModel B SP2D BT 7 4 V 1400 mAh Li ion Discard us...

Page 8: ... damage to objects if the machines are improperly handledcontrarytothisindication CAUTION Keep away from flame or other sources of heat Failure to do this may cause fire or machine failure Do not drop or shock the machine as this may cause machine failure During lightning turn off and keep away from the machine because of danger of electric shock and machine failure Avoid locations subject to rapi...

Page 9: ...batterytooverheat burstorburn Checkforthe correctelectrode Donotconnectthebatterytoapoweroutletoracarcigarettelighter jackasthismaycausethebatterytooverheat burstorburn BecausetheB SP2D BTbatteryisexclusivelyfortheB SP2Dprinter donotusethebatteryinothermachines Doingsomaydamage the batteryoraffecttheperformanceandlifeofthebattery Precautions The following precautions will help to ensure that this ...

Page 10: ...ct sunlight high temperatures high humidity dust or gas 5 Anydatastoredinthememoryoftheprintercouldbelostduringa printerfault 6 DONOTopenthemediacoverandbatterycoverduringoperation Doing so will stop printer operation 7 DO NOT scratch the surface of printed labels or receipt with a sharpobject ...

Page 11: ...FACE 2 2 2 4 WIRELESS LAN INTERFACE 2 3 2 5 IrDA INTERFACE 2 3 2 6 BATTERY 2 4 2 7 MEDIA 2 5 3 APPEARANCE 3 1 3 1 FRONT VIEW 3 1 3 2 INTERIOR 3 2 3 3 OPERATION PANEL 3 2 4 INSTALLING THE PRINTER 4 1 4 1 LOADING THE BATTERY 4 1 4 2 INSTALLING THE MEDIA GUIDE 4 3 4 3 INSTALLING THE MEDIA GUIDE FOR OUTSIDE WOUND PAPER 4 5 5 LOADING THE MEDIA 5 1 6 SECURING THE PRINTER TO YOUR WAIST 6 1 ...

Page 12: ...e changed without notification 3 PleaserefertoyourlocalAuthorisedServicerepresentativewithregardto any queries you may have in this manual 7 CONNECTING THE SERIAL INTERFACE CABLE 7 1 8 ISSUING THE MEDIA 8 1 9 CARE HANDLING OF THE MEDIA 9 1 10 GENERALMAINTENANCE 10 1 10 1 CLEANING 10 1 10 2 COVERS 10 3 10 3 REMOVING JAMMED MEDIA 10 3 11 TROUBLESHOOTING 11 1 ...

Page 13: ...ablelithium ion batteryasapowersource thisprintercanissuemax 650piecesof40 mmpitch labelswithafully chargedbattery Thenumberoflabelsvariesdependingon theoperatingenvironment printcondition etc Anautomaticpowerofffunctionallowsobtainingthebatterydrivingtimetothe maximum There are four choices of the setting time 1 minute 5 minutes 30 minutes and 120 minutes Loading a label roll is very simple just ...

Page 14: ...Bluetooth 40 IrDA Wireless LAN Print mode H Batch Strip mode Dot density of the print head G 8 dots mm Destination 1 2 ACCESSORIES Owner s Manual 1 copy Belt Holder 1 pc Media Guide for Outside Wound Paper 1 pc Cable Clamp 1 pc GH20 model only Battery 1 pc Media Guide 2 pcs SMW 3x8 Screw 2 pcs SMW 3x8 Screw 1 pc GH20 model only Ferrite Core 1 pc GH20 model only ...

Page 15: ...nt Presentation 27 point Helvetica Medium 9 15 18 point Helvetica bold 18 21 point Helvetica Italic 18 point Times New Roman Medium 12 15 point Times New Roman Bold 15 18 21 point Times New Roman Italic 18 point Prestige Elite Medium 10 5 point Prestige Elite Bold 15 point Courier Medium 15 point Courier Bold 18 point OCR A 12 point OCR B 12 point GOTHIC725 Black 6 point TEC Font1 TEC Font1 Propor...

Page 16: ... automatically changes depending on the operating temperature head temperature and battery voltage 2 Some fonts and bar codes are not available depending on the print mode 3 Some two dimensional codes are not available depending on the print mode Item Type Supportprofile Radioclass Communicationmethod Communicatingdistance Datacode Transmissioncontrol Operatingmode Description 2 3 BLUETOOTH INTERF...

Page 17: ... incandescentlamp Start stopsynchronisation Halfduplex transmission Start bit 1 bit Stop bit 1 bit 8 bit data Nonparity JIS 8 code Packed BCD code Shift JIS code CRC 16 bits GeneratingpolynomialX16 X12 X5 1 TEC Protocol Ir COMM 9 WIRE 2 4 WIRELESS LAN INTERFACE The following specification is applicable only to the GH40 model Item Communicationmethod Supportingprintprotocol Communicabledistance Cli...

Page 18: ...2 4 EO1 33038 2 SPECIFICATIONS 2 6 BATTERY Item Type Voltage Capacity Description Lithium ionbattery DC 7 4V 1400mAh 2 6 BATTERY ...

Page 19: ...2 5 EO1 33038 2 SPECIFICATIONS 2 7 MEDIA 2 7 MEDIA Label Feeddirection Black Mark on reverse side Tag Receipt G D C H I E A B H D G E A B F ...

Page 20: ...ead life 2 28 0 mm and 31 0 mm are not applicable to the media rolled outside 3 This specification is applicable only to the media rolled inside For media rolled outside the specification is 31 0 mm 55 0 mm A B C E D F H G I 28 31 34 37 40 43 46 49 52 55 58 0 5 NOTE 2 13 0 67 0 10 0 60 0 10 0 167 0 7 0 160 0 Label Receipt With black mark No black mark 10 0 507 0 7 0 500 0 Variable Variable 28 31 3...

Page 21: ...FRONT VIEW MediaOutlet BackingPaper Outlet MediaCover ReleaseCatch BatteryCover IrDA Interface Window SerialInterface Connector GH20modelonly StatusIndicator PowerButton FEEDButton Cutter MediaCover CableClamp SecuringHole GH20modelonly CableBand GH20modelonly ...

Page 22: ... details refertoSection11 Troubleshooting PowerButton A push power switch To turn on the power press this switch once To turn off the power press and hold this switch for about 2 seconds The power will automatically turn off when the specified idle time selectable from 1 5 30 and 120 minutes has passed To turn on the power again press this button The time can be selected on the PC Period of time w...

Page 23: ...ustion or heat 3 If the battery pack leaks liquid or gives out smoke or bad smell immediately stop using it and keep it away from fire Failure to do this may cause explosion or combustion 4 In the United States used lithium ion batteries should be returned to the store where you bought the machine USA only 5 LITHIUM ION BATTERY DISPOSE OF PROPERLY Caution Do not handle damaged or leaking lithium i...

Page 24: ... Be careful not to apply excessive force to the battery cover when it is opened as this may break the battery cover Battery status indication at the power on time Fullycharged Flashes in red for a few seconds and then lights in green Batterynearend Flashes in red for a few seconds and then lights in orange Lowbattery Flashes in red for a few seconds and then lights in red If the status indicator d...

Page 25: ...ired for a 58 mm wide media roll 1 Slide the media cover release catches inside and open the media cover 2 Fit one media guide into the media holder s edge of the operation panel side and the other one into a groove which corresponds to the width of media to be used First insert side 1 then 2 until it snaps in position NOTE Be sure to fit the media guide in parallel with the grooves MediaCover Med...

Page 26: ...aGuide NOTE When using a 55 mm wide media roll attach the media guides to both edges of the media holder When using a meida roll which is narrower than 55 mm move only the media guide on the printer s bottom side opposite side to the operation panel The position of the media guide of the operation panel side is fixed 1 2 MediaHolder ...

Page 27: ...tside WoundPaper However whenusingtheoutsidewoundpaper itisnecessarytofitthemedia guide for outside wound paper Without this part a paper jam may occur When fitting the media guide for outside wound paper insert it into the slits of theprinter NOTES 1 Whenusingoutsidewoundpaperthatis34to55mmwide firstfitthemedia guides and then the media guide for outside wound paper 2 Do not fit the media guide f...

Page 28: ...rn off the power 1 Slide the media cover release catches inside and open the media cover A cutter is attached to the inside of the media cover Care should be taken not to injure your hand with the cutter when opening the cover MediaCover MediaCover ReleaseCatch 2 Put a label roll or a receipt roll into the media holder unit in the orientation asshownbelow WARNING ...

Page 29: ...media cover completely Make sure that the media cover releasecatchessnapbackintoposition MediaCover ReleaseCatch 3 Whenthelabelortaghasbeenloadedinthepoweronstate the labelor tagwillbeautomaticallyfedtoadjusttheprintstartposition onlywhen the black mark or feed gap sensor is selected Receiptpaperwillnotbefedautomatically MediaCover ReleaseCatch ...

Page 30: ... THE MEDIA MediaCover ReleaseCatch 3 When the label has been loaded in the power on state the label will be automaticallyfedtoadjusttheprintstartposition onlywhen thefeedgap sensor is selected NOTE Be sure to take up any slack in the media roll before closing the media cover An incompletely closed cover will cause a media skew print positionmisalignment poorprintquality paperjam etc MediaCover Rel...

Page 31: ... when securing it to your waist 1 Attach the enclosed belt holder to the printer back with the two SMW 3x8 screws It can be attached both horizontally and vertically BeltHolder NOTE When attaching the belt holder horizontally the printer s upper side shouldbepositionedupside SMW 3x8 Screw 2 Insert the belt holder into your belt and lower the printer to secure it to your waist ...

Page 32: ... Placetheprinterupsidedown andconnecttheserialinterfacecabletothe printer 3 Secure the serial interface cable tightly to the printer with the cable band Then fold back the cable band s end and insert it into any of the openings of the band NOTE If the serial interface cable is still loose wind it around the cable band one time as shown below CableBand SerialInterface Cable ...

Page 33: ...may damage the internal wire or connectorterminal 5 Put the enclosed ferrite core on the serial interface cable between the connectorandthecableclamp 7 CONNECTING THE SERIAL INTERFACE CABLE SMW 3x8 Screw SerialInterfaceCable FerriteCore CableClamp NOTE Use the serial interface cable model CABLE SP2D S or equivalentwhichmeetsthefollowingspecifications 1 2 m long Shield type When in use the enclosed...

Page 34: ...ablefromtheprinterbefore performingIrDAcommunication 3 IrDA is available on the condition indicated below The following performance is obtained under fluorescent light max 1000 lx Care must be taken to prevent the direct sunlight or intensive light from coming into the IrDA interface window Failure to do this may cause a communicationfailure 4 In the case of Bluetooth communication make sure that ...

Page 35: ...the printer to automatically issue a label on which the bar code indicating the Bluetooth device address is printed 2 FortheGH40model pressingandholdingthepowerbuttoncausesthe printertoautomaticallyissuealabelonwhichtheparametersregarding the wireless LAN such as IP address MAC address ESS ID etc are printed IP Address ESS ID MAC Address IP Address ...

Page 36: ...andyterminaltotheprinter Regardingtheoperation ofthehandyterminal pleaserefertothehandyterminal soperatingmanual IrDACommunicationSample BluetoothandWirelessLAN Adhoc CommunicationSample 8 ISSUING THE MEDIA WirelessLAN Infrastracture CommunicationSample ...

Page 37: ...D button is pressed Beforeissuingthenextlabel removetheprintedlabel This operation differs depending on the print mode NOTE Trim off the backing paper coming from the backing paper outlet When issuing a receipt press the FEED button after printed to feed it to the position where it is easily cut Each time the FEED button is pressed the receipt is fed for 20 mm 4 Trim off the printed media upward o...

Page 38: ...ng erratic media advance and poor printquality Store the media in plastic bags and always reseal after opening Unprotected media can get dirty and the extra abrasion from the dust and dirt particles will shorten the print head life Store the media in a cool dry place Avoid areas where they would be exposed to direct sunlight high temperature high humidity dust or gas The thermal paper used for dir...

Page 39: ...e volatile solvents such as thinner or benzene for cleaning as this may damage the sensor window causing a paper feed error or machinefailure 4 DO NOT APPLY cleaner or detergent directly onto any cover or panel 5 DONOTcleanthecoverswithalcoholasitmaycausethemtodiscolour lose their shape or develop structural weakness 10 1 CLEANING To help retain the high quality and performance of your printer it ...

Page 40: ...ed TOSHIBA TEC service representative 5 Wipe the cutter platen and strip roller with a soft cloth moistened with ethylalcohol Removedustorforeignsubstancesfromtheinternalparts of the printer if any 6 Removepaperparticlesorstainsfromthefeedgapsensor blackmark feed gap sensor and the strip batch sensor with a soft cloth PrintHead Element Soft Cloth Cutter StripRoller FeedGapSensor Platen BlackMark F...

Page 41: ...nedwithamilddetergentsolution NOTE Cleantheprintercoverwith anelectrostaticfreecleanerforautomated officeequipment 10 3 REMOVING JAMMED MEDIA 1 Turn off the printer 2 Openthemediacover 3 Remove the media roll from the printer 4 Removethejammedmedia DONOTUSEanysharpimplementortoolas thesecoulddamagetheprinter 5 Clean the print head and platen then remove any further dust or foreign substances 10 2 ...

Page 42: ...takecorrectiveaction Correctiveaction Load a new media roll Closethemediacovercompletely Turn off the printer remove the jammed media andre loadthemediaroll correctly Contact a TOSHIBA TEC service representativeforrepair Open the media cover and allow the print head to cool Check that the interface cable is connected firmly Check the communicationparameters Open the media cover and close it again ...

Page 43: ...e is insufficient area in the flash ROM The print mode is not selectedcorrectly Thebatteryvoltageis low Thebatteryisnearly end The printer is printing orcommunicatingwith the PC or handy terminal The power is on Status Indicator Blinks in Red Lights in Red Lights in Orange Blinks in Green or Orange Lights in Green 11 TROUBLESHOOTING Cause The battery pack is not loaded The battery life is expired ...

Page 44: ...H20modelonly The printer is communi cating with the PC or handyterminalbythe Bluetooth GH30model only Otherproblems The printer stops printingeachtimeone label is issued IrDAcommunication cannotbeused Correctiveaction Replacethebatterywith a fully charged one Replacethebatterywith a new one which has beenfullycharged Turn on the power Movetheprintercloser within10cm Move the printer to the properp...

Page 45: ...rect Thetransmissionrate is incorrect Otherproblems IrDAcommunication cannotbeused Serialinterface communicationcannot be used GH20 model only Correctiveaction Send the correct communicationmode Set the correct printer ID on the PC or handy terminal Move the printer so that the IrDA interface window faces the PC s orhandyterminal sone Correct the print mode Correctthetransmission rate Turn on the ...

Page 46: ...uni cationrange Theoperatingareais subject to noise or interference The printer address is not correctly set on the PCorhandyterminal The print mode is incorrect Otherproblems Inquiriescannotbe madebytheBluetooth GH30modelonly Bluetoothcommunica tion cannot be used GH30modelonly Correctiveaction Turn on the power Movetheprintercloser within 3 m Avoidsuchlocations Makeaninquirywithin oneminuteafter...

Page 47: ...nt the PC or handy terminal is not correctlyset The print mode is incorrect Otherproblems Wireless LAN communicationcannot be used GH40 model only Correctiveaction Turn on the power Movetheprintercloser to the position where the communicationis possible Avoidlocationswhere thereisanyobstacle betweentheprinterand the access point PC or handyterminal Avoidsuchlocations Set the correct printer addres...

Page 48: ...hts or blinks in red The media is not loadedcorrectly Otherproblems Printfailure Blurredprint Theprinterreceives print data but does not print Correctiveaction Cleantheprinthead Replacethemediaroll with a new one Replacethemediaroll withtheproperone Closethemediacover so that the media cover releasecatchessnap backintoposition Replacethemediaroll withtheproperone Replacethebatterywith a new one wh...

Page 49: ......

Page 50: ...EO1 33038C E ...

Reviews: