background image

– 13 –

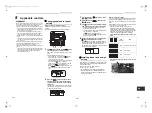
Filter sign setting

According to the installation condition, the lighting time 
of the filter sign (Notification of filter cleaning) can be 
changed.
Follow to the basic operation procedure
(

1


2


3


4


5


6

 ).

• For the CODE No. in Procedure 

3

, specify [01].

• For the [Set data] in Procedure 

4

, select the SET 

DATA of filter sign lighting time from the following 
table.

To secure better effect of 
heating

When it is difficult to obtain satisfactory heating due to 
installation place of the indoor unit or structure of the 
room, the detection temperature of heating can be 
raised. Also use a circulator or other device to circulate 
heat air near the ceiling.
Follow to the basic operation procedure
(

1


2


3


4


5


6

 ).

• For the CODE No. in Procedure 

3

, specify [06].

• For the set data in Procedure 

4

, select the SET 

DATA of shift value of detection temperature to be 
set up from the table below.

Remote control sensor

The temperature sensor of the indoor unit senses room 
temperature usually. Set the remote control sensor to 
sense the temperature around the remote control.
Select items following the basic operation procedure 
(

1


2


3


4


5


6

 ).

• Specify [32] for the CODE No. in Procedure 

3

.

• Select the following data for the SET DATA in 

Procedure 

4

.

When 

 flashes, the remote control sensor is 

defective.
Select the SET DATA [0000] (not used) or replace the 
remote control.

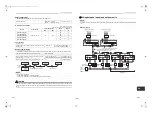
Group control

In a group control, a remote control can control up to 
maximum 8 units.
• The wired remote control only can control a group 

control. The wireless remote control is unavailable 
for this control.

• For wiring procedure and wires of the individual line 

(Identical refrigerant line) system, refer to “Electric 
work” in this Manual.

• Wiring between indoor units in a group is performed 

in the following procedure.

• Connect the indoor units by connecting the remote 

control wires from the remote control terminal blocks 
(A, B) of the indoor unit connected with a remote 
control to the remote control terminal blocks (A, B) of 
the other indoor unit. (Non-polarity)

• For address setup, refer to the Installation Manual 

attached to the outdoor unit.

SET DATA

Filter sign lighting time

0000

None

0001

150 H

0002

2500 H (Factory default)

0003

5000 H

0004

10000 H

SET DATA

Detection temp shift value

0000

No shift

0001

+1.8 °F (+1 °C)

0002

+3.6 °F (+2 °C) 

(Factory default)

0003

+5.4 °F (+3 °C)

0004

+7.2 °F (+4 °C)

0005

+9.0 °F (+5 °C)

0006

+10.8 °F (+6 °C)

SET DATA

0000

0001

Remote control 

sensor

Not used 

(factory default)

Used

9

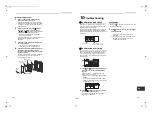
Test run

Before test run

• Before turning on the circuit breaker, carry out the 

following procedure.
1) By using 500 V-megger, check that resistance of 

1 M

Ω

 or more exists between the terminal block 

L

1

 to L

2

 and the ground (grounding).

If resistance of less than 1 M

Ω

 is detected, do not 

run the unit.

2) Check the valve of the outdoor unit being opened 

fully.

• To protect the compressor at activation time, leave 

power-ON for 12 hours or more be for operating.

• Before starting a test run, be sure to set addresses 

following the Installation Manual supplied with the 
outdoor unit.

Execute a test run

Operate the unit with the remote control as usual.
For the procedure of the operation, refer to the 
attached Owner’s Manual.
A forced test run can be executed in the following 
procedure even if the operation stops by thermo.-OFF.
In order to prevent a serial operation, the forced test 
run is released after 60 minutes have passed and 
returns to the usual operation.

CAUTION

• Do not use the forced test run for cases other than the 

test run because it applies an excessive load to the 
devices.

Wired remote control

1

Push 

 button for 4 seconds or more. 

[TEST] is displayed on the display part and 
the selection of mode in the test mode is 
permitted.

2

Push  

button.

3

Select the operation mode with 


button, [COOL] or [HEAT].

• Do not run the air conditioner in a mode other 

than [COOL] or [HEAT].

• The temperature controlling function does not 

work during test run.

• The detection of error is performed as usual.

4

After the test run, push 

 button to 

stop a test run.

(Display part is same as procedure 

1

.)

5

Push 

 check button to cancel (release 

from) the test run mode.

([TEST] disappears on the display and the status 
returns to a normal.)

2, 4

3

1,5

25-EN

26-EN

+00EH99876101-2_00Ta.book  Page 13  Monday, September 1, 2014  10:15 AM

Summary of Contents for Carrier MMU-AP0071MH2UL

Page 1: ...lti 18 Français Indoor Unit Model name Compact 4 way Cassette type MMU AP0071MH2UL MMU AP0091MH2UL MMU AP0121MH2UL MMU AP0151MH2UL MMU AP0181MH2UL AIR CONDITIONER MULTI TYPE Installation Manual For commercial use Pour usage commercial 00EH99876101 2_00Ta book Page 1 Monday September 1 2014 10 15 AM ...

Page 2: ...sold parts The Ceiling panel and remote control are sold separately For the installation of these products follow the Installation Manuals supplied with them Part name Q ty Shape Usage Installation Manual 1 This manual Hand over to customers Heat insulating pipe 2 For heat insulation of pipe connecting section Installation pattern 1 For confirmation of ceiling opening and indoor unit position Inst...

Page 3: ...ixed in the refrigerant the gas pressure in the refrigeration cycle becomes abnormally high and it resultingly causes pipe burst and injuries on persons Perform installation work properly according to the Installation Manual Inappropriate installation may result in water leakage electric shock or fire When the air conditioner is installed in a small room provide appropriate measures to ensure that...

Page 4: ...t resistance are correct Do not use the air conditioner for special purposes such as preserving food precision instruments or art objects or where breeding animals or growing plants are kept This may degrade the quality of preserved materials Place where any of high frequency appliances including inverter devices private power generators medical equipment and communication equipment and inverter t...

Page 5: ... the air conditioning unit must be positioned in a location that can sufficiently support its weight and give protection against adverse environmental conditions Failure to do so may result in unit damage and possible human injury Any incomplete installation may also cause possible risk of human injury Unpack the package take out the product and then place it on the floor so that the same surface ...

Page 6: ...oning a ceiling opening and hanging bolts For new ceiling Use the installation pattern to position the ceiling opening when a ceiling is hanged After the hanging bolts have been installed install the indoor unit To use the supplied pattern attach it to the indoor unit using the supplied fixing screws 0 2 5 mm 0 6 16 mm 4 pcs Screw pattern to the ceiling panel hanging brackets of the indoor unit Be...

Page 7: ...er Accessory To prevent the bolt from falling off for safety be sure to set it just under the hanging bracket as shown in the figure Eccentric washer Accessory Nut 3 8 M10 Hanging bolt 3 8 M10 Nut 3 8 M10 Procure hanging bolts and nuts locally Install with the marking UP facing up Indoor unit Level vial levelness 0 2 5 mm or less Hanging bolt Hanging bracket Installation gauge 1 0 4 1 7 10 42 mm C...

Page 8: ...esive agent cannot be used for the pipe connecting port hard socket of the indoor unit Be sure to use the attached hose band for fixing otherwise damage or water leakage of the drain pipe connecting port is caused Connecting drain pipe Connect a hard socket locally procured to the hard socket of the attached supplied flexible hose Connect a drain pipe locally procured to the connected hard socket ...

Page 9: ...0 8 mm or more thickness 2 Flare nut and flare works are also different from those of the conventional refrigerant Take out the flare nut attached to the main unit of the air conditioner and use it REQUIREMENT When the refrigerant pipe is long provide support brackets at intervals of 8 2 9 10 2 5 3 m to clamp the refrigerant pipe Otherwise abnormal sound may be generated CAUTION IMPORTANT 4 POINTS...

Page 10: ...ward ceiling side Banding band locally procured 7 Electrical connection WARNING 1 Use predefined wire and connect them certainly Keep the connecting terminal free from external force Improper wire connection or clamping may result in exothermic fire or malfunction 2 Connect ground wire grounding work Incomplete grounding cause an electric shock Do not connect ground wires to gas pipes water pipes ...

Page 11: ...Wire size AWG20 Total wire length of remote control wiring and remote control inter unit wiring L L1 L2 Ln In case of wired type only Up to 1640 5 500 m In case of wireless type included Up to 1312 4 400 m Total wire length of remote control inter unit wiring L1 L2 Ln Up to 656 2 200 m L1 L L2 Ln Indoor unit Remote control inter unit wiring Indoor unit Indoor unit Indoor unit Remote control Max 8 ...

Page 12: ...1 U2 A B L1 L2 L1 L2 Screw Cover of electrical control box Electrical control box Screw Wire cover Conduit plate B Screw Conduit plate A Screw Lock nut Conduit plate A Conduit pipe Adhered surface Slit section Heat insulator A Ground screw for shielded wire Power supply terminal block Control wire 2 core shielded wire Control wire connecting port Control wire Remote control terminal block Cord cla...

Page 13: ...elected unit runs and the louvers start swinging The indoor unit can be confirmed for which to change settings 1 6 1 3 2 5 4 Display content varies with the indoor unit model 3 Specify CODE No with temp setup buttons 4 Select SET DATA with timer time buttons 5 Push button When the display changes from flashing to lit the setup is completed To change settings of another indoor unit repeat from Proc...

Page 14: ...setup refer to the Installation Manual attached to the outdoor unit SET DATA Filter sign lighting time 0000 None 0001 150 H 0002 2500 H Factory default 0003 5000 H 0004 10000 H SET DATA Detection temp shift value 0000 No shift 0001 1 8 F 1 C 0002 3 6 F 2 C Factory default 0003 5 4 F 3 C 0004 7 2 F 4 C 0005 9 0 F 5 C 0006 10 8 F 6 C SET DATA 0000 0001 Remote control sensor Not used factory default ...

Page 15: ...No appear on the display part of the remote control The check code is only displayed during the operation If the display disappears operate the air conditioner according to the following Confirmation of error log for confirmation Confirmation of error log When an error occurred on the air conditioner the error log can be confirmed with the following procedure The error log is stored in memory up t...

Page 16: ...16 E16 00 Capacity over 01 No of connected units Capacity over No of connected indoor units I F E18 Communication error between indoor units Indoor E19 E19 00 Header is nothing 02 Two or more header units Outdoor header units quantity error I F E20 E20 01 Outdoor of other line connected 02 Indoor of other line connected Other line connected during automatic address I F E23 E23 Sending error in com...

Page 17: ...d remote control display Outdoor 7 segment display Sensor block display of receiving unit Auxiliary code Operation Timer Ready Flash A3 IPDU Fan IPDU 1 2 3 01 02 03 04 05 06 07 08 09 0A 0B 0C 0D 0E 0F IPDU error Error detected by TCC LINK central control device TCC LINK TOSHIBA Carrier Communication Link P18 P18 ALT Discharge temp TD3 error I F P19 P19 Detected outdoor unit number ALT 4 way valve ...

Page 18: ...ystems in a single refrigerating device the amounts of refrigerant should be as charged in each independent device For the amount of charge in this example The possible amount of leaked refrigerant gas in rooms A B and C is 22 lbs 10 kg The possible amount of leaked refrigerant gas in rooms D E and F is 33 lbs 15 kg NOTE 2 The standards for minimum room volume are as follows 1 No partition shaded ...

Page 19: ...ILING 3 0003 Have you changed lighting time of filter sign If not fill check mark in NO CHANGE and fill check mark in ITEM if changed respectively For check method refer to Applicable controls in this manual Filter sign lighting time CODE No 01 NO CHANGE NONE 0000 150H 0001 2500H 0002 5000H 0003 10000H 0004 Filter sign lighting time CODE No 01 NO CHANGE NONE 0000 150H 0001 2500H 0002 5000H 0003 10...

Reviews: