background image

33

Set up

Preparation

Basic Operation

Advanced Operation

Reference Section

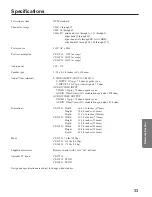
Television system

NTSC standard

Channel coverage

VHF: 2 through 13
UHF: 14 through 69
Cable TV: mid band (A-8 through A-1, A through I)

super band (J through W)
hyper band (AA through ZZ, AAA, BBB)
ultra band (65 through 94, 100 through 125)

Power source

120V AC, 60Hz

Power consumption

CE27T11:   92W (average)
CE32T11: 101W (average)
CE36T11: 102W (average)

Audio power

5W + 5W

Speaker type

2-3/8 x 4-3/4 inches (60 x 120 mm)

Audio/Video terminals

S-VIDEO INPUT (CE32T11/CE36T11)

Y-INPUT: 1V (p-p), 75 ohm, negative sync.
C-INPUT: 0.286V (p-p) (burst signal), 75 ohm

AUDIO/VIDEO INPUT

VIDEO: 1V(p-p), 75 ohm, negative sync.
AUDIO: 150mV(rms) (30% modulation equivalent, 47k ohm)

AUDIO/VIDEO OUTPUT

VIDEO: 1V(p-p), 75 ohm, negative sync.
AUDIO: 150mV(rms) (30% modulation equivalent, 4.7k ohm)

Dimentions

CE27T11: Width

26-11/16 inches (677mm)

Height

24-3/8 inches (618mm)

Depth

21-13/16 inches (552mm)

CE32T11: Width

30-7/16 inches (773mm)

Height

28-1/8 inches (714mm)

Depth

22-5/8 inches (575mm)

CE36T11: Width

34-7/8 inches (886mm)

Height

30-3/4 inches (781mm)

Depth

24-1/2 inches (622mm)

Mass

CE27T11: 76 lbs (34.5kg)
CE32T11: 128 lbs (58.1kg)
CE36T11: 172 lbs (78 kg)

Supplied accessories

Remote Control with 2 size “AA” batteries

Optional TV stand

CE27T11:

CE32T11: ST3212
CE36T11: ST3512

Design and specifications are subject to change without notice.

Specifications

Summary of Contents for CE27T11

Page 1: ...1 Set up Preparation Basic Operation Advanced Operation Reference Section cTOSHIBA CORPORATION 1999 CE27T11 CE32T11 CE36T11 ...

Page 2: ...ages on your TV screen forextendedperiodsoftime Stationarypatternsgenerated by PIP display computer displays video games stock market reports etc can become permanently engrained on the picture tube This damage is not protected by your warranty as it is the result of misuse Should you wish to use your TOSHIBA Television to display still images it is always advisable to reduce brightness and contra...

Page 3: ...ration 18 Watching TV Programs or Video Input 18 Selecting the TV channels 18 Selecting the video input source 18 Convenient Remote Functions 19 Displaying on screen information 19 Muting the Sound 19 Changing quickly between two channels 19 Setting the off timer sleep timer 20 Displaying the XDS information 20 Receiving Stereo SAP Broadcasts 21 Selecting stereo or SAP sound 21 Activating the surr...

Page 4: ...LE VCR MTS CE27T11 CE32T11 CE36T11 OUT IN S VIDEO VIDEO VIDEO VIDEO AUDIO R L MONO AUDIO R AUDIO R L MONO L MONO VIDEO1 VIDEO2 ANT 75Ω OUT IN VIDEO1 VIDEO2 VIDEO VIDEO AUDIO R L MONO AUDIO R L MONO ANT 75Ω CE27T11 CE32T11 CE36T11 Selecting a location for the TV Place the TV on the floor or on a sturdy platform in a location where light does not directly hit the screen Place the TV far enough from ...

Page 5: ...th S video compatible components Connecting a VCR This connection allows you to watch local channels and video programs play or record on the VCR while watching TV and to record from one channel while watching another channel Connecting a cable converter box This connection allows you to watch cable and premium channels Tune the TV to channel 3 or 4 whichever channel is vacant in your area then us...

Page 6: ...erter box Stereo VCR Caution If you have a mono VCR connect L Mono to VCR Audio OUT using only one audio cable If you have a S VHS VCR use the S video connections and remove the video cable Do not connect the video cable and the S video cable to VIDEO 1 simultaneously When you use a converter box with your TV there may be features that you cannot program using the remote control such as block chan...

Page 7: ...e upon the provisions of copyright laws Note To monitor dubbing editing the VCR 2 for recording must select LINE IN and the TV must select VIDEO 1 Connecting two VCRs This connection allows you to record dub edit from one VCR to another VCR while watching a video program You will also be able to record from one TV channel while watching another channel From Antenna VCR 1 OUT IN S VIDEO VIDEO VIDEO...

Page 8: ... throw your batteries into a fire Do not mix battery types or combine used batteries with new ones Remove dead batteries immediately to prevent battery acid from leaking into the battery compartment If you do not intend to use the remote control for a long time remove the batteries Note This Remote Control s functions may or may not operate your VCR or cable TV converter Refer to the owner s manua...

Page 9: ...4 POWER indicator Remote sensor POWER 15 Remote Control TIMER POWER CH RTN SUR ADV ADV MUTE RECALL TV VIDEO SURROUND REC TV VCR REW FF STILL LOCATE SWAP STOP SOURCE PLAY PIP FAV C CAPT RESET XDS EXIT FAV VOL CH MENU 1 4 7 2 5 8 3 6 9 0 ENT 100 TV CABLE VCR MTS Device buttons 11 Press TV until it blinks to control the TV Channel Number 18 C CAPT 27 XDS 20 MTS 21 PIP functions 24 SURROUND 21 TV VIDE...

Page 10: ...ter Press the CABLE button whenever you control the cable TV converter Aim at the VCR or cable TV converter REW Press to rewind the tape In playback mode press to view picture moving rapidly in reverse FF Press to rapidly advance the tape In playback mode press to view the picture moving rapidly in forward direction PLAY Press to begin tape playback ENTER Some VCR s and Cable TV converters require...

Page 11: ...Press the matching Device button VCR or CABLE and ENT at the same time until the Device button lights up It indicates that the Remote Control is in the program mode Perform the following steps while the back light is on about 20 seconds 4 Point the Remote Control toward the VCR or converter and press the Number buttons to enter the three digit code number for your brand of VCR or converter If the ...

Page 12: ...4 GE 031 072 144 147 063 107 109 205 206 207 208 Go Video 132 136 Goldstar 012 013 020 101 123 Harman Kardon 012 045 Hitachi 004 026 034 043 063 047 013 Instantreplay 031 JCL 031 Jcpenny 012 013 040 101 031 Jensen 043 JVC 048 043 130 152 055 060 012 031 047 Kenwood 014 048 043 Lloyd 034 LXI 003 009 017 034 101 013 014 Magin 040 Magnavox 067 031 034 041 Marantz 031 067 012 Marta 101 Matsui 202 MEI ...

Page 13: ... Memorex 052 Movie Time 028 032 NSC 071 073 015 028 038 OAK 016 031 037 053 Panasonic 044 047 Paragon 052 Philips 020 065 006 012 013 085 090 202 Pioneer 034 051 001 063 076 Popular Mechanics 206 Post News Week 016 Prucer 059 PTS 011 048 071 072 073 074 Pulsar 052 RCA 047 Regal 049 050 Regency 057 Rembrant 025 BRAND NAME CODE NUMBER RK 091 Samsung 030 068 Scientific Atlanta 003 011 041 042 043 045...

Page 14: ...s on the screen The T S buttons on the TV will function as the VOLUME T S buttons when no menu display is on the screen The T S buttons on the Remote Control will function as the FAV t s buttons when no menu display is on the screen TIMER POWER CH RTN SUR ADV ADV MUTE RECALL TV VIDEO SURROUND REC TV VCR REW FF STILL LOCATE SWAP STOP SOURCE PLAY PIP FAV C CAPT RESET XDS EXIT FAV VOL CH MENU 1 4 7 2...

Page 15: ... T S 3 Press T or S until your desired language is displayed in purple If you select FRANCAIS for example the display language changes to French Understanding Auto Power Off feature If a vacant channel is tuned or TV broadcast for a day is finished the TV will automatically turn off after about 15 minutes This feature does not operate in the VIDEO mode Understanding Last Mode Memory feature If the...

Page 16: ... CONTROL 0 MIN TV CABLE ADD ERASE FAVORITE CH MOVE t s SELECT T S TIMER TV CABLE CH PROGRAM ADD ERASE V CHIP CONTROL 0 MIN TV CABLE ADD ERASE FAVORITE CH MOVE t s START T S CH PROGRAMMING COMPLETED CH PROGRAM CABLE 24 CABLE 4 4 When channel programming is complete you will see the message at the right 5 Press CHANNEL s or t to make sure the channel programming has been done properly The channel me...

Page 17: ... A 6 69 69 14 A 15 B 92 92 16 C 93 93 94 94 34 U 95 A 5 35 V 96 A 4 36 W 97 A 3 37 AA 98 A 2 38 BB 99 A 1 100 100 60 XX 101 101 61 YY 102 102 62 ZZ 63 AAA 123 123 64 BBB 124 124 65 65 125 125 66 66 2 Press MENU repeatedly until the Setup menu is displayed on the screen 3 Press s or t repeatedly until ADD ERASE is displayed in purple TIMER TV CABLE CH PROGRAM ADD ERASE V CHIP CONTROL 0 MIN TV CABLE...

Page 18: ...structions furnished with the video equipment 1 Turn the TV and the video equipment ON 2 Press TV VIDEO on the Remote Control or on the TV to select VIDEO 1 or VIDEO 2 The selected source will be displayed in purple TO SELECT PUSH TV VIDEO V I D E O 1 V I D E O 2 T V 3 Operate the video equipment normally About the Demonstration Mode When this function is activated your TV will automatically displ...

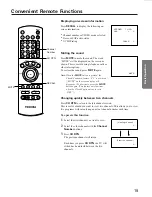
Page 19: ... or SAP audio status V CHIP rating S T E R E O S A P T V P G L V C A P T I O N T E X T C A B L E 4 Muting the sound Press MUTE to mute the sound The word MUTE will be displayed on the screen as shown This is useful during telephone calls or other interruptions To restore the sound press MUTE again Note When the MUTE button is pressed the Closed Captioned feature C1 is activated MUTE on the screen ...

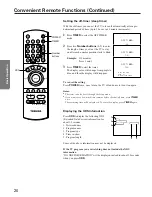
Page 20: ... to blue and then the display will disappear To cancel the setting Press POWER twice once to turn the TV off and once to turn it on again Notes The timer can also be set through the Setup menu If you want to see how much time remains before the shut off time press TIMER once The remaining time will be displayed To erase the display press TIMER again Displaying the XDS information Press XDS to disp...

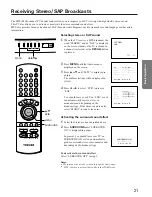
Page 21: ...n STR so you can automatically receive stereo or monaural sound depending on the broadcast type If the stereo sound is noisy select MONO to reduce the noise Activating the surround sound effect 1 Select the Stereo mode as described above 2 Press SURROUND until SURROUND ON is displayed in purple In general you should leave your TV on SURROUND ON so it can automatically produce surround stereo or mo...

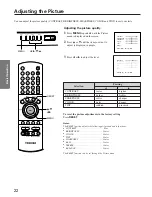
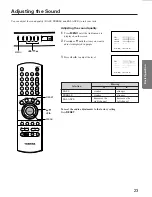
Page 22: ...nish Pressing TIMER POWER CH RTN SUR ADV ADV MUTE RECALL TV VIDEO SURROUND REC TV VCR REW FF STILL LOCATE SWAP STOP SOURCE PLAY PIP FAV C CAPT RESET XDS EXIT FAV VOL CH MENU 1 4 7 2 5 8 3 6 9 0 ENT 100 TV CABLE VCR MTS MENU RESET s t T S MENU VOLUME CHANNEL TV VIDEO POWER MENU T S t s CONTRAST BRIGHTNESS SHARPNESS COLOR TINT RESET MOVE t s ADJUST T S CONTRAST BRIGHTNESS SHARPNESS COLOR TINT RESET ...

Page 23: ... Audio menu is displayed on the screen 2 Press s or t until the item you want to adjust is displayed in purple MTS SURROUND BASS TREBLE BALANCE MOVE t s SELECT T S STR SAP MONO ON OFF MTS SURROUND BASS TREBLE BALANCE STR SAP MONO ON OFF MOVE t s ADJUST T S 3 Press T or S to adjust the level TIMER POWER CH RTN SUR ADV ADV MUTE RECALL TV VIDEO SURROUND REC TV VCR REW FF STILL LOCATE SWAP STOP SOURCE...

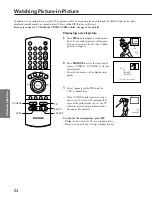
Page 24: ...m block mode See page 28 for details Displaying a small picture 1 Press PIP once to display a small picture The 1 9 size window picture will appear If you press twice The 1 16 size window picture will appear 7 1 16 1 9 PIP 2 Press SOURCE to select the video input source VIDEO1 or VIDEO 2 for the small picture The selected source will be displayed in purple TO SELECT PUSH SOURCE VIDEO 1 VIDEO 2 TV ...

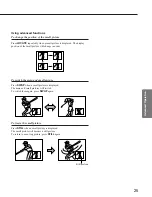
Page 25: ...The display position of the small picture will change in order To switch the main and small picture Press SWAP when a small picture is displayed The main and small pictures will switch To switch them again press SWAP again To freeze the small picture Press STILL when a small picture is displayed The small picture will become a still picture To return to a moving picture press STILL again Still pic...

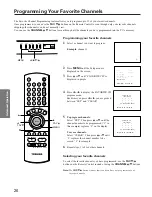
Page 26: ...yed on the screen 3 Press s or t until FAVORITE CH is displayed in purple FAVORITE CH SET CLEAR 0 0 0 0 0 0 0 0 0 0 0 0 TV CYAN CABLE BLUE SELECT T S SET t s 4 Press T or S to display the FAVORITE CH program menu Each time you press T or S you are guided between SET and CLEAR 5 To program channels Select SET Then press s or t until the channel number to be programmed 2 in this example replaces 0 o...

Page 27: ...RECALL TV VIDEO SURROUND REC TV VCR REW FF STILL LOCATE SWAP STOP SOURCE PLAY PIP FAV C CAPT RESET XDS EXIT FAV VOL CH MENU 1 4 7 2 5 8 3 6 9 0 ENT 100 TV CABLE VCR MTS s t T S Select C1 C2 C3 or C4 to view captions Select C1 for translation of the primary language in your area Select T1 T2 T3 or T4 to view Text The top of the mountain is covered with snow all the year round WORLD WEATHER LONDON M...

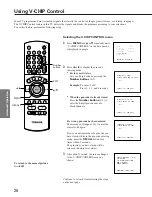
Page 28: ...ADD ERASE V CHIP CONTROL 0 MIN TV CABLE ADD ERASE FAVORITE CH MOVE t s START T S If a wrong pin code has been entered The message will appear Try to enter the correct code again If you can not remember the pin code you have stored while in the pin code entering mode press the RECALL button four times within 5 seconds The pin code you have stored will be released Factory reset status ENABLE BLOCKIN...

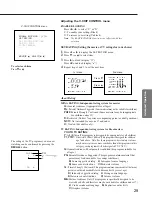
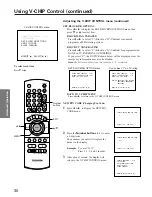
Page 29: ...ts would find this program suitable for all ages PG Parental Guidance Suggested This program contains material that parents may find unsuitable for younger children D Some suggestive dialog L Infrequent coarse language S Some sexual situations V Moderate violence 14 Parents Strongly Cautioned This program contains some material that many parents would find unsuitable for children under 14 years of...

Page 30: ... SURROUND REC TV VCR REW FF STILL LOCATE SWAP STOP SOURCE PLAY PIP FAV C CAPT RESET XDS EXIT FAV VOL CH MENU 1 4 7 2 5 8 3 6 9 0 ENT 100 TV CABLE VCR MTS Number buttons MENU EXIT s t T S BACK TO V CHIP MENU Press T or S to return to the V CHIP CONTROL menu NEW PIN CODE Changing Pin Code 1 Press T or S to display the NEW PIN CODE menu PLEASE ENTER NEW PIN CODE SELECT 0 9 END EXIT BLOCK MPAA UNRATED...

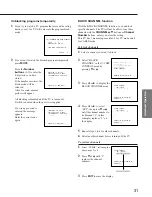
Page 31: ...EMPORARILY UN BLOCK SELECT 0 9 END EXIT INCORRECT PIN CODE PLEASE ENTER PIN CODE TO TEMPORARILY UN BLOCK SELECT 0 9 END EXIT All blocking is disabled until the TV is turned off It will be enabled when the power is reapplied If a wrong pin code is entered the message appears Enter the correct code again Unblocking programs temporarily 1 If you try to watch a TV program that exceeds the rating limit...

Page 32: ... or chamois cloth dampened with a solution of mild detergent and warm water to clean TV screen and trim Do not use too much water on the TV screen Water spills into the cabinet and may cause damage to the TV Avoid excess water 3 Remove any extra moisture with the same cloth or a dry one To maintain the finish and appearance of the cabinet polish it from time to time with a quality furniture polish...

Page 33: ...6V p p burst signal 75 ohm AUDIO VIDEO INPUT VIDEO 1V p p 75 ohm negative sync AUDIO 150mV rms 30 modulation equivalent 47k ohm AUDIO VIDEO OUTPUT VIDEO 1V p p 75 ohm negative sync AUDIO 150mV rms 30 modulation equivalent 4 7k ohm Dimentions CE27T11 Width 26 11 16 inches 677mm Height 24 3 8 inches 618mm Depth 21 13 16 inches 552mm CE32T11 Width 30 7 16 inches 773mm Height 28 1 8 inches 714mm Depth...

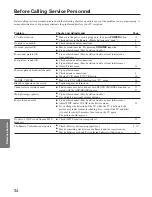
Page 34: ...ay be turned on 27 Cannot select a certain channel That channel may be locked out with BLOCK CHANNEL function or 31 erased with the ADD ERASE function 17 Multiple images ghosts Try another channel Maybe station trouble Use a highly directional outdoor antenna Poor color or no color Try another channel Maybe station trouble or local interference Adjust TINT and or COLOR in the Picture menu 22 If yo...

Page 35: ...nship as limited above and do not extend to any product or parts which have been lost or discarded by you or to damage to products or parts caused by misuse accident damage caused by Acts of God such as lightning or fluctuations in electric power improper installation improper maintenance or use in violation of instructions furnished by us or to units which have been modified or had the serial num...

Page 36: ...2 CANADA TEL 905 470 5400 SERVICE CENTERS TORONTO 191 McNABB STREET MARKHAM ONTARIO L3R 8H2 CANADA TEL 905 470 5400 MONTREAL 1643 NORTH SERVICE RD TRANS CANADA HIGHWAY DORVAL QUEBEC H9P 1J1 CANADA TEL 514 856 4100 VANCOUVER 22171 FRASER WOOD WAY RICHMOND B C V6W 1J5 TEL 604 303 2500 TOSHIBA AMERICA CONSUMER PRODUCTS INC HEAD OFFICE 82 TOTOWA ROAD WAYNE NEW JERSEY 07470 FACTORY SERVICE CENTER 1420B...

Reviews: