background image

Summary of Contents for ColorStream TP50G60

Page 1: ...ARY Received_ _ _ _ Copied Entered _ us N _PDS _ Received S _ _ Scanned _ Y 7_ Batch 8 03 o _ Proj Tel ect on evls on OWNER S MANUAL TP5OG60 TP5OG60C TP55G60 TP55G65 TP61G60 ColorStream TM TOSHIBA CORPORATION 1997 ...

Page 2: ...is product may b e strong enough to cause an electric shock DO NOT TF_YTO SI RVICE THIS pRODUCT YOUFtSELF The exclamation point in the triangle tells you that impo_ tant operating and maintenance instructions follow this symbol CAUTION As a safety feature the AC plug has one prong wider than the other It will fit only one way into a standard electrical outlet If the plug will not fit into the outl...

Page 3: ...asts 31 q o listen to Stereo SAP broadcasts 31 ADVANCED OPERATION Enhancing the Surround Sound Effe _ 32 To activate the Surround sound function 32 Operating the Sub Bass System 33 To operate the Sub Bass System 33 Setting the OFF Timer and the Ch ck 34 To set the OFF timer 34 To set the clock 35 Watching Picture in Picture 36 To display a small picture 36 To use advanced functions 37 Locking Chan...

Page 4: ...iquids such as drinks or cosmetics on the TV If any foreignmaterial or water has gotten into the I V remove the AC cord and contact your dealer When thecab_et becomes dirty clean it with a soft dry_othp When tfte cabinet is very dirty _ Use a damp cloth to wipe the cabinet clean _ Finish with a dry cloth Do not use solvents such as benzine or thinner to clean the TV These solvents may distort the ...

Page 5: ...t or near a heater Avoid places subject to extremely high temperatures or humidity and temperature of 41 F 5 C or lower f Power Supply Plug into an electrical outlet with standarc household power 120 volt AC 60 Hz Do not change the plug s safety prong See page 2 Moisture Condensation If the room temperature suddenly rises or if tae i M is moved from a cool place to a hot place condensation may occ...

Page 6: ... is generally a round cable with F type connectors that can easily be attached to a terminal without tools F type connector Not supplied _ A 300 ohm cable is a flat twin lead cable that can be attached to a terminal using an antenna adapter Not supplied C C 3 o P Antenna connection panel There are two separate 75 ohm F type connector input terminals and a converter output terminal as shown below T...

Page 7: ...P _Z_ __ t o tll IV rea r ANT 75_2 OUT ANT 2 Note You can connect another signal source such as a cable TV system or video game to the ANT 2 terminal Separate VHF and UHF antenna cables VHF antenna 4 W ANT 75_ _ OUT ANT 2 _U V mixer Not supplied Note You can connecl another signal source such as a cable TV system or video game to the ANT 2 terminal p m _J UHF antenna 7 ...

Page 8: ...hout a decoder box Unscrambled channels able TV _ ANT 75_ _ ANT 1 OUT ANT 2 Note You can connect another signal source such as an antenna or video game to the ANT 2 terminal A 2 Cable with a decoder box Scrambled and Unscrambled channels The unscrambled channels are input through the ANT 1 terminal whenever the ANT1 2 menu or the ANT VIDEO button on the TV is in ANT 1 mode See page 21 The scramble...

Page 9: ...V VCR button on the Remote Control VIDEO AUDIO connections from the VCR to the TV are required for stereo tape playback from sterec VCRs See page 48 Using a 2 way signal splitter You can view either TV programs or VCR tapes regardless of the position of the VCR s TViVCR swil ch Antenna or Cable TV _ P ow 2 way signal splitter Not supplied C d __ ANT 75_2 1_ OUT ANT 2 ANT IN OUT VCR I Note VIDEO AU...

Page 10: ...are input through the VCR and the ANT 2 terminal whenever the ANT1 2 menu or the ANT VIDEO button is in the ANT 2 position Set the TV and the VCR Lo channel 3 or 4 to match the _utput channel of the decoding device 2 way Cable 1 V signal splitter Not supplied IN Cable TV converted decoder OUT Notes VIDEO AUDIO connections from the VCR to the TV are required for stereo tape playback from stereo VCR...

Page 11: ...o the page numbers in brackets 0 I z the door Behind the door Illustrations represent TP55G60 POWER indicator PCWER 1 Remote sensor PC WER button 20 ANT VI DEO button 21 ENTER button 19 I IN VIDEO 3 S VIDE VIDEO LZMoNoF_UDIO _R j VIDEO 3 INPUTS 541 ENTER MENU button 18 DEMO button 20 CHANNEL buttons 25 v buttons 119 VOLUME buttons 25 buttons 19 Dual function buttons 11 ...

Page 12: ...ackets LIGHT _ TV CABLE VCR switch 15 Set to TV to control the TV MUTE 26 Aim at the remote sensor on the TV Channel Number 25 EDS 27 ENTER 19 FAV 42 I RESET 30 I I PIP CH 36 I F CABLE VCR RECALL 26 POI VER 20 TIMER I 34 35 TV VIDEO 50 _CHANNEL 25 VOLUME 25 CH RTN 26 MENU 118 PIP CH 36 P TOSHIBA FAV 42 4 _ 18 J You carl light up these buttons by pushing LIGHT ...

Page 13: ...ller supplied with your VCR or cable box may have keys not duplicated on this Remote Control If you want to use these functions please use the original remote controller Battery installation Place the Remote Control face down and remove the battery cover Press and slide to remove CAUTIONS Do not throw your batteries into a fire Dispose of your batteries in a designated disposal area Do not combine...

Page 14: ...LE To control a cable TV converter VCR To control a VCR Channel Number Press the numbers to select a channel Aim at the VCR or cable TV converter STOP Press to stop the tape REC _ Press to s_ t re_ording i TV VCR Press to select the TV mode to view one program while recording another program f PO I _l R _TV Press to turn the VCR or CABLE m VCR cable TV converter on Press again to turn off LIGHT RE...

Page 15: ...ABLE VCR switch to VCR or CABLE 3 4 While holding down RECALL press the Number buttons to enter the three digit code number for your brand XSt VCR or converter Point the Remote Control at the VCR or at the converter and press POWER to test the code number If the number is correct the VCR should turn on If the VCR does not respond to the Remote Control repeat steps 1 through 4 with another code num...

Page 16: ...Grundig 100 Harley Davidson 019 Harman Kardon 057 094 Harwood 087 091 HCM 091 Headquarter 065 HI Q 066 Hinari 091 227 Hitachi 019 060 061 084 124 254 Hypson 091 Imperial 019 Interfunk 100 ITT 060 065 123 125 ITV 056 297 JCL 054 Jensen 060 JVC 027 060 086 Kaisui 091 Kendo 125 228 Kenwood 057 060 065 086 KLH 091 Kodak 054 056 Korpel 091 Leyco 091 Lloyd 019 Loewe 056 Loewe opta 100 Iogik 091 259 Luxo...

Page 17: ...59 Zenith 052 053 058 Cable TV converter code table BRAND NAME CODE NUMBER ABC 020 022 026 030 032 033 036 066 Antronix 041 Archer 041 058 172 Belcor 075 Cable Star 075 Cabletenna 041 Cableview 041 Century 172 Citizun 172 Color Voice 044 050 Comtronics 059 079 Contec 038 Eastern 021 Garrard 172 GC Electronics 035 075 Gemini 034 089 General instrument 030 Hamlin 028 039 053 278 292 Hitachi 030 Hyte...

Page 18: ...CE I Press or to select or 11 II adjust a setting _lY I llc ll_ tD d fll ill Qillii llilltiIHIIIllllli i _ MTS BASS TREBLE BALANCE SPEAKERS P r_ _ _ _1 _1_ _ LANGUAGE ___ TV CABLE CH PROGRAM _ ADD ERASE z ANT1 2 Li_ VMORE I_1 _ _1 _I _ I_1 IJ_ORE CH LABEL _ FAVORITE CH _r_ RESET _ _T_ I_I _ _1 _1_ 1 _1_I IIICH LOCK _ 1 11 II e _ 1 _ __t F PASSWOFID _ _ _ _ _1 1 1_1 IIIcH LABEL I IIlllel II _ _ Set...

Page 19: ...omatically if you do not press a button with_ 15 seconds_ and the other displays will disappear within 6 seconds If you want to close all the on screen displays instantly press t he EXIT button on the Remote Control The v buttons on the I V function as the CHANNEL buttons when no menu display is on the screen The buttons on the TV function as the VOLUME buttons when no menu display is on the scree...

Page 20: ...ain Auto Power Off If an empty channel is selected or the TV broadcast for the day s finished the TV will automatically turn off after about 15 minutes 1 his Auto Power Off feature does not operate in the VIDEO mode Last Mode Memory If the power supply is cut off while you are watching the TV the Last Mode Memoryfeature automatically turns on the TV when the power is restored If you know the power...

Page 21: ...ess or highlighted until ANT 1 2 is LANGUAGE TV CABLE CH PR GRAM ADD EI IASE r lilliwi ANT1 JI_IVIOR E Press or to select ANT 1 or ANT 2 Using the ANT VIDEO button on the TV Each time you press this button the ANT 1 VIDE 1 VIDEO 2 VIDEO 3 or ANT 2 mode will be selected in order The selected mode will be displayed in magenta to show which signal source you are watching Press the button until ANT 1 ...

Page 22: ... MENU then press or until the SET UP menu appears LANGUAGE FV CABLE CH PROGRAM ADD ERASE ANT1 2 I IORE Press or until TV CABLE is highlighted Press or to select TV or Cable whichever you use LA GUAGE llr llf l II_I EH rl Cat CH PROGRAM ADDtERASE ANT1 2 YMORE CH PROGRAM function Select CH PROGRAM following steps 1 and 2 above LANGUAGE AOD EFIASE 1_ _ 4 ANT 1 2 _j VMORE 2 Press or _ to start channel...

Page 23: ... add with the Channel Number but tons See page 25 on how to select channels Press MENU then press or _ until the SET UP menu appears Press or until ADD ERASE is highlighted Press or _ To erase the channel Press or to select Erase The channel will be erased from the memory LANGUAGE TV CABLE CH PROGRAM ADD ERA E ANT1 2 TMORE L ANGUAG _ TV CABLE CH PROGRAM ANT1 2 TMORE To add the channel Press I or t...

Page 24: ...d be made after the TV has been on for at least 30 minutes To check and align the colors Press MENU then press or until the PICTURE menu appears Press or until CONVERGENCE is highlighted 3 Press or to display the CONVERGENCE menu If alignment is correct there will be one vertical and one horizontal white line 4 If you see separate colored lines you have to align the colors Press ENTER to select RE...

Page 25: ...nce Press CHANNEL to select the next higher channel Press CHANNEL to select the next lower channel Press the button again to select the next memorized channel 10 To select a channel directly Press the Channel Number buttons 0 9 and 100 To select channel 4 press 4 or press 0 and 4 in order To select channel 38 press 3 and 8 in order To select channel 125 press 100 2 and 5 in order Adjust the sound ...

Page 26: ...y without affecting the picture I MUTE 2 To restore the sound press MUTE again Note When the MUTE button is pressed the Closed Captioned feature C1 is activated To deactivate it press the MUTE button again This feature only functions when the Closed Caption mode is set to Off See page 44 To return to the previously viewed channel Using this function you can watch two channels alternately Select th...

Page 27: ...etters Program name Program type _ Program length Elapsed time in show _ Program description _ 3b _ 42_ h l_ _ EDS ON _ I lkll_ lll l o I Ill III I1_ I1_ 11111 t II Some of the above information may not be displayed If the T_Vprogram you are watching does not include EDS information Only EDS ON will be displayed for about 4 seconds when you press the EDS button t EDS ON To close the EDS display Pr...

Page 28: ... II TINT SHARPNESS VMORE 2 Press or until the item you want to adjust is highlighted Example CONTRAST adjustment mode display 1_ _ I_I_ _1 _ L_ BR I GHTNESS DOLOR ll INT SHARPNESS li I MORE Press or to adjust the level 1_1_1_14_1_ CONTRAST BRIGHTNESS COLOR TINT SHARPNESS lower darker weaker reddish softer higher lighter stronger greenish sharper When you adjust any of the five PICTURE items the ne...

Page 29: ...Press or _ to select the temperature _ you want Cool Bluish Medium Neutral Warm Redish I_ l IIIII _l J 1 r _iI111 l Coo _51CTUFtE PREFERENCE To select the picture preference You can select a desired picture set up from three preset picture modes Normal Theater and Memory instantly 1 2 Select the PREFERENCE menu Press or until PICTURE PREFERENCE is highlighted _i_ COLOP TEMPI_ RATURE _ P I CTLq _E ...

Page 30: ...evel o M rs B _SS TFqEBLE BJ_LANCE SFEAKERS o_ F _ _ _1 _1 _1_ TREBLE BALANCE _4 _ SPEAKERS Ii l_1_1_14_1_ i l dCliillllllll ll llllllllllllll_ lllllilllll illlllllllll IIIIIltllll _ _c BASS TREBLE BALANCE weaker stronger weaker stronger decreases the decreases the left right channel channel RESET To reset the PICTURE and AUDIO adjustments to the factory preset level maximum CONTRAST and all other...

Page 31: ...splayed on the screen It is also displayed whenever the TV is turned on a channel is selected or the RECALL button is pressed STEREO SAP Press MENU then press or until the AUDIO menu appears Press or until MTS is highlighted Press _ or to select STR If a stereo broadcast is received STR will be displayed in yellow Normally this function can be left in the stereo mode STR Your TV will then automati...

Page 32: ...Select the STR stereo mode following steps 1 through 3 on the previous page Press MENU then press 4 or until the PREMIUM menu appears Press or to select SURROUND Press 4 or to highlight On S URFiOUND I __ _ q_1_ q_ _ To deactivate the Surround sound function Select Off in step 4 above NOTE Normally you can leave the MTS function set to STR and the SURROUND sound function set to On The TV will auto...

Page 33: ...ub Bass System Press MENU then press _ or P until the SBS menu appears SL S SES LEVEL Press or until SBS is highlighted Press _ or _ to select On SBS LEVEL t To adjust the SBS level Select SBS LEVEL in the SBS menu Press 4 or to adjust the SBS level To deactivate the Sub Bass System function Select Off in step 3 above Note The Sub Bass System signal does not pass through the VARIABLE AUDIO OUTPUT ...

Page 34: ...yed on the screen To close the display press TIMER two more times Press TIMER to select the TIMER mode The first digit will flash 2 3 Press any two Number buttons to enter the length of time you want the TV to stay on The remaining number s to be adjusted will flash continuously Example 120 minutes Press 1 then 2 Press TIMER again to start the timer The display color will change from magenta to cy...

Page 35: ...rst digit will flash 2 CLOCK 00 00 TO SI T HOUR AND MINUFE PUSH 0 9 TO SIART PUSH TIMER 3 Press four Number buttons to enter the correct time The remaining number s to be adjusted will flash continuously Example To set 9 25 p m Press 0 9 2 and 5 The clock operates on a 12 hour cycle Press TIMER to start the clock The display color will change from magenta to cyan then the display will go off CLOCK...

Page 36: ...the desired program 2 Press PIP once to display a small picture The 1 9 size window picture will appear If you press PIP again the 1 16 size window picture will appear Press PIPCH or to select the desired program for the small picture PIP 4 To turn off the small picture press PIP again To display a picture from an external source as a small picture Connect the external source equipment for the sma...

Page 37: ...y images on your TV screen for an extended period of time Stationary patterns generated by the PIP display computer displays videogames stock market report_ etc can become permanently ingrained on the picture tube This damage is not protected by your warranty as it is the result of misuse If you use your TOSHIBA Television to display still images it is always advisable to reduce the brightness and...

Page 38: ...hlighted Press or to display the CH LOCK menu SET CLEAR will be highlighted Press or to select Set Press until PASSWORD is highlighted 5 6 Press the Number buttons 0 9 to enter a 4 digit code The numbers you enter will replace the dashes in the display Pick a number that is easy to remember Example To enter 1234 Press 1 2 3 and 4 in order 1 _ 12 123 _1234 Press until CH INPUT is highlighted then p...

Page 39: ... is highlighted and enter the 4 digit code used to lock out the channels with the Number buttons 0 9 IIIcH LOCK SET CLEAR CH INPUT CH LOCKED 0 0 0 0 CH 0 30 24 15 TV CYAN Cab_ CABLE BLUE _ z o ILl a o W z t_ Press ENTER o If a wrong code ha_ee_j_ _ntered TI ese messages _l_pear Try to enter the correct code again _ UCH LOCK SET CLEAR _34 r i J _ _ _p Ko ll OH INPUT CH LOCKED 0 0 0 0 CH 0 0 0 0 TV ...

Page 40: ... _STILL LOCATE SWAP FOSNIBA Press MENU then press or _ until the SET UP menu appears Example To assign ABCD to channel 4 Press or until CH LABEL is highlighted Press or i_ to display the CH LAIBEL menu SET CLEAR will be highlighted 4 Press or _ to select Set Press until CH INPUT is highlighted and select the channel you want to label with the Channel Number buttons Press until LABEL is highlighted...

Page 41: ...Z _ _ _ _ _ Z A 9 0 _ Repeat step 7 to enter the second third and fourth characters IIIcH LABEL SET CLEAR CH INPUT To label another channel repeat steps 5 through 8 You can label 32 Channels To clear the channel label 1 2 3 Select CH LABEL in the SET UP menu Press _ or _ to select Clear Press until CH INPUT is highlighted then select the channel you want to clear with the Channel Number buttons o ...

Page 42: ... s memory press CHANNEL Press MENU then press 4 or _ until the SET UP menu appears Press or until FAVORITE CH is highlighted 3 Press 4 or _ to display the FAVOR_E CH menu SET CLEAR will be highlighted Press or _ to select Set Press until CH INPUT is highlighted then press the Channel Number buttons to enter the channel number Press ENTER Repeat steps 5 and 6 for other channels L _NGUAGE i_ T_ CABL...

Page 43: ...H INPUT _H SET UP 7 11 18 0 CH 0 0 0 0 0 0 0 0 TV CYAN CABLE BLUE _ _ _ _ mFAVORtTE CH _Bl_i_ 1 Clearl CH INPUT CH SET UP 7 11 18 0 CH 0 0 0 0 0 0 0 0 TV CYAN CABLE BLUE I_ _ _ 0 FAVORITE CH CH INPUT CH SET UP 0 0 0 0 CH 0 0 0 0 0 0 0 0 TV CYAN _ CABLE BLUE _ _ __ _z _ Note FAV will function 3nly after you have programmed your favorite channels a O W Q P D 43 ...

Page 44: ...pful for hearing impaired individuals Select the desired program Press MENU then press or until the CLOSED CAPTION menu appears p _1_1 1_1 __ CLOSED CAPT ION _ Press or is highlighted until CLOSED CAPTION Press or to select the caption you want C1 Caption 1 C2 Caption 2 C3 Caption 3 or C4 Caption 4 Select C1 for a transcription of the primarv language in your area To deactivate this function Selec...

Page 45: ...ation or stock market reports Select the desired program Press MENU then press or _ until the CLOSED CAPTION menu appears Press or until CLOSED CAPTION is highlighted Press or to select the text you want T1 Text 1 T2 Text 2 T3 Text 3 or T4 Text 4 CLOSED CAPT I ON To deactivate this function Select Off in step 4 above Note When you select a caption format channel and the Text mode the Text screen w...

Page 46: ... Press or until FLESH TONE is highlighted t 3 Press or to select On _ 11 1 4 m lO _I On 1 4OI SE REDUCT ION CONVERGENCE ___ _ E _ Noise Reduction Function This function allows you to reduce visible interference in your TV picture This is useful when receiving a broadcast with a weak signal or playing back a video cassette or disk damaged by repeated use Press MENU then press or until the PICTURE m...

Page 47: ...T_L L LOCATE SWAP TOSHIBA MENU AIT I_Im Press MENU then press 4 or until the SET UP menu appears Press or until LANGUAGE is highlighted Press 4 or to select the language you_ want LANGU _GE TVI CAE L E CH PROGRAM DD EF ASE TMORE i TV CABLE CH PROGRAM ADD ERASE ANT1 t2 _V_D_E T _ CABLE PFOG CAN ADDIEFF ANT 1 2 VMORE ENGLISH FRENCH SPANISH TVtCABLE _1 CH PROGRAM ADD ERASE Add ANT1 _ 2 TMORE __ __ _ ...

Page 48: ...of the equipment to be connected as well When connecting other equipment to the TV first turn off all main power switches If you connect monaural sound equipment connect the audio output of the equipment to the L MONO jack of the VIDSO 1 VIDEO 2 or VIDEO 3 INPUT jacks on the TV The S VIDEQ jac kaccepts the SEPARATED Luminance Chrominance Y C signals conforming to the NTSC standard 48 ...

Page 49: ...DIO 1 L 4ONO R VIDEO AUDIO INPUT jacks VIDEO 3 S VIDEO INPUT jack VIDEO 3 z _ rear AUDIO CENTER CHANNEL IN jack S VIDEO INPUT jack VIDEO 1 VARIABLE AUDIO OUTPUT ja_ ks VIDEO AUDIO INPUT jacks VIDEO 1 _ he AUDIO CENTER CHANNEL IN jack is only for TP55G60 and TP61G60 VIDEO AUDIO INPUT jacks VIDEO 2 DVD INPUT jacks VIDFO AUDIO OUTPUT jacks C s _ z_ OO 49 ...

Page 50: ...te source Each time you press the button the TV VIDEO 1 VIDEO 2 or VIDEO 3 source will be selected in order The selected source will be displayed in magenta TV P VIDEO 1 VIDEO 2 VIDEO 3 TO SELECT PUSH TV VIDEO Note on the VIDEO 2 INPUT iacks The VIDEO 2 INPUT jacks can also be used for connecting a second piece of video equipment with video audio outputs To view signals from equipment connected to...

Page 51: ...ons Aud tllS vde outputs output S video cable Not supplied Audio cable Not supplied TV rear s _o_o R OUT_ _ _ AJ0 C II II III I To select the video input source Turn on _heTV and the VCR Notes When the S video cable is connected to the S VIDEO IN jack the video cable phono type should not be Press TV VlDEO on the Remote Control or ANT connected VIDEO on the TV to select VIDEO 1 The S VIDEO jack ac...

Page 52: ... I Press TV VIDEO on the Remote Control or ANT VIDEO on the TV to select the input source of the playback_ CR _ P Set the recording VCR to record mode and the playback VCR to play You can view the video signal from the playback VCR on the TV screen while dubbing it onto the recording VCR CAUTION The unauthorized recordincl of television programs video tapes and other materials may infringe upon th...

Page 53: ...e 1 I II Turn on the TV and the DVD player Press TV VIDEO on the Remote Control or ANT VIDEO on the TV to select VIDEO 2 NOTE When the color difference input jacks Cr Cb are connected the PIP function is restricted as follows When the main picture is in TV mode VIDEO 2 Operate your DVD player normally mode cannot be selected as a window PIP picture When the main picture is in VIDEO 2 mode the PIP ...

Page 54: ... camera To A V output Usually supplied with the video camera S video cable A V cable Video plugs R Audio plugs TV front v oEo _ _ bMONO R I z_ To select the video input source To operate your video camera properly see the instructions supplied with the connected video camera 1 Turn on the TV and the video camera Press W VIDEO on the Remote Control or ANT VIDEO on the TV to select VIDEO 3 3 Operate...

Page 55: ...e recorder or amplifier to record audio from the IV This constant audio signal is not affected by pressing the VOLUME buttons on the PJ or the TV s Remote Control I To turn off the built in speakers Press MENU then press or until the AUDIO menu appears Press or _ until SPEAKERS is highlighted MTS BASS TREBLE BALANCE SPEAKERS 4 Press or _ _ _ se _ect Off MTS BASS TREBLE BALANCE To turn on the built...

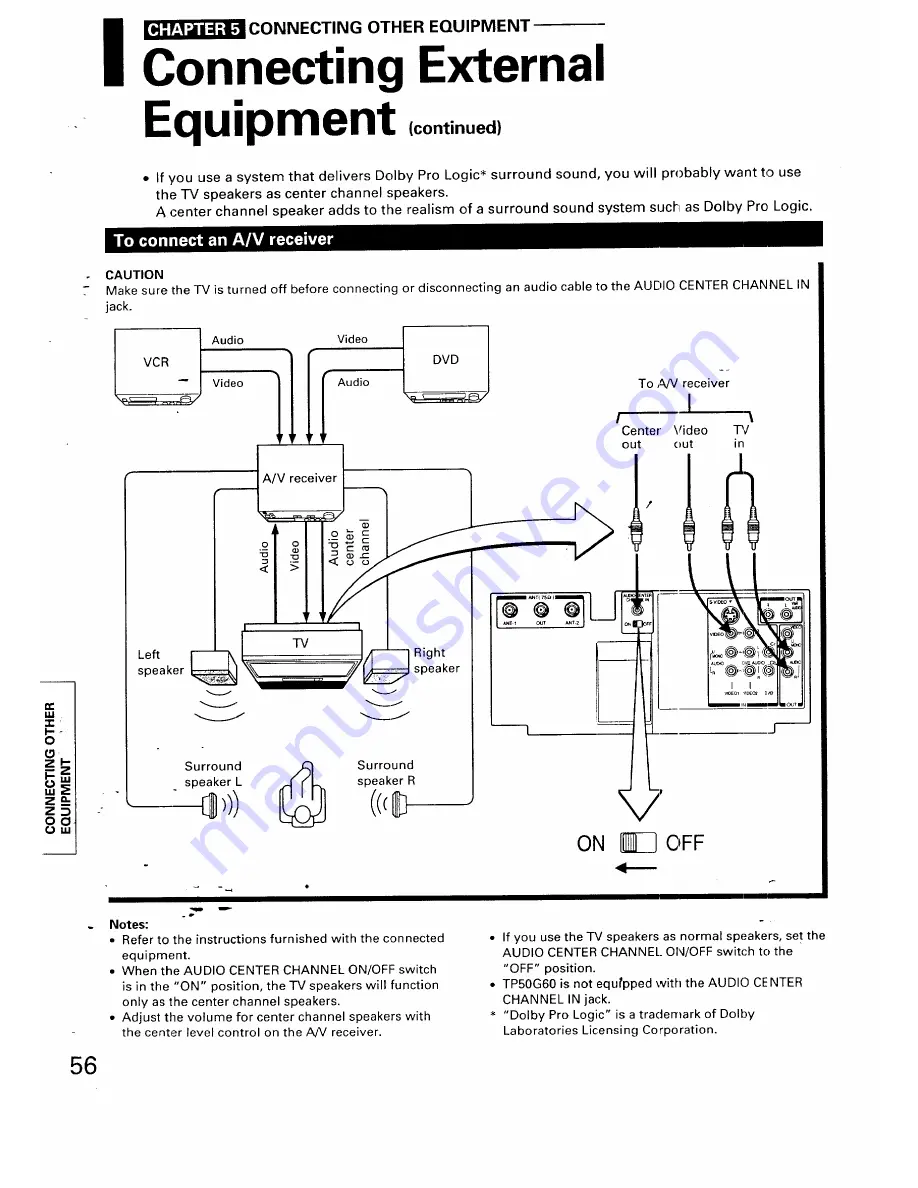
Page 56: ...rround _ Surround speaker L speaker R Right speaker To _ receiver I Center Video PJ out out in ON I OFF 4 _ I P P Notes Refer to the instructions furnished with the connected equipment When the AUDIO CENTER CHANNEL ON OFF switch is in the ON position the TV speakers will function only as the center channel speakers Adjust the volume for center channel speakers with the center level control on the ...

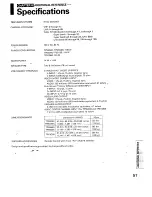
Page 57: ...modulation equivalent 47 kohm ColorStream TM Color Difference VIDEO INPUT Y INPUT 1V p p 75 ohm Cr INPUT 0 7 V p p 75 ohm Cb INPUT 0 7 V p p 75 ohm VIDEO AUDIO OUTPUT VIDEO 1 V p p 75 ohm negative sync AUDIO 150 mV rms 30 modulation equivalent 4 7 kohm VARIABLE AUDIO OUTPUT 0 350 mV rms 30 modulation equivalent 4 7 kohm AUDIO CENTER CHANNEL INPUT For TP55G60 and TP61G60 1 V rms 30 modulation equiv...

Page 58: ...I _ADDITIONAL REFERENCE Before Calling Service Personnel Before calling service personnel please check the following chart for the possible cause of the problem you are experiencing r_ ...

Page 59: ... have been lost or discarded by you or to damage to products or parts caused by misuse accident damage caused by Acts of God such as lightning or fluctuations in electric power improper installation improper maipt na nce or use in violation of instructions furnished by us or to units which have had the serial number removed altered_ defaced or rendered illegible How to Obtain Warranty Service If a...

Page 60: ...SS GA 30071 46_ 7 TOSHIBA HAWAII INC HEAD OFFICE 327 KAMAKEE STREET HONOLULU HAWAII 96814 U S A TEL 808 521 5377 TOSHIBA OF CANADA LTD HEAD OFFICE 191 McNABB STREET MARKHAM ONTARIO L3R 8H2 CANADA TEL 905 470 5400 SERVICE CENTERS TORONTO 191 McNABB STREET MARKHAM ONTARIO L3R 8H2 CANADA TEL 905 470 5400 MONTREAL 1643 NORTH SERVICE RD TRANS CANADA HIGHWAY DORVAL QUEBEC H9P 1J1 CANADA TEL 514 _56 4100...

Reviews: