background image

Disc playback

42

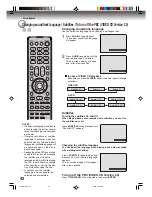
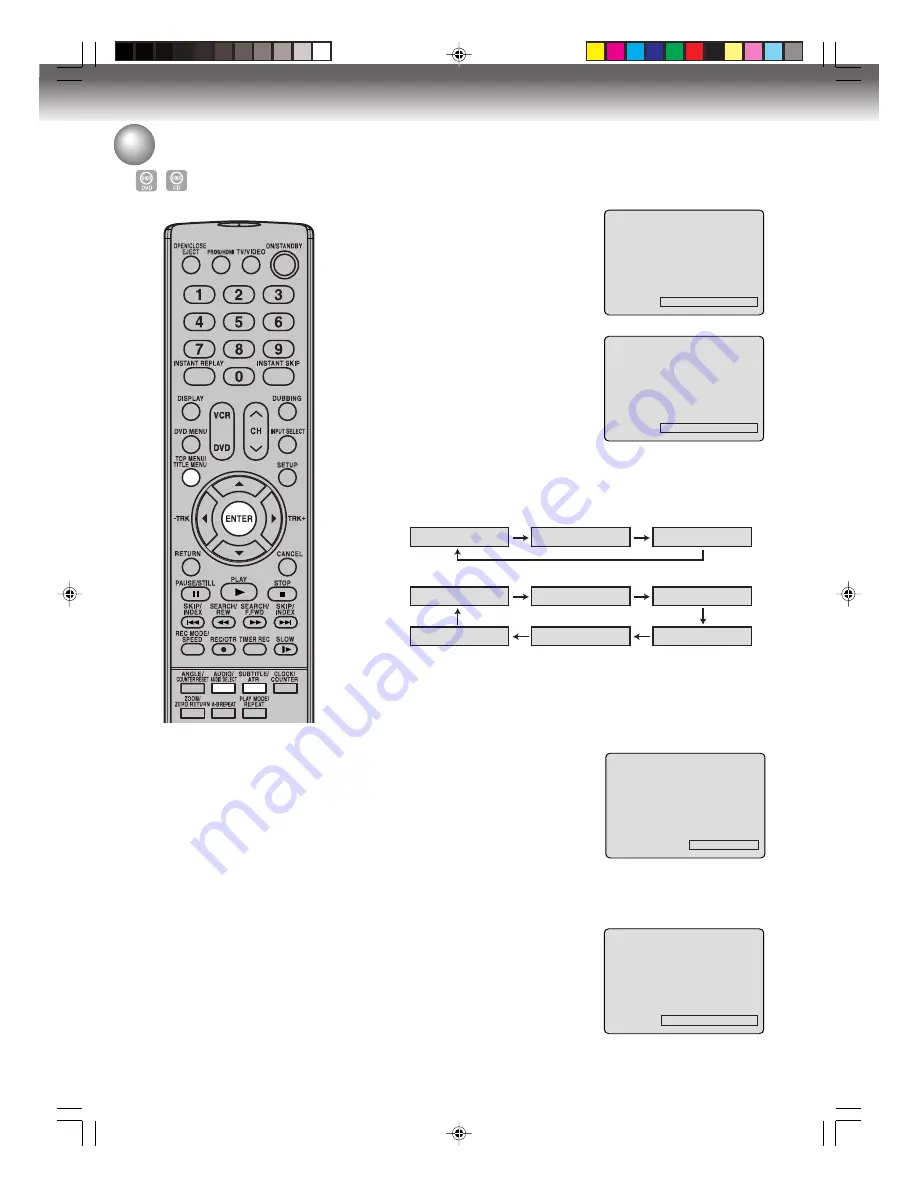
Changing soundtrack language / Subtitles / To turn off the PBC (VIDEO CD Version 2.0)

Audio 1/8 ENG Dolby Digital

Audio 2/8 FRA Dolby Digital

Subtitle OFF

Subtitle 1/32 ENG

Changing soundtrack language

You can select the language when you play a multilingual disc.

1

Press 

AUDIO

 during playback.

The current soundtrack language
will appear.

2

Press 

AUDIO

 repeatedly until the

desired language is selected.
The on-screen display will disap-
pear after a few seconds.

Subtitles

Turning the subtitles On and Off

When playing back a disc recorded with subtitles, you can turn
the subtitles on or off.

Press 

SUBTITLE

 during playback until

“Subtitle OFF” appears.

Changing the subtitles language

You can select the language when playing back a disc recorded
with multilingual subtitles.

Press 

SUBTITLE

  repeatedly during

playback until your desired language
appears.
The on screen display will disappear
after a few seconds.

NOTES:

• If the desired language is not heard

after pressing the button several
times, the language is not recorded
on the disc.

• Changing soundtrack or subtitles

language is canceled when you
open the disc tray. The initial default
language or available language will
be heard and seen if the disc is
played back again.

• Depending on the DVD you may be

unable to turn on, turn off, or change
the subtitles, even if they are
recorded on the disc. While playing
the DVD, the subtitles may change
while opening or closing the disc
tray, or while changing the title.

• In some cases, the subtitles

language is not changed to the
selected one immediately.

Audio LR

Audio L

Audio R

Audio 1/2 LR

Audio 1/2 R

Audio 1/2 L

Audio 2/2 R

Audio 2/2 LR

Audio 2/2 L

3

3

3

3

3

In case of VIDEO CD playback

Each time you press the 

AUDIO 

button, the audio type will change

as follows:

VIDEO CD

S-VCD

To turn off the PBC (VIDEO CD Version 2.0)

Press 

TITLE MENU

 in the stop mode, then press 

ENTER

.

 2J40101A P41-47

3/4/06, 10:44 AM

42

Summary of Contents for D-VR5

Page 1: ... 53 63 Introduction Various settings Disc playback Tape playback Recording Editing the disc 2006 Toshiba Corporation 78 82 Dubbing Additional information This device does not tape record copy protected DVD Video Discs DIGITAL VIDEO 2J40101A Cover 3 4 06 10 42 AM 1 ...

Page 2: ...ot expressly approved by the partly responsible for compliance with the FCC Rules could void the user s authority to operate this equipment CAUTION THIS DIGITAL VIDEO PLAYER EMPLOYS A LASER SYSTEM TO ENSURE PROPER USE OF THIS PRODUCT PLEASE READ THIS USER S GUIDE CARE FULLY AND RETAIN FOR FUTURE REFERENCE SHOULD THE UNIT REQUIRE MAINTE NANCE CONTACT AN AUTHORIZED SERVICE LOCATION USE OF CONTROLS A...

Page 3: ...t and to protect it from overheating These openings must not be blocked or covered The openings should never be blocked by placing the unit on a bed sofa rug or other similar surface This unit should never be placed near or over a radiator or heat source This unit should not be placed in a built in installation such as a bookcase or rack unless proper ventilation is provided and or the manufacture...

Page 4: ...SI NFPA 70 provides information with respect to proper grounding of the mast and supporting structure grounding of the lead in wire to an antenna discharge unit size of grounding conductors location of antenna discharge unit connection to grounding electrodes and requirements for the grounding electrode EXAMPLE OF ANTENNA GROUNDING AS PER THE NATIONAL ELECTRICAL CODE ANTENNA DISCHARGE UNIT NEC SEC...

Page 5: ...ideo cassettes and other materials may infringe the rights of copyright owners and be contrary to copyright laws Certain audio features of this product manufactured under a license from Desper Products Inc Spatializer N 2 2 and the circle in square device are trademarks owned by Desper Products Inc Microsoft Windows Media and the Windows logo are either registered trademarks or trademarks of Micro...

Page 6: ...reen display ON or OFF 29 Contents Setting the screen 30 TV SCREEN 30 STILL MODE 30 LINE1 INPUT LINE2 INPUT 30 Setting the image quality 31 BRIGHTNESS 31 E B L 31 Setting the audio 31 DRC 31 VIRTUAL SURROUND Spatializer N 2 2TM 31 EXTERNAL AUDIO INPUT 31 SAP Second Audio Program 32 DOLBY DIGITAL OUTPUT 32 Setting the recording 32 INITIAL REC TO 32 INITIAL REC MODE 32 AUTO CHAPTER 32 INDEX PICTURE ...

Page 7: ...e 51 Slow motion 51 Frame by frame picture 51 Adjusting tracking condition 51 Repeat playback 51 Instant skip 51 To display VCR operation status 51 ZERO RETURN function 52 Video index search system 52 Recording Read this before recording on disc 53 Types of disc 53 Recording modes 53 Disc remaining time 53 Images that cannot be recorded 54 Recording a TV program 55 One touch Timer Recording OTR 57...

Page 8: ... find this function of great advantage on long programs as you do not have to wait for the end of recording to begin playback Recording function Timer recording The timer recording system allows you to select the date time and channel and record the desired programs Up to 12 timer programs within a month can be stored in this unit One touch Timer Recording OTR The One touch Timer Recording feature...

Page 9: ...tensively loud sounds may blow the speakers or may damage the hearing of those in hearing range Do not playback the discs listed below CDG Photo CD CD ROM CD TEXT CD EXTRA SACD PD CDV DVD ROM DVD R RW DVD audio etc The below DVD Video may not be played back DVD Video that do not have the region number 1 or ALL PAL or SECAM DVD Video Prohibited or business use DVD Video CD R CD RWs cannot be played...

Page 10: ...ack recording and editing Original playlist Playback and recording Editing with limitation Playback and recording Editing with limitation DVD RAM When using cartridge type DVD RAM discs it will be necessary to remove the disc from the car tridge Use only DVD RAM discs that comply with DVD RAM standard Version 2 0 or 2 1 The recorder cannot record on a disc formatted in any other standard When usin...

Page 11: ...ing in the VR mode One time recording is set to 1 title 1 chapter How ever if you stop recording temporarily or erase scenes by editing the chapter will automatically be partitioned The interval between chapters can be specified See page 32 When recording in the Video mode One time recording is set to 1 title In recording chap ters are set automatically The interval between chap ters can be specif...

Page 12: ...ont panel Please open it to access the S VIDEO jack and the AUDIO L R VIDEO IN INPUT 2 jacks Remote senser CHANNEL buttons VCR indicator OPEN CLOSE button AC power cord COAXIAL DIGITAL AUDIO OUT jack DVD Priority AUDIO L R VIDEO OUT jacks DVD VCR common AUDIO L R OUT jacks DVD Priority AUDIO L R VIDEO IN INPUT 1 jacks S VIDEO IN INPUT 1 jack S VIDEO OUT jack DVD Priority COMPONENT OUT jacks DVD Pr...

Page 13: ...flashes Counter display in hour minute second Cable TV channel display TV channel display Track number display for CD Display for afternoon out in the morning The external input channel L1 or L2 display Error display Lights during playback of DVD and CD Flashes in auto resume DVD or CD is temporarily stopped Lights during DVD recording CD CD R DVD DVD R DVD RW VR 10 00 01H00M00S C 36CH 2CH TRK 002...

Page 14: ... CANCEL Deletes the Timer recording program 60 Cancels input data in the setting mode 26 PAUSE STILL Still picture Recording pause on off 37 51 PLAY Playback 34 50 STOP Stop 34 50 56 SKIP Skips chapters in the forward or reverse direction 37 INDEX Searches for the INDEX mark of a tape 52 SEARCH REW Rewind Review playback 37 50 51 SEARCH F FWD Fast Forward Forward search playback 37 50 51 REC MODE ...

Page 15: ...annel at a time The are also used to navigate on screen menu system You can directly access specific channels using numeric keys Each press of DVD or VCR switches the screen between the DVD screen DVD mode and the VCR screen VCR mode Operation Aim the remote control at the remote sensor and press control buttons to operate Operate the remote control within 30 angle on either side of the remote sen...

Page 16: ...ns ANTENNA TO DVD VCR CONNECTION The DVD VCR must be connected between the antenna and the TV First disconnect the antenna from the TV and connect it to the DVD VCR Then connect the DVD VCR to the TV Below are 3 common methods of connect ing an antenna system to a DVD VCR Find the type of antenna system you are using and follow the connection diagram If both UHF and VHF antennas have 300 ohm twin ...

Page 17: ...D VCR to the TV Below are 3 common methods of connecting your DVD VCR to a TV Find the type of TV you are using and follow the connection diagram This DVD VCR has a single 75 ohm output for connection to a TV If your TV has separate UHF and VHF antenna inputs numbers 2 and 3 below use a splitter to connect the DVD VCR to the TV for UHF and VHF reception Antenna connections The unauthorized recordi...

Page 18: ...ecording of one channel while watching another ALLOWS Recording of channels through the converter box scrambled and unscrambled Using the programmable timer to record only the channel selected at the converter box PREVENTS Recording one channel while watching another Using the DVD VCR tuner to select channels 1 2 3 ALLOWS Recording of channels through the converter box scrambled and unscrambled Us...

Page 19: ...ambled channels while recording another channel Using the DVD VCR tuner to select channels ALLOWS Recording of nonscrambled channels Recording of one channel while watching another Watching premium channels through the converter while recording nonscrambled channels Using the programmable timer PREVENTS Recording scrambled channels ALLOWS Recording of all channels through the converter box Recordi...

Page 20: ...nit Connect to a TV with Component video output You can enjoy the highest quality picture by connecting the unit s component video out jacks to the component video input jacks of your TV with component video cables not supplied To switch the output signals Progressive Interlace Press PROG HDMI to change the video output signals progressive and interlace from Component video output jacks see page 2...

Page 21: ...the output for each ouput jacks are as shown in the following table and differ depending on output setting When the HDMI Progressive is active it is impossible to output any video images from the Video out jack and S Video out jack In this case press PROG HDMI repeatedly to switch the HDMI Progressive output setting to OFF or set the TV to Component input mode HDMI input mode Notes PROG HDMI butto...

Page 22: ...uddenly come out from the speakers affecting your ears or causing the speakers to be damaged Caution for the optical digital audio output connector Do not connect to an amplifier with an optical digital input connector which does not contain a Dolby Digital or DTS decoder Otherwise any attempt to play DVDs may cause such a high level of noise that it may be harmful to your ears and damage your spe...

Page 23: ...onnection if the auto clock setting is unsuccessful select the PBS channel carrying the XDS information then turn the DVD VCR off After 3 minutes turn the DVD VCR on If the clock is not set automatically set the clock manually See page 27 Setting the video channel To view playback of a recorded tape or DVD disc or to watch a program selected by the VCR s channel selector the TV must be set to chan...

Page 24: ...sired item and press ENTER This completes the setting procedure To return to the previous screen press RETURN To close the SETUP MENU press SETUP NOTES For items that require different operations from the basic setting procedure the setting procedure is de scribed in each individual section The item which is indicated by blue color cannot be selected TIMER REC SET cannot be selected when the clock...

Page 25: ...ng number press CANCEL AUTOMATIC The unit will automatically select the same language in the AUDIO setting When the unit selects the same language as the AUDIO setting the subtitles will not appear during playback When you do not use the same language as the AUDIO setting the subtitles will appear during play back OFF Subtitles do not appear NOTE If the selected language is not recorded on the dis...

Page 26: ...pear Press OPEN CLOSE to remove the disc 4 Use the numeric keys to input the password To interrupt the input process press RETURN 5 Press ENTER 6 Playback will commence if the entered password was correct NOTE This temporary cancellation of the rating level will re main active until the disc is ejected When the disc is ejected the original rating level will be set again automatically Selecting par...

Page 27: ...t To correct the situation Select STANDARDTIME and select the time zone from the below Selectable time zones and correction times ATLANTIC GMT 4 hours GMT Greenwich Mean Time EASTERN GMT 5 hours CENTRAL GMT 6 hours MOUNTAIN GMT 7 hours PACIFIC GMT 8 hours ALASKA GMT 9 hours HAWAII GMT 10 hours AUTOMATIC AUTO SET NOTES When shipped from the factory the STANDARD TIME is set to AUTOMATIC After making...

Page 28: ...R to clear the screen You cannot format Ver 1 0 DVD RW and DVD R You cannot format a disc if the disc protection is ON In such a case be sure to cancel the disc protection see page 29 before format You cannot format a DVD RAM in the Video mode When you select CANCEL and press ENTER the DISC SETUP screen will appear NEW DISC FORMAT If you insert an unused DVD RW disc the disc is auto matically form...

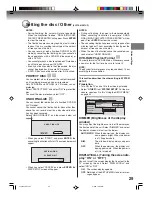
Page 29: ...tus from the below AUTOMATIC When the power is on the display win dow appears bright When the power is off it appears dark DIM The window display always appears dark OFF When the power is on the display win dow appears dark When the power is off it is turned off DISPLAY CALL Turning the screen dis play ON or OFF You can turn off the screen display that is output to the TV screen by this unit Selec...

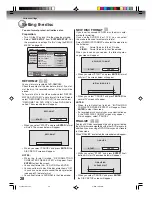
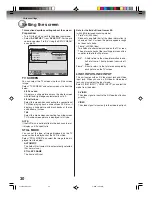
Page 30: ...INPUT LINE2 INPUT SETUP MENU RETURN SETUP ENTER BACK END 4 3 Letter box AUTOMATIC VIDEO VIDEO SELECT ENTER This section describes settings about the screen Preparation Turn ON the TV and set it to the video input mode Select AV SETUP 1 from AV SETUP For the pro cedure see steps 1 to 3 in Using the SETUP MENU on page 24 TV SCREEN You can select the TV screen size to suit the screen image Select TV ...

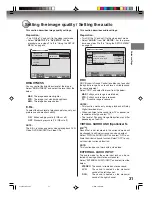
Page 31: ... differ depending on the DVD VIRTUAL SURROUND Spatializer N 2 2TM Sound that is not recorded in the surround mode will be changed to artificial surround sound and output Select VIRTUAL SURROUND and select ON to ac tivate the virtual surround function Select OFF to can cel the virtual surround function NOTE This function does not work with a video tape EXTERNAL AUDIO INPUT The audio mode for the au...

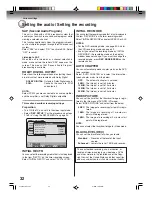
Page 32: ... INITIAL REC MODE You can select the recording mode that is first displayed in the item REC MODE on the timer recording screen Select INITIAL REC MODE and select XP SP LP or SLP NOTES For the DVD recording mode see page 53 And for the VCR recording mode see page 49 Even if you select the recording mode by INITIAL REC MODE the recording mode on the display window does not change If you want to chan...

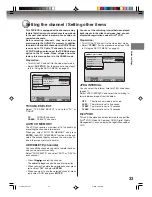
Page 33: ... or delete the chan nels you do not want manually Select ADD DELETE and select ADD or DEL for each channel Press CH to select the channel The numeric keys can also be used for selection When you want to delete the selected channel press to select DEL and press ENTER When you want to use the selected channel press to select ADD and press ENTER You can set the switching interval between played back ...

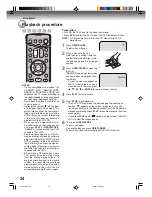
Page 34: ...ON STANDBY The disc tray closes automatically and DVD VCR turns off NOTES If a non compatible disc is loaded IN CORRECT DISC REGION CODE ERROR or PARENTAL ERROR will appear on the TV screen according to thetypeofloadeddisc Inthiscase check your disc again See pages 9 and 26 Some discs may take a minute or so to start playback A prohibition symbol may appear at the upper right of the screen This sy...

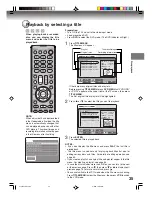
Page 35: ...e previous page Press then press or to display next previous page To return to normal use press You cannot switch to the VCR mode when the title menu is showing Press TITLE MENU to clear the title menu then press VCR to switch to the VCR mode RETURN PLAY BACK SET END SELECT TITLE MENU ENTER TITLE MENU Original titles Playlist Thumbnail image Recording information DISC NAME 11 23 2006 08 41AM 006 S...

Page 36: ...ack condition playback stop pause and record The number of audio languages and present language Playback elapsed time Current subtitles language Recording mode The number of titles and present title number Present channel Present time The number of angles and present angle number The number of chapters and present chapter number TITLE 02 02 ORG TIME 00 05 15 CHAPTER 01 01 SUBTITLE ANGLE 01 01 REC ...

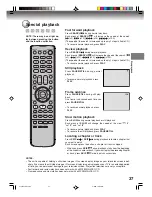
Page 37: ...ress SLOW during normal playback or still playback Each press of SLOW will change the speed of the slow 1 2 1 4 and 1 8 To resume normal playback press PLAY To resume the still playback press PAUSE STILL Locating a chapter or track Press SKIP or SKIP during playback to locate a chapter that you want to watch Each time you press the button a chapter or track is skipped NOTES The unit is capable of ...

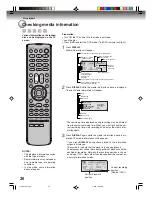
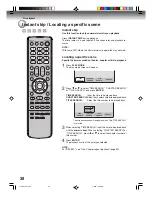
Page 38: ...EARCH and press ENTER TIME SEARCH Input the time to be played back CHAPTER SEARCH Select the chapter number to be played back TITLE SEARCH Select the title number to be played back The screen above shows the display when CHAPTER SEARCH is selected 3 When selecting TIME SEARCH input the time to be played back with the numeric keys When selecting CHAPTER SEARCH or TITLE SEARCH press or to select the...

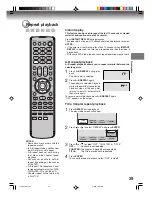
Page 39: ...erial and continues to play as normal Press INSTANT REPLAY during playback The video returns to a point 10 seconds before and playback resumes NOTES If the time from the title top is less than 10 seconds when INSTANT REPLAY is pressed the title top is repeated and then the video is played back With some DVD Video the one touch repeat operation may not work TIME SEARCH CHAPTER SEARCH TITLE SEARCH R...

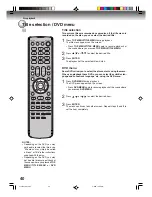
Page 40: ...ppears on the screen Press TOP MENU TITLE MENU again to resume playback at the scene where you pressed TOP MENU TITLE MENU 2 Press or to select the desired title 3 Press ENTER The playback of the selected title will start DVD menu Some DVDs allow you to select the disc contents using the menu When you playback these DVDs you can select the subtitles lan guage and soundtrack language etc using the ...

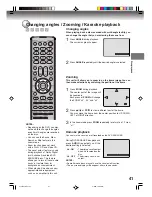
Page 41: ... frame image You can then make selections by switching the position of the frame 1 Press ZOOM during playback The center part of the image will be zoomed in Each press of ZOOM will change the ZOOM x2 x3 and x4 2 Press or to view a different part of the frame You may move the frame from the center position to UP DOWN LEFT or RIGHT direction 3 In the zoom mode press ZOOM repeatedly to return to a 1 ...

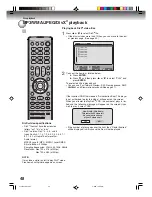
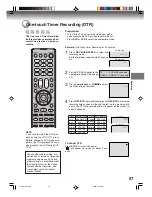
Page 42: ...appears The on screen display will disappear after a few seconds NOTES If the desired language is not heard after pressing the button several times the language is not recorded on the disc Changing soundtrack or subtitles language is canceled when you open the disc tray The initial default language or available language will be heard and seen if the disc is played back again Depending on the DVD y...

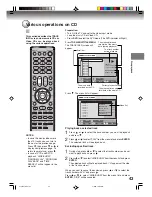
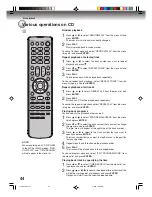
Page 43: ... from the menu list and press ENTER The selected track will be played back Excluding specified track 1 During stop press or to select the track number you do not want to playback and press 2 Press or to select HIDE SHOW from the menu list and press ENTER The selected track will not be played back H appears at the side of the track number When you want to cancel the exclusion press or to select the...

Page 44: ... played back repeatedly To cancel the repeat all playback select REPEAT ALL from the menu list again and press ENTER Playing back programs You can specify the playback order yourself 1 Press or to select PROGRAM PLAYBACK from the menu list and press ENTER 2 Press or to select the track number that you want to change the order of and press ENTER The mark will appear at the right side of the track n...

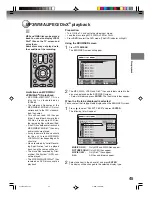
Page 45: ...3 WMA JPEG or DivX Press DVD to select the DVD mode The DVD indicator will light Using the BROWSER screen 1 Press TITLE MENU The BROWSER screen will appear 2 The MP3 WMA JPEG and DivX files and folders stored in the disc are displayed on the BROWSER screen Select a folder and press ENTER The files in the folder appear When the file to be displayed is selected You can select the file types to be di...

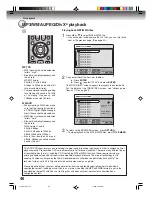
Page 46: ...see Various opera tions on CD on page 43 Grammy03_02 mp3 Grammy03_03 mp3 Grammy03_04 mp3 Grammy03_05 mp3 Grammy03_06 mp3 Grammy03_07 mp3 Grammy03_08 mp3 Grammy03_09 mp3 Grammy03_10 mp3 Grammy03_01 mp3 BROWSER ENTER RETURN PLAY BACK SET END SELECT TITLE MENU 3 To return to the BROWSER screen press RETURN To stop playback of the MP3 or WMA files press TITLE MENU This DVD VCR requires discs and recor...

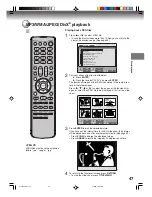
Page 47: ...me for JPEG slide show the pictures will be played back one after another automatically See page 33 Press ZOOM to enlarge the displayed image Press ANGLE to rotate the image by 90 degrees each time Alone jpg Ambassadeurs Aristide_Bruant jp Arlstide Bruant jpg At_the_Moulin_Rouge jpg Clown Cha U Kao jpg Dancer Seated jpg EI Dorado jpg Galerie 65 Cannes jpg Jane Avril 1893 jpg Alfred Ia Guigne jpg p...

Page 48: ...ps 320kbps Sampling frequencies 32kHz 44 1kHz 48kHz Resolution Max 720 x 576 at 25fps Max 720 x 480 at 30fps NOTE It may take a while to start to play DivX video Please wait until picture appears on screen If the incorrect DRM file is loaded Authorization Error This player is not authorized to play this video will appear on the screen When you attempt to play DivX VOD the number of plays is lim it...

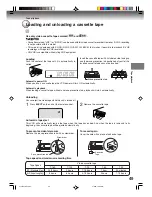
Page 49: ...ape until it is automatically in serted Insert the cassette tape with its labeled side facing up and the erase prevention tab positioned at your left An inverted cassette tape cannot be inserted Automatic power ON When you insert a cassette tape the VCR power will turn ON automatically Automatic playback When loading a cassette tape without an erase prevention tab playback will start automatically...

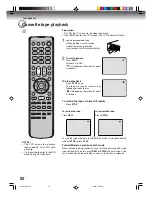
Page 50: ...start will appear on the screen for about 4 seconds To stop playback Press STOP once The tape will stop but remain fully loaded and ready to play will appear on the screen for about 4 seconds To rewind the tape or forward it rapidly Press STOP To rewind the tape Press REW To forward the tape Press F FWD To stop the tape winding press STOP To switch to playback directly without STOP press PLAY Forw...

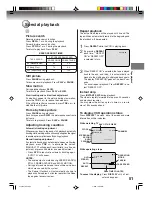
Page 51: ...OTION During picture search mode there will be noise bars which are caused by the system The Special Playback will automatically change to playback after approx 5 minutes to protect the video tape against excessive wear Repeat playback The entire video tape will be played until its end The tape will then automatically rewind to the beginning and the playback will be repeated 1 Press REPEAT while t...

Page 52: ...ing programs Press INDEX For Preceding programs Press INDEX Additional press increases the INDEX NO up to 9 When the INDEX or is pressed the unit starts searching the INDEX NO selected and finds the portion then playback starts automatically To stop the Index Search press STOP ZERO RETURN function This function makes tape rewind ing stop at the counter 00 00 00 position automatically NOTES for Cou...

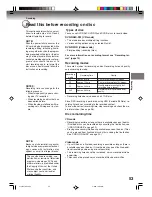
Page 53: ...tle be overwritten Titles cannot be erased nor can recorded titles be overwritten This section explains what you must know to record onto a disc Read it before attempting to record NOTES Recording time can change for the following reasons When image quality is poor as dur ing poor TV reception When recording on a disc that has been edited before When the video is followed with re cordings of still...

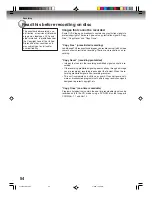
Page 54: ...fway through an image you are recording recording is paused at that instant When the re cording prohibited signal ends recording resumes This unit incorporates a built in copy guard It cannot record soft ware or broadcasted programs that contain copy restriction signals designed to protect copyright etc Copy Once one time recordable Programs images that contain the one time recordable signal can b...

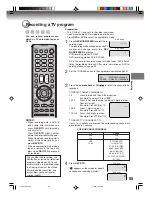
Page 55: ...110 for 110 TO SELECT TV CHANNELS 1 12 If only 1 or 2 buttons are pressed the corresponding channel will be selected in 2 seconds VHF UHF CABLE CHANNELS 4 Press REC OTR appears on the screen for about 4 seconds and recording will start NOTES When recording onto a DVD it takes some time from when you press REC OTR until recording actually starts Press REC OTR slightly earlier before the preferred s...

Page 56: ...elect the TV channel you want to watch by using the TV channel selector NOTE Some CABLE hookups do not permit viewing one channel while re cording another See pages 18 19 Auto Rewind feature This VCR will automatically rewind the tape when the tape has ended except during OTR and TIMER REC It will also eject the tape VCR mode DVD mode NOTES If the disc space become full the recording is stopped an...

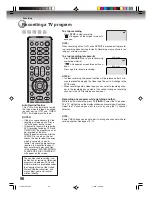
Page 57: ... as shown in the chart below up to a maximum of 6 hours The OTR and recording time will appear on the screen for about 4 seconds To cancel OTR Press STOP or turn off the power will appear on screen for about 4 sec onds TV VHF UHF channels CABLE CABLE TV channels NOTE If you wish to watch the DVD play back during the VCR OTR press DVD to change to DVD mode and perform the DVD playback You can also ...

Page 58: ... the timer record indicator flashes Replace the tape or disc to allow re cording 2 Press or to select TIMER REC SET and press ENTER The TIMER REC SET screen will appear ENTER RETURN BACK END SELECT SETUP ENTER TIMER REC SET REC REC TO MODE CH END START DATE NEW SETUP MENU TIMER REC SET SYSTEM SETUP AV SETUP REC SETUP CH SETUP OTHER SETUP MENU ENTER RETURN BACK END SELECT SETUP ENTER TIMER REC SET ...

Page 59: ... 17PM SETUP MENU SELECT ENTER RETURN BACK END SELECT SETUP ENTER TIMER REC SET REC REC TO MODE TYPE DATE MM DD START END CH REC TO REC MODE ONCE 000 DVD SP OK 11 08 03 02 17 03 17 SETUP MENU ONCE EVERY SUN EVERY MON EVERY TUE EVERY WED EVERY THU EVERY FRI EVERY SAT MON FRI NOTES If you select timer recording on a specified date only one time select ONCE in the TYPE for recording You can record sam...

Page 60: ...seconds The timer indicator disappears from the display and recording continues Press STOP to stop recording completely Checking or changing the timer recording When you want to check the selected timer recording follow the steps 1 and 2 of Setting timer recording and display theTIMER REC SET screen To change the timer recording select the program to be changed and press ENTER The changing method ...

Page 61: ...rom the beginning of a program currently being recorded You will find this function of great advantage on long programs as you do not have to wait for the end of recording to begin playback NOTES Chase playback is not available when recording a DVD RW R disc and video tape Chase playback is not available when recording in XP mode Slow Instant skip Instant replay A B repeat and Frame advance will n...

Page 62: ...g an MTS STEREO TV program or playing a prerecorded Hi Fi STEREO on video tape press AUDIO SELECT to select how the audio will be heard through the speakers Normally set to the Hi Fi STEREO position this button can be set to the MONO position if the stereo audio is of poor quality The R and L positions allow the au dio from the Right or Left Hi Fi channel to be heard over both TV speak ers This bu...

Page 63: ...portant titles from being erased accidentally If you create a playlist both the original title and playlist will be dis played on the title menu Editable items The items that can be edited are different between original title and playlist For the disc in Video mode only the title name can be edited The items can be edited in each are as follows NOTES This unit cannot record or edit a disc which wa...

Page 64: ...lect the original title which will be used as the base of a playlist 3 Press The editing menu of original title will appear 4 Press or to select NEW PLAYLIST 5 Press ENTER The editing menu closes and the created playlist appears at the bottom of the list NOTES A playlist can only be created with a DVD RAM or a DVD RW in VR mode You cannot create a playlist with a DVD RW inVideo mode nor with a DVD...

Page 65: ...where you want to change the title name Press or to select the playlist Press to display the editing menu of the playlist Press or to select RENAME TITLE 3 Press ENTER The keyboard screen will appear 4 Use the keyboard screen to enter the title name 5 Press DISPLAY to return to the title menu Family 1 2 a b c 3 d e f CANCEL Back RETURN Exit STOP Caps 0 Space bar 4 g h i 5 j k l 6 m n o 7 q p r s 8...

Page 66: ... playlist where a scene you want to erase is included Press or to select the playlist Press to display the editing menu of the playlist Press or to select EDIT TITLE 3 Press ENTER The EDIT TITLE screen will appear 4 Press ENTER to playback the playlist on the EDIT TITLE screen Use each operation button F FWD REW SKIP7 7 7 7 7 SKIP6 6 6 6 6 PLAY PAUSE STILL SLOW INSTANT SKIP for the playback to sea...

Page 67: ...layback also can be used 8 Adjust the start and end points To adjust the start point select Adjust start and press ENTER You can change the start point by pressing or To adjust the end point select Adjust end and press ENTER You can change the end point in the same way as the start point If you determine the scene to be erased press or to select Finish and press ENTER A chapter mark is automatical...

Page 68: ...ed is created 1 Press TITLE MENU to display the title menu 2 Select the playlist where you want to combine the titles Press or to select the playlist Press to display the editing menu of the playlist Press or to select TITLE COMBINE 3 Press ENTER Select the title that you want to combine from the title menu 4 Press ENTER Following the playlist the selected title is combined The several titles were...

Page 69: ...he original title will not be erased 1 Press TITLE MENU to display the title menu 2 Select the playlist that you want to erase Press or to select the playlist Press to display the editing menu of the playlist Press or to select DELETE TITLE 3 Press ENTER The selected playlist will be erased 2J40101A P63 71 3 4 06 10 45 AM 69 ...

Page 70: ...r marks to one disc 1 Press TITLE MENU to display the title menu 2 Select the original title where a chapter mark is added Press or to select the original title Press to display the editing menu of the original title Press or to select ADD CHAPTER MARK 3 Press ENTER The ADD CHAPTER MARK screen will appear ENTER RETURN ENTER BACK END TITLE MENU ADD CHAPTER MARK NAME 11 25 2003 08 41 AM CHAPTER 1 3 ...

Page 71: ...rn to the normal screen press TITLE MENU Combining chapters By erasing the added chapter marks the chapters can be combined 1 Press TITLE MENU to display the title menu 2 Select the original titles where you want to combine the chapters Press or to select the original title Press to display the editing menu of original title Press or to select COMBINE CHAPTERS 3 Press ENTER The COMBINE CHAPTERS sc...

Page 72: ... to rename Press or to select the original title Press to display the editing menu of original title Press or to select RENAME TITLE Editing an original title SELECT ENTER RETURN ENTER BACK END TITLE MENU COMBINE CHAPTERS NAME 11 25 2003 10 03 PM CHAPTER 2 4 LENGTH 00 02 03 00 30 17 3 Press ENTER The keyboard screen will appear The entering method of the title name is the same as for the playlist ...

Page 73: ...n you erase the scene you can increase the disc space 1 Press TITLE MENU to display the title menu 2 Select the original title where a scene you want to erase is in cluded Press or to select the original title Press to display the editing menu of original title Press or to select EDIT TITLE 3 By pressing ENTER the following message screen will appear 4 Press or to select YES and press ENTER then t...

Page 74: ...ed title cannot be restored When you erase the title you can increase the disc space 1 Press TITLE MENU to display the title menu 2 Select the original title you want to erase Press or to select the original title Press to display the editing menu of original title Press or to select DELETE TITLE 3 By pressing ENTER the following message screen will appear 4 Press or to select YES and press ENTER ...

Page 75: ...elect RENAME DISC NOTES The disc name can be a maximum of 30 characters Long names will be shortened in the title menu For using the keyboard screen see Using the keyboard screen page 76 A DVD R disc cannot be named af ter it is finalized 3 Press ENTER The keyboard screen will appear 4 Use the keyboard screen to enter the disc name Drama_Family Numbers Signs Letters 1 2 a b c 3 d e f CANCEL Back R...

Page 76: ...screen This section explains the function of the keyboard screen and how to input characters The disc name and the title name can be changed using the keyboard screen Keyboard screen types The keyboard screen has three types of Letters Num bers and Signs The type can be switched over by pressing REW or F FWD Letters This is mainly used for inputting alphabeti cal letters For the keyboard screen of...

Page 77: ...ying your titles using the keyboard screen with the Letters tab 1 Press STOP Or press or to select Caps then press ENTER Live Show 1 2 a b c 3 d e f CANCEL Back RETURN Exit STOP Caps 0 Space bar 4 g h i 5 j k l 6 m n o 7 q p r s 8 t u v 9 w x y z DISPLAY OK DISPLAY OK Numbers Signs Letters Upper Lower Auto caps 2 Press or to select the type of letters in the list below and press ENTER Auto caps De...

Page 78: ...OTES Dubbing cannot be accomplished when a copy protected tape is used disc protection is set disc has no recording space HDMI mode is active Dubbing stops when the video tape is played back to the end and stops recording space becomes full The videos recorded from TV pro grams or movies can be used only for your personal enjoyment with out permission of the copyright holder Confirm that the VCR i...

Page 79: ...movies can only be used for your own personal enjoyment You can record both video and audio from a disc to a video tape When a disc with a copy guard is used a distorted image is re corded onto the video tape Confirm that the DVD indicator lights 4 Press DUBBING The DVD is waiting for playback and the VCR is waiting for re cording Then the following message appears 5 Press DUBBING or press or to s...

Page 80: ...is recorded using this unit Preparation Turn ON the TV and set the unit to the video input mode Load a video tape where the erase protection tab is not activated or a disc with enough recording space To record onto a video tape set the unit to VCR mode whereas to record onto a disc set it to DVD mode 1 Press INPUT SELECT and set the channel to L2 or L1 L1 LINE 1 on the rear panel L2 LINE 2 on the ...

Page 81: ...nnot output to a connected device Some models of DV format digital video cameras may be not compatible DV recording does not start in the following cases While recording or in the Chase playback mode While timer recording standby mode DV recording does not work if the DV terminal is connected to equipment other than DV format digital video camera such as a PC Do not keep the DV terminal connected ...

Page 82: ...are trademarks of Dolby Laboratories DTS This is a digital sound system developed by Digital Theater Systems for use in cinemas This system uses 6 audio channels and provides accurate sound field positioning and realistic acoustics By connecting a DTS Digital Surround decoder you can also listen to DTS Digital Surround sound DVD menu Menu recorded on a DVD Video that enables the user to select sub...

Page 83: ...ures of this unit such as recording and playback Timer record ing is also set from the SETUP MENU slide show Technique for flipping through and viewing many im ages JPEG files subtitle language Language used for subtitles of movies etc Viewers can watch in a language of their choosing title A program recorded on a disc is called a title title menu Menu that lists titles and tracks recorded on the ...

Page 84: ...5 Thai 3018 Bihari 1218 Hungarian 1831 Oriya 2528 Tibetan 1225 Breton 1228 Icelandic 1929 Panjabi 2611 Tigrinya 3019 Bulgarian 1217 Indonesian 1924 Pashto Pushto 2629 Tonga 3025 Burmese 2335 Interlingua 1911 Persian 1611 Turkish 3028 Byelorussian 1215 Irish 1711 Polish 2622 Turkmen 3021 Cambodian 2123 Italian 1930 Portuguese 2630 Twi 3033 Catalan 1311 Japanese 2011 Quechua 2731 Ukrainian 3121 Chin...

Page 85: ...st for troubleshooting when you have problems with your unit Consult your local dealer or service outlet if problems persist Be sure all connections are properly made when using with other units DVD VCR PAGE 15 15 35 50 16 19 23 16 22 16 22 37 51 15 18 19 DVD Select proper language in the SETUP MENU No disc is inserted The disc may be dirty Clean up the disc The unit cannot play DVD ROMs etc Some ...

Page 86: ...et correctly The recording start end time is not set correctly TIMER REC has not been pressed is not lit Tracking adjustment beyond range of automatic tracking circuit Try Manual tracking adjustment Video heads are dirty The tape is worn or damaged 49 55 27 59 60 51 86 No picture or screen is blurred or divided into two parts No 4 3 16 9 picture No on screen display Nothingappearsinthedisplaywindo...

Page 87: ...ored even if the res toration process is performed Load a disc A disc specified other than Region 1 or Region ALL cannot be played back Check the disc and load a proper disc Load a disc Wait until the process is completed Erase unnecessary titles or load another disc and restart recording 34 9 9 55 36 10 29 74 Combining chapters cannot be performed A process requiring a longer time such as edit in...

Page 88: ...ized VHF 2 13 UHF 14 69 Cable TV 14 36 A W 37 59 AA WW 60 85 AAA ZZZ 86 94 86 94 95 99 A 5 A 1 100 125 100 125 01 5A Channel 3 or 4 Switchable Approx 1minute and 48 seconds with T 120 Cassette Tape at 25 C 20Hz to 20 000Hz More than 90dB NTSC DVD 12cm 8 cm Self Recording Playback only CD 12cm 8cm DVD Video Recording VR mode DVD VIDEO Video mode DVD RAM DVD RW DVD R XP Approx 60 min SP Approx 120 m...

Page 89: ...ial purposes have a limited warranty for all parts and labor which warranty begins on the date of original retail purchase and ends on the date that is ninety 90 days thereafter Owner s Manual and Product Registration Card Read this owner s manual thoroughly before operating this DAV Product Complete and mail the enclosed product registration card or register your DAV Product on line at www tacp t...

Page 90: ...E AND IN LIEU OF ALL OTHER WARRANTIES GUARANTEES AGREEMENTS AND SIMILAR OBLIGATIONS OF TACP WITH RESPECT TO THE REPAIR OR REPLACEMENT OF ANY PARTS IN NO EVENT SHALLTACP BE LIABLE FOR CONSEQUENTIAL OR INCIDENTAL DAMAGES INCLUDING BUT NOT LIMITED TO LOST PROFITS BUSINESS INTERRUPTION OR MODIFICATION OR ERASURE OF RECORDED DATA CAUSED BY USE MISUSE OR INABILITY TO USE THIS DAV PRODUCT No person agent...

Page 91: ...Additional information 91 Memo 2J40101A P88 BACK 3 4 06 10 46 AM 91 ...

Page 92: ...Printed in Thailand 2J40101A P88 BACK 3 4 06 10 46 AM 92 ...

Reviews: