3 INSTALLING PRINTER DRIVERS FOR WINDOWS
62 Installing the Printer Drivers
Installing the printer drivers by using the individual installers
Perform installation corresponding to your Windows computer.
To perform installation, you must log onto Windows with the “Administrator” account; this enables the
installation and uninstallation of client software.
If Windows Vista / Windows 7 / Windows 8 / Windows Server 2008 / Windows Server 2012 is used, you
can perform the installation by temporarily changing the user account following the procedure below.
- Open the folder containing the set up program for installing the preferred printer driver, and then
double-click “Setup.exe”.
- When the [User Account Control] dialog box is displayed, enter an administrator password, and then
click [Yes] ([OK]).
Even when you have logged on Windows with the “Administrator” account, the [User Account Control]
dialog box may appear. In this case, click a button for allowing the operation, such as [Continue], and
then continue.
1
Insert the Install Disc into the disc drive.
When you insert the Install Disc into the disc drive, Software Installer may launch automatically. In this
case, click [Exit] to close it and continue the operation.
2
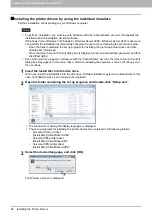
Open the folder containing the set up program, and double-click “Setup.exe”.
The window for choosing the display language is displayed.
The set up programs for installing the printer drivers are contained in the following folders:
- Universal Printer 2 driver
[Install Disc]:\Client\Drivers\UNI\
- Universal PS3 printer driver
[Install Disc]:\Client\Drivers\PS\
- Universal XPS printer driver
[Install Disc]:\Client\Drivers\XPS\
3
Select the desired language, and click [OK].
The Welcome screen is displayed.


