e-STUDIO202S UNPACKING AND INSTALLATION 5 - 4
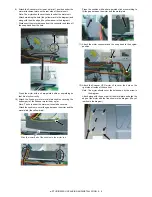
8. Loading paper
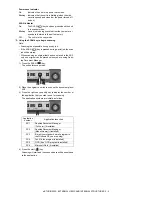
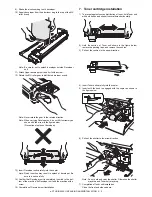
1) Raise the handle of the paper tray and pull the paper tray out
until it stops.
2) Remove the pressure plate lock. Rotate the pressure plate
lock in the direction of the arrow to remove it while pressing
down the pressure plate of the paper tray.
3) Store the pressure plate lock which has been removed in step
2). To store the pressure plate lock, rotate the lock to fix it on
the relevant location.
4) Adjust the paper guides on the paper tray to the copy paper
width and length. Squeeze the lever of paper guide (A) and
slide the guide to match with the width of the paper. Move
paper guide (B) to the appropriate slot as marked on the tray.
5) Fan the paper and insert it into the tray. Make sure the edges
go under the corner hooks.
Note: Do not load paper above the maximum height line (
).
Exceeding the line will cause a paper misfeed.
6) Gently push the paper tray back into the unit.
9. Power to copier
Ensure that the power switch of the unit is in the OFF position.
Plug the other end of the power cord into the nearest outlet. Turn
the power switch on the left side of the unit to the "ON" position.
The start (
) indicator will light up and other indicators which
show the initial settings of the operation panel will also light up to
indicate the ready condition.
10. Software
The CD-ROM that accompanies the machine contains the follow-
ing software:
MFP driver
Printer driver
The printer driver enables you to use the printer function of the
machine.
The printer driver includes the Print Status Window. This is a utility
that monitors the machine and informs you of the printing status,
the name of the document currently being printed, and error mes-
sages.
Please note that the Print Status Window does not operate when
the machine is used as a network printer.
Scanner driver*
The scanner driver allows you to use the scanning function of the
machine with TWAIN-compliant and WIA-compliant applications.
Desktop Document Manager*
Desktop Document Manager is an integrated software environ-
ment that makes it easy to manage documents and image files,
and launch applications.
Button Manager*
Button Manager allows you to use the scanner menus on the
machine to scan a document.
*: The scanning feature can only be used with computers that are
connected to the machine by a USB cable.
Before installation
Hardware and software requirements
Check the following hardware and software requirements in order
to install the software.
*1: Compatible with Windows 98, Windows Me, Windows 2000
Professional, Windows XP Professional, Windows XP Home
Edition or Windows Vista preinstalled model standardly
equipped with a USB port.
*2: Printing is not available in MS-DOS mode.
*3: The machine does not support printing from a Macintosh envi-
ronment.
*4: Administrator's rights are required to install the software using
the installer.
Installation environment and usable software
The following table shows the drivers and software that can be
installed for each version of Windows and interface connection
method.
*1: The printer driver that is installed will vary depending on the
type of connection between the machine and your computer.
Install the software according to the Operation Manual.
Pressure plate lock
Paper guide (B)
Paper guide (A)
Computer
type
IBM PC/AT or compatible computer equipped
with a USB 2.0/1.1*
1
Operating
system*
2
*
3
Windows 98, Windows Me, Windows 2000
Professional*
4
, Windows XP Professional*
4
,
Windows XP Home Edition*
4
, Windows Vista*
4
Display
1024 x 768 dots (XGA) display with 16bit
Hard disk
free space
150 MB or more
Other
hardware
requirements
An environment on which any of the operating
systems listed above can fully operate
Cable
Operating
system
Printer
driver
Scanner
driver
Button
Manager
Desktop
Document
Manager
USB
Windows 98/
Me/2000/
XP/Vista
Available*
1
Available

