background image

Parts Catalog

7-9

5060-XXX

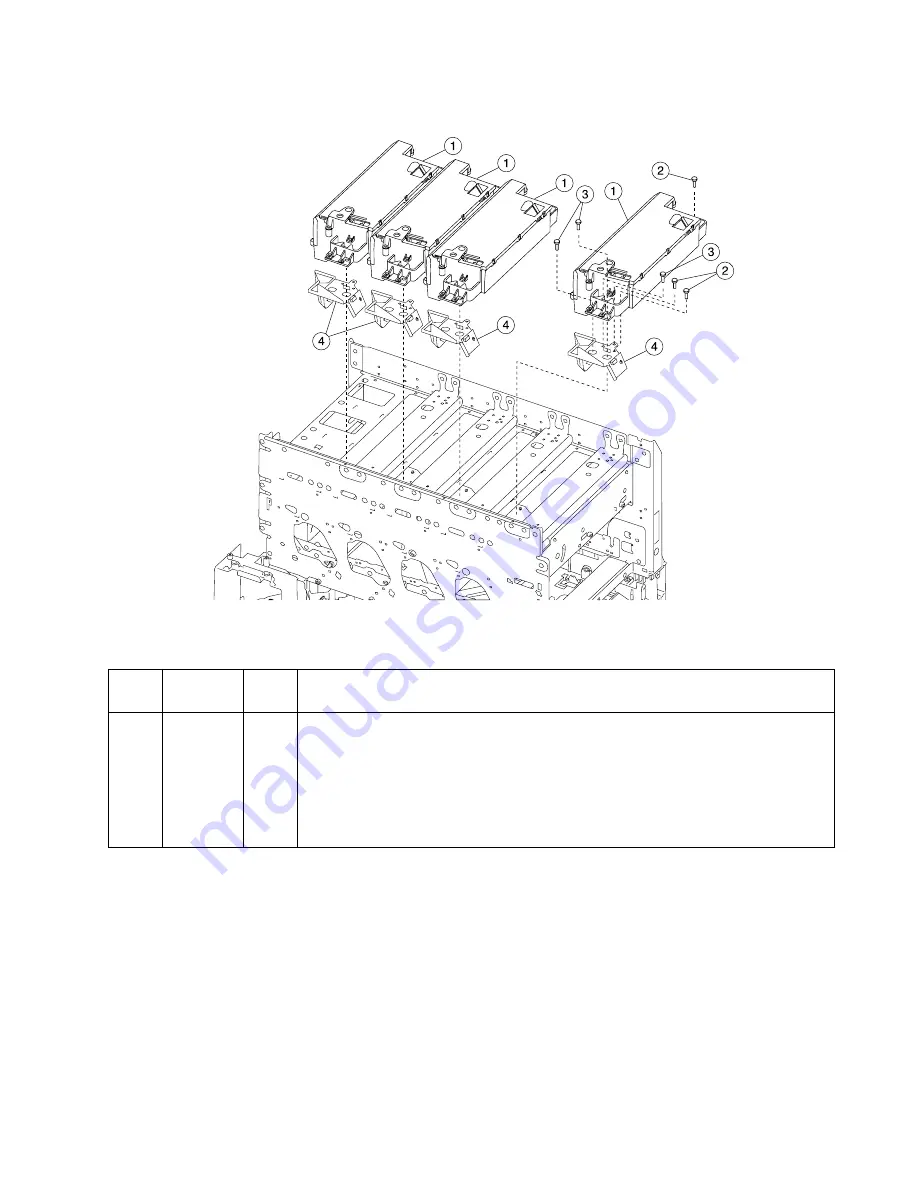
Assembly 4:  Printheads

Asm-
Index

Part 
Number

Units

Description

4-1

 12G6322

4

Printhead Assembly 

2

12

Screw, PP 12G6534

3

12

Screw, PP 12G6539

4

12G6523

4

PSD Assembly

NS

12G6535

4

Guide Assembly, Cartridge Left Side

NS

12G6536

4

Guide Assembly, Cartridge Right Side

Summary of Contents for e-STUDIO 20CP

Page 1: ...as been compressed to make the download a reasonable size All the pages are present but there are no bookmarks and the pictures have been downsampled to screen resolution The full resolution manual with bookmarks is available on the e STUDIO20CP CBT ...

Page 2: ...COLORPRINTER e STUDIO20CP ...

Page 3: ... ii ...

Page 4: ...ation herein these changes will be incorporated in later editions Improvements or changes in the products or the programs described may be made at any time Comments may be addressed toToshiba America Business Solutions Inc Attention Color Support Irvine CA 92618 USA or Toshiba America Business Solutions may use or distribute any of the information you e mail color support tabs toshiba com supply i...

Page 5: ......

Page 6: ...2 Symptom Table 500 Sheet Drawer Option 2 4 Symptom Table HCIT 2000 Sheet Option 2 4 Symptom Table Output Expander Option 2 5 Symptom Table 5 Bin Mailbox Option 2 5 Error Code Table 2 6 Sub Error Code Table 2 18 HCIT System Board LED Error Code Table 2 21 2XX Paper Jam Message Table 2 22 User Attendance Message Table 2 26 Service Checks 2 46 Cartridge Drive Assembly Service Checks 2 46 Black Cartr...

Page 7: ...nsing Service Check 2 97 Tray 1 Service Check 2 98 Autocompensator Service Check 2 99 Multipurpose Feeder MPF Service Check 2 102 Paper Path Service Check 2 105 Close Door HVPS Printhead Interlock Switch Service Check 2 107 500 Sheet Drawer Option Service Check 2 109 Duplex Option Service Check 2 116 HCIT 2000 Sheet Option Service Check 2 119 Diagnostic Aids 3 1 Configuration Menu 3 1 Black and Wh...

Page 8: ... 10 ROM Memory Test 3 11 Parallel Wrap Test 3 11 Serial Wrap Test 3 12 Input Tray Tests 3 13 Input Tray Feed Test 3 13 Input Tray Sensor Test 500 Sheet Trays 3 13 Input Tray Tests 2000 Sheet Tray 3 14 Output Bin Test Standard Bin 3 15 Output Bin Feed Test 3 15 Output Bin Sensor Test 3 15 Output Bin X Sensor Test 3 16 Base Sensor Test 3 17 5 Bin Mailbox Diverter Test 3 17 Finisher Tests 3 18 Staple...

Page 9: ... 4 10 Rear Cover 4 11 HVPS Transfer Board 4 12 Rear Fan Cover 4 12 Fuser Fan 4 13 Engine Board 4 14 LVPS 4 14 Fuser Assembly 4 16 Fuser Drive Assembly 4 17 Lower Right Door Assembly 4 17 Fuser Top Duct 4 18 Fuser Bottom Duct 4 18 Fuser Web Oiler Motor Assembly 4 19 Redrive Door 4 20 Front Cover Assembly 4 21 Top Cover Assembly 4 22 Operator Panel 4 25 Cartridge Drive Assembly Yellow 4 27 Cartridge...

Page 10: ...0 Waste Container Latch 4 41 Paper Size Sensing Assembly 4 42 Second Transfer Roll 4 42 BOR Drive Assembly 4 43 Cartridge Contact Assembly 4 44 Connector Locations 5 1 Engine Board 5 1 RIP Board 5 11 LVPS Cable Connectors to Engine Board RIP Board 5 18 LVPS Fuser Connectors 5 20 HCIT 2000 Sheet Board 5 21 HVPS 5 24 HVPS Developer Board 5 26 Preventive Maintenance 6 1 Safety Inspection Guide 6 1 Lu...

Page 11: ... Feeder MPF 7 12 Assembly 7 500 Sheet Integrated Tray 7 14 Assembly 8 Autocompensator Assembly 7 16 Assembly 9 ITU Assembly 7 17 Assembly 10 Cartridge Contact Assembly 7 20 Assembly 11 Electronics 7 22 Assembly 12 Output Expander 7 32 Assembly 13 5 Bin Mailbox 7 36 Assembly 14 500 Sheet Tray Option 7 40 Assembly 15 Duplex Unit 7 44 Assembly 16 HCIT 7 48 Assembly 17 Finisher 7 52 Assembly 18 Option...

Page 12: ...ch um einen Galliumarsenlaser mit 5 Milliwatt handelt der Wellen der Länge 770 795 Nanometer ausstrahlt Das Lasersystem und der Drucker sind so konzipiert daß im Normalbetrieb bei der Wartung durch den Benutzer oder bei ordnungsgemäßer Wartung durch den Kundendienst Laserbestrahlung die die Klasse I übersteigen würde Menschen keinesfalls erreicht Avis relatif à l utilisation de laser Pour les Etat...

Page 13: ... o cualquier otra situación de servicio técnico Declaração sobre Laser A impressora está certificada nos E U A em conformidade com os requisitos da regulamentação DHHS 21 CFR Subcapítulo J para a Classe I 1 de produtos laser Em outros locais está certificada como um produto laser da Classe I em conformidade com os requisitos da norma IEC 60825 Os produtos laser da Classe I não são considerados per...

Page 14: ...n I määrityksiä voimakkaammalle säteilylle kirjoittimen normaalin toiminnan käyttäjän tekemien huoltotoimien tai muiden huoltotoimien yhteydessä VARO Avattaessa ja suojalukitus ohitettaessa olet alttiina näkymättömälle lasersäteilylle Älä katso säteeseen VARNING Osynlig laserstrålning när denna del är öppnad och spärren är urkopplad Betrakta ej strålen Laser notis Denna skrivare är i USA certifier...

Page 15: ...ormation This product is designed tested and approved to meet strict global safety standards with the use of specific Toshiba components The safety features of some parts may not always be obvious Toshiba is not responsible for the use of other replacement parts The maintenance information for this product has been prepared for use by a professional service person and is not intended to be used by...

Page 16: ...ng Das zuständige Fachpersonal sollte entsprechende Vorsichtsmaßnahmen treffen Pautas de Seguridad Este producto se ha diseñado verificado y aprobado para cumplir los más estrictos estándares de seguridad global usando los componentes específicos de Toshiba Puede que las características de seguridad de algunas piezas no sean siempre evidentes Toshiba no se hace responsable del uso de otras piezas ...

Page 17: ...d algunes peces pot ser que no sempre siguin òbvies Toshiba no es responsabilitza de l us d altres peces de recanvi La informació pel manteniment d aquest producte està orientada exclusivament a professionals i no està destinada a ningú que no ho sigui El risc de xoc elèctric i de danys personals pot augmentar durant el procés de desmuntatge i de servei d aquest producte El personal professional h...

Page 18: ...gnostic Information contains an error indicator table symptom tables and service checks used to isolate failing field replaceable units FRUs 3 Diagnostic Aids contains tests and checks used to locate or repeat symptoms of printer problems 4 Repair Information provides instructions for making printer adjustments and removing and installing FRUs 5 Connector Locations uses illustrations to identify t...

Page 19: ...xvi Service Manual 5060 XXX ...

Page 20: ...he printer to be used in all types of system environments You can attach one internal adapter to support network configurations requiring Ethernet Token Ring or parallel ports The printer has flexible paper handling It supports a wide variety of paper sizes and has a standard multipurpose feeder that makes it easy to print on envelopes transparencies labels card stock and non standard size paper Y...

Page 21: ...ter s primary output bin to offer 5 output destinations in one part Each of the five bins supports approximately 100 pages of 20 lb paper The 20CP supports only one output option above the printer Finisher offers stapling hole punching offset stacking and an additional output bin Two models will be available 2 3 or 4 hole left edge hole punching will be available The single staple position is the ...

Page 22: ...hanging a print cartridge After changing an intermediate transfer unit A manual calibration can be initiated by selecting Color Adjustment from the Utilities Menu Resolution 1200 x 1200 dpi 2400 image quality Toner Darkness Toner darkness settings offer five 5 user selectable settings to balance print darkness and toner savings The higher the setting the darker the print The toner darkness default...

Page 23: ...00 Sheet Tray 24 in 600 mm 31 in 800 mm 21 in 521 mm 55 lb 25 kg Output Expander 20 7 in 525 mm 16 1 in 410 mm 20 3 in 515 mm 10 5 lb 4 7 kg 500 Sheet Drawer 28 2 in 715 mm 21 3 in 540 mm 9 1 in 230 mm 15 6 lb 7 1 kg 500 Sheet Tray 17 3 in 440 mm 16 1 in 410 mm 4 3 in 110 mm 4 5 lb 2 0 kg 5 Bin Mailbox 20 2 in 513 mm 13 1 in 333 mm 10 7 in 272 mm 6 2 lb 2 8 kg Finisher 47 7 in 1 213 mm 25 7 in 653...

Page 24: ...ront 20 in 508 mm Rear 12 in 304 8 mm Top 20CP 42 in 1 066 8 mm Note Allow 1 219 2 mm 48 in clearance to the right if you will be adding a 20CP finisher Note Allow clearance above the printer front door clearance and for adding options such as additional input drawers output expander or 5 bin mailbox Acoustics All measurements were made in accordance with ISO 7779 and reported in conformance with ...

Page 25: ...Humidity 8 to 80 Maximum Wet Bulb Temperature 80 1o F 26 7o C Altitude 10 000 ft 0 to 3 048 meters Atmospheric Pressure 74 6 kPa Ambient Operating Environment Temperature 60 to 90o F 15 6 to 32 2o C Relative Humidity 8 to 80 Storage and Shipping packaged printer with or without print cartridge Temperature 40 to 110o F 40 to 43 3o C Print Cartridge Temperature 40 to 110o F 40 to 43 3o C In some cas...

Page 26: ...or selected Available printer memory Media size and type Resolution Printer usage setting Time to First Print Time to first print from standby mode Black 17 5 seconds Color 20 seconds 2400 Image Quality 1200 x 1200 dpi Simplex printing on letter size media pages per minute Letter 8 5 in x 11 in 20 10 A4 3 4 in x 11 7 in 19 9 5 Legal 8 5 in x 14 in 16 2 8 1 Transparencies 10 10 Envelopes 10 10 Dupl...

Page 27: ...sor 350 MHz Duty Cycle Up to 60K page maximum one time usage Up to 4K pages per month average usage Memory Configuration Available Memory Options Optional 64MB 128MB and 256MB SDRAM DIMMs are available from Toshiba The memory options for the 20CP printers are 168 pin synchronous DRAM DIMMs dual in line memory modules Flash Memory Options Memory slots for extra flash or DRAM 2 Expansion slots for o...

Page 28: ... 7 in 210 mm x 297 mm x x x x x x x x 5 6 7 A5 5 83 in x 8 27in 148 mm x 210 mm x x x x x x x 5 JIS B5 7 17 in x 10 23 in 182 mm x 257 mm x x x x x x x x 5 Statement 5 5 in x 8 5 in 140 mm x 216 mm x x x x x x 5 Letter 8 5 in x 11 in 216 mm x 279 mm x x x x x x x x 5 6 7 Folio 8 5 in x 13 in 216 mm x 330 mm x x x x x x x 5 6 7 Legal 8 5 in x 14 in 216 mm x 256 mm x x x x x x x x 5 6 7 Executive 7 ...

Page 29: ... 9 x 355 6 mm x x x x 7 Envelope 3 875 in x 7 5 in 98 mm x 191 mm x x x 9 Envelope 3 875 in x 8 9 in 98 mm x 225 4 mm x x x 10 Envelope 4 125 in x 9 5 in 105 mm x 241 mm x x x DL Envelope 4 33 in x 8 66 in 110 mm x 220 mm x x x Media Size Supported 500 Sheet Input Multi purpose Tray 2 000 Sheet Drawer Duplex Standard Output 5 Bin Mailbox Output Expander Finisher to Staple Hole Punch Offset Stack O...

Page 30: ...tock x x x x x Transparen cies x x x x Envelopes x Labels Vinyl x x x x Paper x x x x x Polyester x x x x Dual Web x x x x x Integrated Labels x x x x x Media Size Supported 500 Sheet Input Multi purpose Tray 2 000 Sheet Drawer Duplex Standard Output 5 Bin Mailbox Output Expander Finisher to Staple Hole Punch Offset Stack Or with Output Bin ...

Page 31: ...tion portrait 3 When Other Envelope is selected the page is formatted for 8 5 x 14 in 215 9 x 355 6 mm unless the size is specified in the software application 4 Statement and Folio are supported as standard size through software only Tray size sensing must be turned off before this standard size is visible in the paper size menu on the operator panel 5 2 hole punch is supported 6 3 hole punch is ...

Page 32: ...ver 65 lb 176 g m2 Card stock upper limit grain short a f Index Bristol 110 lb 199 g m2 Tag 125 lb 203 g m2 Cover 80 lb 216 g m2 Transparencies i j Laser printer type 43 to 45 lb bond 161 to 169 g m2 Labels upper limit Paper 48 lb bond 180 g m2 Dual web paper 48 lb bond 180 g m2 Polyester 59 lb bond 220 g m2 Vinyl g h 92 lb liner 300 g m2 Integrated forms Pressure sensitive area c 140 to 175 g m2 ...

Page 33: ...199 g m2 Dual web paper 53 lb bond 199 g m2 Polyester 59 lb bond 220 g m2 Vinyl g h 78 lb liner 260 g m2 Integrated forms Pressure sensitive area c Up to 47 lb bond 140 to 175 g m2 Paper base grain long 20 to 36 lb bond 75 to 135 g m2 Envelopes d e Sulfite wood free or up to 100 cotton bond 16 to 28 lb bond 60 to 105 g m2 2 000 Sheet Drawer Paper b f Xerographic or business paper 16 to 19 9 lb bon...

Page 34: ...rd stock upper limit grain short a Index Bristol 110 lb 199 g m2 Tag 125 lb 203 g m2 Cover 80 lb 216 g m2 Transparencies Laser printer type 43 to 45 lb bond 161 to 169 g m2 Labels upper limit Paper 48 lb bond 180 g m2 Dual web paper 48 lb bond 180 g m2 Polyester 59 lb bond 220 g m2 Vinyl G H 92 lb liner 300 g m2 Integrated forms Pressure sensitive area c Up to 47 lb bond 140 to 175 g m2 Paper base...

Page 35: ...ion does not support 16 to 19 9 lb 60 to 74 9 g m2 grain long paper transparencies labels envelopes or A5 card stock g Vinyl labels are supported only when printing environment and media are 20 to 23 deg C 68 to 90 deg F Specialty papers Gloss book 60 to 120 lb book 88 to 176 g m2 grain long Finisher Staple and Hole Punch Paper Xerographic or business paper 16 to 19 9 lb bond 60 to 74 9 g m2 grain...

Page 36: ...mulated Emission of Radiation LCD Liquid Crystal Display LED Light Emitting Diode LVPS Low Voltage Power Supply M Magenta MROM Masked Read Only Memory MS Microswitch NVRAM Nonvolatile Random Access Memory OEM Original Equipment Manufacturer OPT Optical Sensor PC Photoconductor POR Power On Reset POST Power On Self Test PSD Position Sensing Device PWM Pulse Width Modulation RIP Raster Imaging Proce...

Page 37: ...1 18 Service Manual 5060 XXX ...

Page 38: ...l support for assistance POR Power On Reset Sequence on page 2 1 Symptom Table Base Printer on page 2 2 Symptom Table 500 Sheet Drawer Option on page 2 4 Symptom Table HCIT 2000 Sheet Option on page 2 4 Symptom Table Output Expander Option on page 2 5 Symptom Table 5 Bin Mailbox Option on page 2 5 Error Code Table on page 2 6 Sub Error Code Table on page 2 18 HCIT System Board LED Error Code Table...

Page 39: ...er On or the front cover is closed that a new or different toner cartridge has been installed The printer detects at power On when the cover is closed that a new or different ITU has been installed The printer detects at power On that the fuser temperature is below 60 degrees C When coming out of power saver if power saver has been active or 8 hours or longer If the printer is turned On when a cal...

Page 40: ...on page 4 14 Print Quality 100 Single color printed All Black Print All Cyan Print All Magenta Print All Yellow Print Go to Print Quality Service Checks on page 2 69 Print Quality Blank Page No Image Go to Blank Page No Image on page 2 70 Print Quality Evenly spaced horizontal marks or lines on the printed page Go to Evenly spaced horizontal marks or lines on the page on page 2 74 Print Quality Bl...

Page 41: ...ice Check on page 2 109 Paper jams in the option tray Go to the 500 Sheet Drawer Option Service Check on page 2 109 Paper fails to pick from the 500 sheet option tray Go to the 500 Sheet Drawer Option Service Check on page 2 109 Paper does not feed from the option to the next option above Go to the 500 Sheet Drawer Option Service Check on page 2 109 Media fails to pass thru from the lower attached...

Page 42: ...ption Service Check on page 2 56 Excessive Static electricity buildup Go to Output Expander Option Service Check on page 2 56 Symptom Action Printer fails to recognize the option is installed The paper feeds into the standard bin Go to 5 Bin Mailbox Option Service Check on page 2 63 The printer does not display Output Bin s Full Go to 5 Bin Mailbox Option Service Check on page 2 63 The media does ...

Page 43: ...ng Reflash the Engine Board with the correct level code If this does not fix the problem replace the Engine Board on page 4 14 908 Engine Software Engine ASIC Error Replace the Engine Board on page 4 14 910 Trans Sensor Tray 1 Transparency Sensor Error Replace Tray 1 Transparency Sensor Assembly If this does not fix the problem replace the Engine Board on page 4 14 911 Trans Sensor Tray 2 Transpar...

Page 44: ...talled correctly replace the following FRU s RIP Board on page 4 10 If this does not fix the problem replace Engine Board on page 4 14 940 TMC Error Cyan TMC switch failure Go to the Cyan Cartridge Drive Assembly Service Check on page 2 49 941 TMC Error Magenta TMC switch failure Go to the Magenta Cartridge Drive Assembly on page 2 48 942 TMC Error Yellow TMC switch failure Go to the Yellow Cartri...

Page 45: ...lure RIP Board Replace the RIP Board on page 4 10 954 NVRAM Failure NVRAM CRC failure Replace the RIP Board on page 4 10 955 Code CRC loc RIP Board This error indicates that the Code ROM or NAND failed the CRC check The location of the failure is indicated by loc 956 System Board Processor Failure Errors 956 and 957 indicate which area of the controller RIP card failed Replace the RIP Board on pag...

Page 46: ... make sure they are seated and connected correctly Go to the service check for the device indicated 984 device comm Invalid command parameter received by the specified device 990 device This error message indicates that an equipment check condition has occurred in the specified device but the device is unable to identify the exact component failure Go to 990 Error Code displayed for Tray x on page...

Page 47: ...ync Check for the correct installation of the all the cables to the RIP Board assembly and to the Printhead assembly J7 and J8 on the RIP Board Go to RIP Board on page 5 11 If the cables are connected correctly to the RIP Board and to the Printhead assembly replace the following FRU RIP Board on page 4 10 If this does not fix the problem replace Magenta Printhead Assembly Go to Printheads on page ...

Page 48: ...FRU Magenta Printhead Assembly Go to Printheads on page 4 33 Note Whenever a printhead assembly is replaced it is necessary to perform the Printhead Adjustments on page 4 1 If this does not fix the problem replace RIP Board on page 4 10 112 Printhead Error No first Hysnc Yellow Replace the following FRU RIP Board on page 4 10 If this does not fix the problem replace Yellow Printhead Assembly Go to...

Page 49: ...127 on page 2 90 128 Fuser Error Fuser Under Temperature in Standby Hot Roll Go to Error Code 128 on page 2 88 129 Fuser Error Fuser Under Temperature in Standby BUR Go to Error Code 129 on page 2 88 130 Fuser Error Fuser failed to reach standby temperature Hot Roll Go to Error Code 130 on page 2 88 131 Fuser Error Fuser failed to reach standby temperature BUR Go to Error Code 131 on page 2 89 132...

Page 50: ...ck Motor No encoder Feedback Autocompensator Motor Replace the Autocompensator Assembly 148 Motor ITU Belt Motor Unable to lock Replace the following FRU ITU Drive Motor Assembly on page 4 39 If this does not fix the problem replace Engine Board on page 4 14 149 Motor Fuser Drive Motor unable to lock Go to Error Code 149 Error Code 155 on page 2 92 150 Motor Black Cartridge Motor unable to lock Go...

Page 51: ...artridge Drive Assembly on page 2 48 164 Motor Cyan Cartridge BLDC motor mfg unknown Go to Cyan Cartridge Drive Assembly Service Check on page 2 49 165 Motor Yellow Cartridge BLDC motor Mfg Unknown Go to Yellow Cartridge Drive Assembly Service Check on page 2 50 167 Motor Web Oiler encoder error unexpected encoders Replace the Fuser Assembly on page 4 16 168 Motor Unknown manufacture type Perform ...

Page 52: ...page 4 33 Note Whenever the printhead assembly is replaced it is necessary to perform the Printhead Adjustments on page 4 1 175 Motor Mirror Motor lock not achieved Yellow Replace the following FRU RIP Board on page 4 10 If this does not fix the problem replace Yellow Printhead Assembly Go to Printheads on page 4 33 Note Whenever the printhead assembly is replaced it is necessary to perform the Pr...

Page 53: ... Replace the Magenta PSD Sensor Assembly on page 4 35 Note It is necessary to remove the Magenta Printhead Assembly to access the PSD Sensor Assembly therefore it is necessary to perform the Printhead Adjustments on page 4 1 187 PSD Error EOS sensor out of range scan direction Yellow Replace the Yellow PSD Sensor Assembly on page 4 35 Note It is necessary to remove the Yellow Printhead Assembly to...

Page 54: ...ry to remove the Printhead Assembly to access the PSD Sensor Assembly therefore it is necessary to perform the Printhead Adjustments on page 4 1 194 PSD Error No EOS reading Magenta Go to PSD Service Check on page 2 96 Note It is necessary to remove the Printhead Assembly to access the PSD Sensor Assembly therefore it is necessary to perform the Printhead Adjustments on page 4 1 195 PSD Error No E...

Page 55: ... not deactivate by the previous page or the current page did not activate the fuser exit sensor within the time out period 2D 09 Paper jam detected The fuser exit sensor did not deactivate during the time out period 2D 0A Paper jam detected A paper jam detected in the Duplex unit 2D 0B Paper jam detected A paper jam detected in Tray 2 2D 0C Paper jam detected A paper jam detected in Tray 3 2D 0D P...

Page 56: ...PWM error 2D 2E Duplex input motor error detected the engine detected a motor encoder error 2D 2F Duplex reversing motor error detected the engine detected a stall condition 2D 30 Duplex reversing motor error detected the engine has detected a PWM error condition 2D 31 Duplex reversing motor error has been detected the engine detected a motor encoder error 2D 32 A Tray 2 pick motor stall error det...

Page 57: ...tected when picking media from the MPF 2D 49 An autocompensator motor PWM error detected when picking media form Tray 1 2D 4A A staging motor Encoder error detected 2D 4B An autocompensator motor Encoder error detected when picking media from the MPF 2D 4C An autocompensator motor Encoder error detected when picking media from Tray 1 2D 4E The output expander sensor was not activated by the media ...

Page 58: ...on sensor S2 2 Jam before the leading edge of the paper reaches the registration sensor S2 3 Paper jam is still detected in the HCIT after removing the jam 4 Paper jam is still detected even with front of jam door closed 5 Paper jam detected at pick sensor 6 Error detected with the tray 7 Error detected at the registration roller home position 8 Error detected at the pick roller home position sens...

Page 59: ... 5 Primary Paper is jammed at the fuser open the right door to access the jam area If sheets have been accumulated to be stapled or offset when the jam occurred the printer alternately flashes the primary and secondary messages to indicate that all accumulated sheets not be removed during the jam clearing procedure Secondary When this message is displayed do not remove accumulated sheets during th...

Page 60: ...ary messages to indicate that all accumulated sheets not be removed during the jam clearing procedure Secondary When this message is displayed do not remove accumulated sheets during the jam clearance procedure as the printer will not reprint the removed sheets Also if the accumulated sheets are removed the portion of the job printed after the jam will not be stapled 24x Paper Jam Clear Paper Path...

Page 61: ...e stapled or offset when the jam is detected the printer alternately flashes the primary and secondary messages to indicate that all accumulated sheets should not be removed during the jam clearance procedure Secondary Do not remove accumulated sheets during the jam clearance procedure The printer will not reprint the removed sheets Also if the accumulated sheets are removed the portion of the job...

Page 62: ...ted sheets are removed the portion of the job printed after the jam will not be stapled 280 Paper Jam Clear Paper Path Leave Job in Finisher Primary Paper is jammed in the Finisher option open the side door or top cover to access the jam If sheets have been accumulated to be stapled or offset when the jam occurred the printer alternately flashes the primary and secondary messages to indicate that ...

Page 63: ...r open the printer left door to access the jammed media Secondary If sheets have been accumulated to be stapled when the jam is detected the printer alternately flashes the primary and secondary messages indicating the accumulated sheets should not be removed during jam clearance Note When the secondary message is displayed if the accumulated sheets are removed the printer will not reprint these s...

Page 64: ...ary and secondary messages indicating the accumulated sheets should not be removed during jam clearance Note When the secondary message is displayed if the accumulated sheets are removed the printer will not reprint these sheets Also if the print job is completed the portion of the job printed after the jam will not be stapled 24x Paper Jam Clear Paper Path Leave Job in Finisher area 5 Primary Thi...

Page 65: ...rtion of the job printed after the jam will not be stapled 271 Paper Jam Clear Paper Path Leave Job in Finisher area 5 Primary Paper has jammed at Output Bin 1 open the door of Bin 1 to access the jammed media Secondary If sheets have been accumulated to be stapled when the jam is detected the printer alternately flashes the primary and secondary messages indicating the accumulated sheets should n...

Page 66: ...nting and stapling jobs 283 Staple Jam message indicates that a staple jam has been detected during a priming operation No secondary message will be displayed Note After the error has been cleared the printer does not reprint any pages which existed in the accumulator for stapling The following actions can be taken while either the primary or secondary messages are displayed Press Go to initiate p...

Page 67: ...SELECT and RETURN buttons while powering on the machine 3 Release the buttons when Performing Self Test is displayed 4 Select Calibrate Trays from the menu 5 Select Tray X from the menu 6 The display will prompt load paper if necessary 7 Load paper 8 Press Go 9 Calibrating Tray X will be displayed 10 Repeat for any other Trays that might need to be calibrated 11 Exit Configuration Menu Change Cart...

Page 68: ... likely cause of this message is a failure to reattach the option when removed to service a printer intervention The following actions can be taken while this message is displayed If the option was temporarily removed or not connected properly then reattach or reconnect it When the option is recognized the printer will automatically clear the attendance message and continue Press GO to execute a c...

Page 69: ...ay be taken while this message is displayed The user may empty the Hole Punch Box and put it back to clear the message Press Go to ignore the message the job will be printed without hole punching Each time a new job that requests Hole Punch will cause this message to be displayed again if the box has not been emptied Priming Failed Retry GO Stop This message will be displayed when an error has occ...

Page 70: ... staple unit is not installed This message may be displayed at any of the following times Prior to printing the first page of a batch of pages that are to be stapled or during the printing of a batch of pages that are to be stapled if the condition cannot be detected prior to printing the first page of the batch The following actions can be taken while this message is displayed A new staple cartri...

Page 71: ...tions will be available via the Busy Waiting Menu Cancel Job Reset Printer Reset Active Bin Check Supply Levels This message will be displayed when the user has Hot Unplugged a paper handling option and the printer requires the reinstallation of the option to print a page which has been formatted by an install Tray x interpreter prior to removal of the option or Cancel Job Bin x x 1 2 or 3 Tray x ...

Page 72: ...efective Cyan Cartridge This message will be displayed when the top cover is closed and a defective print cartridge is detected It may take the printer 10 to 20 seconds to determine whether or not the print cartridge The printer may be allowed to print pages during this 10 to 20 second interval If pages are allowed to print then they will not be reprinted once a valid print cartridge is inserted R...

Page 73: ... Menu Group The following functions will be available via the Busy Waiting Menu Cancel Job Reset Printer Reset Active Bin Check Supply Levels Note Menu Lockout does NOT prevent access to the Busy Waiting Menu Group 34 Short Paper This message will be displayed when the printer has determined that the paper length is too short to print the data as formatted The following actions can be taken while ...

Page 74: ...y be degraded The most probable cause for this error message is a defective print cartridge or ITU 37 Insufficient Collation Area This message will be displayed when the printer memory and disk used to store pages is too full to collate the print job The following actions can be taken while this message is displayed Press Go to clear the message and continue collating the remaining pages of the jo...

Page 75: ...bs May Not be Restored These messages may be displayed when the printer has attempted to Print and Hold jobs from the disk and found that some or all of the jobs could not be restored Each of the three messages 57 Configuration Held Jobs May describe different conditions under which the restore failed Primary Message 37 Insufficient Memory The printer firmware ran out of memory while attempting to...

Page 76: ...o the Busy Waiting Menu Group 39 Complex Page This message will be displayed when a page is too complex to print The following actions can be taken while this message is displayed Press Go to clear the message and continue processing the job some data loss may occur Try to simply the print job Press Menu or Menu to access the Busy Waiting Menu Group The following functions may be available Cancel ...

Page 77: ...normal operation will continue Flash operations will not be allowed until the flash is formatted 54 Std Par ENA Connection Lost This message will be displayed when the printer detects during POST that the connection to an ENA has been lost Once a connection is initially established a printer setting is modified to 54 Par x ENA to note a connection exists Each time the power is cycled on the connec...

Page 78: ...eck 56 Standard Serial Disabled 56 Serial Port x Disabled These messages may be displayed when data is sent to the printer across a serial port but the port has been disabled Note Once the error has been displayed for the first time reporting of further errors will be suppressed until the printer is reset or menus are entered The following actions can be taken while this message is displayed Press...

Page 79: ...ata is sent to the printer across the USB port but the port has been disabled Note Once the error has been displayed for the first time reporting of further errors will be suppressed until the printer is reset or menus are entered The following actions can be taken while this message is displayed Press Go to clear the message Any data received on the USB port will be discarded Press Menu or Menu t...

Page 80: ...odels Output Bix x x 1 2 or 3 Tray x x 2 3 4 or 5 Duplex The following actions can be taken while this message is being displayed The user is required to remove the incompatible option and press Go to clear the message Note If the user has installed the incompatible option to satisfy a Check Option Connections Reattach Option attendance condition the user must reinstall an associated compatible op...

Page 81: ...rmatted disk at POST The following actions can be taken while this message is displayed Press Go to clear the message The disk will be marked as bad and normal operation will continue however disk operation will not be allowed until the disk is formatted 64 Unsupported Disk Format This message will be displayed when the printer detects an unsupported disk format at POST This message may appear if ...

Page 82: ...ions can be taken while this message is displayed Insert the waste container and press Go 82 Waste Bottle Nearly Full This message will be displayed when the waste container is nearly full The following actions can be taken while this message is displayed Press Go Nearly Full will be reflected in the Supplies Menu 84 Replace Oiler This message will displayed when the web oiler is exhausted or miss...

Page 83: ...ormed Error Code 168 will be displayed 88 Yellow Toner Low 88 Magenta Toner Low 88 Cyan Toner Low 88 Black Toner Low These messages will be displayed when either the Yellow Magenta Cyan or Black toner cartridge is low on toner The following actions can be taken while this message is displayed Open the front door remove the old toner cartridge insert a new toner cartridge and close the door or Pres...

Page 84: ...ge Drive Motor has either failed to lock or has lost lock Check the Black Cartridge Drive Motor Cable connection to J64 on the Engine Board Is the cable installed correctly Go to Step 2 Install the cable correctly 2 Check the Black Cartridge Drive Motor Cable connection to the Black Cartridge Drive Motor card Is the Cable installed Correctly Go to Step 3 Install the cable correctly 3 Check continu...

Page 85: ...Yes No 1 Error Codes 151 and 157 These error codes indicate that the Magenta Cartridge Drive Motor has either failed to lock or has lost lock Check the Magenta Cartridge Drive Motor Cable connection to J47 on the Engine Board Is the cable installed correctly Go to step 2 Install the cable correctly 2 Check the Magenta Cartridge Drive Motor Cable connection to the Magenta Cartridge Drive Motor card...

Page 86: ...ions and Questions Yes No 1 Error Codes 152 and 158 These error codes indicate that the Cyan Cartridge Drive Motor has either failed to lock or has lost lock Check the Cyan Cartridge Drive Motor Cable connection to J47 on the Engine Board Is the cable installed correctly Go to step 2 Install the cable correctly 2 Check the Cyan Cartridge Drive Motor Cable connection to the Cyan Cartridge Drive Mot...

Page 87: ... Questions Yes No 1 Error Codes 153 and 159 These error codes indicate that the Yellow Cartridge Drive Motor has either failed to lock or has lost lock Check the Yellow Cartridge Drive Motor Cable connection to J47 on the Engine Board Is the cable installed correctly Go to step 2 Install the cable correctly 2 Check the Yellow Cartridge Drive Motor Cable connection to the Yellow Cartridge Drive Mot...

Page 88: ...he Engine Board and check the voltages on J2 refer to Table 1 Are the voltages correct Replace the Fuser Fan on page 4 13 Replace the Engine Board on page 4 14 Connector Pin No Fan On Fan Off Fan Disconnected Fan Switch On Fan Disconnected Fan Switch Off J2 1 1 6 V dc 3 3 V dc 3 3 V dc 3 3 V dc J2 2 0 V 0 V 0 V 0 V J2 3 1 9 V dc 0 V dc 0 V 2 V dc J2 4 24 V dc 24 V dc 24 V dc 24 V dc Step Actions a...

Page 89: ...off and manually spin the fan and check that it rotates freely Does the fan rotate freely Go to Step 2 Replace the RIP Fan on page 4 36 2 Check the RIP Fan Cable connection to the Engine Board J2 for correct installation Is the cable installed correctly Go to Step 3 Install the cable correctly 3 Disconnect the RIP fan from J53 on the Engine Board and check the voltages on J53 refer to Table 3 Are ...

Page 90: ... Power Check to make sure the printer is receiving main AC power Is the printer receiving AC power Go to Step 2 Inform the customer that AC power to the printer is incorrect 2 AC Power Check Wall Outlet Check the AC line voltage at the AC outlet Is the AC line voltage correct Go to Step 3 Inform the customer that the AC line voltage is incorrect 3 AC Power Cord Is the power cord in good condition ...

Page 91: ...2 5 V dc J9 3 5 V dc J9 4 24 V dc J9 5 24 V dc J9 6 Ground J9 7 Ground J9 8 Ground J9 9 Ground J9 10 Ground Note All voltages are approximate values Are the voltages correct Go to Step 3 Replace the LVPS on page 4 14 3 DC Voltages at RIP Board Turn the power off and disconnect the LVPS cable to J23 on the RIP Board Turn the Power Supply Assembly power on and check the following voltages on the LVP...

Page 92: ...er buildup surface damage to the roll oil or other contaminants on the surface of the roll Do you see any problems with the second transfer roll Replace the Second Transfer Roll on page 4 42 Go to Step 2 2 Transfer Arms Springs and associated hardware Call your next level of support None of these parts are service related parts Is there any problem see with the associated hardware Call your next l...

Page 93: ...oken Are there any problems with the Transfer terminal contact transfer cable connection or ITU Transfer Bellcrank assemblies Repair or replace as necessary If this does not correct the problem contact your next level support Replace the FRU s in order 1 HVPS Transfer Board on page 4 12 2 Engine Board on page 4 14 3 ITU Assembly on page 4 40 Step Symptoms Yes No 1 The printer does not recognize on...

Page 94: ...complete on page 2 60 Go to Step 5 5 271 Paper Jam Check Bin X Post Complete first sheet of paper feeds into Output Bin X Go to 271 Paper Jam Check Bin X Post Complete first sheet of paper feeds into Output Bin X on page 2 61 Go to Step 6 6 No indication that Bin X is full OR No indication that Bin X is near full Go to No indication that Bin X is full OR No indication that Bin X is near full on pa...

Page 95: ...ecognized by the base printer Go to Step 3 Go the Autoconnect system on the Output Expander Option base printer and check cables and connectionsto the Engine Board 3 Output Expander Assembly Mechanical Linkage Cables Check the output expander autoconnect cable and connector for any signs of damage especially the connector pins Is there any signs of damage to the cable connector or connector pins R...

Page 96: ...cal Drive Components Check the following parts 1 Check the output expander Drive Belt to make sure it is installed on the drive pulley and belt idler pulley 2 Check the belt tension spring to make sure it is not loose or broken Are there any problems with these parts Repair or replace as necessary Go to Step 2 2 Check of Mechanical Linkage DC Motor Drive Assembly Make the following Checks 1 Check ...

Page 97: ...does not fix the problem replace the Engine Board on page 4 14 Step Actions and Questions Yes No 1 Pass Thru Sensor Flag Check the sensor flag for correct operation Is the flag operating correctly Go to Step 2 Repair or replace as necessary 2 Pass Thru Sensor Cable Check to make sure the pass thru sensor cable is correctly connected to Jx on the Control Board Is the cable connected correctly Go to...

Page 98: ...e measures between 115 ohms and 135 ohms Is the resistance correct Go to step 3 Replace the DC Motor Mechanical Linkage Assembly 3 D C Motor Mechanical Linkage Assembly Check for continuity between J4 1 and J4 2 and the case of the motor It measures infinity Is there continuity between J4 1 or J4 2 and the case of the motor Note If the motor is shorted from either J4 1 or J4 2 and the case of the ...

Page 99: ...connected correctly Go to Step 2 Reseat the cable and recheck for correct operation of the option 2 Resistance Check Disconnect J4 from the option board and check the resistance of the motor on the cable connector between J4 1 and J4 2 The resistance should measure between 115 and 135 ohms Is the resistance correct Go to Step 3 Replace the Mechanical Linkage DC Motor Assembly 3 DC Motor Check betw...

Page 100: ...ep 2 2 The printer does not recognize one or more output options as installed Go to The printer does not recognize one or more output options as installed on page 2 64 Go to Step 3 3 271 Paper Jam Check Bin 1 displays Go to 271 Paper Jam Check Bin 1 displays on page 2 66 Go to Step 4 4 274 Paper Jam Check Bin 4 displays Go to 274 Paper Jam Check Bin 4 displays on page 2 66 Go to Step 5 5 Ready Bin...

Page 101: ... 2 68 Go to Step 8 8 Paper does not feed into the bin selected 271 Paper Jam Check Bin 1 displays Go to Paper does not feed into the bin selected 271 Paper Jam Check Bin 1 displays on page 2 68 Go to Step 9 9 990 Service Error Displays Go to 990 Service Error Displays on page 2 68 Call your next level support Step Action and Questions Yes No 1 Excessive static electricity buildup Front Cover Assem...

Page 102: ...Go to Step 3 3 Mechanical Linkage Electrical Check to make sure the autoconnect cables are connected correctly to the Control Board Are the cables attached securely and correctly Go to Step 4 Reseat the cables 4 Voltage check Base printer autoconnect connector Turn the power off and remove the 5 Bin Mailbox option from the printer Check the voltages on the base printer top autoconnect connector Go...

Page 103: ...t Go to Step 4 Replace the Control Board 4 Bottom Pass Thru Sensor voltage check 2 Check the voltage at J5 2 on the board the voltage measures approximately 0 V dc Is the voltage correct Replace the Sensor Assembly Replace the Control Board Step Action and Questions Yes No 1 Top Pass Thru Sensor Flag Check the top sensor flag for correct operation binding broken parts or interference from the sens...

Page 104: ...tion Are there any problems with the sensor flag Repair or replace the sensor flag Go to Step 4 4 Bin X Sensor Cable continuity Check the continuity of the sensor cable Is there continuity Replace the Bin X Sensor Replace the Bin X Cable Step Action and Questions Yes No 1 Bin X Sensor Bin X Sensor 1 thru 5 Check to make sure the sensor is seated correctly in the side of tray X Is the sensor seated...

Page 105: ...ing Replace parts or repairs necessary Go to Step 2 2 Bin X Solenoid Check the solenoid for any binds or sticking problems Is the solenoid binding or sticking Replace the Solenoid Assembly Go to Step 3 3 Bin X Solenoid Check the resistance of the solenoid It measures between approximately 30 ohms and 50 ohms Is the resistance correct Replace the 5 Bin Mailbox Control Board Assembly Replace Bin X S...

Page 106: ...the installed software can cause print quality problems Incorrect characters could print and the copy may not fit the page correctly Note Some 201 Paper Jam errors can be caused by a faulty print cartridge 2 Resistance Check Disconnect J4 from the option board and check the resistance of the motor on the cable connector between J2 1 and J2 2 The resistance measures between 115 and 135 ohms Is the ...

Page 107: ...he problem still exist for the remaining cartridges Go to Step 3 Replace the failing cartridge 3 Magenta Print Cartridge Check Enter the CE Diagnostic Mode Remove the Magenta Print Cartridge and run the print test Does the problem still exist for the remaining cartridges Replace the Yellow Print Cartridge Replace the Magenta Print Cartridge Step Action and Questions Yes No 1 Second Transfer Roll C...

Page 108: ... operate correctly Go to Step 3 Remove and repair the High Voltage Contact Assembly 3 Continuity Check High Voltage Contact Assembly Check continuity from the Developer HVPS contact Spring to the Charge Roll Pin in the contact assembly Is there continuity Go to Step 4 Remove and repair the High Voltage Contact Assembly 4 Cartridge HV contact Assembly Developer Pin Springs Check the developer pin s...

Page 109: ... Check the PC Drum Developer Pin Spring to make sure it is not bent or damaged Is the spring bent or damaged Replace the PC Drum Developer Pin Spring Replace the HVPS Developer Board on page 4 38 Step Action and Questions Yes No 1 Retraction Motor Check Generally this symptom is caused by a retracted ITU assembly Check to see if the ITU retraction motor keeps the ITU in the retracted position Does...

Page 110: ...tuck or does not operate smoothly Repair the HV Contact Block Assembly Go to Step 4 4 High Voltage Contact Block Assembly Check Continuity Check for continuity from the PC Drum Contact Pin to the PC Drum Developer Pin Spring Is there continuity Go to Step 5 Repair the HV contact Block Assembly 5 High Voltage Contact Block Assembly Check PC Drum Developer Pin Spring Check the PC Drum Developer Pin ...

Page 111: ...olor has a problem go to Step A on page 2 75 If all colors have a problem go to Step B on page 2 75 Step Action and Questions Yes No 1 Print Cartridge Check Are lines spaced at 46 mm or 95 mm intervals Replace the print cartridge Go to step 2 2 Cartridge Drive Assembly Check Are the lines spaced at a 4mm interval Replace the Cartridge Drive Assembly No problem found Step Action and Questions Yes N...

Page 112: ...en previously serviced Was Color Calibration disabled Set Color Calibration on Go to step 2 2 Toner Density Calibration Run Toner Density Calibration from the Utility menu Does this fix the problem Problem Solved Replace the HVPS Transfer Board on page 4 12 Step Action and Questions Yes No 1 Print Cartridge Check to make sure that the print cartridges are properly inserted and are seated properly ...

Page 113: ...commended Go to Step 2 Inform the customer 2 Is the quality of the transparency poor or do brown colors appear when projected Go to Step 3 Go to Step 4 3 Fuser Settings From the CE menu select fuser settings and set to High Does this fuser setting fix the problem Problem Solved Replace the Fuser Assembly on page 4 16 4 Does the transparency have a splotchy appearance Go to Step 5 Replace the Secon...

Page 114: ...t cartridge for the faulty color Does this fix the problem Problem Solved Go to Step 2 2 HV Contact Block Assembly Doctor Blade or TAR Contact Check for a stuck TAR contact pin in the HV Contact Block assembly of the color with the problem Check figure 1 for pin location Is the TAR contact pin stuck or operating smoothly Go to Step 3 Repair the HV Block Contact for the faulty color 3 Doctor Blade ...

Page 115: ...Step 3 Repair the HV Block Contact for the faulty color 3 Doctor Blade Contact Check to make sure the Doctor Blade Cable is connected to the Doctor Blade terminal on the Developer HVPS Is the cable connected correctly Go to Step 4 Connect the cable correctly Replace the cable if it is broken or damaged 4 Doctor Blade Contact Pin in HV Contact Block Assembly Check to make sure the Doctor Blade Cont...

Page 116: ...and Questions Yes No 1 Print Cartridge Check to make sure the cartridge is seated properly and that all packing material has been removed from the cartridge Has all packing material been removed and the cartridge is seated correctly Problem Solved Go to Step 2 2 Cartridge Check The cartridge may be out of toner or have another toner problem Try a new toner cartridge Does a new toner cartridge fix ...

Page 117: ...used by a damaged ITU Assembly Replace the ITU Assembly on page 4 40 If only one color streaks in the printed area go to step 1 Step Action and Questions Yes No 1 Media settings Check to see if the printer is set for light paper Is the printer set for light paper Set the printer for current media type and go to Step 2 Go to Step 3 2 Does resetting the media type fix the problem Problem Solved Go t...

Page 118: ...his step Step Action and Questions Yes No 1 Buttons Test Perform the Button Test on page 3 10 Do any or all of the Buttons fail to operate correctly Note If all the buttons fail to operate correctly the LCD display is blank Power On Status LED is on and the Machine beeps 5 Times go Step B Replace the Operator Panel on page 4 25 Test Passes No problem found Step Action and Questions Yes No 1 LCD Te...

Page 119: ...perator Panel board connector can cause this symptom Check for continuity between Pin J1 4 and ground on the board Go to RIP Board on page 5 11 Is there continuity Go to step 11 Replace the RIP Board on page 4 10 11 Operator Panel Cable Continuity Check continuity of the Operator Panel Cable Is there continuity Replace the Operator Panel on page 4 25 Go to the Operator Panel on page 4 25 and repla...

Page 120: ...stic packaging as well as making sure the ITU blanket have been removed Has all the packing material been removed Go to step 2 Remove the packing material from the printer 2 Are the Black Printhead Video and Black Printhead control cables connected correctly to the Black Printhead and to J10 and J11 on the RIP Board Go to step 3 Reseat the cables correctly 3 Check for any signs of damage to the Bl...

Page 121: ... as well as making sure the ITU blanket have been removed Has all the packing material been removed Go to step 2 Remove the packing material from the printer 2 Are the Cyan Printhead Video and Cyan Printhead control cables connected correctly to the Cyan Printhead and to J10 and J11 on the RIP Board Go to step 3 Reseat the cables correctly 3 Check for any signs of damage to the Cyan Video Printhea...

Page 122: ... well as making sure the ITU blanket have been removed Has all the packing material been removed Go to step 2 Remove the packing material from the printer 2 Are the Magenta Printhead Video and Magenta Printhead control cables connected correctly to the Magenta Printhead and to J10 and J11 on the RIP Board Go to step 3 Reseat the cables correctly 3 Check for any signs of damage to the Magenta Video...

Page 123: ... well as making sure the ITU blanket have been removed Has all the packing material been removed Go to step 2 Remove the packing material from the printer 2 Are the Yellow Printhead Video and Yellow Printhead control cables connected correctly to the Yellow Printhead and to J10 and J11 on the RIP Board Go to step 3 Reseat the cables correctly 3 Check for any signs of damage to the Yellow Video Pri...

Page 124: ...uits fuser hot roll thermistor back up roll thermistor engine board or LVPS fuser control circuits 6 Replace the RIP Board on page 4 10 Does this fix the problem Problem Solved Replace the Yellow Printhead Go to Printheads on page 4 33 You must perform the Printhead Adjustments on page 4 1 anytime a printhead is replaced Step Action and Questions Yes No 1 Is Error Code 120 displayed Install the co...

Page 125: ...and Questions Yes No 1 Voltage Check Go to Engine Board on page 5 1 Measure the voltage on connector J10 11 The voltage measures approximately 13 V dc to 64 V dc as the hot roll lamp turns off and on Is the voltage correct Replace the Fuser Assembly on page 4 16 Go to step 2 2 Thermistor Resistance Check Hot Roll Measure the resistance of the hot roll thermistor assembly The resistance measures as...

Page 126: ...y can be checked by measuring between pin 1 and pin 5 on the single line AC fuser connector located on the bottom of the fuser frame Go to LVPS Fuser Connectors on page 5 20 Is there continuity Replace the Fuser Assembly on page 4 16 Go to step 2 2 Hot Roll Lamp incorrectly installed or damaged It is easier to check the lamp by removing it from the right side of the fuser frame assembly Check to m...

Page 127: ...embly on page 4 16 2 Voltage Check Measure the voltage on J10 6 Go to Engine Board on page 5 1 The voltage will vary as the lamp turns off and on between approximately 1 5 V dc to 1 8 V dc Is the voltage correct Find the correct system problem or error code Replace the following FRU s in order 1 LVPS on page 4 14 2 Engine Board on page 4 14 Step Action and Questions Yes No 1 Thermistor Resistance ...

Page 128: ... Replace the FRU s in the following order 1 Fuser Assembly on page 4 16 2 LVPS on page 4 14 3 Engine Board on page 4 14 Error Code 125 Error Code 135 Error codes 125 and 135 indicate that a problem exists in the fuser assembly with the back up roll bearings back up roll thermistor LVPS or engine board Replace the FRUs in the following order 1 Fuser Assembly on page 4 16 2 LVPS on page 4 14 3 Engin...

Page 129: ...connected to J8 on the Engine Board Go to Engine Board on page 5 1 Is the cable connected correctly Go to step 2 Correctly install the cable 2 FRU Replacement Replace the following Frus in the order shown 1 Fuser Drive Assembly on page 4 17 2 Engine Board on page 4 14 Replace the Fuser Drive Assembly on page 4 17 Replace the Fuser Assembly on page 4 16 Step Action and Questions Yes No 1 Excessive ...

Page 130: ...ck Engine Board connector J10 2 Go to Engine Board on page 5 1 Measure the voltage on the connector at J10 2 The voltage measures approximately 5 V dc Is the voltage correct Replace the following Frus in order 1 Fuser Assembly on page 4 16 2 LVPS on page 4 14 Replace the Engine Board on page 4 14 Step Action and Questions Yes No 1 Engine Board Connector Cable Check connector J10 for correct instal...

Page 131: ...ght cause the paper to jam at the exit of the fuser assembly Were any broken parts or damage found to the fuser assembly Replace the Fuser Assembly on page 4 16 Go to the Paper Path Service Check on page 2 105 Step Action and Questions Yes No 1 LVPS Cable Check the LVPS cable to J10 on the Engine Board to make sure it is seated correctly Go to Engine Board on page 5 1 Is the cable seated correctly...

Page 132: ...nt Cover Assembly Does the front cover close correctly Go to step 4 Correctly install the door or repair as necessary 4 Front Cover Assembly Check to make sure the front cover flag is not broken or damaged Is the flag broken or damaged Replace the Front Cover Assembly on page 4 21 Go to step 5 5 Front Cover HV Interlock Cable Assembly to Engine Board Check to make sure that the Cable is correctly ...

Page 133: ... PSD cable Note The PSD cable has one connector on one end RIP Board and two connectors on the other end Black PSD Board and Magenta PSD Board Is there continuity Replace the PSD Sensor Assembly on page 4 35 If this does not correct the problem replace the RIP Board on page 4 10 Whenever the the PSD assembly is replaced it is necessary to perform all Printhead Adjustments on page 4 1 Replace the P...

Page 134: ...s replaced it is necessary to perform all Printhead Adjustments on page 4 1 Replace the PSD cable for the Cyan and Yellow PSD Assemblies Step Action and Questions Yes No 1 Check to make sure Tray 1 is installed and seated correctly in the printer Is the tray correctly installed in the printer Go to step 2 Install Tray 1 correctly If there is still a problem go to Tray 1 Service Check on page 2 98 ...

Page 135: ...parts installed correctly and not broken or missing Go to step 6 Repair or replace parts as necessary 6 Is the answer to Step 3 Yes Replace Tray 1 Go to step 7 7 Check the following parts in the printer to make sure they are operating correctly Check for any signs of broken or missing parts Size Sensing Springs Size Sensing Links Size Sensing Bracket Is there any sign of broken or missing parts Re...

Page 136: ...the Tray 1 Feed test in the CE Diagnostics as a printed copy is not required 2 Check to make sure the autocompensator has fully retracted to its upper position Does the Autocompensator retract correctly Go to step 3 Go to the Autocompe nsator Service Check on page 2 99 3 Check for any signs of damage to the Paper Tray Guide Is the paper tray guide damaged loose or missing Replace the Paper Tray Gu...

Page 137: ...the Engine Board on page 4 14 Step Action and Questions Yes No 1 Check Tray 1 for any signs of damage to the Pick Arm Lift Bellcrank activation tabs on the rear of the tray Is there any damage to the tray Replace Tray 1 Go to step 2 2 Check the following parts for any signs of damaged loose or missing parts Pick Arm Lift Bellcrank Bellcrank Lift Spring Tray interlock bellcrank Are any of the parts...

Page 138: ... Sensor inside the printer The Paper Level Sensor is a dual sensor and checks the following levels for Tray 1 Does the Sensor Test pass Note The Tray 1 Level Sensor is a Dual Sensor assembly that senses when Tray 1 is empty nearly empty or partially empty Call your next level support Go to step 2 2 Paper Level Sensing Assembly Check to make sure the assembly is not loose or damaged Check to make s...

Page 139: ...ncy material installed in Tray 1 meets machine requirements Does the media meet requirements Go to step 2 Inform the customer 2 Check the following for correct installation and any signs of broken or damaged parts Transparency Lift Arm Transparency Lift Link Is the Transparency Sensor Assembly installed correctly not damaged or broken Go to step 3 Repair or replace parts as necessary 3 Check conti...

Page 140: ...ing media from the MFP Go to step 4 Go to the Autocompe nsator Service Check on page 2 99 4 Check the following parts for any sign of broken damaged or missing parts MPF Bracket Assembly MPF Drive Gear MPF Drive Gear Bushing MPF Drive Gear Shaft Are any of the parts broken damaged or missing Repair or replace parts as necessary Go to step 5 5 Manually turn the MPF Drive Gear in the MPF assembly Do...

Page 141: ...5 V dc J70 4 0 V dc Are the voltages correct Go to step 5 Replace the Engine Board on page 4 14 5 Check continuity of the Sensor Cable that is between the Engine board and MPF assembly Is the continuity Replace the Sensor Assembly Replace the Sensor Cable Assembly 6 Check the following parts for any signs of excessive wear damaged broken or missing parts MPF Autocompensator Assembly Rib Housing Fr...

Page 142: ... there any obstructions in the paper path in the are of Sensor S2 Clear the area of the obstruction Go to Step 3 3 Check for any cables broken or loose parts that might cause the paper to jam in the input area of the printer Were any problems found inside the printer Repair or replace parts as necessary Go to Step 4 4 Check to make sure the Transfer Plate is correctly installed Is the Transfer Pla...

Page 143: ...Transport Assembly Replace the Vacuum Transport Assembly Go to Step 5 5 Check to make sure that the Vacuum Transport Assembly drive gear meshes correctly with drive gear on the fuser drive assembly Do the gears mesh correctly Go to Step 6 Check both the Fuser Drive Assembly and Vacuum Transport Assembly to make sure they are installed correctly 6 Check to make sure that the fuser drive assembly dr...

Page 144: ...t powered on for some time with this symptom displayed the printer may then display a 902 Service Error Step Action and Questions Yes No 1 Check the Vacuum Transport for correct operation Is the Vacuum Transport operating correctly Go to step 2 Replace the Vacuum Transport Assembly 2 Does the media jam at the entry to the fuser assembly Go to step 3 Go to Step 4 3 Check the fuser drive assembly fo...

Page 145: ...all the front cover correctly or repair as necessary 5 Front Cover Assembly Check to make sure the front cover flag is not broken or damaged and actuates the switches correctly Is the flag broken or damaged Replace the Front Cover Assembly on page 4 21 Go to step 6 6 Printhead Cover Open Interlock Cable assembly Check to make sure that the Cable is correctly connected to J12 on the RIP board Is th...

Page 146: ...Cover Assembly Does the front cover close correctly Go to step 5 Install the front cover correctly or repair as necessary 5 Front Cover Assembly Check to make sure the front cover flag is not broken or damaged and actuates the switches correctly Is the flag broken or damaged Replace the Front Cover Assembly on page 4 21 Go to step 6 6 HVPS Cover Open Interlock Cable Assembly to Engine Board Check ...

Page 147: ...ched wiring or damage to the contacts in the connector Are there any problems with the autoconnect cables Repair or replace as necessary Go to step 5 5 Tray X Autoconnect Cable Check the Tray X autoconnect cable s for correct installation at the Tray X System board Are the Tray X autoconnect cable s connected correctly Go to step 6 Install the cables correctly and recheck 6 Tray X Autoconnect Cabl...

Page 148: ...ick Arm Lift Bellcrank installed correctly Go to step 4 Install the bellcrank correctly 4 Check the following for loose broken or missing parts Bellcrank Lift Spring Tray interlock Bellcrank Any any of these parts loose broken or missing Repair or replace as necessary Go to step 5 Step Action and Questions Yes No 1 Run Tray x sensor test from the diagnostic menu Does the test pass for sensor L2 Go...

Page 149: ...ty of the Paper Level Sensing Assembly Cable Do you measure continuity Go to step 5 Replace the cable 5 Check the Paper Level Sensing Assembly for correct installation Check the following for any signs of damaged or broken parts Check the Paper Level Sensing Flag Check the Paper Level Sensing Flag spring Is the Paper Level Sensing Assembly installed correctly Replace the Paper Level Sensing Assemb...

Page 150: ... can observe the autocompensator feed rolls and the paper thru the tray access door You run the Tray x feed test from the diagnostic menu to help diagnose a feed problem Is the media leaving the tray Go to step 8 Go to step 5 5 Are the autocompensator pick arm rolls turning Go to step 6 Go to step 10 6 Check the autocompensator pick arm rolls for any sign of wear or contamination Are the autocompe...

Page 151: ... necessary Replace the Autocompen sator Assembly Step Action and Questions Yes No 1 Check the transparency material to make sure it meets specifications Does the transparency material meet specifications Go to step 2 Inform the customer that the transparency media in tray x does not meet specification 2 Check the Transparency Sensing Assembly for correct installation Is the Transparency Sensing As...

Page 152: ...per Size Sensing Assembly Replace the Electronics Size Sensing Assembly Step Action and Questions Yes No 1 Check to make sure the autocompensator cable is correctly installed at the tray System board Is the cable correctly installed Go to step 2 Install the cable correctly 2 Check to make sure the drive assembly cable is connected correctly to the tray system board Is the cable correctly installed...

Page 153: ... s that is installed beneath the printer Try to isolate which of the options is causing the problem Go to step 3 3 Check to make sure that the Duplex Option is correctly installed Is the Duplex Option installed correctly Go to step 4 Install the Duplex Option correctly 4 Check to make sure that the bottom option cable connector is snapped firmly into the bottom of the base machine Is the cable con...

Page 154: ...l the cable If the connector is damaged replace the cable assembly 9 Check the Upper Options Cable in the duplex option to make sure it is connected correctly to J11 on the Duplex options board Is the cable connected correctly Go to step 10 Install the cable correctly 10 Check continuity of the Upper Duplex Options Cable Is there continuity Replace the Duplex Options Board Install the cable correc...

Page 155: ... 1 Check the Duplex Shaft Assembly for any signs of worn broken or damaged parts Is the Duplex Shaft Assembly worn or broken Replace the Duplex Shaft Assembly Go to step 2 2 Check the Duplex 40T Shaft Drive F R Gear for any broken teeth or other damage to the gear Is the gear broken Replace the Shaft Drive Gear Go to step 3 3 Check the three Duplex Shaft Assembly bearings for any signs of missing ...

Page 156: ...4 Disconnect J5 from the engine board and check the voltages on connector J5 on the engine board The voltages measure as follows J5 1 24 V dc J5 3 5 V dc J5 5 5 V dc J5 6 5 V dc J5 8 5 V dc All voltages are approximate values Are the voltages correct Go to step 5 Replace the Engine Board 5 Autoconnect Cables Check the autoconnect from the printer or option above the HCIT 2000 Sheet Option Check fo...

Page 157: ...LED is mounted on the HCIT system board Step Action and Questions Yes No 1 Does the printer power up and work normally when plugged into the AC outlet on the HCIT Go to step 2 Go to step 5 2 Check the system board LED to see if it is On solid or blinking LED On solid means that the HCIT has detected the front door or side door open LED Blinking means that the system is operating Is the LED On soli...

Page 158: ...selected paper size Go to step 3 Reinstall the guide if installed incorrectly 3 Paper Size Sensor Cable Check for correct installation of the Paper Size Sensor Cable to the HCIT System Board at CN7 Is the cable installed correctly Go to step 4 Install the cable correctly 4 Check for loose or broken loose or missing paper size sensor flag spring Is a sensor flag spring broken loose or missing Recon...

Page 159: ...t specifications 3 Use the Standalone Feeding operation to observe paper feeding from the tray Does the paper feed from the paper tray Go to step 14 Go to step 4 4 Using the Standalone Feeding Operation Test observe the Registration Motor the registration motor is the motor at the top of the feed assembly Does the Motor turn Go to step 5 Go to step 6 5 Does the Pick Motor the lower motor in the Fe...

Page 160: ... step 14 12 Check the Pick Home Sensor cable to make sure it is installed correctly to the sensor and to CN6 on the System Board Is the cable connected correctly Go to step 13 Install the cable correctly 13 Is the Registration Home Sensor operating correctly Replace the following FRU s in the order shown 1 HCIT System Board 2 Feed Unit Assembly Replace the following FRU s in the order shown 1 Regi...

Page 161: ...2 124 Service Manual 5060 XXX ...

Page 162: ...ect and Return buttons while you turn the printer on and wait unit Performing Self Test appears on the display Release the buttons The following are available from the Configuration Menu Black and White Lock Fuser Cnt Value Reset Fuser Cnt Print Quality Pages Note This is not displayed if in DEMO mode Color Trapping Size Sensing Type Sensing Sensed Trans Sensed Paper Calibrate Trays Panel Menus PP...

Page 163: ...y two when a duplex sheet is printed The counter can be used to track printer usage When the counter reaches 150 000 the printer posts a fuser maintenance message on the operator panel 1 Enter the Configuration Menu and Select Reset Fuser Count to view the page count 2 Press RETURN to return to the previous menu or Press SELECT to reset the maintenance page counter back to zero Print Quality Pages...

Page 164: ...cy Custom Type 5 Select the value you want from the above list Sensed Paper Only paper sources that support Auto Type Sensing are displayed The factory default paper type or each tray is determined by the value of Configuration ID This value is as follows Tray 1 factory default paper type Plain Paper Tray 2 factory default paper type Plain Paper or Custom Type 2 Tray 3 factory default paper type P...

Page 165: ...Configuration Menu 2 Select the desired Tray from the menu You will be prompted to load paper into the selected tray not transparencies Load input source Plain Paper 3 Press GO to initiate calibration 4 Press RETURN to abort the calibration and return to the previous menu Panel Menus Select Panel Menus from the Configuration Menu Disable Enable PPDS Emulation This only displays if the PPDS interpr...

Page 166: ... Alignment This alignment is required anytime you replace the ITU Assembly 1 Enter the Configuration Menu Group by pressing Select and Return at POST 2 Select ITU Alignment from the Configuration Menu Group 3 A test page is printed after ITU Alignment is selected 4 After the test page prints enter alignment values for each alignment setting Example A Alignment 1 5 The alignment values range from 7...

Page 167: ...lease the buttons when Performing Self Test is displayed The tests display on the operator panel in the order shown Print Registration Alignment Top Fine Margin Adjustment Miscellaneous Tests Print Tests Hardware Tests Duplex Tests if installed Input Tray Tests 500 Sheet Trays Input Tray Tests 2000 Sheet Trays Output Bin Tests Finisher Tests if installed Base Sensor Test Device Tests if optional f...

Page 168: ...nding on the disk size To run the Disk Test Clean Test 1 Select Disk Test Clean from the Device Tests menu Files will be lost Go or Stop message displays to warn the user that all contents on the disk will be lost 2 To exit the test immediately and return to the Device Tests menu press Return Stop To continue with the test press Go If Go is selected Disk Test Clean BAD 000000 00 message displays T...

Page 169: ...inting duplexed pages Continues until Return Stop is pressed You must use either Letter or A4 paper To run the Duplex Quick Test 1 Select Duplex Quick Test from the menu 2 Select Single or Continuous The single Duplex Quick test cannot be canceled The printer attempts to print the Quick Test Page from the default paper source If the default paper source only supports envelopes then the page is pri...

Page 170: ...ion 1 and the oldest error displays in position 12 if 12 errors have occurred If an error occurs after the log is full the oldest error is discarded Identical errors in consecutive positions in the log are entered All 2xx and 9xx error messages are stored in the error log To view the Error Log 1 Select Display Log from the Error Log menu The Error log displays on three screens as only four entries...

Page 171: ...ch button one at a time and a CL Closed displays in place of an OP The proper operation of each button can be checked 3 Press Return Stop to cancel the test SDRAM Memory Test This test checks the validity of SDRAM both standard and optional The test writes patterns of data to SDRAM to verify that each bit in memory can be set and read correctly To run the SDRAM Memory Test 1 Select SDRAM Memory Te...

Page 172: ... following messages displays for approximately three seconds ROM Checksum Error ROM Burst Read Error Once the maximum pass count or fail count is reached the test stops with the power indicator on solid The final results display on the screen Parallel Wrap Test Use this test with a wrap plug to check operation of the parallel port hardware Each parallel signal is tested To run the Parallel Wrap Te...

Page 173: ...erial Wrap Test 1 Disconnect the serial interface cable and install the wrap plug 2 Select the appropriate Serial Wrap Test from the menu Serial Wrap Serial 1 Wrap Serial 2 Wrap or Serial 3 Wrap P and F represent the same numbers for DRAM The power indicator blinks indicating the test is running 3 This test runs continuously unless canceled by pressing Return Stop Each time the test finishes the s...

Page 174: ...engaged during this test Note This test can be run using any of the paper or envelope sizes supported by the printer The pages are placed in the default output bin however the Feed Test menu lets you to select the input source To run the Input Tray Feed Test 1 Select Input Tray Feed Test from the menu 2 Select the input source from the sources displayed on the Feed Test Menu All installed sources ...

Page 175: ...e 2000 Sheet Tray sensors are working correctly Select Sensor Test from the menu for the tray you want to test The following is displayed input tray EM OP NE OP LE OP SC OP The selected tray is displayed on line 1 input tray either Tray 1 2 3 or 4 EM trays empty sensor NE trays near empty sensor LE trays paper level sensor SC input trays side cover sensor Manually actuate the bin sensor by moving ...

Page 176: ...verifies that media can be fed to a specific output bin No information is printed on the media because the printhead is not turned on during this test To run the Output Bin Feed Test 1 Select Feed Test from the Output Bin Test menu 2 Select the output bin you want the paper to exit into All output bins installed on the printer are shown on the feed test menu 3 Select either Single one sheet of med...

Page 177: ...creen is displayed you can manually actuate the sensor you want to test When the sensor is closed CL displays and when the sensor is open OP displays 4 To exit the test press Return or Stop Output Bin X Sensor Test Output Expander To run the Output Bin x Sensor tests 1 Select Output Bin Tests from the menu 2 Select Output Bin Tests Sensor Tests 3 Select Sensor Tests Output Bin x 4 Press Return Sto...

Page 178: ...can be checked using this test Input Sensor S1 Input Sensor S2 Inline Media Sensor Fuser Exit Sensor To run the Base Printer Sensor Test 1 Select Base Printer Sensor Test from the menu The operator panel displays OP for open and CL for closed 2 Manually toggle the sensors by hand to verify that each sensor switches from open to closed 5 Bin Mailbox Diverter Test Note This test checks the operation...

Page 179: ...in and then stapled To run the Finisher Feed Test 1 Select Finisher Feed Test from the menu 2 Select a destination bin The printer feeds eight pieces of media to the selected finisher output bin where they are stapled Note No information is printed on the fed sheets as the laser is not engaged during this test 3 This test cannot be canceled or terminated once the test has begun When the test is co...

Page 180: ...ors are ready to test Media Path 2 S3 CL S4 CL S3 S4 Once the screen is displayed you can manually actuate each of the sensors When the sensor is closed CL is displayed when the sensor is open OP will be displayed If you select Media 3 from the menu the following will be displayed and the sensors polled Media Path 3 testing Once the sensors have been polled the following will be displayed and the ...

Page 181: ...h a three hole pattern Enter the Diagnostic mode 4 Select Finisher Tests from the menu 5 Select Hole Punch Test Press Return after the test is complete to exit the test Miscellaneous Tests Automated Motor Detection This test initiates an Automated Motor Detection It must be performed if the NVRAM contents are erased such as when a RIP or engine board has been replaced This test must be performed a...

Page 182: ...character in the selected symbol set If continuous is selected all sources printing with paper sizes will print the same page continuously until the test is stopped If continuous is selected from a source which contains envelopes then the envelope print test pattern is printed on the first envelope and the rest are blank The Print Test page always prints single sided regardless of the Duplex setti...

Page 183: ...the printheads and the reading from the PSD at calibration time To run the Print Line Length Page select Print Line Length Page from the menu No buttons are active while the Print Line Length Page is printing Press Return to exit Print Registration The print registration range is as follows Bottom Margin 25 to 25 Top Margin 25 to 25 Left Margin 12 to 12 Right Margin 12 to 12 To set Print Registrat...

Page 184: ...he same 5 If Return is selected and you exit the alignment menu after a margin value has been changed but not saved then the default value is not changed However if the Alignment Test page is requested after a margin value has been changed but not saved then the default value is changed and the Alignment Test Page is printed using the new value 6 To verify that the margin values are correct you mu...

Page 185: ...u want to run 2 Turn the HCIT power off by moving the LVPS slide switch to the left position 3 Press and hold the Push Button Switch PBSW1 while moving the LVPS slide switch to the right position The red LED on the HCIT Control board comes on 4 Press PBSW1 to feed paper 5 Press PBSW1 to stop feeding paper Dip Switch Settings Table DSW1 DSW2 DSW3 DSW4 Mode Off Off Off N A Set for shipping Off Off O...

Page 186: ...e if you need to put down the ESD sensitive part for any reason first put it into its special bag Machine covers and metal tables are electrical grounds They increase the risk of damage because they make a discharge path from your body through the ESD sensitive part Large metal objects can be discharge paths without being grounded Prevent ESD sensitive parts from being accidentally touched by othe...

Page 187: ...4 2 Service Manual 5060 XXX 2 Position the printhead along the front A and rear B scribe lines 3 Run an Alignment Test Page from Setting Printer Alignment on page 3 23 ...

Page 188: ...he front of the printhead to a position that allows the printhead color to align over the black target on the right side of the Alignment Test Page Tighten the front mounting screw 7 Run an Alignment Test Page to verify the printhead front adjustment Note You may be required to make both front and rear printhead adjustments several times to obtain correct manual alignment on both sides of the Alig...

Page 189: ... install the correct screw type in each location during reassembly Reference number Screw type Location Purpose Qty 002 4 40 Machine Parallel Connector to Shield Attach 2 102 M3 5x8mm Thread Cutting Cartridge Guides to Upper Frame Attach 8 Upper Front Cover to Cartridge Guides Attach 4 Front Cover Pivot to Front Upper Cover Attach 2 Front Left Light Shield to Upper Front Cover Attach 1 121 M3 5x6m...

Page 190: ...me Attach 2 Front Lamp Brackets to Fuser Frame Attach 2 Blank INA Covers to RIP Shield Mounting 2 RIP Card Ground Shield to RIP Shield Mounting 5 RIP Shield to Engine Shield Mounting 4 RIP Card to RIP Shield Mounting 12 Engine Card to Engine Shield Mounting 6 RIP Shield Cover to RIP Shield Mounting 8 V Block Plates to Upper Frame Mounting 2 Ground Cable Strap to RIP Ground Shield Attach 1 Referenc...

Page 191: ...to Lower Right Door Mounting 2 Bias Latch Cover to Door Attach 1 MPF Asm To MPF Door Attach 6 Support Bracket to MPF Door Attach 4 MPF Cable Cover to Door Asm Mounting 1 MPF Latch Support Brackets to Upper Frame Attach 2 Voltage Cable to Terminal BOR ITU Black Attach 1 Voltage Cable to Terminal BOR ITU Cyan Attach 1 Voltage Cable to Terminal BOR ITU Magenta Attach 1 Voltage Cable to Terminal BOR I...

Page 192: ... Cover Asm to Lower Frame Attach 4 Front Lower Right Cover to Lower Frame Attach 1 Front Right Handle Cover Asm to Lower Frame Attach 4 Right Front Cover to Lower Frame Attach 2 Left Lower Cover to Lower Frame Attach 2 Left Upper Cover Asm to Lower Frame Attach 2 Left Upper Cover Asm to Upper Frame Attach 1 Left Lower Pivot to Lower Frame Attach 2 Left Upper Pivot to Left Lower Cover Attach 1 Rear...

Page 193: ... to Frame Mounting 5 BOR Drive Asm to Upper Frame Mounting 1 ITU Drive Asm to Lower Frame Mounting 3 Fuser Drive Asm to Lower Frame Mounting 4 Vacuum Top Duct to Lower Frame Mounting 2 Toner Shield to Lower Frame Attach 4 Upper Deflector To Lower Frame PF XPORT Mounting 2 VTB Asm to Lower Frame PF XPORT Mounting 2 Inner Deflector to VTB Assembly PF XPORT Attach 1 Jam Access Spring to VTB Asm PF XP...

Page 194: ...t Cover Support and Top Cover Attach 1 Cartridge Drive Assemblies to Upper Frame Mounting 12 Upper Door Hinges to Upper Frame Redrive Attach 2 Inner Redrive Assembly to Upper Frame Mounting 2 412 2 9x5 2mm Plastite Hinge Restraint to Door MPF SEMS Attach 1 423 M3 5x9 Plastite Tray Bias Bellcrank to Tray Mounting 1 484 M3 5x14 Machine Panhead Printhead to Upper Frame Mounting 12 Reference number Sc...

Page 195: ... printer down Note Some removal procedures require removing cable ties You must replace cable ties during reassembly to avoid pinching wires obstructing the paper path or restricting mechanical movement Outer EMC Shield 1 Loosen screw type 232 on page 4 5 A and lift the outer EMC shield from the printer RIP Board Go to RIP Board Assembly Network Model 5060 002 on page 7 25 or RIP Board Assembly No...

Page 196: ...l cables from the RIP board and remove the board Rear Cover Go to Rear Cover on page 7 5 for part number 1 Remove the rear cover screw type 323 on page 4 7 A 2 Open the MPF remove the rear cover screw type 323 on page 4 7 B and remove the rear cover ...

Page 197: ...board screw type 324 on page 4 9 and 312 on page 4 6 A 3 Disconnect the five spade terminals B from the transformers 4 Disconnect the control cable C 5 Remove the HVPS transfer board Rear Fan Cover Go to Rear Fan Cover on page 7 5 for part number 1 Remove the Rear Cover on page 4 11 2 Remove the rear fan cover screw type 323 on page 4 7 A and remove the rear fan cover ...

Page 198: ...ser Fan Go to Fuser Fan on page 7 28 for part number 1 Remove the Rear Fan Cover on page 4 12 2 Disconnect the fuser fan cable from connector J2 B on the engine board 3 Remove the fuser fan screws A part number 12G6529 and remove the fan ...

Page 199: ...ard 4 Remove the engine board screw type 323 on page 4 7 A and remove the engine board 5 Remove the engine board Be careful not to damage the paper size switches and actuators B LVPS Go to LVPS 115V on page 7 23 or LVPS 220V on page 7 23 for part number 1 Remove the Rear Fan Cover on page 4 12 2 Remove the Fuser Assembly on page 4 16 3 Remove the LVPS screw type 121 on page 4 4 A from the rear of ...

Page 200: ...Repair Information 4 15 5060 XXX 4 Remove the right rear cover screw type 121 on page 4 4 A ...

Page 201: ...inter Note Be sure to reinstall the ground strap when you replace the LVPS Fuser Assembly CAUTION Be sure the fuser assembly has cooled before you remove it Go to Fuser Assembly 115V 500W on page 7 6 or Fuser Assembly 220V 500W on page 7 6 for part numbers 1 Open the lower right door assembly 2 Unlatch the two fuser latches A 3 Remove the fuser assembly ...

Page 202: ...e 4 16 2 Remove the fuser drive assembly screw type 323 on page 4 7 A and remove the assembly Lower Right Door Assembly Go to Lower Right Door Assembly on page 7 3 for part number 1 Open the lower right door assembly 2 Carefully flex the lower right door assembly to free the hinges from the mounting posts 3 Remove the lower right door assembly ...

Page 203: ...page 4 12 2 Remove the fuser top duct screw type 323 on page 4 7 A and remove the top duct Fuser Bottom Duct Go to Fuser Bottom Duct on page 7 5 for part number 1 Remove the Fuser Top Duct on page 4 18 2 Remove the Fuser Fan on page 4 13 3 Press the fuser bottom duct latches A to release the duct lift up and remove the duct ...

Page 204: ... on page 4 16 2 Remove the paper path access door cover right mounting screw 3 Remove the Front Right Handle Cover Assembly on page 4 28 4 Disconnect the web oiler motor assembly cable 5 Remove the fuser web oiler motor assembly mounting screws and remove the assembly Note When you reinstall the web oiler motor assembly pull the excess cable twist install a cable tie and route the cable down into ...

Page 205: ...cable A is routed away from gears B Redrive Door Go to Redrive Door on page 7 11 for part number 1 Open the redrive door 2 Loosen the redrive door upper hinge screw type 324 on page 4 9 A 3 Lift the redrive door from the hinge B and remove the redrive door ...

Page 206: ...Assembly Go to Front Cover Assembly on page 7 3 for part number 1 Open the front cover assembly 2 Remove the detent post tension spring B 3 Flex the front cover assembly to free the hinge from the mounting post A 4 Remove the front cover assembly ...

Page 207: ...r 1 Remove the Front Cover Assembly on page 4 21 2 Remove the Redrive Door on page 4 20 3 Remove the redrive cap 4 Remove the light shield screw type 324 on page 4 9 and 323 on page 4 7 A 5 Remove the shield 6 Remove the front upper pivot cover screw type 102 on page 4 4 A and remove the pivot cover ...

Page 208: ...Information 4 23 5060 XXX 7 Open the MPF and remove the top cover screw type 323 on page 4 8 B from the left side of the printer 8 Remove the top cover screw type 323 on page 4 8 A from the rear of the printer ...

Page 209: ...ice Manual 5060 XXX 9 Remove the top cover mounting screws A from the front of the printer 10 Remove the operator panel bezel 11 Open the redrive door and loosen the redrive assembly screw type 323 on page 4 7 A ...

Page 210: ...in full sensor C flag A and upper options auto connect B from the top cover 14 Remove the top cover Operator Panel Go to Operator Panel Assembly Low Volt on page 7 3 or Operator Panel Assembly High Volt on page 7 3 for part number 1 Remove the Front Cover Assembly on page 4 21 2 Remove the operator panel bezel ...

Page 211: ...4 26 Service Manual 5060 XXX 3 Unlatch the operator panel latches A 4 Disconnect the operator panel cable from the operator panel and remove the operator panel ...

Page 212: ...s A 3 Disconnect the cable from the cartridge drive assembly 4 Remove the cartridge drive assembly Cartridge Drive Assembly Cyan Magenta Black Go to Cartridge Drive Assembly Cyan Magenta Black on page 7 30 for part number 1 Remove the RIP Board Shield Assembly on page 4 37 2 Remove the Engine Board on page 4 14 3 Remove the cartridge drive assembly mounting screws A 4 Disconnect the cable B from t...

Page 213: ...tridge drive assembly Front Right Handle Cover Assembly Go to Front Right Handle Cover Assembly on page 7 3 for part number 1 Open the front cover 2 Remove the light shield screw type 324 on page 4 9 and 323 on page 4 7 A 3 Remove the light shield ...

Page 214: ...move the front right handle cover assembly screw type 323 on page 4 7 A and remove the assembly Front Left Handle Cover Assembly Go to Front Left Handle Cover Assembly on page 7 3 for part number 1 Open the front cover 2 Remove the front left handle cover assembly screw type 323 on page 4 7 A and remove the assembly ...

Page 215: ...m Access Door Assembly Go to Lower Jam Access Door Assembly on page 7 5 for part number 1 Remove the Front Left Handle Cover Assembly on page 4 29 2 Remove the lower jam access door assembly screw type 323 on page 4 7 A and remove the door ...

Page 216: ... and Front Lower Left Cover on page 7 3 for part numbers 1 Remove the Front Left Handle Cover Assembly on page 4 29 B 2 Open the paper path access door remove screw type 323 on page 4 7 A and remove the door 3 Separate the paper path access door cover from the front lower left cover C Be careful not to lose the door spring D ...

Page 217: ...F 2 Remove the MPF strap screw type 412 on page 4 9 A 3 Disconnect the MPF switch cable from the engine board at connector J10 4 Release the MPF latch B and remove the MPF Waste Container Door Go to Waste Container Door on page 7 5 for part number 1 Open the waste container door 2 Flex the door and remove it from the hinges A ...

Page 218: ...inthead is removed it is necessary to perform the Printhead Manual Adjustment on page 4 1 and Printhead Electronic Alignment on page 4 4 1 Remove the Top Cover Assembly on page 4 22 2 Draw a scribe line on the frame next to the front A and rear B of the printhead to provide reference points before removing a printhead When you replace the printhead tighten the three mounting screws friction tight ...

Page 219: ...the holes A in the top of the rear printer frame 4 Remove the printhead mounting screw A from the front of the printhead assembly 5 Disconnect the printhead video cable B from the printhead 6 Disconnect the mirror motor hysnc cable C from the RIP board at connector J2 7 Remove the printhead ...

Page 220: ...A and rear B of the printhead to provide reference points before removing a printhead 2 Remove the PSD sensor assembly mounting screws 3 Lift the PSD sensor assembly and disconnect the cable 4 Remove the PSD sensor assembly Note Be careful not to lose shim A under the PSD sensor assembly When you reinstall the assembly pull forward on tab B and install the front mounting screw first ...

Page 221: ...bly on page 4 22 2 Remove the rip fan screw type 324 on page 4 9 A 3 Disconnect the rip fan cable from the engine board at connector J53 4 Remove the rip fan Redrive Assembly Go to Redrive Assembly on page 7 11 for part number 1 Open the redrive door 2 Remove the redrive assembly screw type 323 on page 4 7 A ...

Page 222: ...ive assembly with tab A RIP Board Shield Assembly Go to RIP Board Shield Assembly on page 7 25 for part number 1 Remove the Top Cover Assembly on page 4 22 2 Remove the Rear Fan Cover on page 4 12 3 Remove the Rear Cover on page 4 11 4 Remove the RIP Board on page 4 10 5 Remove the HVPS Transfer Board on page 4 12 6 Remove the RIP board shield assembly mounting screws A through the holes in the sh...

Page 223: ... assembly HVPS Developer Board Go to HVPS Developer Board on page 7 26 for part number 1 Remove the RIP Board Shield Assembly on page 4 37 2 Remove the HVPS developer board mounting screws 3 Disconnect the HVPS developer board cables A B C and remove the board ...

Page 224: ...37 2 Remove the VTB fan with a flatblade screwdriver ITU Drive Motor Assembly Go to ITU Motor Drive Assembly on page 7 17 for part number 1 Remove the RIP Board Shield Assembly on page 4 37 2 Remove the Engine Board Shield on page 4 40 3 Remove the ITU drive motor assembly mounting screws B disconnect cable A and remove the assembly ...

Page 225: ...RIP Board Shield Assembly on page 4 37 2 Remove the Engine Board on page 4 14 3 Remove the engine board shield screw type 323 on page 4 7 A screw type 232 on page 4 5 B and remove the shield ITU Assembly Go to ITU Assembly on page 7 17 for part number 1 Open the front cover 2 Remove the toner cartridges 3 Open the MPF ...

Page 226: ...d slide the ITU from the printer Waste Container Latch Go to Waste Container Latch on page 7 29 for part number 1 Remove the Paper Size Sensing Assembly on page 4 42 2 Use a flatblade screwdriver to release the waste container latch from the paper size sensing assembly ...

Page 227: ...1 Remove the Rear Cover on page 4 11 2 Remove the Rear Fan Cover on page 4 12 3 Remove the Engine Board Shield on page 4 40 4 Open the waste toner container door and slide the container out 5 Remove the paper size sensing assembly screw type 323 on page 4 7 A 6 Remove the assembly Second Transfer Roll Go to Second Transfer Roll on page 7 8 for part number 1 Remove the ITU Assembly on page 4 40 2 L...

Page 228: ... 31 for part number 1 Open the front cover 2 Remove the yellow toner cartridge 3 Remove the front right light shield cover 4 Remove the BOR housing assembly screw type 323 on page 4 7 A and remove the assembly Note Gear B can easily fall from the assembly Be careful not to lose the gear ...

Page 229: ...e the Cartridge Drive Assembly Cyan Magenta Black on page 4 27 2 Open the front cover 3 Remove the toner cartridges 4 Remove the cartridge rail front and rear mounting screws and remove the rail 5 Disconnect the cable from the HVPS developer board 6 Press the cartridge contact assembly retaining tabs A and remove the assembly ...

Page 230: ...pper Motor 1 Oiler PHA OUT 2 Oiler PHB OUT 3 Oiler PHA OUT 4 Oiler PHB OUT J4 VTB Fan 1 FAN2 Stall IN 2 Ground 3 FAN2 PWM Out 4 24 V dc Left Side J5 Options Conn Trays 1 24 V dc options 2 Ground 3 RXD1_OPTS_IN 4 Ground 5 STAG_ENC 6 5 V dc options 7 Ground 8 TXD1_OUT J7 Options Conn Stacker 1 24 V dc options 2 Ground 3 RXD1_OPTS_IN 4 Ground 5 5 V dc options 6 Ground 7 TXD1_OUT ...

Page 231: ... 4 5 V dc 5 Y DIR OUT 6 FUSER DIR OUT 7 24 V dc 8 24 V dc 9 Ground 10 Ground 11 Y CLK OUT 12 FUSER CLK OUT 13 Y HALL IN 14 FUSER HALL IN 15 Y LOCK IN 16 FUSER LOCK IN J9 LVPS 1 3 3 V dc 2 5 V dc 3 5 V dc 4 24 V dc 5 24 V dc 6 Ground 7 Ground 8 Ground 9 Ground 10 Ground Connector Pin No Signal ...

Page 232: ...3 FUSER CAM2 IN 4 OILER ENC A IN 5 OILER ENC B IN 6 HR THERM IN 7 BR THERM IN 8 Ground 9 5 V dc switched 10 ZERO Xing IN 11 HR HEAT ON OUT 12 BR HEAT ON OUT J11 Bin Full 1 5 V dc switched 2 BIN FULL IN 3 Ground J12 BOR Motor 1 LIFT PHA OUT 2 LIFT PHA OUT Connector Pin No Signal ...

Page 233: ...UT 3 SC K CHIP 4 DEV PWM OUT 5 CART METER M IN 6 K CHG PWM OUT 7 SC M CHIP 8 CMY CHG PWM OUT 9 CART METER C IN 10 CMY AC B EN OUT 11 SC C CHIP 12 M DEV PWM OUT 13 CART METER K IN 14 C DEV PWM OUT 15 SC Y CHIP 16 Y DEV PWM OUT 17 Ground 18 24 V dc switched Connector Pin No Signal ...

Page 234: ...I2C CLK RIP 3 NOTIFY RIP 4 Ground 5 VSYNC Y OUT 6 FPIRQ RIP 7 VSYNC M OUT 8 VSYNC C OUT 9 Ground 10 VSYNC K OUT 11 HSYNC Y IN 12 HSYNC C IN 13 HSYNC M IN 14 HSYNC K IN 15 RIP PRESENT OUT 16 Ground 17 ITU ZONECLK OUT 18 ITU HOMEZONE OUT 19 ON OUT Connector Pin No Signal ...

Page 235: ... OUT 6 C DIR OUT 7 24 V dc M and C 8 24 V dc M and C 9 Ground 10 Ground 11 M CLK OUT 12 C CLK OUT 13 M HALL IN 14 C HALL IN 15 M LOCK IN 16 C LOCK IN J52 Waste CLNR Full 1 CLR FULL IN 2 Ground J53 RIP Fan 1 FAN3 STALL IN 2 Ground 3 FAN3 PWM OUT 4 24 V dc Right Side Connector Pin No Signal ...

Page 236: ...K DIR OUT 6 ITU DIR OUT 7 24 V dc ITU and K 8 24 V dc ITU and K 9 Ground 10 Ground 11 K CLK OUT 12 ITU CLK OUT 13 K HALL IN 14 ITU HALL IN 15 K LOCK IN 16 ITU LOCK IN J67 Staging Motor 1 5 V dc switched 2 STAGING ENG OUT 3 Ground 4 Ground 5 STAGING OUT 2 6 STAGING OUT 1 Connector Pin No Signal ...

Page 237: ... switched 6 Ground 7 PRISM LED VOLT 8 Ground 9 PRISM SENSOR IN 10 5 V dc switched J69 Paper Out Low XPAR Media 2 1 5 V dc switched 2 PAPER OUT IN 3 PAPER LOW IN 4 Ground 5 LED VCC 6 Ground 7 3 3 V dc 8 XPAR TRAY 1 IN J70 MPF Media 1 5 V dc switched 2 MPF FEED LOW IN 3 MPF FEED OUT IN 4 Ground Connector Pin No Signal ...

Page 238: ...T 8 C SERVO INTO 9 C TX PWM OUT 10 Y SERVO INTO 11 Y TX PWM OUT 12 M SERVO INTO 13 M TX PWM OUT 14 Ground 15 24 V dc switched J72 ITU Autoconnect 1 5 V dc 2 ITU DATA 3 3 3 V dc 4 TPS GAIN OUT 5 ITU TEMP 6 BELT HOLE 1 7 Ground 8 Ground 9 ITU EEPROM CLK 10 24 V dc Right Side 11 TPS LED ON OUT 12 TONER PATCH OUT 13 BELT HOLE 2 14 5 V dc switched Connector Pin No Signal ...

Page 239: ...5060 XXX Engine Board J73 Autocompensator Motor1 5 V dc switched 1 2 AUTOCOMP ENC IN 3 Ground 4 Ground 5 AUTOCOMP OUT 2 6 AUTOCOMP OUT 1 J86 Cover Interlock 1 24 V dc to Cover SW 2 24 V dc switched Connector Pin No Signal ...

Page 240: ...P I2CClk 4 Ground 5 OP I2R J2 Printhead Yellow Connector 1 Ground 2 HSYNC SOS 3 thermistor 4 5 V dc Hsync 5 Ground 6 mm ref freq 7 mm lock 8 mm strt en 9 Ground 10 24 V dc mir mtr J3 Printhead Yellow Connector 1 NC 2 NC 3 laser en 4 Ground 5 laser adj 6 Ground 7 laser PWM 8 5 V dc head 9 Ground 10 video data 11 video data ...

Page 241: ... ALTHERM 8 5 V dc EOS card J5 Printhead Cyan Connector 1 Ground 2 HSYNC SOS 3 thermistor 4 5 V dc Hsync 5 Ground 6 mm ref freq 7 mm lock 8 mm strt en 9 Ground 10 24 V dc mir mtr J6 Printhead CYAN Connector 1 NC 2 NC 3 laser en 4 Ground 5 laser adj 6 Ground 7 laser PWM 8 5 V dc head 9 Ground 10 video data 11 video data Connector Pin No Signal ...

Page 242: ...8 mm strt en 9 Ground 10 24 V dc mir mtr J8 Printhead Magenta Connector 1 NC 2 NC 3 laser en 4 Ground 5 laser adj 6 Ground 7 laser PWM 8 5 V dc head 9 Ground 10 video data 11 video data x J9 Printhead Magenta Black Connector 1 Ground 2 lexhsync eos 3 ALTHERM 4 5 V dc EOS card 5 Ground 6 lexhsync eos 7 ALTHERM 8 5 V dc EOS card Connector Pin No Signal ...

Page 243: ...und 10 24 V dc mir mtr J11 Printhead Black Connector 1 NC 2 NC 3 laser en 4 Ground 5 laser adj 6 Ground 7 laser PWM 8 5 V dc head 9 Ground 10 video data 11 video data J12 Cover Open Switch Connector 1 5 V dc 2 Ground 3 V Corx J13 Parallel Port Connector J18 USB Port Connector 1 USB 5 V dc 2 USB D 3 USB D 4 Ground G1 G1 Ground G2 G2 Ground Connector Pin No Signal ...

Page 244: ...t 2 J20 Option DRAM Socket 1 J21 Base DRAM Socket J23 Power Connector 1 Ground 2 Ground 3 Ground 4 Ground 5 Ground 6 Ground 7 Ground 8 Ground 9 3 V dc Sense 10 3 3 V dc 11 3 3 V dc 12 3 3 V dc 13 5 V dc 14 5 V dc 15 5 V dc 16 24 V dc Connector Pin No Signal ...

Page 245: ...nnector 1 ITU Zone CLk 2 ITU Zone HB 3 RIPPRES N 4 Ground 5 HSYNCN M 6 TSYNCN K 7 HSYNCN Y 8 HSYNCN C 9 Ground 10 VSYNCN K 11 VSYNCN M 12 VSYNCN C 13 VSYNCN Y 14 VSYNCN 15 OWL PIO NOTIFY R 16 Ground 17 OP I2DATA R 18 OP I2CLK R Connector Pin No Signal ...

Page 246: ...Connector Locations 5 17 5060 XXX RIP Board ...

Page 247: ... 3 Ground Return 3 3 V dc rtn 4 Ground Return 3 3 V dc rtn 5 Ground Return 5 V dc Rtn 6 Ground Return 5 V dc Rtn 7 Ground Return 5 V dc Rtn 8 Ground Return 24 V dc Rtn 9 3 3 V dc Sense 10 3 3 V dc 11 3 3 V dc 12 3 3 V dc 13 5 V dc 14 5 V dc 15 5 V dc 16 24 V dc Engine Board Power 1 3 3 V dc 2 5 V dc 3 5 V dc 4 24 V dc 5 24 V dc 6 Ground 7 Ground 8 Ground 9 Ground 10 Ground ...

Page 248: ...tions 5 19 5060 XXX Engine Board Cable 1 FusExitSen 2 BURCam1 3 N C 4 WebEncoderA 5 WebEncoderB 6 HRThermistor 7 BURThermistor 8 Ground 9 5 V dc switched 10 ZCSense 11 Heat On 1 12 Heat On 2x Connector Pin No Signal ...

Page 249: ...or Pin No Signal LVPS AC Fuser Connector 1 AC Load 1 2 AC Common 3 Ground 4 NC 5 AC Load 2x LVPS DC Fuser Control Connector 1 FusExitSen 2 BURCam1 3 N C 4 WebEncoderA 5 WebEncoderB 6 HRThermistor 7 BURThermistor 8 Return Analog Ground 9 5 V dc switched 10 N Cx ...

Page 250: ... 1 Send 2 PRI RXD 3 PGND 4 PERON 5 SGND 6 PRI TXD CN2 LVPS 1 Poweron 2 5 V dc 3 SGND 4 PGND 5 PGND 6 PGND 7 24 V dc 8 24 V dc 9 24 V dc CN3 REG Motor 1 24 V dc 2 24 V dc 3 REG A 4 REG A 5 REG B 6 REG B 7 No Connection CN4 PICK Motor 1 24 V dc 2 24 V dc 3 PICK A 4 PICK A 5 PICK B 6 PICK B ...

Page 251: ...egistration Home Pick Home 1 5 V dc 2 GND 3 SIDE 4 5 V dc 5 GND 6 LEVEL 7 5 V dc 8 GND 9 EMPTY 10 5 V dc 11 GND 12 RHOME 13 5 V dc 14 GND 15 PHOME CN7 Size Sensors Near Empty 1 5 V dc 2 GND 3 SIZE 0 4 5 V dc 5 GND 6 SIZE 1 7 5 V dc 8 GND 9 SIZE 2 10 5 V dc 11 GND 12 NE EMP Connector Pin No Signal ...

Page 252: ...Connector Locations 5 23 5060 XXX CN8 S1 Pick Sensor S2 Registration Sensor 1 5 V dc 2 S2 3 GND 4 5 V dc 5 S1 6 GND Connector Pin No Signal ...

Page 253: ...able T102 Transformer HV Terminal I ITU 1 HV Transformer output to 2nd Transfer Roll Cable T201 Transformer HV Terminal K Black 1 HV Transformer Output Terminal to Black Transfer Cable T301 Transformer HV Terminal C Cyan 1 HV Transformer Output Terminal to Cyan Transfer Cable T401 Transformer HV Terminal Y Yellow 1 HV Transformer Output Terminal to Yellow Transfer Cable T501 Transformer HV Termina...

Page 254: ...Connector Locations 5 25 5060 XXX HVPS Board ...

Page 255: ...Sense 10 CYM Acenable 11 M CtSense 12 CYM Chgpwm 13 M TnrSense 14 K Chgpwm 15 K CtSense 16 K Devpwm 17 K TnrSense 18 K Acenable CN2 Smart Cartridge Black 1 K CtSense 2 K TnrSense Gnd Return CN3 Smart Cartridge Magenta 1 M CtSense 2 M TnrSense Gnd Return CN4 Smart Cartridge Cyan 1 C CtSense 2 C TnrSense Gnd Return CN5 Smart Cartridge Yellow 1 Y CtSense 2 Y TnrSense Gnd Return CB Terminal Cleaner Bi...

Page 256: ...Connector Locations 5 27 5060 XXX HVPS Developer Board ...

Page 257: ...5 28 Service Manual 5060 XXX ...

Page 258: ...ng or altered parts especially in the area of the On Off switch and the power supply Damaged missing or altered covers especially in the area of the top cover and the power supply cover Possible safety exposure from any non Toshiba attachments Lubrication Specifications Lubricate only when parts are replaced or as needed not on a scheduled basis Use of lubricants other than those specified can cau...

Page 259: ...owing part numbers 12G6496 Maintenance Kit 115V 12G6497 Maintenance Kit 220V 83 ITU Maintenance is displayed at each 105K copies when the ITU Assembly needs to be replaced to maintain the print quality and reliability of the printer There are two assemblies ITU assembly and Second Transfer Roll in a maintenance kit Both should be replaced at the same time The parts are available as a maintenance k...

Page 260: ...by one index number Parts peculiar to one or the other of the assemblies are listed separately and identified by description NS Not Shown in the Asm Index column indicates that the part is procurable but is not pictured in the illustration PP Parts Packet in the Description column indicates the part is contained in a parts packet The parts catalog uses these designations to identify model specific...

Page 261: ...7 2 Service Manual 5060 XXX Assembly 1 Covers ...

Page 262: ...rew PP 12G6530 14 12G6411 1 Front Right Handle Cover Assembly 15 12G6394 1 Front Lower Right Cover 16 12G6357 1 Front Cover Assembly 17 12G6391 1 Paper Path Access Door 18 2 Screw PP 12G6309 19 12G6388 1 Front Lower Left Cover 20 12G6412 1 Front Left Handle Cover Assembly 21 12G6404 1 Left Front Light Shield Cover 22 12G6402 1 Operator Panel Bezel with Logos 23 12G6344 1 Operator Panel Assembly Lo...

Page 263: ...7 4 Service Manual 5060 XXX Assembly 1 1 Covers ...

Page 264: ...or Assembly 6 12G6400 1 Waste Container Door 7 12G6390 1 Rear Cover 8 12G6401 1 Rear Fan Cover 9 12G6340 1 Fuser Top Duct 10 12G6358 1 Fuser Bottom Duct 11 12G6360 1 Fuser Wall Duct NS 12G6339 1 Blank TLI SN Label NS 12G6510 6 Cable Tie NS 12G6511 2 Cable Mount NS 12G6485 1 Lower Access Jam Door Assembly NS 12G6386 1 Duplex Actuator Arm NS 12G6387 2 Ground Cable NS 12G6383 2 Fuser Latch Slide NS 1...

Page 265: ...115V 500W 1 12G6302 1 Fuser Assembly 220V 500W NS 12G6514 1 Fuser Assembly WEB Oiler 115V 500W NS 12G6515 1 Fuser Assembly WEB Oiler 220V 500W 2 12G6337 1 Fuser Lamp 115V 500W Hot Roll 2 12G6341 1 Fuser Lamp 220V 500W Hot Roll 3 12G6338 1 Fuser Lamp 115V 400W Backup Roll 3 12G6342 1 Fuser Lamp 220V 400W Backup Roll ...

Page 266: ...alog 7 7 5060 XXX Assembly 2 1 Fuser Asm Index Part Number Units Description 2 1 1 12G6414 1 Fuser Drive Assembly 2 4 Screws PP 12G6309 NS 12G6543 1 WEB Oiler Index Drive Assembly NS 12G6545 1 WEB Oiler Assembly ...

Page 267: ... Manual 5060 XXX Assembly 3 Vacuum Belt Transport Assembly Asm Index Part Number Units Description 3 1 12G6489 1 Vacuum Belt Transport Assembly 2 12G6488 1 Transfer Plate Assembly 3 12G6428 1 Second Transfer Roll ...

Page 268: ...heads Asm Index Part Number Units Description 4 1 12G6322 4 Printhead Assembly 2 12 Screw PP 12G6534 3 12 Screw PP 12G6539 4 12G6523 4 PSD Assembly NS 12G6535 4 Guide Assembly Cartridge Left Side NS 12G6536 4 Guide Assembly Cartridge Right Side ...

Page 269: ...7 10 Service Manual 5060 XXX Assembly 5 Paper Feed Output Redrive ...

Page 270: ... Units Description 5 1 56P0107 1 Anchor Bracket Mounting 2 12G6493 2 Upper Door Hinge 3 2 Screw PP 12G6533 4 12G6492 1 Redrive Assembly 5 12G6355 1 Redrive Door 6 12G6513 1 Lower Rear Door Latch 7 12G6512 1 Lower Front Door Latch 8 2 Screw PP 12G6530 9 12G6485 1 Door Assembly Jam Access ...

Page 271: ...7 12 Service Manual 5060 XXX Assembly 6 Multipurpose Feeder MPF ...

Page 272: ...57 1 MPD Support Bracket Cover 9 12G6456 1 Sensor Mount Bracket 10 12G6461 1 Paper Out Low Sensor 11 12G6458 1 MPF Support Bracket Spring 12 12G6459 1 MPF Support Bracket 13 12G6462 1 MPF Bracket Assembly 14 12G6463 1 MPF Drive Gear 15 12G6465 1 MPF Drive Gear Bushing 16 12G6464 1 MPF Drive Gear Shaft 17 12G6451 1 MPF Autocompensator Pick Assembly 18 12G6354 1 Rib Housing 19 12G6447 1 Friction Buc...

Page 273: ...7 14 Service Manual 5060 XXX Assembly 7 500 Sheet Integrated Tray ...

Page 274: ...2G6418 1 Back Restraint 4 12G6424 1 Size Sensing Gear Cover 5 12G6423 3 Size Sensing Gear 6 12G6422 1 Size Sensing Barrel Cam 7 12G6538 10 Screw M 3x5mm 8 12G6425 1 Tray Bias Bellcrank Assembly 9 1 Screw PP 12G6533 10 12G6426 1 Tray Bias Spring 11 12G6568 1 Reflector Label 12 12G6421 1 Wear Strip 13 12G6420 1 Tray Wear Clip 14 12G6417 1 Side Restraint 15 99A0120 2 Restraint Pad ...

Page 275: ...Lift Bellcrank 4 12G6557 1 Bellcrank Lift Spring 5 12G6427 1 Pick Assembly 500 Tray 6 99A0070 2 Pick Rolls 7 12G6475 1 Transparency Lift Arm 8 12G6473 1 Transparency Lift Link NS 12G6476 1 Paper Level Sensing Assembly NS 12G6461 1 Sensor Paper Out Low NS 12G6478 1 Flag Paper Out Low NS 56P0551 1 Cable Paper Media Low Out NS 56P0552 1 Cable Pick Motor Extension NS 12G6472 1 Tray Interlock Bracket ...

Page 276: ...60 XXX Assembly 9 ITU Assembly Asm Index Part Number Units Description 9 1 12G6300 1 ITU Assembly 2 12G6518 1 ITU Motor Drive Assembly 3 1 Screw PP 12G6309 NS 12G6443 2 ITU Bias Spring NS 12G6413 1 ITU Light Shield Assembly ...

Page 277: ...7 18 Service Manual 5060 XXX Assembly 9 1 ITU Assembly ...

Page 278: ... Transfer Bellcrank 8 12G6438 2 BOR Spring Yellow 9 12G6437 3 Front Transfer Bellcrank 10 12G6435 3 Front V Block Guide 11 56P0172 2 BOR Spring Cyan 12 56P0171 2 BOR Spring Magenta 13 56P0173 2 BOR Spring Black 14 56P0182 1 Front V Block Guide Black 15 12G6436 1 ITU Black Transfer Front Bellcrank 16 12G6445 1 TFR Rear Bellcrank Black 17 56P0181 1 Rear V Block Guide Black 18 12G6439 1 Black Termina...

Page 279: ...7 20 Service Manual 5060 XXX Assembly 10 Cartridge Contact Assembly ...

Page 280: ...71 6 Contact Pin 7 12G6363 1 Housing Cartridge Contacts 8 12G6378 1 Cartridge Support Roller 9 12G6367 1 TAR Contact 10 12G6366 1 Developer Roll Contact 11 12G6368 1 Doctor Blade Contact 12 12G6370 1 Charge Roll Contact 13 12G6369 1 PC Drum Contact 14 12G6365 1 Cap Developer Contacts 15 12G6379 1 Smart Chip Cable Assembly 16 12G6364 1 Cleaner Contacts Cap 17 2 Screw PP 12G6309 18 12G6373 4 Cleaner...

Page 281: ...7 22 Service Manual 5060 XXX Assembly 11 Electronics ...

Page 282: ...uay HV African Countries Denmark HV Austria HV Czech HV Slovak countries HV Greece HV Hungary HV Finland HV Norway HV Sweden HV France HV Belgium HV Netherlands HV Germany HV Italy HV Lebanon HV Syria HV Egypt HV Jordan HV Iran HV Euro English HV Albania HV Bosnia HV Bulgaria HV Croatia HV Slovenia HV Macedonia HV Yugoslavia Serbia and Montenegro HV Romania HV Iceland HV Poland HV Russia HV Turkey...

Page 283: ...7 24 Service Manual 5060 XXX Assembly 11 1 Electronics ...

Page 284: ...G6310 1 Cable Video Printhead Y NS 12G6311 1 Cable Video Printhead C NS 12G6312 1 Cable Video Printhead M NS 12G6313 1 Cable Video Printhead K NS 12G6314 1 Cable LEXPSD YC NS 12G6315 1 Cable LEXPSD MK NS 12G6316 1 Cable HVPS Control Developer NS 12G6317 1 Cable HVPS Control Transfer NS 12G6318 1 Cable RIP Engine Comm and CT NS 12G6319 1 Cable Options Stacker NS 12G6320 1 Cable Options Bottom NS 12...

Page 285: ...9 3 1 Screw PP 12G6530 4 12G6541 4 Standoff High Voltage Power Supply Developer 5 4 Screw PP 12G6540 6 12G6328 1 HVPS Developer Board NS 12G6339 1 Contact Assembly Black Terminal NS 12G6340 1 Contact Assembly Magenta Terminal NS 12G6341 1 Contact Assembly Cyan Terminal NS 12G6546 1 Contact Assembly Yellow Terminal NS 12G6442 1 Terminal Contact Spring ...

Page 286: ...og 7 27 5060 XXX Assembly 11 3 Electronics Asm Index Part Number Units Description 11 3 1 12G6336 1 Engine Board Shield 2 12 Screw PP 12G6531 3 12G6323 1 Engine Board 4 12G6387 1 Ground Strap 5 14 Screw PP 12G6309 ...

Page 287: ...11 4 Electronics Asm Index Part Number Units Description 11 4 1 12G6343 1 RIP Fan Duct 2 12G6361 1 RIP Fan 3 2 Screws PP 12G6530 4 12G6479 1 VTB Fan 5 12G6382 1 Fuser Fan 6 12G6529 2 Screws Fuser Fan Mounting NS 12G6490 1 VTB Fan Gap Cover ...

Page 288: ...ntainer 2 12G6470 1 Waste Container Latch Spring 3 12G6469 1 Waste Container Latch 4 12G6467 4 Paper Size Sensing Spring 5 12G6468 1 Paper Size Sensing Bracket 6 1 Screw Paper Size Sensing Assembly Mounting PP 12G6531 7 12G6466 4 Paper Size Sensing Link NS 12G6472 1 Bracket Tray Interlock NS 12G6505 1 Waste Toner Full Sensor ...

Page 289: ... 6 Electronics Asm Index Part Number Units Description 11 6 1 12G6480 1 Registration Motor Assembly 2 2 Screw PP 12G6533 3 4 Screw PP 12G6530 4 12G6526 3 Cartridge Drive Assembly Cyan Magenta Black 5 12G6527 1 Cartridge Drive Assembly Yellow ...

Page 290: ...Parts Catalog 7 31 5060 XXX Assembly 11 7 Electronics Asm Index Part Number Units Description 11 7 1 12G6446 1 BOR Drive Assembly 2 3 Screw PP 12G6309 ...

Page 291: ...7 32 Service Manual 5060 XXX Assembly 12 Output Expander ...

Page 292: ... Board Output Expander DC motor 7 9 Screw PP 56P0167 8 56P0409 1 Cover Front Control Board 9 99A1817 1 Tray Output Expander 10 99A1688 1 Diverter Arm 11 99A1689 1 Spring Clutch Assembly 12 99A0482 1 Spring Output Tray 13 99A0481 1 Latch Output Tray 14 2 Shaft Bearing PP 99A0572 15 99A1784 2 Bracket Attach 16 99A0415 2 Spring Swing Arm 17 56P0408 1 Output Expander Assembly Mechanical Linkage 18 56P...

Page 293: ...7 34 Service Manual 5060 XXX Assembly 12 1 Output Expander ...

Page 294: ... 56P0410 2 Bracket Attach 5 11 Screw PP 56P0167 6 56P0400 1 Cover Front 7 99A0361 1 Belt 160 Gear 8 99A0362 1 Arm Assembly Belt Idler 9 99A0364 1 Spring Belt Tensioner 10 99A0482 1 Spring Output Tray 11 99A0481 1 Latch Output Tray 12 99A0912 1 Frame Assembly 13 99A0351 1 Sensor Output Expander Pass Thru 14 3 Shaft Bearing PP 99A0572 15 99A0913 1 Shaft Assembly Middle 40T Also order PP 99A0572 NS 9...

Page 295: ...7 36 Service Manual 5060 XXX Assembly 13 5 Bin Mailbox ...

Page 296: ...5 Bin Mailbox Pass thru 14 99A1712 5 Tray Paper Cap 15 56P0420 1 Bracket Asm Bail Attach 16 99A1743 1 Kit 5 Bin Mailbox Asm 17 1 Bail order 99A1743 5 Bin Mailbox Asm Kit 18 99A1713 5 Support Paper Tray 19 99A1687 5 Stop Asm Paper Tray 20 99A1735 4 Flag Bin Full 21 56P0412 1 Rear Structural Cover 22 99A1736 5 Cable Dual Sensor 23 99A1737 5 Sensor Dual Paper Height 24 99A1718 1 Cable Asm Lower Auto ...

Page 297: ...7 38 Service Manual 5060 XXX Assembly 13 1 5 Bin Mailbox ...

Page 298: ...erter Actuator 7 99A1730 4 Arbor Diverter Actuator 8 99A1789 4 C clip 9 56P0418 1 Bracket Attach Front 10 99A1732 4 Solenoid Diverter 11 99A1738 5 Deflector Paper Exit w Brush 12 99A1722 4 Deflector Paper 13 99A1787 4 Deflector 14 99A1721 1 Deflector Paper Top Bin NS 99A1734 1 Spring Static Ground NS 99A0462 1 Grease Packet IBM 23 NS 99A1715 1 Roller Asm Rear Access Door NS 99A1717 1 Gear Drive NS...

Page 299: ...7 40 Service Manual 5060 XXX Assembly 14 500 Sheet Tray Option ...

Page 300: ...with System Board 10 12G6558 1 Pick Arm Lift Bellcrank 11 12G6566 1 Paper Size Sensing Assembly 12 12G6557 1 Bellcrank Lift Spring 13 12G6560 1 500 Base Assembly 14 12G6380 7 Machine Pad 15 56P0169 1 Plate 500 Support Assembly 16 12G6554 1 Paper Guide 17 12G6563 1 Wall Support plate 18 12G6552 1 Base Door Assembly 19 12G6561 1 Spring 20 12G6555 1 500 Option Deflector 21 12G6567 1 Grounding Spring ...

Page 301: ...7 42 Service Manual 5060 XXX Assembly 14 1 500 Sheet Tray Option ...

Page 302: ...12G6418 1 Back Restraint 4 12G6424 1 Size Sensing Gear Cover 5 12G6423 3 Size Sensing Gear 6 12G6422 1 Size Sensing Barrel Cam 7 12G6538 10 Screw M 3x5mm 8 12G6425 1 Tray Bias Bellcrank Assembly 9 1 Screw PP 12G6533 10 12G6426 1 Tray Bias Spring 11 12G6568 1 Reflector Label 12 12G6421 1 Wear Strip 13 12G6420 1 Tray Wear Clip 14 12G6417 1 Side Restraint 15 99A0120 2 Restraint Pad ...

Page 303: ...7 44 Service Manual 5060 XXX Assembly 15 Duplex Unit ...

Page 304: ...Exit Sensor 11 56P0435 1 Duplex Shaft Mount 12 56P0479 1 Front Decurl Assembly 13 56P0444 1 F R Backup Shaft Assembly 14 56P0476 3 5mm Bushing 15 56P0473 1 Brake Pad 16 56P0439 1 Duplex Paper Guide 17 56P0454 1 Wall Support 18 56P0475 1 Brake Spring 19 56P0472 1 Pass Thru Shaft Assembly 20 56P0441 1 Duplex Shaft Assembly 21 56P0468 1 Pass Thru Spring 22 56P0470 1 Aligner Arm Spring 23 56P0466 1 Sp...

Page 305: ...7 46 Service Manual 5060 XXX Assembly 15 1 Duplex Unit ...

Page 306: ...upport 7 56P0430 1 Duplex Card Assembly 8 56P0458 1 Chassis Ground Spring 9 56P0433 1 Right Jam Clearance Tray Assembly 10 99A1789 1 Retainer C Clip 11 56P0478 2 Aligner Spring 12 99A0323 2 Paper Guide Assembly 13 56P0465 2 Drive Alignment Shaft Assembly 14 56P0477 1 Reduction Gear Shaft 15 56P0451 3 Backup Spring Assembly 16 99A1717 2 32PPM Drive Gear 17 56P0452 3 Backup Spring Assembly 18 56P043...

Page 307: ...7 48 Service Manual 5060 XXX Assembly 16 HCIT ...

Page 308: ...e 16 56P0547 1 Elevator Lift Belt 17 56P0549 1 Elevator Lift 17 56P0507 1 Cam Separator Assembly 17 56P0598 1 Left Jam Cover Upper 18 56P0563 3 Ring 7 Elevator Lift Gear Elevator Lift 19 56P0548 1 Elevator Lift Gear 20 56P0523 2 Paper Tray Arms 21 56P0525 1 Feed Unit Complete Assembly 22 56P0527 2 Bushing 23 56P0533 1 Spring Feed Unit Front 24 56P0534 1 Spring Feed Unit Rear 25 56P0562 1 Feed Cove...

Page 309: ...7 50 Service Manual 5060 XXX Assembly 16 1 HCIT ...

Page 310: ...56P0492 2 Caster Fixed 9 56P0504 1 Left Side Cover 10 56P0508 1 Upper Left Side Jam Cover 11 56P0507 1 Locating Pin Options Front Right 12 56P0506 1 Locating Pin Options Rear Left 13 56P0514 1 Options Autoconnect Cable Assembly 14 56P0517 1 Options Cable Mounting Plate NS 56P0509 1 Cable Feed Unit Special Sensors NS 56P0510 1 Cable Feed Unit Sensors NS 56P0512 1 Cable Elevator Motor NS 56P0515 1 M...

Page 311: ... Paper 17 56P0323 1 Gear Assembly Offset Motor and Gear 17 56P0324 1 Motor Assembly Elevator Tray 17 56P0325 1 Motor Assembly Paper Feed 17 56P0326 1 Flag Paper Full 17 56P0327 1 Belt 40S3M888 17 56P0328 1 Belt 40S3M198 17 56P0329 1 Belt 40S3M225 17 56P0330 1 Belt 40S3M279 17 56P0331 1 Belt 40S3M80 17 56P0332 1 Belt 40S3M900 17 56P0333 2 Belt 60S6M1420 17 56P0334 1 Belt 170P2M4 17 56P0335 1 Belt 4...

Page 312: ...r OS 535223 601 17 56P0349 1 Sensor OS 311D A5 17 56P0350 2 Sensor EE SX460 P1 CHN 17 56P0351 1 Switch Cover Open 17 56P0352 1 Switch Micro SS 5FL 3T 10E 17 56P0353 1 Switch Micro K3 3 17 56P0354 1 Bracket Finisher Alignment 17 56P0355 1 Guide Vertical Paper 17 56P0356 1 Pack Magnet Strong and Weak and Door Latch 17 56P0357 1 Actuation Assembly 17 56P0358 1 Accumulator Slides 17 56P0359 1 Harness ...

Page 313: ...arness 17 56P0371 1 Harness 17 56P0372 1 Harness 17 56P0373 1 Harness 17 56P0374 1 Harness 17 56P0375 1 Harness 17 56P0376 1 Harness 17 56P0377 1 Harness 17 56P0378 1 Harness 17 56P0379 1 Harness 17 56P0380 1 Harness 17 56P0381 1 Harness 17 56P0382 1 Harness 17 56P0383 1 Solenoid Inverter 17 56P0384 1 Belt Staple Assembly 17 56P0385 1 Solenoid Drop Assembly 17 56P0386 1 Fan Assembly DC Motor 17 56...

Page 314: ... Assembly 32MB Flash DIMM 18 56P0162 1 Adapter Parallel 1284 C B 18 56P9938 1 Hard Disk 5GB or larger with Adapter formatted 18 56P9939 1 Hard Disk 5GB or larger ISP Hard Disk unformatted 18 56P9926 1 Forms Software 18 56P9927 1 Forms Director Software 18 56P9928 1 Toshiba Forms 4MB DIMM 18 56P9929 1 Toshiba Forms 8MB DIMM 18 56P9930 1 Toshiba Forms 16MBMB DIMM 18 56P9932 1 Toshiba Forms 64MB DIMM...

Page 315: ...isher Attach Kit 19 1 Screw Type 323 PP 12G6309 19 1 Screw Type 324 PP 12G6530 19 1 Screw Type 232 PP 12G6531 19 1 Screw Type 102 PP 12G6532 19 1 Screw Type 312 322 412 423 PP 12G6533 19 1 Screw Type 484 PP 12G6534 19 1 Screw 500 Sheet Tray PP 12G6538 19 1 Screw Type 124 PP 12G6539 19 1 Screw Type 121 PP 12G6540 ...

Page 316: ...5 Output Bin Test Standard Bin 3 15 Output Bin X Sensor Test 3 16 5 Bin Mailbox Diverter Test 3 17 Print Registration 3 22 Diagnostic Mode 3 6 Diagnostics Error Code Table 2 6 Service Checks 2 46 Sub Error Code Table 2 18 Symptom Table Base Printer 2 2 Symptom Table HCIT 2000 Sheet Option 2 4 Symptom Table Output Expander Option 2 5 Symptom Table 5 Bin Mailbox Option 2 5 Symptom Table 500 Sheet Dr...

Page 317: ...r Cover 4 33 Lower Jam Access Door Assembly 4 30 Lower Right Door Assembly 4 17 LVPS 4 14 Multipurpose Feeder MPF 4 32 Operator Panel 4 25 Outer EMC Shield 4 10 Paper Path Access Door Cover Front Lower Left Cover 4 31 Paper Size Sensing Assembly 4 42 Printheads 4 33 PSD Sensor Assembly 4 35 Rear Cover 4 11 Rear Fan Cover 4 12 Redrive Assembly 4 36 Redrive Door 4 20 RIP Board 4 10 RIP Board Shield ...

Page 318: ... 12G6354 7 13 12G6355 7 11 12G6356 7 3 12G6357 7 3 12G6358 7 5 12G6360 7 5 12G6361 7 28 12G6362 7 21 12G6363 7 21 12G6364 7 21 12G6365 7 21 12G6366 7 21 12G6367 7 21 12G6368 7 21 12G6369 7 21 12G6370 7 21 12G6371 7 21 12G6372 7 21 12G6373 7 21 12G6374 7 21 12G6375 7 21 12G6376 7 21 12G6377 7 21 12G6378 7 21 12G6379 7 21 7 25 12G6380 7 3 7 41 12G6382 7 28 12G6383 7 5 12G6384 7 5 12G6385 7 5 12G6386...

Page 319: ...16 7 41 12G6472 7 16 7 29 12G6473 7 16 7 41 12G6474 7 16 7 41 12G6475 7 16 7 41 12G6476 7 16 12G6478 7 16 12G6479 7 28 12G6480 7 30 12G6485 7 5 12G6488 7 8 12G6489 7 8 12G6490 7 28 12G6491 7 3 12G6492 7 11 12G6493 7 11 12G6494 7 29 12G6503 7 25 12G6504 7 25 12G6505 7 29 12G6506 7 3 12G6507 7 3 12G6509 7 25 7 55 12G6510 7 5 7 41 12G6511 7 5 12G6512 7 11 12G6513 7 11 12G6514 7 6 12G6515 7 6 12G6518 ...

Page 320: ...52 56P0339 7 52 56P0340 7 53 56P0341 7 53 56P0342 7 53 56P0343 7 53 56P0344 7 53 56P0345 7 53 56P0346 7 53 56P0347 7 53 56P0348 7 53 56P0349 7 53 56P0350 7 53 56P0351 7 53 56P0352 7 53 56P0353 7 53 56P0354 7 53 56P0355 7 53 56P0356 7 53 56P0357 7 53 56P0358 7 53 56P0359 7 53 56P0360 7 53 56P0361 7 53 56P0362 7 53 56P0363 7 53 56P0364 7 53 56P0365 7 54 56P0366 7 54 56P0367 7 54 56P0368 7 54 56P0369...

Page 321: ... 7 45 56P0483 7 45 56P0490 7 49 56P0491 7 51 56P0492 7 51 56P0493 7 51 56P0494 7 49 56P0495 7 49 56P0497 7 49 56P0498 7 49 56P0500 7 51 56P0501 7 51 56P0503 7 51 56P0504 7 51 56P0505 7 51 56P0506 7 51 56P0507 7 49 7 51 56P0508 7 51 56P0509 7 51 56P0510 7 51 56P0511 7 49 56P0512 7 51 56P0513 7 49 56P0514 7 51 56P0515 7 51 56P0516 7 49 56P0517 7 51 56P0518 7 49 56P0519 7 49 56P0520 7 49 56P0522 7 49...

Page 322: ...50 7 39 99A0462 7 39 99A0481 7 33 7 35 99A0482 7 33 7 35 99A0545 7 55 99A0560 7 55 99A0629 7 55 99A0912 7 35 99A0913 7 35 99A0915 7 33 99A0923 7 55 99A1512 7 37 99A1580 7 33 99A1611 7 25 99A1687 7 37 99A1688 7 33 99A1689 7 33 99A1708 7 37 99A1710 7 37 99A1712 7 37 99A1713 7 37 99A1715 7 39 99A1716 7 37 99A1717 7 39 7 47 99A1718 7 37 99A1719 7 37 99A1721 7 39 99A1722 7 39 99A1723 7 37 99A1724 7 37 ...

Page 323: ...I 8 Service Manual 5060 XXX ...

Reviews: