1
2
3
4
5
6
7
8
9
10
11
12
5-19
Select other copy modes as required.
8
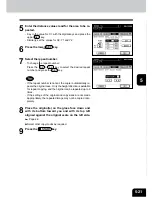
Place the original(s) on the glass face down and
with its bottom toward you and with its top left
aligned against the original scale on the left side.
Page 2-9
7
Press the lower SET key.
6
Enter the distance values read in step 5 for the
specified area.
- Key in the value for X1 with the digital keys and press the
upper SET key.
- Similarly, set the values for X2, Y1 and Y2.
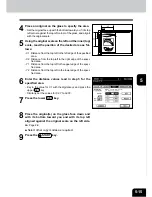
4
When centring a part of an original, place the origi-
nal on the glass to specify the area.
- Set the original face up with the bottom toward you, fit its
top left corner against the top left corner of the glass, and
align it with the original scale.
5
Using the original scale on the left and the inner (top)
scale, read the position of the desired area, as fol-
lows:
- X1 Distance from the top left to the left edge of the specified
area.
- X2 Distance from the top left to the right edge of the speci-
fied area.
- Y1 Distance from the top left to the upper edge of the speci-
fied area.
- Y2 Distance from the top left to the lower edge of the speci-
fied area.
9
Press the START key.
Summary of Contents for e-studio 210c
Page 1: ...OPERATOR S MANUAL FOR COPYING FUNCTIONS DIGITAL COLOUR PLAIN PAPER COPIER ...
Page 26: ...1 2 3 4 5 6 7 8 9 10 11 12 1 12 BEFORE MAKING COPIES ...
Page 60: ...1 2 3 4 5 6 7 8 9 10 11 12 3 16 SETTING OF BASIC COPY MODES ...
Page 70: ...1 2 3 4 5 6 7 8 9 10 11 12 4 10 COLOUR EDITING AND ADJUSTMENT ...
Page 92: ...1 2 3 4 5 6 7 8 9 10 11 12 USING THE EDITING FUNCTIONS 5 22 ...
Page 172: ...1 2 3 4 5 6 7 8 9 10 11 12 9 30 WHENTHE GRAPHIC SYMBOLS FLASH ONTHETOUCH PANEL ...


