background image

Touch

To

7

Status/Supplies

Show a printer warning or error
message whenever the printer requires
intervention to continue processing.

View more information on the printer
warning or message, and on how to
clear it.

8

Tips

View a context

sensitive help information.

This may also appear on the home screen:

Touch

To

Search Held Jobs

Search current held jobs.

Jobs by user

Access print jobs saved by user.

Profiles and
Solutions

Access profiles and solutions.

Features

Feature

Description

Attendance message
alert

If an attendance message affects a function,
then this icon appears and the red indicator light
blinks.

Warning

If an error condition occurs, then this icon
appears.

Printer IP address

Example:

123.123.123.12

3

The IP address of your printer is located at the
top left corner of the home screen and appears
as four sets of numbers separated by periods.
You can use the IP address when accessing the
Embedded Web Server to view and remotely
configure printer settings even when you are not
physically near the printer.

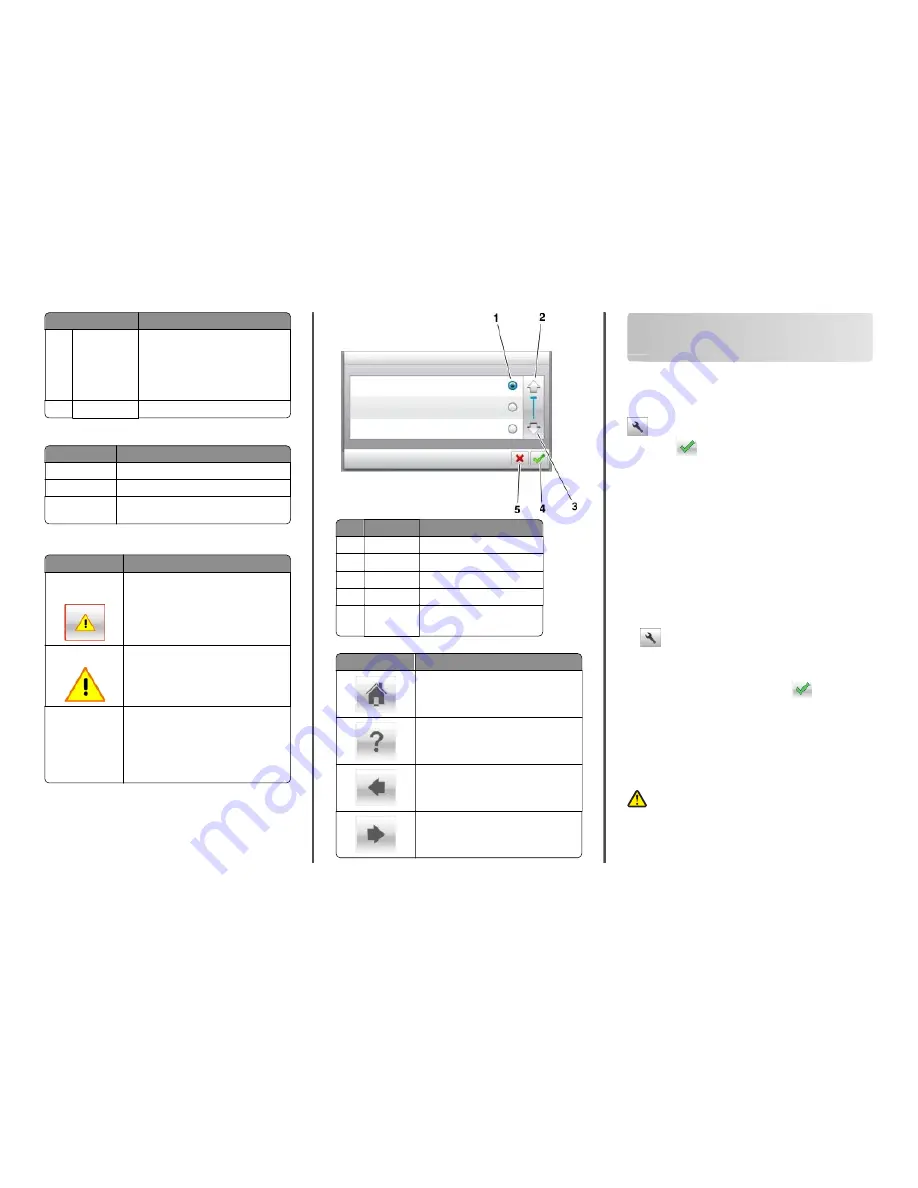
Using the touch-screen buttons

Note: 

Your home screen may vary, depending on your home screen

customization settings, administrative setup, and active embedded
solutions.

Touch the

To

1

Radio button

Select or clear an item.

2

Up arrow

Scroll up.

3

Down arrow

Scroll down.

4

Accept button Save a setting.

5

Cancel button

Cancel an action or a selection.

Return to the previous screen.

Touch

To

Return to the home screen.

Open a context-sensitive Help dialog on the
printer control panel.

Scroll to the left.

Scroll to the right.

Loading paper and specialty
media

Setting the paper size and type

From the home screen navigate to:

 > 

Paper Menu

 > 

Paper Size/Type

 > select a tray > select the paper

size or type > 

Configuring Universal paper settings

The Universal paper size is a user

defined setting that lets you print on

paper sizes that are not preset in the printer menus.

Notes:

The smallest supported Universal size is 76 x 127 mm
(3 x 5 inches) and is loaded only in the multipurpose feeder and
manual feeder.

The largest supported Universal size is 215.9 x 359.9 mm
(8.5 x 14.17 inches) and is loaded only in the multipurpose
feeder and manual feeder.

1

From the home screen, navigate to:

 > 

Paper Menu

 > 

Universal Setup

 > 

Units of Measure

 > select

a unit of measure

2

Touch 

Portrait Width

 or 

Portrait Height

.

3

Select the width or height, and then touch 

.

Loading the 250


and 550

sheet tray

The printer has one 250-sheet tray (Tray 1) with an integrated manual
feeder. The 250-sheet tray, the 650-sheet duo tray, and the 550-sheet
tray support the same paper sizes and types and are loaded in the same
way.

CAUTION—POTENTIAL INJURY: 

To reduce the risk of

equipment instability, load each tray separately. Keep all other
trays closed until needed.

1

Pull out the tray completely.


2

Summary of Contents for e-STUDIO 305CP

Page 1: ...utton light Printer status Off The printer is off idle or in Ready state Solid amber The printer is in Sleep mode Blinking amber The printer is entering or waking from Hibernate mode Blinking amber for 0 1 second then goes completely off for 1 9 secondsinaslow pulsing pattern The printer is in Hibernate mode Understanding the home screen When the printer is turned on the display shows a basic scre...

Page 2: ...ow Scroll down 4 Accept button Save a setting 5 Cancel button Cancel an action or a selection Return to the previous screen Touch To Return to the home screen Open a context sensitive Help dialog on the printer control panel Scroll to the left Scroll to the right Loading paper and specialty media Setting the paper size and type From the home screen navigate to PaperMenu PaperSize Type selectatray ...

Page 3: ... to the correct position for the size of the paper being loaded Note Use the paper size indicators on the bottom of the tray to help position the guide 4 Squeeze and then slide the width guide tab to the correct position for the size of the paper being loaded Note Use the paper size indicators on the bottom of the tray to help position the guides 5 Flex the sheets back and forth to loosen them and...

Page 4: ...r The tray is loaded in the same way as the 250 sheet tray and the optional 550 sheet tray and supports the same paper types and sizes The only differences are the look of the guide tabs and the location of the paper size indicators CAUTION POTENTIAL INJURY To reduce the risk of equipment instability load each tray separately Keep all other trays closed until needed 1 Length guide tab 2 Paper size...

Page 5: ...r 3 Width guide 4 Feeder extender 5 Paper size indicator 6 Load the paper and then adjust the width guide to lightly touch the edge of the paper stack Load paper card stock and transparencies with the recommended printable side facedown and the top edge entering the printer first Load envelopes with the flap side up and against the right side of the paper guide Notes Do not load or close the multi...

Page 6: ...amage Paper loaded in the tray should match the paper type name assigned in the printer The temperature of the fuser varies according to the specified paper type Printing issues may occur if settings are not properly configured Creating a custom name for a paper type Using the Embedded Web Server 1 Open a Web browser and then type the printer IP address in the address field Notes View the printer ...

Page 7: ...tly 2 Click Settings Print Settings Quality Menu Toner Darkness 3 Adjust the setting and then click Submit Using the printer control panel 1 From the home screen navigate to Settings Print Settings Quality Menu Toner Darkness 2 Adjust the setting and then touch Using Max Speed and Max Yield Max Speed and Max Yield let you choose between a faster print speed or a higher toner yield Max Yield is the...

Page 8: ...r models select Next Clear the jam press OK and then press to confirm x page jam open front door to clear fuser 1 Open the front door CAUTION HOT SURFACE The inside of the printer might be hot To reduce the risk of injury from a hot component allow the surface to cool before touching it 2 Pull the green lever to open the fuser cover 3 Hold down the fuser cover and then remove the jammed paper Note...

Page 9: ...s to confirm x page jam open front door to clear duplex 1 Open the front door CAUTION HOT SURFACE The inside of the printer might be hot To reduce the risk of injury from a hot component allow the surface to cool before touching it 2 Firmly grasp the jammed paper on each side and then gently pull it out Note Make sure all paper fragments are removed 3 Close the front door 4 From the printer contro...

Page 10: ...per on each side and then gently pull it out Note Make sure all paper fragments are removed 3 Insert the tray 4 From the printer control panel touch to clear the message and continue printing For non touch screen printer models select Next Clear the jam press OK and then press to confirm x page jam clear multipurpose feeder 1 Push the paper release lever in the multipurpose feeder to access the ja...

Page 11: ...der 4 Slide the paper guide until it rests lightly against the edge of the paper stack 5 From the printer control panel touch to clear the message and continue printing For non touch screen printer models select Next Clear the jam press OK 11 ...

Reviews: