10
© 2009 TOSHIBA TEC CORPORATION All rights reserved
e-STUDIO182/212/242
DRUM RELATED SECTION
10 - 15
10.7.8
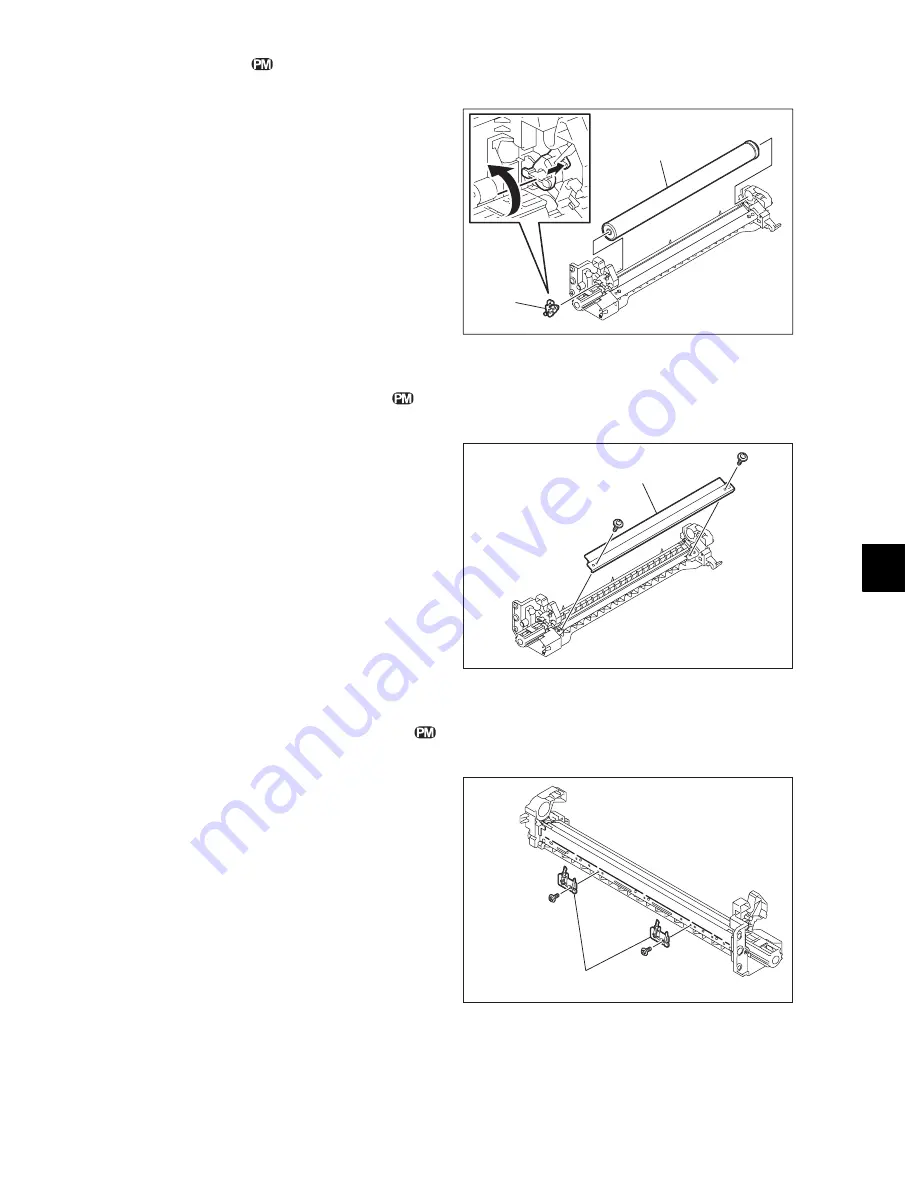
Drum
10.7.9
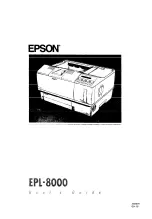
Drum cleaning blade
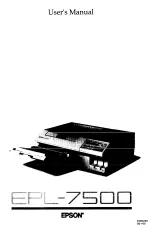
10.7.10 Drum separation finger
(1) Take off the main charger.
P.10-13 "10.7.4 Main charger"
(2) Rotate the lever while pushing its latch and
pull it out.
(3) Take off the drum.
Notes:
1. Be careful not to touch, spit or scratch the
drum surface.
2. Avoid direct light. Place the drum in a
dark place immediately after taking off.
3. Be careful not to touch or scratch the
edge of the cleaning blade.
Fig. 10-22
(1) Take off the drum.
P.10-15 "10.7.8 Drum"
(2) Remove 2 screws and take off the drum
cleaning blade.
Note:
Be careful not to touch or scratch the edge of
the drum cleaning blade.
Fig. 10-23
(1) Take off the drum.
P.10-15 "10.7.8 Drum"
(2) Take off 2 drum separation finger units by
removing 1 screw each.
Note:
When replacing the drum separation fingers,
make sure that the drum has been taken off
first since the fingers may scratch the drum
surface.
Fig. 10-24
Drum
Lever
Drum cleaning blade
Drum separation finger unit
Summary of Contents for e-studio182
Page 12: ......
Page 18: ...e STUDIO182 212 242 2009 TOSHIBA TEC CORPORATION All rights reserved CONTENTS 6 ...
Page 76: ...e STUDIO182 212 242 2009 TOSHIBA TEC CORPORATION All rights reserved COPY PROCESS 3 14 ...
Page 120: ...e STUDIO182 212 242 2009 TOSHIBA TEC CORPORATION All rights reserved SCANNER 6 26 ...
Page 128: ...e STUDIO182 212 242 2009 TOSHIBA TEC CORPORATION All rights reserved LASER OPTICAL UNIT 7 8 ...
Page 228: ...e STUDIO182 212 242 2009 TOSHIBA TEC CORPORATION All rights reserved FUSER EXIT UNIT 12 24 ...
Page 257: ......
Page 258: ......


