2
© 2009 TOSHIBA TEC CORPORATION All rights reserved
e-STUDIO182/212/242
OUTLINE OF THE MACHINE
2 - 23
2.6.2
SRAM board (SRAM)
2.6.3
Fuse PC board (FUS)
Note:
This fuse PC board is copacked with the damp heater unit. (The damp heater unit is optional for
NAD, CND and MJD.)
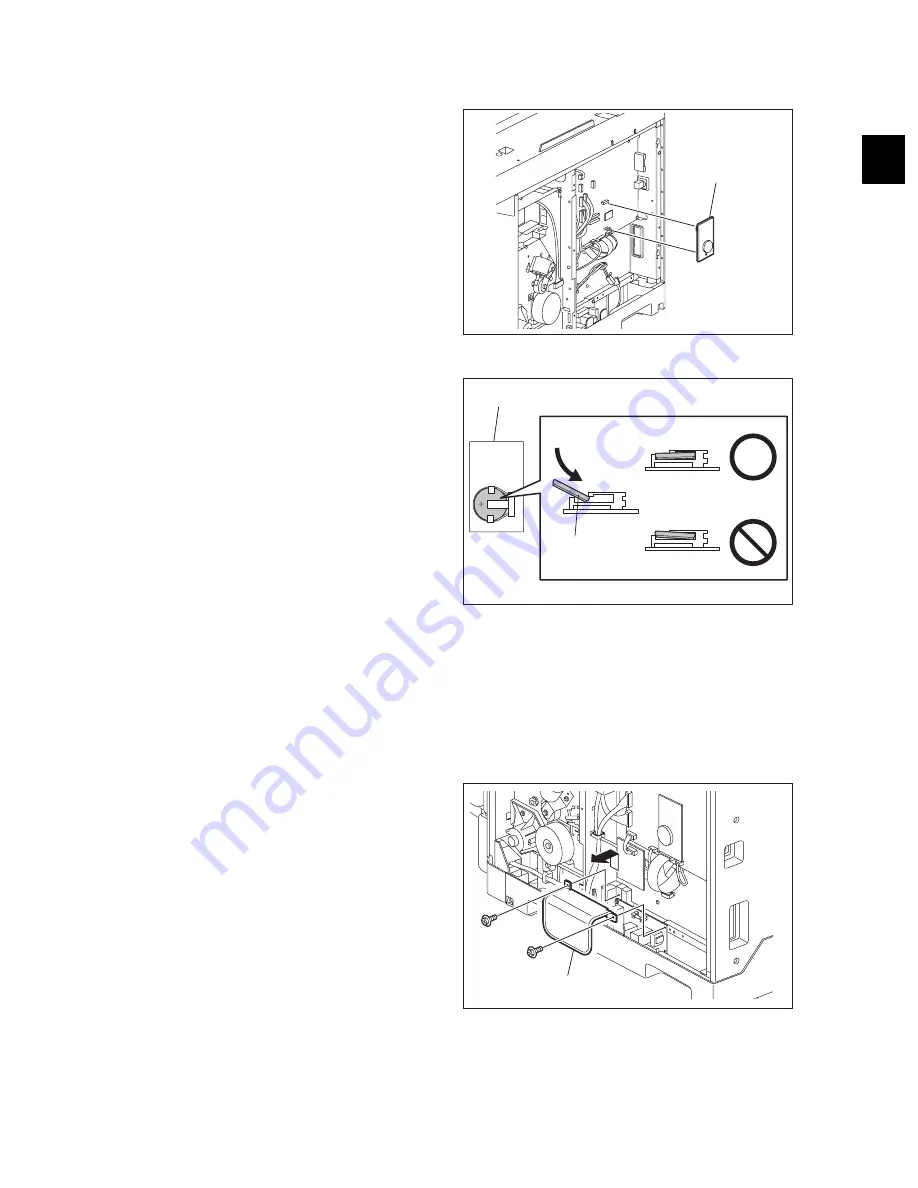
(1) Take off the rear cover.
P.2-21 "2.5.10 Rear cover"
(2) Release 1 lock support and take off the
SRAM board.
Notes:
1. Be sure to perform “08-388” after the
SRAM board has been replaced.
2. Perform "05-310" with the platen cover
and the ADF/RADF closed after replacing
the SRAM board.
3. Make sure that the direction of the battery
on the SRAM board is correct when
replacing it.
Fig. 2-25
Fig. 2-26
(1) Take off the rear cover.
P.2-21 "2.5.10 Rear cover"
(2) Remove 2 screws and take off the cover.
Fig. 2-27
SRAM board
SRAM board
Battery
Cover
Summary of Contents for e-studio182
Page 12: ......
Page 18: ...e STUDIO182 212 242 2009 TOSHIBA TEC CORPORATION All rights reserved CONTENTS 6 ...
Page 76: ...e STUDIO182 212 242 2009 TOSHIBA TEC CORPORATION All rights reserved COPY PROCESS 3 14 ...
Page 120: ...e STUDIO182 212 242 2009 TOSHIBA TEC CORPORATION All rights reserved SCANNER 6 26 ...
Page 128: ...e STUDIO182 212 242 2009 TOSHIBA TEC CORPORATION All rights reserved LASER OPTICAL UNIT 7 8 ...
Page 228: ...e STUDIO182 212 242 2009 TOSHIBA TEC CORPORATION All rights reserved FUSER EXIT UNIT 12 24 ...
Page 257: ......
Page 258: ......


