background image

Chapter 4 TROUBLESHOOTING

56

Can I send a fax from a computer?

Yes. You can send a fax or an Internet Fax from a 

computer in which the N/W-Fax Driver is installed. 

You do not need to print the original fax.
1.  Select [Print] in the [File] menu of the 

application.

2.  Select [TOSHIBA e-STUDIO Fax], and then click 

[Preferences] ([Properties]).

3.  Specify the destination on the [Send] tab of the 

printer driver, and then click [OK].

4.  Click [Print] ([OK]).  

&


GD-1370 Fax Guide 

: “Chapter 4: USING N/W-

FAX DRIVER (NETWORK FAX)” - “Sending Network 
Faxes”

&


Software Installation Guide

 (PDF) : “Chapter 2: 

RECOMMENDED INSTALLATION”

Scanning

How can I scan an image 

in the JPEG format?

Select [Full Color] or [Gray Scale] for color modes 

in the scan setting, and then select [JPEG] for the 

file format.

&


Scanning Guide

 (PDF) : “Chapter 2: SCANNING 

(BASIC OPERATION)” - “Saving Data in the Shared 

Folder” or “Sending Data to an E-mail Address” or 

“Saving Data to a USB Storage Device”

Where is the scanned file stored?

If you have specified [File] as the storage directory, 

data is stored in a shared folder “file_share” in the 

internal storage device of this equipment. To 

download the data, see the following page:

&

 P.37  “Storing scanned data of a shared 

folder in a Windows computer” 

I cannot forward the scanned data to a 

folder on the network.

Check the following:
• Is the specified folder shared? Setting the shared 

folder may differ depending on the equipment or 

OS.

• Is the network path for the folder entered 

correctly?

• Is the login user name or password entered 

correctly?

• Is your antivirus software blocking writing to the 

network folder?

[Remote 1] (or [Remote 2]) cannot be 

selected in [Save as File].

Confirm the shared folder setting on the 

TopAccess menu.
1.  Select as follows: [Administration] tab > [Setup] 

> [Save as file].

2.  Confirm that [Use Network Folder Destination] 

is selected on [Destination].

3.  Confirm that [Remote 1] (or [Remote 2]) of 

[Remote 1 and Remote 2 Settings] is selected.

&


TopAccess Guide

 (PDF) : “Chapter 8: 

[Administration] Tab Page” - “[Setup] Item List” 

- “Save as File settings”

Printing

How can I delete a printing job?

1.  Press the Job Status button at the upper right 

of the home screen or [Job Status] at the lower 

right on the screen of each function.

2.  Press [Print] on the [Jobs] tab.
3.  Select the job to be deleted from the print job 

list, and then press [Delete].

4.  Press [Delete] to delete the job.

&


Software Troubleshooting Guide

 (PDF) : 

“Chapter 1: CONFIRMING JOB STATUS ON THE 

TOUCH PANEL” - “Deleting jobs”

Summary of Contents for e-STUDIO330AC

Page 1: ...MULTIFUNCTIONAL DIGITAL COLOR SYSTEMS Quick Start Guide ...

Page 2: ...ies User Documentation DVD in the DVD ROM drive on your computer Software Installer starts automatically If Software Installer does not launch use the explorer to open the Client Utilities User Documentation DVD and double click Setup exe 2 Select I agree to the terms of the License Agreement and click Next 3 Click the Open User s Manual link in Software Installer The browser starts automatically ...

Page 3: ...auses and solutions for software problems such as the printer driver Software Installation Guide Describes how to install client software such as the printer driver Printing Guide Describes how to use the Print function TopAccess Guide Describes procedures for remote setup and management from a web based utility TopAccess TopAccess web utility allows you to manage the equipment from a browser High...

Page 4: ... pay attention when operating the equipment Read the following descriptions Describes handy information for operating the equipment Indicates pages containing related information Original paper direction You can place paper or originals in a landscape direction Example A4 LT size original on the original glass Screens in this manual Windows 10 screenshots are used to describe the procedures in Win...

Page 5: ...pying Operations 28 Fax Operations 32 Scanning Operations 36 e Filing Operations 38 Printing Operations 40 Chapter 3 MAINTENANCE Replacing Toner Cartridge 44 Replacing Waste Toner Box 46 Replacing Staple Cartridge 48 Regular Cleaning 49 Chapter 4 TROUBLESHOOTING Troubleshooting 52 FAQs 55 Chapter 5 INFORMATION ABOUT EQUIPMENT Items Included with this Equipment 60 Client Software 61 Advanced Applic...

Page 6: ...cteristics of the toner and allows you to print images of an optimal quality Toshiba cartridges and containers are engineered to specifications designed to provide the best possible performance and image quality Toshiba recommends that genuine Toshiba products are used to maintain peak performance and functionality If you are using a toner cartridge other than the one we recommend the toner may no...

Page 7: ...Chapter 1 PREPARATIONS Description of Components 8 Turning On Off 15 Placing Paper and Originals 18 Installing Client Software 20 ...

Page 8: ...r misfed paper in the Paper Feed Unit or Large Capacity Feeder 5 Paper Feed Unit or Large Capacity Feeder The Paper Feed Unit adds one drawer You can load A4 LT LG or 13 LG size paper in the Large Capacity Feeder Specifications Guide PDF Chapter 3 SPECIFICATIONS OF OPTIONS 6 Drawer Load paper in the drawer P 18 Placing Paper and Originals Specifications Guide PDF Chapter 3 SPECIFICATIONS OF OPTION...

Page 9: ...ce the cartridge P 44 Replacing Toner Cartridge 6 Waste toner box Replace this when a message about waste toner box replacement is displayed P 46 Replacing Waste Toner Box 7 Main charger cleaners When the print result is uneven clean the main chargers P 50 Cleaning the main chargers 8 Cleaner Cleans the LED print head or slit glass for color printers P 50 Cleaning the main chargers 9 Exit tray Hol...

Page 10: ... access MFP Management Guide PDF Chapter 2 SETTING ITEMS Admin 8 MEMORY RX lamp Turns on when receiving fax data and fax communications 9 Alarm lamp Turns on when an error occurs and action needs to be taken 10 PRINT DATA lamp Turns on when receiving data such as print data 11 START button Starts operations such as copying The blue lamp on the left of the button turns on when the equipment is read...

Page 11: ...e angle of the control panel You can adjust the angle of the control panel between 7 and 90 degrees from the horizontal position Be careful not to catch your hands in the gap between the equipment and the control panel This could cause an injury ...

Page 12: ...e PDF Chapter 4 APPENDIX 2 Home Data Sync button Synchronize the data on the home screen This button is displayed when the Public Home function is enabled TopAccess Guide PDF Chapter 8 Administration Tab Page Setup Item List 3 Home Setting button Modify the home screen settings MFP Management Guide PDF Chapter 4 APPENDIX 4 Job Status button Check the progress of jobs and the process history Softwa...

Page 13: ... panel supports swipe and pinch operations Press Tap Lightly press buttons on the screen with your finger and lift it immediately Swipe Press the screen with your finger and slide it in one direction Turns pages on the home screen and scrolls up and down in a list ...

Page 14: ...screen Press the button with your finger drag it to another place and lift your finger Pinch pinch and spread Press the screen with two fingers pinch them together or spread them apart on the screen You can use this operation in previews of the Simple Scan Scan and Fax functions etc ...

Page 15: ...nd condition While the equipment is warming up you can use the auto job start function For details see the following guide Copying Guide PDF Chapter 2 HOW TO MAKE COPIES Basic Copying Procedure The home screen is displayed when ready When turning off you also need to shut down by pressing the POWER button on the control panel For details see the following page P 16 Turning off Log in to the equipm...

Page 16: ...ogress such as FAX reception will be aborted No computer should access the equipment over a network such as TopAccess If you press the POWER button while a job is running a message is displayed asking if you want to delete the current job and turn off the equipment Press the POWER button You can then select how to turn the equipment off If you press Shutdown the screen disappears and the equipment...

Page 17: ...icular protocol 6 is disabled The touch panel display turns off and the ENERGY SAVER button turns green When you press the ENERGY SAVER button when print or fax data are received through a wired LAN or when the time set for Scheduled Print has come 1 The default value is 1 minute 2 The function name and the available settings vary depending on the destination 3 The ENERGY SAVER button on the contr...

Page 18: ... Set the end guide to match the paper size 5 Push in the drawer Check that the height of the paper does not exceed the MAX line on the side guides Placing paper Be careful not to catch your fingers when pushing the drawer back This could cause an injury See the following page for supported paper Specifications Guide PDF Chapter 1 SPECIFICATIONS OF PAPER For placing paper in the Large Capacity Feed...

Page 19: ...eder Copying Guide PDF Chapter 2 HOW TO MAKE COPIES Enlarging or Reducing Images Dual Scan Document Feeder 1 Place the originals face up on the original feeder tray 2 Align the side guides to the original length Do not place any heavy objects 4 kg 9 lb or over on the original glass and do not press on it with force Breaking the glass could injure you When an original is scanned from the original g...

Page 20: ...n the power on and check that the home screen is displayed on the touch panel P 15 Turning On Off 1 Insert the Client Utilities User Documentation DVD in the DVD ROM drive of a Windows computer 2 Select I agree to the terms of the License Agreement and click Next 3 Click Recommended 4 Select the port to connect to this equipment and click Install 5 Click Open User s Manual to browse the operator s...

Page 21: ...ces Devices and printers 1 Right click on TOSHIBA Universal Printer 2 and then click Printer properties 2 Obtain configuration data of the options automatically by opening the Device Settings tab menu 3 Click OK 4 A list of discovered printers is displayed 1 Select this equipment on the list and 2 click OK 6 For details of the recommended installation see the following guide Software Installation ...

Page 22: ...22 MEMO ...

Page 23: ...Chapter 2 BASIC OPERATIONS Home Screen Operations 24 Copying Operations 28 Fax Operations 32 Scanning Operations 36 e Filing Operations 38 Printing Operations 40 ...

Page 24: ...nd register functions on the home screen Recalling functions Press the HOME button 1 Press the function you want 2 The following functions can be recalled as the default Simple Copy Simple Scan Copy Scan Fax Optional Print e Filing User Functions User Language Counter EWB Optional ...

Page 25: ...settings URL and applications in the Home screen Moreover you can remove the registered functions and perform customization such as a change of the numbers size and background of the buttons Template Guide PDF Chapter 1 REGISTERING JOB SETTINGS ONTO THE HOME SCREEN MFP Management Guide PDF Chapter 4 APPENDIX TopAccess Guide PDF Chapter 8 Administration Tab Page Registration Administration tab Item...

Page 26: ... have placed the original document on the original glass press Job Finish to finish copying 4 Place the original P 19 Placing originals 2 Simple Copy Settings Sets Specify the number of copies Color Mode Specify the color mode and density Paper Zoom Specify the size of the copy paper and zoom Resolution Specify the resolution 2 Sided Specify the duplex setting for the original and copies ...

Page 27: ...n Specify the 2 Sided Scan setting for the original Preview Click this to display the preview of an image scanned after pressing Start When you press Edit on the preview screen you can change the page order and edit the pages such as rotating Simple Scan sends the scanned data to an E mail address An administrator needs to set up the equipment in advance When you press Address Book you can select ...

Page 28: ...ass press Job Finish after all pages are scanned To stop copying press Stop Printouts are ejected to the exit tray or the receiving tray of the Finisher The tray to which the paper is ejected is indicated by the arrow on the touch panel You can switch the color mode The following modes are available Full Color Copies in full color Default Black Copies in black and white Auto Color Automatically de...

Page 29: ...er the sorting mode is automatically set 1 When copying a set of originals with different sizes press Mixed Size The original sizes that can be mixed are as follows North America LG LT Other than North America A4 FOLIO For example when Original 1 Original 2 and Original 3 are copied in 2 sets they can be made as follows 2 3 3 1 2 3 1 2 3 1 2 3 1 2 3 1 1 2 Sort Group 1 Press Sort and then 2 OK 2 ...

Page 30: ...es For example the following settings can be made 1 sided original to 2 sided copy 2 sided original to 2 sided copy 2 Setting original mode Press Original Mode 1 1 Select the original mode and then 2 press OK Available modes differ depending on the color mode You can select from 5 types in full color mode For example the following setting can be made Originals with text and photographs 2 ...

Page 31: ...lace paper face down on the bypass tray and then align the side guides to the paper length 1 1 Press the button corresponding to the size of paper set on the bypass tray and then 2 OK 2 Press the START button Bypass copying starts 3 Press Paper Type if the paper on the bypass tray is other than plain paper By default density adjustment is set to Auto when the color mode is Black ...

Page 32: ...ss on the touch panel and enter the recipient fax number with the 2 numeric keys If you make a mistake when entering a fax number press Back Space to delete one by one Press Clear to delete all the numbers you entered 3 Press Send 4 Place the original P 19 Placing originals 2 When an original is set on the original glass press Job Finish after all pages are scanned You can also press the START but...

Page 33: ...g recipients Select the recipient address you want to check from the address list 1 Check the recipient address on the displayed screen Press Clear to delete the recipient 2 Specifying recipients in groups 1 Press and then 2 select the recipient You can specify up to 400 recipients single and group To cancel a selected recipient press it again ...

Page 34: ...erved transmissions Press Option 1 The transmission condition setting screen is displayed 2 Press Job Status 1 After each item is set press Close 3 1 Press Fax 2 select the reserved transmission you want to delete and then 3 press Delete 2 Press Delete on the confirmation screen 3 ...

Page 35: ...he address book from the send receive log screen select the record in the send or receive log and then press Entry 3 Registering recipients Press User Functions User on the home screen and then Address 1 1 Press an open button to create a new recipient and then 2 Entry 2 1 Enter the address information and then press 2 OK To register a group in the address book see the following guide MFP Manageme...

Page 36: ...lder and store data in a Windows computer Press Scan on the home screen 1 Make the scan settings 3 Storing the scanned data in a shared folder Press File 4 Place the original P 19 Placing originals 2 Press Scan 6 1 Set File Name 2 File Format etc and then 3 press OK 5 When an original is set on the original glass press Job Finish after all pages are scanned ...

Page 37: ...at IP address of the equipment file_share e g When the IP address of the equipment is 192 168 0 10 enter 192 168 0 10 file_share in the address bar of Windows Explorer For the IP address of the equipment ask your network administrator It is useful to make a shortcut of the file_share folder as this allows you to skip step 2 2 Store the scanned data in a Windows computer Scanned data stored in the ...

Page 38: ...ments by copying them scanning them or using the printer driver For details see the following guides Scanning Guide PDF Chapter 2 SCANNING BASIC OPERATION Saving Data in e Filing Boxes Printing Guide PDF Chapter 2 PRINTING FROM WINDOWS APPLICATIONS Outputting a Job Saved to the Equipment Press the START button to store the documents 5 1 Specify the box to be stored and the document name and then 2...

Page 39: ...ocument you want to print and then 2 press Print You can preview selected documents as thumbnails You can delete selected documents from e Filing This allows you to make print settings such as selecting the duplex printing mode or adding page numbers You can print specific pages for confirmation 3 Select the box that contains the document you want to print 2 ...

Page 40: ...1 Set the print options and click OK 3 1 Select the printer driver of the equipment and then 2 click Preferences Properties 2 Click Print OK To install the printer driver in a Windows computer see the following guide P 20 Installing Client Software Software Installation Guide PDF Chapter 3 INSTALLING PRINTER DRIVERS FOR WINDOWS To install the printer driver in a Mac computer see the following guid...

Page 41: ...s on the background of the paper Click the Effect tab To skip blank pages Click the Others tab To print with templates Click the Templates tab To specify paper size or number of copy sets Click the Basic tab To specify 2 sided printing or N up printing Click the Finishing tab Select Number of pages per Sheet to print several pages on one sheet Pages are reduced to fit the selected paper size and p...

Page 42: ... Same as Original Size 5 Select Bypass Tray in Paper Source 6 Select the paper type to be fed from the bypass tray in Paper Type When printing documents is attempted with thick paper and so on other than plain paper click Paper Type to specify the paper type For more information about the paper types refer to the Specification Guide 7 Set other printing functions as needed and then click OK 8 Clic...

Page 43: ...Chapter 3 MAINTENANCE Replacing Toner Cartridge 44 Replacing Waste Toner Box 46 Replacing Staple Cartridge 48 Regular Cleaning 49 ...

Page 44: ...needs replacing follow the procedures below 1 Open the front cover 2 Remove the color toner cartridge 3 Hold the new toner cartridge with its seal side up 4 Shake the new toner cartridge strongly with its seal side up 5 Pull off the seal 2 1 6 Align the new toner cartridge to the guide Insert it up to the black line ...

Page 45: ... then return it Repeat this 3 times for each of the 4 colors 8 Close the front cover Replacing Toner Cartridge Never attempt to incinerate toner cartridges Dispose of used toner cartridges and waste toner boxes in accordance with local regulations ...

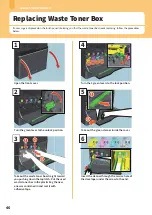
Page 46: ... plastic bag the new one was contained in and seal it with adhesive tape 4 Turn the 4 green levers to the lock position 5 Take out the green cleaner inside the cover 6 Insert the cleaner through the service hole of the developer under the arrow to the end Replacing Waste Toner Box If a message is displayed on the touch panel informing you that the waste toner box needs replacing follow the procedu...

Page 47: ... round hole appears Repeat this 3 times for each of the 4 colors 8 Attach the cleaner with its top on the right and its holding side on the left 9 Turn the 4 green levers to the lock position 10 Push the waste toner box securely until the upper latches click taking care not to tilt it 11 Turn the green lever to the lock position 12 Close the front cover Replacing Waste Toner Box ...

Page 48: ...isplayed informing you that the staple cartridge needs replacing follow the procedures below 1 Open the cover of the Offline Stapler 2 Remove the empty staple cartridge 3 Fit a new staple cartridge 4 Close the cover of the Offline Stapler Stapler Unit of Offline Stapler ...

Page 49: ...area surface of the long rectangular glass 2 Original glass 3 Lower Guide 4 Platen sheet 5 Scanning area of Dual Scan Document Feeder surface of the long rectangular glass Wipe it with a soft dry cloth If there are still stains remaining wipe with a piece of soft cloth which has been moistened with water and then squeezed well Do not use liquids other than water such as alcohol organic solvents or...

Page 50: ...ed image Clean them following the procedure below Cleaning for the front cover When the front cover has got dirty lightly wipe it clean with a soft cloth Be careful not to scratch the parts to be cleaned Do not use a hard cloth or dirty cloth or a tissue 1 Open the front cover 2 Pull out the cleaner until the mark appears and then return it Repeat this 3 times for each color 3 Close the front cove...

Page 51: ...Chapter 4 TROUBLESHOOTING Troubleshooting 52 FAQs 55 ...

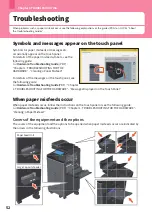
Page 52: ...s of the equipment and the options to be opened when paper misfeeds occur are indicated by the arrows in the following illustrations Symbols for paper misfeeds or messages etc occasionally appear on the touch panel For details of the paper misfeed symbols see the following guide Hardware Troubleshooting Guide PDF Chapter 1 TROUBLESHOOTING FOR THE HARDWARE Clearing a Paper Misfeed For details of th...

Page 53: ...apter 1 CONFIRMING JOB STATUS ON THE TOUCH PANEL Confirming Job Statuses of Printing Copying Scanning Faxing Chapter 2 TROUBLESHOOTING FOR COPYING Copying Problems Chapter 3 TROUBLESHOOTING FOR PRINTING Print Job Problems Printer Driver Problems Network Connection Problems Client Problems Hardware Problems Chapter 4 TROUBLESHOOTING FOR SCANNING Scanning Problems Chapter 5 TROUBLESHOOTING FOR e Fil...

Page 54: ...tab on the touch panel The job history and error codes are displayed in the Log menu Software Troubleshooting Guide PDF Chapter 8 CHECKING THE EQUIPMENT STATUS WITH TopAccess Error Codes Using the Help You can display the Help for this equipment by pressing on screens that have at the top right corner ...

Page 55: ...ing mailboxes TopAccess Guide PDF Chapter 8 Administration Tab Page Registration Administration tab How to Set and How to Operate Fax Received Forward and InternetFAX Received Forward settings How can I register or change a sender s name or fax number You can register or change a sender s name or fax number as follows User Functions User Admin Fax Terminal ID MFP Management Guide PDF Chapter 2 SET...

Page 56: ...ad the data see the following page P 37 Storing scanned data of a shared folder in a Windows computer I cannot forward the scanned data to a folder on the network Check the following Is the specified folder shared Setting the shared folder may differ depending on the equipment or OS Is the network path for the folder entered correctly Is the login user name or password entered correctly Is your an...

Page 57: ...ng of the printer driver is correct Log into Windows using an account that allows installation such as for administrators 1 Select Devices and Printers in the Start menu 2 Right click TOSHIBA Universal Printer 2 and then click Printer properties 3 Select the port of this equipment in the Print to the following port s list on the Ports tab of the printer driver Click Configure Port 4 Confirm if the...

Page 58: ...e power cable into an outlet Is the network cable disconnected If it is disconnected connect it to the LAN port Has toner or paper run out Does the set number of pages exceed the maximum allowed for the specific department or user If the problem still occurs after checking the above see the following guide or contact your administrator Software Troubleshooting Guide PDF Chapter 3 TROUBLESHOOTING F...

Page 59: ...Chapter 5 INFORMATION ABOUT EQUIPMENT Items Included with this Equipment 60 Client Software 61 Advanced Applications 63 Options 64 Logging in 67 ...

Page 60: ...pment Safety Information Describes the necessary precautions for use Read this booklet first Quick Start Guide This guide Describes the preparations basic and advanced usage maintenance and regular cleaning of the equipment Client Utilities User Documentation DVD Contains PDF files of the Operator s Manuals such as the Copying Guide Contains client software such as the printer drivers and the util...

Page 61: ...PPD file for Mac Allows you to print documents from Mac computers Mac OS X 10 6 8 or later Software Installation Guide PDF Chapter 4 INSTALLING PRINTER DRIVERS FOR MAC OS Printing Guide PDF Chapter 3 PRINTING FROM MAC OS APPLICATIONS UNIX Linux filter Allows you to print documents from the UNIX Linux workstation Software Installation Guide PDF Chapter 5 INSTALLING PRINTER DRIVERS FOR UNIX Linux Pr...

Page 62: ...ore the data stored in e Filing on Windows computers Software Installation Guide PDF Chapter 8 INSTALLING e Filing BACKUP RESTORE UTILITIES Windows Client software for network management functions TopAccess Allows you to view device information display logs create templates and an address book and manage the equipment using a browser Since TopAccess is already installed enter the IP address of the...

Page 63: ...d by the MFP with the OCR function and can save them in the shared folders on the network together with the recognized results In addition you can automatically give file names and create storage folders by using recognized results Recognized results can be checked and edited using the attached tool Operator s Manual for e BRIDGE Plus for WebDAV Through the use of the WebDAV protocol you can uploa...

Page 64: ...fline Stapler MJ 1047 Uses the stapler 2 Paper Feed Unit MY 1050 Adds one more drawer to the equipment Adds up to 3 drawers to the equipment 3 Spacer GR 1380 Adjusts the height of the equipment 4 Large Capacity Feeder KD 1071 Allows you to feed up to 2000 sheets 80 g m2 or 20 lb Bond of A4 LT LG or 13 LG paper 5 Caster GR 1390 Required when the Paper Feed Unit or Spacer is installed 3 2 5 4 1 ...

Page 65: ...ses data stored temporarily when copying or executing other operation IPsec Enabler GP 1080 Allows you to use the IPsec function Hardcopy Security Kit GP 1190 Allows Hardcopy Security Printing and you can track the security pattern information Meta Scan Enabler GS 1010 Allows you to use the Meta Scan function Unicode Font Enabler GS 1007 Allows you to print from the SAP environment using Unicode f...

Page 66: ... 1 Hold the Accessible Arm 2 Hook the Accessible Arm over the top of the Dual Scan Document Feeder Store it near the equipment When it is stored by putting it on the equipment choose somewhere where there is no interference with the paper supply paper misfeeding release or toner replacement Do not use this for any purposes other than closing the device ...

Page 67: ... the FUNCTION CLEAR button on the control panel It works when a specified period of time has passed since the last paper eject or the last use of any button When using department or user management the display returns to the department code or user information input menu When they are not being used the display returns to the home screen The period is set at 45 seconds by default at the time of in...

Page 68: ...er management function Guest is displayed on the touch panel Press Guest to log in as a guest user For the types of functions available contact your administrator Enter your PIN on the touch panel up to 32 digits when prompted For details contact your administrator Select the project when prompted For details contact your administrator You can check information on the user s counter by pressing th...

Page 69: ...The domain name is displayed in Domain For LDAP authentication the LDAP server name is displayed in LDAP instead of Domain If the displayed domain name or LDAP server name is not yours press to select yours 1 Enter the user name up to 128 letters and password up to 64 letters and then press OK 2 The equipment is available for use 3 ...

Page 70: ...70 MEMO ...

Page 71: ...estored by means of an operation from the control panel If any points are unclear or you need further information contact your service technician or representative Item name Manual Reference to 1 Setting the data backup function TopAccess Guide Chapter 8 Administration Tab Page Maintenance Item List Data Backup 2 Backing up or restoring the data from the control panel MFP Management Guide Chapter ...

Page 72: ...ncluded with this Equipment 60 Job Status button 12 LAN Port 9 Large Capacity Feeder 8 M N Main charger cleaners 9 MAIN POWER lamp 10 MEMORY RX lamp 10 Next button 12 O P Offline Stapler 64 Options 64 Original glass 9 Original scale 9 Page Position indicator 12 Paper exit stopper 9 Paper feed cover 8 Paper Feed Unit 64 Placing paper 18 Platen sheet 9 POWER button 10 PRINT DATA lamp 10 Printing 40 ...

Page 73: ...FC 330AC 400AC OME19001200 ...

Page 74: ...Ver00 F Issued in Jan 2020 2020 Toshiba Tec Corporation All rights reserved MULTIFUNCTIONAL DIGITAL COLOR SYSTEMS Quick Start Guide Patent http www toshibatec com en patent 1 11 1 OSAKI SHINAGAWA KU TOKYO 141 8562 JAPAN ...

Reviews: