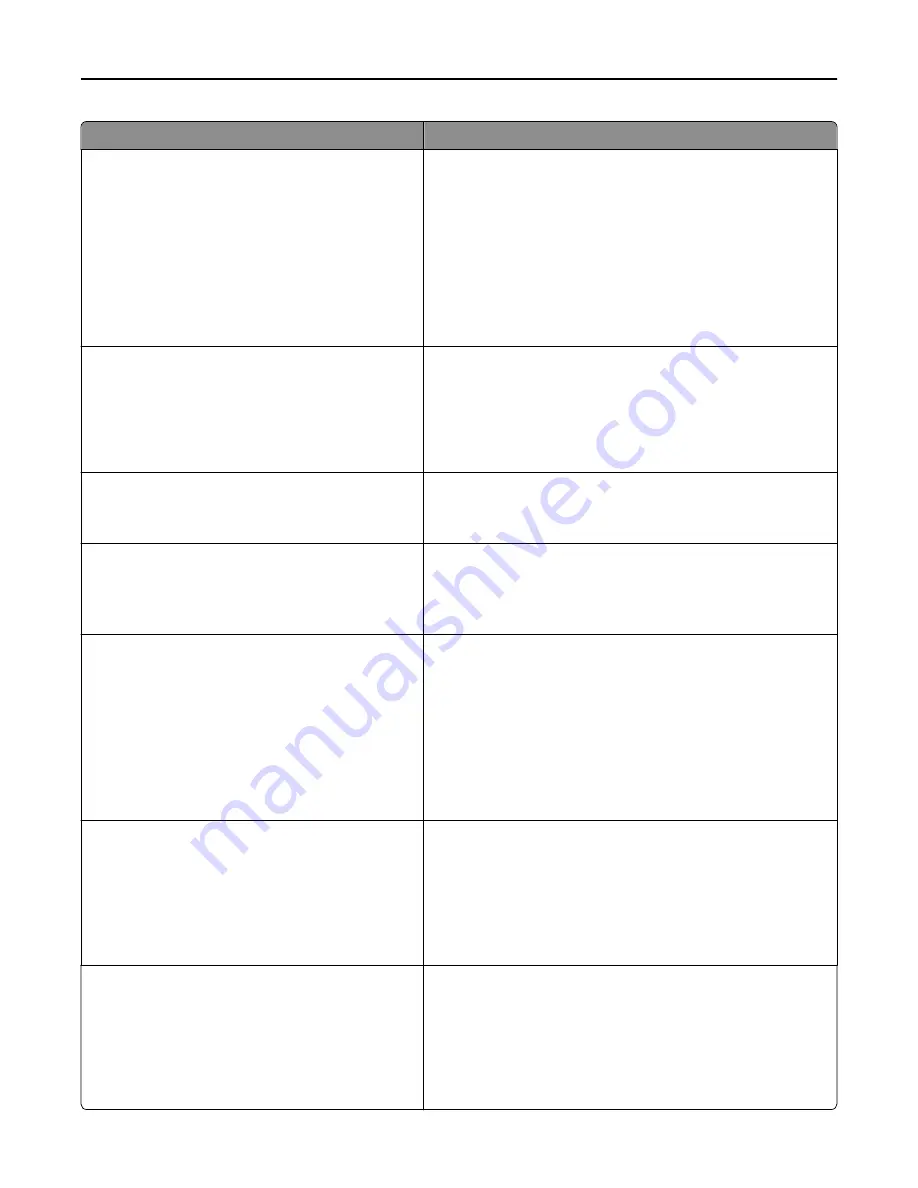
Use
To
Timeouts
Hibernate Timeout
Disabled
20 minutes
1–3 hours
6 hours
1–3 days
1–2 weeks
1 month
Set the amount of time the printer waits before it enters Hibernate
mode.
Note:
3 days is the factory default setting.
Hibernate Timeout on Connection
Hibernate
Do Not Hibernate
Set the printer to Hibernate mode even if there is an active Ethernet
connection.
Notes:
•
Hibernate is the factory default setting.
•
The fax function is available only in some printer models.
Timeouts
Screen Timeout
15–300
Set the amount of time in seconds before returning the control
panel to a Ready state.
Note:
30 is the factory default setting.
Timeouts
Prolong Screen Timeout
On
Off
Set the printer to continue a specified job without returning to the
home screen when the screen timeout timer expires.
Note:
Off is the factory default setting.
Timeouts
Print Timeout
Disabled
1–255
Set the amount of time in seconds the printer waits to receive an
end
‑
of
‑
job message before canceling the rest of the print job.
Notes:
•
90 is the factory default setting.
•
When the timer expires, any partially printed page still in the
printer is printed, and then the printer checks to see if any
new print jobs are waiting.
•
Print Timeout is available only when using PCL emulation.
Timeouts
Wait Timeout
Disabled
15–65535
Set the amount of time in seconds the printer waits for additional
data before canceling a print job.
Notes:
•
40 is the factory default setting.
•
Wait Timeout is available only when the printer is using
PostScript emulation.
Timeouts
Job Hold Timeout
5–255
Set the amount of time the printer waits for user intervention
before it holds jobs that require unavailable resources and
continues to print other jobs in the print queue.
Notes:
•
30 is the factory default setting.
•
This menu appears only when a hard disk is installed.
Understanding the printer menus
95
Summary of Contents for eS305CP
Page 125: ...2 Open the top door 3 Remove the toner cartridges Maintaining the printer 125 ...
Page 130: ...16 Insert the waste toner bottle 17 Insert the right side cover Maintaining the printer 130 ...
Page 134: ...2 Open the top door 3 Remove the toner cartridges Maintaining the printer 134 ...
Page 138: ...14 Insert the waste toner bottle 15 Insert the right side cover Maintaining the printer 138 ...


