background image

EN

EN

FR

IT

DE

PT

PL

CZ

RU

CR

HU

TR

NL

GR

SV

FI

NO

DK

RO

BG

EE

LV

SK

SI

9

Evacuating

After the piping has been connected to the hydro unit, you can perform the 
air purge together at once.

AIR PURGE

Evacuate the air in the connecting pipes and in the hydro unit using a 
vacuum pump. Do not use the refrigerant in the outdoor unit. For details, 
see the manual of the vacuum pump.

Be sure to use a vacuum pump with counter-

fl

 ow prevention function so that 

inside oil of the pump does not 

fl

 ow backward into pipes of the air to water 

heat pump when the pump stops.
(If oil inside of the vacuum pump enters the air to water heat pump, which 
use R410A, refrigeration cycle trouble may result.)
1.  Connect the charge hose from the manifold valve to the service port of 

the packed valve at gas side.

2.  Connect the charge hose to the port of the vacuum pump.
3.  Open fully the low pressure side handle of the gauge manifold valve.
4.  Operate the vacuum pump to start evacuating. Then con

fi

 rm that the 

compound pressure gauge reading is –101 kPa (–76 cmHg).

5.  Close the low pressure side valve handle of the gauge manifold valve.
6.  Open fully the valve stem of the packed valves (both gas and liquid 

sides).

7.  Remove the charging hose from the service port.
8.  Securely tighten the caps on the packed valves.

   Using a vacuum pump

Packed valve at liquid side

Service port (Valve core (Setting pin))

Packed valve at gas side

Vacuum

pump

Vacuum pump adapter for
counter-

fl

 ow prevention

(For R410A only)

Charge hose
(For R410A only)

Handle Hi
(Keep full closed)

Manifold valve

Pressure gauge

Compound pressure gauge

Handle Lo

Charge hose 
(For R410A only)

Connecting pipe

–101 kPa

(–76 cmHg)

CAUTION

• 

KEEP IMPORTANT 5 POINTS FOR PIPING WORK.

(1)  Take away dust and moisture (inside of the connecting pipes).
(2)  Tighten the connections (between pipes and unit).
(3)  Evacuate the air in the connecting pipes using a VACUUM PUMP.
(4)  Check gas leak (connected points).
(5)  Be sure to fully open the packed valves before operation.

   Packed valve handling precautions

•  Open the valve stem all the way out, but do not try to open it beyond the 

stopper.

•  Securely tighten the valve cap with torque in the following table.

Pipe size of Packed Valve

Size of Hexagon wrench

12.70 mm and smallers

A = 4 mm

Cap

Cap Size (H)

Torque

Valve Rod Cap

H17 - H19

14~18 N·m

(1.4 to 1.8 kgf·m)

H22 - H30

33~42 N·m

(3.3 to 4.2 kgf·m)

Service Port Cap

H17

14~18 N·m

(1.4 to 1.8 kgf·m)

A

H

Hexagon wrench
is required.

Service Port Cap

Valve Rod Cap

01_1120551201-1 EN.indd   9

01_1120551201-1 EN.indd   9

5/18/2560 BE 3:12 PM

5/18/2560 BE   3:12 PM

Summary of Contents for HWS-455H-E

Page 1: ...Outdoor unit HWS 455H E AIR TO WATER HEAT PUMP INSTALLATION MANUAL ENGLISH ...

Page 2: ...Refrigerant Piping Connection Evacuating ELECTRICAL WORKS Wiring Connection Power Supply and Connecting Cable Connection Power supply input Wiring Diagram OTHERS Gas Leak Test Earthing Finishing Test run Annual maintenance Air to water heat pump operating conditions CONTENTS EN 1 7 7 7 8 8 9 10 10 10 10 11 11 11 11 11 11 11 ...

Page 3: ...se of this unit can result in a high possibility of severe injury 1 or death WARNING It indicates that incorrect use of this unit may cause severe injury or death CAUTION It indicates that incorrect use of this unit may cause personal injury 2 or property damage 3 1 A severe injury refers to blindness injury burns hot or cold electrical shock bone fracture or poisoning that leaves aftereffects and...

Page 4: ...e sizes of charging port connecting sections on the main unit are different from those for the conventional refrigerant and different size tools are also required For connecting pipes use new and clean piping materials with high pressure withstand capabilities designed for R410A only and ensure that water or dust does not enter Moreover do not use any existing piping as its pressure withstand may ...

Page 5: ... RADIATORS HEATERS FURNACE STOVES ETC WHEN MOVING THE AIR TO WATER HEAT PUMP FOR INSTALLING IT IN ANOTHER PLACE AGAIN BE VERY CAREFUL NOT TO GET THE SPECIFIED REFRIGERANT R410A WITH ANY OTHER GASEOUS BODY INTO THE REFRIGERATION CYCLE IF AIR OR ANY OTHER GAS IS MIXED IN THE REFRIGERANT THE GAS PRESSURE IN THE REFRIGERATION CYCLE BECOMES ABNORMALLY HIGH AND IT RESULTINGLY CAUSES BURST OF THE PIPE AN...

Page 6: ...he hydro outdoor units Midway connection stranded wire and single wire connections are not allowed Improper connection or fixing may cause a fire Wiring between the hydro unit and outdoor units must be well shaped so that the cover can be firmly placed Improper cover installation may cause increased heat fire or electrical shock at the terminal area Be sure to use only approved accessories or the ...

Page 7: ...air absorbed and abnormal high pressure inside the refrigeration cycle and resulting burst or injury Do not modify the power cable connect the cable midway or use a multiple outlet extension cable Doing so may cause contact failure insulation failure or excess current resulting in fire or electrical shock Do not use any refrigerant different from the one specified for complement or replacement Oth...

Page 8: ...harged Improper drainage can result in water leakage causing water damage to furniture Tighten the flare nut with a torque wrench using the prescribed method Do not apply excess torque Otherwise the nut may crack after a long period of usage and it may cause the leakage of refrigerant Wear gloves heavy gloves such as cotton gloves for installation work Failure to do so may cause personal injury wh...

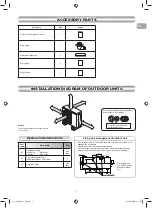
Page 9: ...ION DIAGRAM OF OUTDOOR UNITS INSTALLATION DIAGRAM OF OUTDOOR UNITS Part code Parts name Q ty A Refrigerant piping Liquid side Ø6 35 mm Gas side Ø12 7 mm One each B Pipe insulating material polyethylene foam 6 mm thick 1 C Putty PVC tapes One each Optional Installation Parts 600 mm or more 100 mm or more 100 mm or more 600 mm or more 600 mm or more Remark Some pictures might be different from the a...

Page 10: ... A place full of machine oil A saline place such as the coast A place full of sulfide gas A place where high frequency waves are likely to be generated as from audio equipment welders and medical equipment Strong wind Incused line Flare at hydro unit side Flare at outdoor unit side Flare nut Half union Externally threaded side Internally threaded side Use a wrench to secure Use a torque wrench to ...

Page 11: ...d liquid sides 7 Remove the charging hose from the service port 8 Securely tighten the caps on the packed valves Using a vacuum pump Packed valve at liquid side Service port Valve core Setting pin Packed valve at gas side Vacuum pump Vacuum pump adapter for counter flow prevention For R410A only Charge hose For R410A only Handle Hi Keep full closed Manifold valve Pressure gauge Compound pressure g...

Page 12: ... Block 0 1 0 1 0 1 0 1 30 30 40 40 L N 1 2 3 1 2 3 L N Connecting cable Earth line Earth line Connecting cable Connecting cable connect to terminal block 1 2 3 Power supply terminal block L N Power cord Power cord Terminal block CAUTION 1 The power supply must be same as the rated of air to water heat pump 2 Prepare the power source for exclusive use with air to water heat pump 3 Circuit breaker m...

Page 13: ...d which may damage the compressor or other components If there is a leak at a connection air can be sucked in and the internal pressure further increases which may cause a burst or injury Operate the air to water heat pump in the correct procedure as specified in the Owner s Manual Please refer to the Hydro unit installation manual for the detail of the test run For an air to water heat pump syste...

Page 14: ......

Reviews: