background image

A1-3

IMPORTANT SAFEGUARDS

1.

2.

3.

4.

5.

6.

7.

8.

8A.

9.

10.

11.

12.

13.

14.

15.

16.

READ INSTRUCTIONS
All the safety and operating instructions should be read before the unit is operated.
RETAIN INSTRUCTIONS
The safety and operating instructions should be retained for future reference.
HEED WARNINGS
All warnings on the unit and in the operating instructions should be adhered to.
FOLLOW INSTRUCTIONS
All operating and use instructions should be followed.
CLEANING
Unplug this unit from the wall outlet before cleaning. Do not use liquid cleaners or aerosol cleaners. Use a damp
cloth for cleaning.
ATTACHMENTS
Do not use attachments not recommended by the unit’s manufacturer as they may cause hazards.
WATER AND MOISTURE
Do not use this unit near water. For example, near a bathtub, washbowl, kitchen sink, or laundry tub, in a wet
basement, or near a swimming pool.
ACCESSORIES
Do not place this unit on an unstable cart, stand, tripod, bracket, or table. The
 unit may fall, causing serious injury, and serious damage to the unit. Use only
 with a cart, stand, tripod, bracket, or table recommended by the manufacturer.
An appliance and cart combination should be moved with care. Quick stops,
excessive force, and uneven surfaces may cause the appliance and cart
combination to overturn.
VENTILATION
Slots and openings in the cabinet and in the back or bottom are provided for ventilation, to ensure reliable
operation of the unit, and to protect it from overheating. These openings must not be blocked or covered. The
openings should never be blocked by placing the unit on a bed, sofa, rug, or other similar surface. This unit
should never be placed near or over a radiator or heat source. This unit should not be placed in a built-in
installation such as a bookcase or rack unless proper ventilation is provided or the manufacturer’s instructions
have been adhered to.
POWER SOURCES
This unit should be operated only from the type of power source indicated on the rating plate. If you are not sure
of the type of power supply to your home, consult your appliance dealer or local power company. For units
intended to operate from battery power, or other sources, refer to the operating instructions.
GROUNDING OR POLARIZATION
This unit is equipped with a polarized alternating-current line plug (a plug having one blade wider than the other).
This plug will fit into the power outlet only one way. This is a safety feature. If you are unable to insert the plug
fully into the outlet, try reversing the plug. If the plug should still fail to fit, contact your electrician to replace your
obsolete outlet. Do not defeat the safety purpose of the polarized plug. If your unit is equipped with a 3-wire
grounding-type plug, a plug having a third (grounding) pin, this plug will only fit into a grounding-type power
outlet. This too, is a safety feature. If you are unable to insert the plug into the outlet, contact your electrician to
replace your obsolete outlet. Do not defeat the safety purpose of the grounding-type plug.
POWER-CORD PROTECTION
Power-supply cords should be routed so that they are not likely to be walked on or pinched by items placed upon
or against them, paying particular attention to cords at plugs, convenience receptacles, and the point where they
exit from the appliance.
LIGHTNING
To protect your unit from a lightning storm, or when it is left unattended and unused for long periods of time,
unplug it from the wall outlet and disconnect the antenna or cable system. This will prevent damage to the unit
due to lightning and power line surges.
POWER LINES
An outside antenna system should not be located in the vicinity of overhead power lines or other electric light or
power circuits, or where it can fall into such power lines or circuits. When installing an outside antenna system,
extreme care should be taken to keep from touching such power lines or circuits, as contact with them might be
fatal.
OVERLOADING
Do not overload wall outlets and extension cords, as this can result in a risk of fire or electric shock.
OBJECT AND LIQUID ENTRY
Do not push objects through any openings in this unit, as they may touch dangerous voltage points or short out
parts that could result in fire or electric shock. Never spill or spray any type of liquid into the unit.

PORTABLE CART WARNING

(symbol provided by RETAC)

S3126A

Summary of Contents for MD20F11

Page 1: ...SERVICE MANUAL COLOR TELEVISION DVD VIDEO PLAYER DOCUMENT CREATED IN JAPAN June 2005 MD20F11 FILE NO 140 200517 MFR S VERSION B ...

Page 2: ...a ground conductive wrist strap for body Location of the required Marking The rating sheet and the safety caution are on the rear of the unit CERTIFICATION COMPLIES WITH FDA RADIATION PERFORMANCE STANDARDS 21 CFR SUBCHAPTER J CAUTION THIS DIGITAL VIDEO PLAYER EMPLOYS A LASER SYSTEM TO ENSURE PROPER USE OF THIS PRODUCT PLEASE READ THIS SERVICE MANUAL CARE FULLY AND RETAIN FOR FUTURE REFERENCE SHOUL...

Page 3: ...nd turn on the TV Insulation resistance between the cord plug terminals and the eternal exposure metal Note 2 should be more than 1M ohm by using the 500V insulation resistance meter Note 1 If the insulation resistance is less than 1M ohm the inspection repair should be required Note 1 If you have not the 500V insulation resistance meter use a Tester Note 2 External exposure metal Antenna terminal...

Page 4: ...al power company For units intended to operate from battery power or other sources refer to the operating instructions GROUNDING OR POLARIZATION This unit is equipped with a polarized alternating current line plug a plug having one blade wider than the other This plug will fit into the power outlet only one way This is a safety feature If you are unable to insert the plug fully into the outlet try...

Page 5: ... equipment turn off the power and unplug all of the equipment from the wall outlet Failure to do so may cause an electric shock and serious personal injury Read the owner s manual of the other equipment carefully and follow the instructions when making any connections SOUND VOLUME Reduce the volume to the minimum level before you turn on the product Otherwise sudden high volume sound may cause hea...

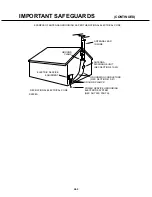
Page 6: ...A DISCHARGE UNIT NEC SECTION 810 20 ANTENNA LEAD IN WIRE GROUNDING CONDUCTORS NEC SECTION 810 21 GROUND CLAMPS POWER SERVICE GROUNDING ELECTRODE SYSTEM NEC ART 250 PART H GROUND CLAMP ELECTRIC SERVICE EQUIPMENT NEC NATIONAL ELECTRICAL CODE S2898A IMPORTANT SAFEGUARDS CONTINUED ...

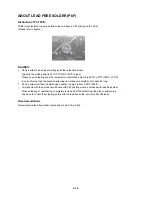
Page 7: ...o soldering the Laser may be damaged WHEN REPLACING DVD DECK When removing the DVD Deck When installing the DVD Deck Remove all the soldering on the short circuit position after the connection of Pick Up PCB and DVD PCB connector NOTE Fig 1 Short circuit using a soldering iron Pick Up PCB Before your operation please read PREPARATION OF SERVICING Use the Lead Free solder Manual soldering condition...

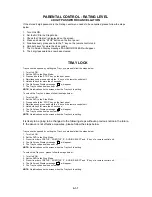
Page 8: ... The On Screen Display message will appear The Tray Lock has now been cleared 1 2 3 4 5 Tray cannot be opened by setting the Tray Lock please follow the steps below Turn Unit ON Set the DVD to the Stop Mode Press and hold the STOP key on the front panel Simultaneously press and hold the 9 key on the remote control unit Hold both keys for more than 2 seconds The On Screen Display message will appea...

Page 9: ...ure soldering iron please be carefull not to heat too long Pb free solder will tend to splash when heated too high about 1100 F 600 C All products with the printed circuit board with PbF printing must be serviced with lead free solder When soldering or unsoldering completely remove all of the solder from the pins or solder area and be sure to heat the soldering points with the lead free solder unt...

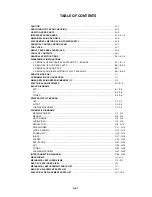
Page 10: ...OWER PRINTED CIRCUIT BOARDS DVD AV CRT LOADING MOTOR SW SCHEMATIC DIAGRAMS MPEG MICON DSP MEMORY MOTOR DRIVE AUDIO VIDEO REGULATOR1 MICON TUNER VIF SIF CHROMA SOUND AMP IN OUT STEREO DEFLECTION CRT POWER LOADING MOTOR SW INTERCONNECTION DIAGRAM WAVEFORMS MECHANICAL EXPLODED VIEWS DVD DECK EXPLODED VIEW MECHANICAL REPLACEMENT PARTS LIST DVD DECK PLACEMENT PARTS LIST ELECTRICAL REPLACEMENT PARTS LIS...

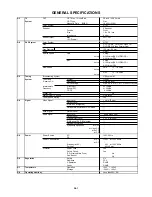
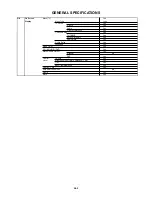
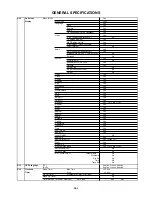
Page 11: ... 2 69 4A A 5 A 1 A I J W W 1 W 84 Intermediate Picture FP 45 75MHz Frequency Sound FS 41 25MHz FP FS 4 50MHz Preset CH No Stereo Dual TV Sound US Stereo Tuner Sound Muting Yes G 4 Signal Video Signal Input Level 1 V p p 75 ohm Output Level S N Ratio Weighted Horizontal Resolution at DVD Mode RGB Signal Output Level Audio Signal Input Level 8 0dBm 50k ohm Output Level Digital Output Level 0 5 V p p...

Page 12: ...annel Setup Yes TV CABLE Yes Auto CH Memory Yes Add Delete Yes V chip Setup Yes Language Yes Sleep Timer Yes CH AV LINE DVD Yes Stereo Audio Output Yes Bilingual No SAP Yes Control Volume Yes Level Brightness Contrast Sharpness Color Yes Tint Yes Bass Treble Balance Yes Caption Text Yes Auto Search Position No Game Yes Mute Yes A3 2 ...

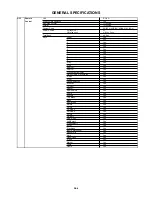
Page 13: ...es Play Yes Still Pause Yes Stop Yes Prohibit Mark Yes PBC Yes Step Yes Skip Yes Skip Yes Random Yes CD VIDEO CD Repeat Yes Slow Yes Slow Yes Search Yes Search Yes Jump Yes Resume Yes Title No Yes Chapter No Yes Track No Yes Time Yes Sub Title No Yes Angle No Yes Vocal On Off No Audio No Yes Audio Stereo L R Yes Video CD Zoom Yes Marker No Yes Program Play Back Yes CD VIDEO CD Surround On Off No S...

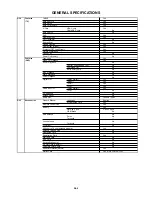
Page 14: ...es 9 Yes 0 Yes Play Yes Stop Yes Search Yes Search Yes Closed Caption Skip Yes Quick View CH RTN Skip Yes Slow Yes Slow Yes Pause Still Step Yes DISPLAY Yes TV DVD Yes Cancel Yes Audio Select Yes Angle Yes Subtitle Yes Top Menu Yes Menu Yes DVD Menu Yes Return Yes CH Up Yes CH Down Yes Vol Down Yes Vol Up Yes Up Set Yes Down Set Yes Left Select Yes Right Select Yes Enter Yes Play Mode Yes Input Se...

Page 15: ...P3 Playback No WMA Playback No JPEG Playback No Digital Out Dolby Digital Yes MPEG Yes PCM Yes DTS Yes Down Mix Out Dolby Digital Yes DTS No 3D Surround No Screen Saver No Audio DAC 192kHz 24bit G 15 Accessories Owner s Manual Language English w Guarantee Card Yes Remote Control Unit Yes Battery Yes UM size x pcs UM 4 x 2 pcs OEM Brand No Rod Antenna No Poles No Terminal Loop Antenna No Terminal U...

Page 16: ...r No VHF UHF Antenna Input F Type G 17 Set Size Approx W x D x H mm 574x481 5x514 5 G 18 Weight Net Approx 25 0kg 55 1lbs Gross Approx 28 5kg 62 8lbs G 19 Carton Master Carton No Content Sets Material Dimensions W x D x H mm Description of Origin Gift Box Material Double Full Color W Color Photo Label No Dimensions W x D x H mm 660 x 575 x 625 Description of Origin Yes Drop Test Natural Dropping A...

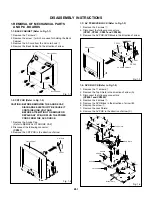
Page 17: ...ATTEMPTING TO REMOVE OR REPAIR ANY PCB UNPLUG THE POWER CORD FROM THE AC SOURCE 1 2 3 Remove the Anode Cap Refer to REMOVAL OF ANODE CAP Disconnect the following connector CP801 Remove the CRT PCB in the direction of arrow Fig 1 1 Front Cabinet 1 1 1 Back Cabinet 3 1 1 4 DVD BLOCK Refer to Fig 1 4 1 2 3 4 5 6 7 8 Remove the 11 screws 1 Remove the Top Shield in the direction of arrow A Disconnect t...

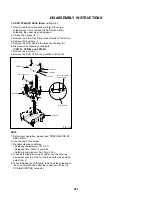
Page 18: ... DVD PCB DVD DECK Refer to Fig 1 5 Fig 1 5 Deck CD Deck Angle Short circuit using a soldering iron Pick Up PCB C A B 3 3 Front Tray Plate CP2301 CP2302 CP2303 NOTE Before your operation please read PREPARATION OF SERVICING Use the Lead Free solder Manual soldering conditions Soldering temperature 350 5 C Soldering time Within 2 seconds Soldering combination Sn 3 0Ag 0 5Cu When Soldering Removing o...

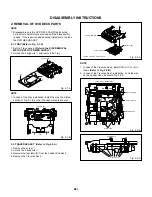
Page 19: ...nsulator R from the Loader Sub Ass y Remove the Traverse Ass y 1 2 3 4 Fig 2 2 A Tray Loader Ass y Fig 2 1 B Insulator R NOTE 1 Disassemble only the DVD DECK PARTS parts listed here Minute adjustments are needed if the disassembly is done If the repair is needed except listed parts replace the DVD MECHA ASS Y 1 1 2 Loader Sub Ass y Traverse Ass y 2 Screw Torque 2 0 0 5kgf cm NOTE 1 2 In case of th...

Page 20: ...ack Loading Unlock the support 2 and remove the Gear Pulley Remove the Gear Main Loading Motor PCB Ass y Loading Belt Pulley Motor 1 Loader Sub Ass y 2 3 LOADING MOTOR PCB ASS Y LOADING BELT Refer to Fig 2 3 A 1 2 3 4 5 Remove the Loading Belt Remove the screw 1 Remove the 2 screws 2 Remove the Loading Motor PCB Ass y Remove the Pulley Motor Fig 2 3 A 2 2 Loading Motor PCB Ass y Screw Torque 2 5 0...

Page 21: ...g 2 6 B Holder Traverse Insulator F Fig 2 7 C 6 0 0 2mm Safety surface for pressing of the insert Feed Motor Gear Motor Fig 2 7 A Traverse Ass y 1 Rack Feed Ass y 2 Switch PCB Ass y 3 3 Gear Motor Feed Motor NOTE 1 2 3 4 When pushing the Rack Feed in the direction of the arrow it should be restored to the original position by the spring force Refer to Fig 2 7 B In case of the Gear Motor installati...

Page 22: ...ate Proceed the steps 1 through 4 24 pin FFC 5 pin FFC When installing the FFC fold it correctly and install it as shown from Fig 2 8 A to Fig 2 8 C 2 8 FFC WIRE HANDLING 1 Do not make the folding lines except the specified positions for the FFC 1 NOTE Fig 2 8 A Fig 2 8 B FEED MOTOR BLUE 4 ORANGE 3 SPINDLE MOTOR BLACK 2 RED 1 Fig 2 7 D Switch PCB Ass y Install wire from 1 to 4 in order Printing Su...

Page 23: ...ip up the sides of the Rubber Cap in the direction of the arrow and remove one side of the support Refer to Fig 3 2 2 GND on the CRT Screwdriver Alligator Clip Support CRT GND on the CRT Rubber Cap CRT Support Fig 3 1 Fig 3 2 3 After one side is removed pull in the opposite direction to remove the other NOTE DISASSEMBLY INSTRUCTIONS INSTALLATION 1 Clean the spot where the cap was located with a sm...

Page 24: ...ompletely Fig 4 2 Blower type IC desoldering machine IC 3 When IC starts moving back and forth easily after desoldering completely pickup the corner of the IC using a tweezers and remove the IC by moving with the IC desoldering machine Refer to Fig 4 3 NOTE Some ICs on the PCB are affixed with glue so be careful not to break or damage the foil of each IC leads or solder lands under the IC when rem...

Page 25: ...eld Wire Refer to Fig 4 7 NOTE Do not absorb the solder to excess Fig 4 7 Soldering Iron IC Braided Shield Wire 4 When bridge soldering between terminals and or the soldering amount are not enough resolder using a Thin tip Soldering Iron Refer to Fig 4 8 Fig 4 8 Thin tip Soldering Iron IC 5 Finally confirm the soldering status on four sides of the IC using a magnifying glass Confirm that no abnorm...

Page 26: ...mode ALL mode TV mode DVD mode Stop Releasing of V CHIP PASSWORD Initialization of factory TV data NOTE Do not use this for normal servicing If you set factory initialization the memories are reset such as the channel setting and the POWER ON total hours POWER ON total hours are displayed on the screen Refer to the PREVENTIVE CHECKS AND SERVICE INTERVALS CONFIRMATION OF HOURS USED Can be checked o...

Page 27: ...equired ADDRESS to be changed is reached Press ENTER to select DATA When DATA is selected it will blink Again step through the DATA using VOL UP DOWN button until required DATA value has been selected Pressing ENTER will take you back to ADDRESS for further selection if necessary Repeat steps 3 to 6 until all data has been checked When satisfied correct DATA has been entered turn POWER off return ...

Page 28: ...HARPNESS AV SUB BIAS BRI DVD CENT BRI DVD MAX BRI DVD MIN CONT DVD CENT CONT DVD MAX CONT DVD MIN COL DVD CENT COL DVD MAX COL DVD MIN TINT DVD SHARPNESS DVD SUB BIAS BRI GAME CENT BRI GAME MAX BRI GAME MIN CONT GAME CENT CONT GAME MAX CONT GAME MIN SUB BIAS TUNING V MUTE POWER ON V MUTE INPUT LEVEL SEPARATION L SEPARATION H H FREQ NO 36 37 38 39 40 41 42 43 44 45 46 47 48 49 50 51 52 53 54 55 56 ...

Page 29: ...ope pattern Using the remote control set the brightness and contrast to normal position Activate the adjustment mode display of Fig 1 1 and press the channel button 07 on the remote control to select VSIZE Press the RIGHT LEFT button on the remote control until the Up Down OVER SCAN Quantity becomes equal to the Right Left OVER SCAN Quantity Receive a broadcast and check if the picture is normal 2...

Page 30: ...t mode display of Fig 1 1 and press the channel button 42 on the remote control to select BRTCD Press the RIGHT LEFT button on the remote control to set the same step numbers as the AV Press the GAME button on the remote control to set to the GAME mode Activate the adjustment mode display of Fig 1 1 and press the channel button 54 on the remote control to select BRTCG Press the RIGHT LEFT button o...

Page 31: ...mote control to select CNTX Press the RIGHT LEFT button on the remote control until the contrast step No becomes 50 Receive a broadcast and check if the picture is normal Press the INPUT button on the remote control to set to the AV mode Activate the adjustment mode display of Fig 1 1 and press the channel button 34 on the remote control to select CNTXA Press the RIGHT LEFT button on the remote co...

Page 32: ...s between the deflection yoke and CRT funnel to fix the deflection yoke Refer to Fig 3 2 b R G B R G B Fig 3 2 a WEDGE WEDGE WEDGE WEDGE POSITION Fig 3 2 b R G B R G B Receive the crosshatch pattern from the color bar generator Combine red and blue of the 3 color crosshatch pattern on the center of the screen by adjusting the pair of 4 pole magnets Combine red blue magenta and green by adjusting t...

Page 33: ...J801 CP802B CP803B TP022 TP024 TU001 J4201 VR3800 CP803A TP401 FB401 CP401 VR402 CP302 CP101 CP802A CP8002 CP8001 CP301 AV PCB CD803 CD802 CD301 CD8101 CD302 S3801 S3802 CD2301 CD2001 CP2301 CP2303 CP2302 CP8101 CD4002 CD2302 CP806 SPEAKER SP351 SPEAKER SP352 J2201 J2204 J2203 J2202 CRT CP801 C D 8 0 1CRT CP3800 CD3800 J4203 ...

Page 34: ...R FO MOT_LD MOT_SLED MOT_SPDL SPINDLE SLED FOCUS TRACK_PWM TRAY_CLOSE OPEN A E A C DVD BLOCK DIAGRAM HA0 A19 HD0 D15 MEMCS0 RD WR SD_A0 A10 SD_D0 D15 16Mbit SDRAM IC4009 K4S161622H UC60 SD_A0 A10 SD_D0 D15 16Mbit SDRAM IC4008 K4S161622H UC60 A A A 3 3V 1 9V REG IC4003 BA33E00WHFP TR TV BLOCK TX RX SPDIF DVD RESET DVD_A_OUT_L ZERO STEREO DAC IC8102 PCM1753DBQR DVD Y DVD C C A B ML MC MD AMCLK ABCLK...

Page 35: ...SOUND DECORDER IC902 AN5829S E1V 19 18 23 21 J2202 FROM DVD BLOCK DVD C DVD Y DVD_A_OUT_L AMP IC4201 NJM4580M TE1 5 3 Q4209 Q4212 MUTE SW L R Q4203 MUTE ZERO E A AT 5 6V B P CON 9V C CHROMA 5V D P CON A5V E P CON 12V F P CON 25V 1 7 POWER ON OFF SKIP REW L V 2 2 2 R J2203 J2204 CH DOWN 2 3 11 59 J4201 2 SPDIF Q4201 DRIVER RX TX DVD_RESET 6 11 12 DVD_A_OUT_R 11 F 6 7 8 D 24 22 4 2 6 19 20 2 2 3 7 1...

Page 36: ... V W FB401 2 3 1 5V REG IC3001 KIA7805API 3 1 5V REG IC3002 KIA7805API 3 1 9V REG IC3005 KIA7809API 3 3V OUT Q3003 POWER BLOCK DIAGRAM P CON 3 3V P CON D5V AT 5 7V SOUND B P CON D9V P CON 9V B E 5 E 6 POWER FEED BACK P CON 5V 10 DVD_H DRIVER Q3005 DRIVER Q3000 SW Q3001 DRIVE Q3008 RY3800 DEGAUSS_H DEGAUSS RELAY DRIVER Q3002 P ON SW Q3007 POWER_ON_H P CON 12V TH3800 ...

Page 37: ...R4078 C4008 R4040 R4001 C4028 C4081 R4069 C4029 W842 R4024 C4031 R4005 R4004 R4003 R4002 R4008 C4076 C4047_1 C2327_1 C2329_1 C4068_1 C4069_1 C4070 R2360 B4002 B4005 B4006 B4007 B4010 IC4003 R4081 R4009 R4080 C4032 C2304 R2355 C4001 IC2304 R2361 R2362 R2335 D2303 D2304 D8111 D8112 D4001 IC4002 C4089 C4100 C4063 C4090 B4009 W854 D8101 R8121 R8116 Q8101 W816 W824 W840 W843 W847 W826 C8105 C8106 C8108...

Page 38: ... W109 W118 W116 W117 R159 W138 W140 W216 W217 W242 W074 W077 W152 W153 W222 W085 W128 W075 W158 W156 W159 W163 W062 L1503 W143 L1501 L1502 W165 W167 C1521 L1505 HS3001 Q3003 W232 W219 CP302 W206 W120 W121 W092 W184 W097 W094 W185 W183 W211 W195 C923_1 C924_1 C947_1 C946_1 W100 W101 W193 W170 W196 W197 W172 W171 W883 W889 W882 W240 W241 W238 R4203 W210 W213 W209 W169 W180 W181 W108 W113 W107 W136 W...

Page 39: ...806 C3817 Q3001 R3808 R634 Q602 R4217 C950 C951 C953 C3809 R4208 C3805 R908 R4202 R4201 Q605 R605 C4228 C4235 C4236 R3008 Q3007 IC302 C303 C312 R303 C328 C309 C307 R302 C324 C310 R304 C313 C322 C306 R306 R355 R622 R4222 R4220 C1517 R1507 C1506 C1511 IC1501 C1509 C1519 C1505 C1507 C1515 C1513 C1512 R1506 C1510 C1508 R1503 Q1501 R1505 C1520 R1504 R1502 C1502 C1504 Q1503 R1510 R1511 C1501 Q1502 R1512...

Page 40: ...SW1 CD2302 PRINTED CIRCUIT BOARDS F 7 F 8 LOADING MOTOR INSERTED PARTS SOLDER SIDE LOADING MOTOR CHIP MOUNTED PARTS SOLDER SIDE SW SOLDER SIDE D D0 0 RE BLUE OR BL SW2 CD2301 M2602 M2601 ...

Page 41: ... HOME HA0 TOUT_SW HA1 TIN_SW HA2 DVD CD HA3 HA15 DRVSB HA4 RF HA5 HA16 DAC_VIDEO_C OPU_A HA6 HA14 DAC_VIDEO_B OPU_B HA7 HA13 OPU_C HA8 HA12 OPU_D HA9 OPU_E HA10 HD15 OPU_F HA11 HA11 VC HA12 HD7 SPDL_SENS HA13 SPDL_SENS HA14 VR_DVD HA15 HA10 P H I L VR_DVD HA16 HD14 DVD_LD HA17 HA9 RESET CD_LD HA18 HD6 SPINDLE_PWM HA19 SLED_PWM HA8 TRACK_PWM HD0 HD13 FOCUS_PWM HD1 HD5 P CON A5V HD2 HOME HOME P CON ...

Page 42: ...LK RESET HA0 HA1 HD11 HA2 RAMDQM RAMDQM HA3 HA4 HD3 HA5 RAMDQM RAMWE RAMDQM RAMWE HA6 HA7 HD10 HA19 HA8 RAMCLK2 RAMCAS RAMCLK RAMCAS HA9 HA10 HD2 HA18 HA11 RAMRAS RAMCLK2 RAMRAS HA12 RAMCKE HA13 RAMCKE HD9 HA17 HA14 RAMCS0 RAMCS1 HA15 HA16 HD1 HA7 HA17 SD_A9 SD_BA0 SD_A9 SD_BA0 HA18 HA19 HD8 HA6 HD0 SD_A8 SD_A10 SD_A8 SD_A10 HD1 HD2 HD0 HA5 HD3 SD_A7 SD_A0 SD_A7 SD_A0 HD4 HD5 RD HA4 HD6 SD_A6 SD_A...

Page 43: ...47 6 3V KA C2340_1 100 6 3V KA Q2305 KTC3875S_Y_RTK VR DVD Q2304 KTC3875S_Y_RTK DVD CD Q2303 KTC3875S_Y_RTK VR DVD W875 W816 W847 W843 OF PRINTING AND SUBJECT TO CHANGE WITHOUT NOTICE NOTE THIS SCHEMATIC DIAGRAM IS THE LATEST AT THE TIME HS2301 763WSAA023 HS76 B2303 MMZ1608R102CT B2304 MMZ1608R102CT B2305 MMZ1608R102CT B2302 MMZ1608R102CT B2301 MMZ1608R102CT DURING PLAYBACK MEASURED WITH THE DIGIT...

Page 44: ... SIGNAL PB CAUTION DIGITAL TRANSISTOR CD8101 2F0C1602 FFC 1 0mm pitch DURING PLAYBACK MEASURED WITH THE DIGITAL TESTER NOTE THE DC VOLTAGE EACH PART WAS CP8101_2 IMSA 9604S 12F 1 10 11 12 2 3 4 5 6 7 8 9 DAC_C_VIDEO DAC_B_VIDEO DAC_VIDEO_C DAC_VIDEO_C P CON A5V DAC_VIDEO_B P CON 5V CD_LD_CTL DAC_VIDEO_B RESET MC MD ML AMCLK ABCLK ALRCLK P H I L ASDATA0 P H I L V_SW V_SW SYS_MUTE GND RESET ZERO R_A...

Page 45: ... PIECES REPAREES PAR UN ETANT ATTENTION SINCE THESE PARTS MARKED BY CAUTION DESCRIBED IN PARTS LIST ONLY CRITICAL FOR SAFETY USE ONES ARE HS3001 763WAA0309 B3001 W5RH3 5X5X1 0 DIGITAL AUDIO SIGNAL PB AUDIO SIGNAL PB CAUTION DIGITAL TRANSISTOR PLAYBACK COLOR SIGNAL PLAYBACK LUMINANCE SIGNAL CD8002 2H0C1001 DURING PLAYBACK MEASURED WITH THE DIGITAL TESTER NOTE THE DC VOLTAGE EACH PART WAS R3025 4 7 ...

Page 46: ...LA NOMENCLATURE DES PIECES N UTILISER QUE CELLS DECRITES DANGEREUSES AN POINT DE VUE SECURITE LES PIECES REPAREES PAR UN ETANT ATTENTION SINCE THESE PARTS MARKED BY CAUTION DESCRIBED IN PARTS LIST ONLY CRITICAL FOR SAFETY USE ONES ARE PLAYBACK LUMINANCE SIGNAL SCL SDA I2C_OFF REMOCON KEY_A KEY_B POWER_FAIL P CON 5V TUNER_AUDIO TUNER_VIDEO 30V POWER_ON_H AFT SCL SDA SDA SCL VIDEO_OUT2 REMOCON POWER...

Page 47: ...1K 1 4W R628 10K R602 10K C624 220 6 3V YK C4219 47 16V YK C602 1 50V KA C628 0 47 50V KA C4213 2 2 50V KA C4239 2 2 50V KA C622 1 50V KA C626 1 50V KA C619 1 50V KA C1518 470 6 3V YK C604 1 50V KA C1521 3 3 50V KA C4218 2 2 50V KA C603 220 16V YK C4237 47 6 3V KA C634 1 50V KA Q602 KTC3875S_Y_RTK SW Q601 KTC3875S_Y_RTK SW Q1503 KTC3875S_Y_RTK BUFFER Q1501 KTC3875S_Y_RTK BUFFER Q1502 KTC3875S_Y_RT...

Page 48: ...K R356 2 2K 1 4W R309 33K 1 4W C304_1 1 50V KA C317_1 10 25V KA C321_1 10 25V KA C319_1 10 25V KA C315 0 1 50V KA C325_1 10 25V KA W837 W850 W845 OF PRINTING AND SUBJECT TO CHANGE WITHOUT NOTICE NOTE THIS SCHEMATIC DIAGRAM IS THE LATEST AT THE TIME DANS LA NOMENCLATURE DES PIECES N UTILISER QUE CELLS DECRITES DANGEREUSES AN POINT DE VUE SECURITE LES PIECES REPAREES PAR UN ETANT ATTENTION SINCE THE...

Page 49: ...0 1K R4241 1 5K R4242 3 3K C4201 47 16V KA C4231 22 16V KA C4230 2 2 50V KA C4214 33 10V KA C4206 2 2 50V KA C4217 100 16V YK C4229 2 2 50V KA C4203 100 16V YK C4234 4 7 50V KA C4207 2 2 50V KA C4232 22 16V KA Q4201 KTC3875S_Y_RTK D AUDIO DRIVER Q4211 KTC3875 S_Y_RTK MUTE SW Q4212 KTC3875S Y_RTK MUTE SW W889 W848 W842 W801 W895 W887 W890 W884 W891 W885 W869 W868 W880 W892 W883 W882 W886 W834 W821 ...

Page 50: ... C943 2 2 50V KA C907 4 7 50V KA C922 2 2 50V KA C920 2 2 50V KA C945 47 16V YK OF PRINTING AND SUBJECT TO CHANGE WITHOUT NOTICE NOTE THIS SCHEMATIC DIAGRAM IS THE LATEST AT THE TIME AUDIO SIGNAL PB CAUTION DIGITAL TRANSISTOR TV DVD TUNER_AUDIO SCL SDA A_OUT_L A_OUT_R AOUDIO_OUT_L AUDIO_OUT_R REAR_A_IN_L REAR_A_IN_R DVD_AUDIO_L DVD_AUDIO_R FRONT_A_IN_R FRONT_A_IN_L P CON 5V P CON 12V GND G 20 G 19...

Page 51: ...M 1 R411_1 10K 1 4W M 1 R424 3 9K 1 4W R467 1 1 2W R419 560 1 2W R417 560 1 2W R412 8 2K 1 4W R418 1 5 1 2W R405 56K 1 2W R415 1 8 1 2W R416 47K 1 4W R456 470 1 2W R453 220K 1 2W R407 1K 1 2W R421 680 1 2W R422 560 1 2W R404 56K 1 2W R460 100 1 4W R423 12K 1 4W R430 56K 1 2W R414 820 1 4W R420 2 2K R410 5 6K 1 4W R406 47K 1 4W R409 22K 1 4W C422 2 2 250V MHE C406 100 35V MHE C407 2200 25V YK C404 ...

Page 52: ...810 560 R804 2 7K 1 4W C803 1 50V KA Q804 2SC4217 BLUE OUT Q801 KTC3199_Y BLUE OUT Q805 2SC4217 GREEN OUT Q802 KTC3199_Y RED OUT Q806 2SC4217 RED OUT Q803 KTC3199_Y GREEN OUT W861 W859 W860 OF PRINTING AND SUBJECT TO CHANGE WITHOUT NOTICE NOTE THIS SCHEMATIC DIAGRAM IS THE LATEST AT THE TIME DANS LA NOMENCLATURE DES PIECES N UTILISER QUE CELLS DECRITES DANGEREUSES AN POINT DE VUE SECURITE LES PIEC...

Page 53: ...00V EZ C3815 470 200V UP C3816 0 0047 250V KX C3809 0 012 B C3824 330P 2KV R C3811_1 820P 2KV RR C3812 0 0022 500V B C3807 0 047 100V MMTS C3805 0 01 B C3806 0 01 B C3817 0 022 B C3801 0 22 275V ECQUL C3814 0 001 500V B C3803 270P CH C3810 0 0022 500V B C3804 0 001 500V B R3829 100 1 4W R3830 1K 1 4W R3827 1 2M 1 4W R3801 6 8K 1 4W R3802 56K 1 2W R3816 1K 1 4W R3805 1K 1 4W R3804 330 1 4W R3825 10...

Page 54: ... LOADING MOTOR PCB LOADING MOTOR SW SCHEMATIC DIAGRAM G 28 G 27 SW PCB SSS 13 2 SW1 GND SW SW 2 CLOSE SW 1 OPEN LOADING MOTOR LOADING MOTOR DED003 PCB610 DED002 PCB640 BCZ3B52 M2603 CD2302 2H052601 M M 5 4 3 2 1 6 5 4 3 2 1 GND SW FEED MOTOR SPINDLE MOTOR SPINDLE MOTOR FEED MOTOR PICK UP INNER LIMIT SWITCH SW2 JCV9B06 M2601 BCZ3B03 M2602 ESE22MH24 CD2301 2H062102 M ...

Page 55: ... VOL CD GND CD MON COM GND NC RF C B A D F E VCC GND PDIC F F T T VIDEO_OUT CME012 CCE012 TM101 COMMAND TRANSMITTER TM101 CP8101_2 CP2303 CP2302 FFC SP1 SP1 SLD SLD LIMIT SW SW GND GND D LD LD OPEN CLOSE SP1 SP1 SLD SLD LIMIT SW SW GND GND D LD LD OPEN CLOSE 5 4 3 2 1 5 4 3 2 1 VREF MON DVD NC SW VOL DVD GND DVD LD DVD LD CD VOL CD GND CD MON COM GND NC RF C B A D F E VCC GND PDIC F F T T DMD020 L...

Page 56: ...agram NOTE MICON TUNER 22 23 24 25 26 POWER ON 0 2ms 1 0V POWER ON 0 2ms 1 0V POWER ON 0 2ms 1 0V POWER ON 5ms 1 0V POWER ON 50µs 1 0V 10 100µs 200mV 9 10µs 100mV 1 MPEG MICON DSP 10ns 100mV 2 3 5ns 20mV 20ns 1 0V 4 200ns 1 0V 6 7 500µs 500mV 500µs 500mV AUDIO VIDEO VIF SIF CHROMA 27 POWER ON 20µs 0 5V 5 5ns 500mV MEMORY ...

Page 57: ...29 NOTE 30 31 32 36 37 33 34 35 38 39 POWER ON 10µs 2 0V POWER ON 10µs 2 0V POWER ON 10µs 2 0V POWER ON 20µs 0 5V POWER ON 20µs 2 0V POWER ON 1ms 100mV POWER ON 1ms 100mV DVD PLAY 10µs 0 5V DVD PLAY 0 5ms 200mV POWER ON 10ms 0 5V DVD PLAY 0 5ms 200mV 51 POWER ON 1ms 200mV 50 POWER ON 1ms 200mV 40 STEREO POWER ON 1ms 50mV 28 STANDBY 0 5µs 50mV ...

Page 58: ...the corresponding balloon number in the schematic diagram NOTE POWER 48 49 STANDBY 5µs 5 0V STANDBY 5µs 5 0V CRT 46 POWER ON 20µs 50V DEFLECTION 44 43 42 POWERON 1ms 200mV POWERON 5ms 10 0V POWERON 20µs 5 0V 47 POWER ON 20µs 50V 45 POWERON 20µs 50V 41 POWER ON 1ms 200mV ...

Page 59: ... ASS Y 201 201 201 124 110 110 201 122 122 112 122 122 202 202 202 202 202 102A 102 206 202 202 102B 102B 102C 120 123 101A 101E 101C 101B 101D 101G 101F A 214 108 107 214 107 108 215 215 121 214 108 107 214 107 108 215 215 210 101H 101H 101H 101 ...

Page 60: ...11 211 207 113 115 206 203 116 106 207 207 207 PCB250 AV PCB ASS Y 135 213 213 103 103 209 104 208 208 208 208 PCB130 DVD PCB ASS Y 208 118 208 125 209 209 109 209 136 111 A 203 117 114 208 208 208 208 208 208 208 208 208 208 118 208 208 212 212 212 212 119 ...

Page 61: ...MECHANICAL EXPLODED VIEW PACKING DIAGRAM I1 3 128 129 126 127 131 132 133 134 BL001 TM101 127 128 ...

Page 62: ...611 AA AA AA AA AA AA AA AA AA AA AA Do not replace the parts Because minute adjustments are needed if this condition is disassembled further more If the repair is needed replace the DVD MECHA ASS Y SW2 PCB640 SW PCB ASS Y CD2001 CD2301 M2602 603 601 605 605 606 702 705 703 SW1 PCB610 LOADING MOTOR PCB ASS Y CD2302 701 607 604 705 617 616 618 Cannot supply separately If the repair is needed replac...

Page 63: ...2549A449 SHEET RATING 121 AE005650 723000C727 SHEET CAUTION 122 AE002965 800WR0A010 SHEET CRT SUPPORT D 123 AE006449 726000A099 SHEET CRT SERVICEMAN 124 BZ710660 741WUA0021 SPRING EARTH 125 AD301370 899EFBA002 WIRING CLIP 126 AE005914 791WHAA114 FILM BAG 127 AD302056 792WHA0422 PACKAGE TOP 128 AD302057 792WHA0423 PACKAGE BOTTOM 129 AE006450 793WCDC682 GIFT BOX 130 AE006451 A5S102U975 INSTRUCTION B...

Page 64: ...N 615 AE004280 92P100100A TRAY 616 AE003535 92P100089A RACK FEED 1 617 AE003536 92P100090A RACK FEED 2 618 AE003543 92P300020A SPRING RACK FEED 619 BZ710149 800WFAA008 CUSHION C 701 AE003530 811022680U SCREW TAP TITE P BIND 2 6x8 702 AE003554 814011723U SCREW PAN M1 7x2 3 P3 703 AE003555 816112080U SEMS TAP TITE P PAN W10 2x8 704 AE003556 814011730U SCREW PAN M1 7x3 P3 705 AE003557 811022080U SCRE...

Page 65: ...C3810 AE001347 C0J0B05H3K CC 0 0022UF 500V B C3811 BZ110203 C0PLRR7W2K CC 820 PF 2KV RR C3812 AE001347 C0J0B05H3K CC 0 0022UF 500V B C3815 BZ110012 E51CGC471M CE 470 UF 200V C3816 AE002878 CD39E0MQ3M CC 0 0047UF 250V C3818 BZ110169 E5EZF2332M CE 3300 UF 16V C3820 AD301348 E02LU5100M CE 10 UF 50V C3822 BZ110028 E5EZT2102M CE 1000 UF 16V C3823 BZ110032 E5EZF3102M CE 1000 UF 25V C3824 BZ110239 C03L0R...

Page 66: ...A2B1 D3821 BZ410126 D2WXRU3AM0 DIODE SILICON RU3AM EIC D3822 BZ410006 D1VT001330 DIODE SILICON 1SS133T 77 D3823 AE006082 D28F0PRA60 DIODE RECTIFIER 30PRA60 FC D3824 BZ410010 D28T21DQN9 DIODE SCHOTTKY 21DQ09N TA2B1 D3825 AD300070 D97U01201B DIODE ZENER MTZJ12B T 77 D3826 BZ410006 D1VT001330 DIODE SILICON 1SS133T 77 D3827 BZ410006 D1VT001330 DIODE SILICON 1SS133T 77 D3828 BZ410067 D97U02R21B DIODE Z...

Page 67: ...A3875SY TRANSISTOR SILICON KTC3875S_Y_RTK Q3000 BZ510057 TAAT01281Y TRANSISTOR SILICON KTA1281_Y Q3001 BZ510109 TCAA3875SY TRANSISTOR SILICON KTC3875S_Y_RTK Q3002 BZ510057 TAAT01281Y TRANSISTOR SILICON KTA1281_Y Q3003 AD301780 TCA0043690 TRANSISTOR SILICON KTC4369 O Y Q3005 BZ510105 TCAT03209Y TRANSISTOR SILICON KTC3209_Y AT Q3006 BZ510070 TCAT032034 TRANSISTOR SILICON KTC3203_Y AT Q3007 BZ510071 ...

Page 68: ...NVG6TLTAB222 VR3800 BZ210265 V1K63Q2BTE VOLUME SEMI FIXED NVG6TLTAB471 P C BOARD ASSEMBLIES PCB110 AE006455 A5S102U110 PCB ASS Y CCE012A PCB130 AE006456 A5S102U130 PCB ASS Y DMD020B PCB250 AE006457 A5S102U250 PCB ASS Y CME012A MISCELLANEOUS B2301 AE005476 0246C51024 CORE BEADS MMZ1608R102CT B2302 AE005476 0246C51024 CORE BEADS MMZ1608R102CT B2303 AE005476 0246C51024 CORE BEADS MMZ1608R102CT B2304 ...

Page 69: ... 067U004029 WIRE HOLDER B2013H02 4P CP803B BZ614334 067U004029 WIRE HOLDER B2013H02 4P CP8101 AE006053 069J7C0589 CONNECTOR PCB SIDE IMSA 9604S 12F EL001 BZ614044 124120301A EYE LET XRY20X30BD EL002 BZ614043 124116281A EYE LET XRY16X28BD F3800 BZ614504 081PC05005 FUSE 51MS050L FB401 AE006458 043220059F TRANSFORMER FLYBACK FJN20A003_M FH3800 AE002634 06710T0009 HOLDER FUSE EYF 52BCY FH3801 AE002634...

Page 70: ...TOSHIBA CORPORATION 1 1 SHIBAURA 1 CHOME MINATO KU TOKYO 105 8001 JAPAN ...

Reviews: