– 83 –
Procedure 1: reading setting data from EEPROM
(Read the setting data from EEPROM, including both the factory settings and any modifications made to them
on site.)
1
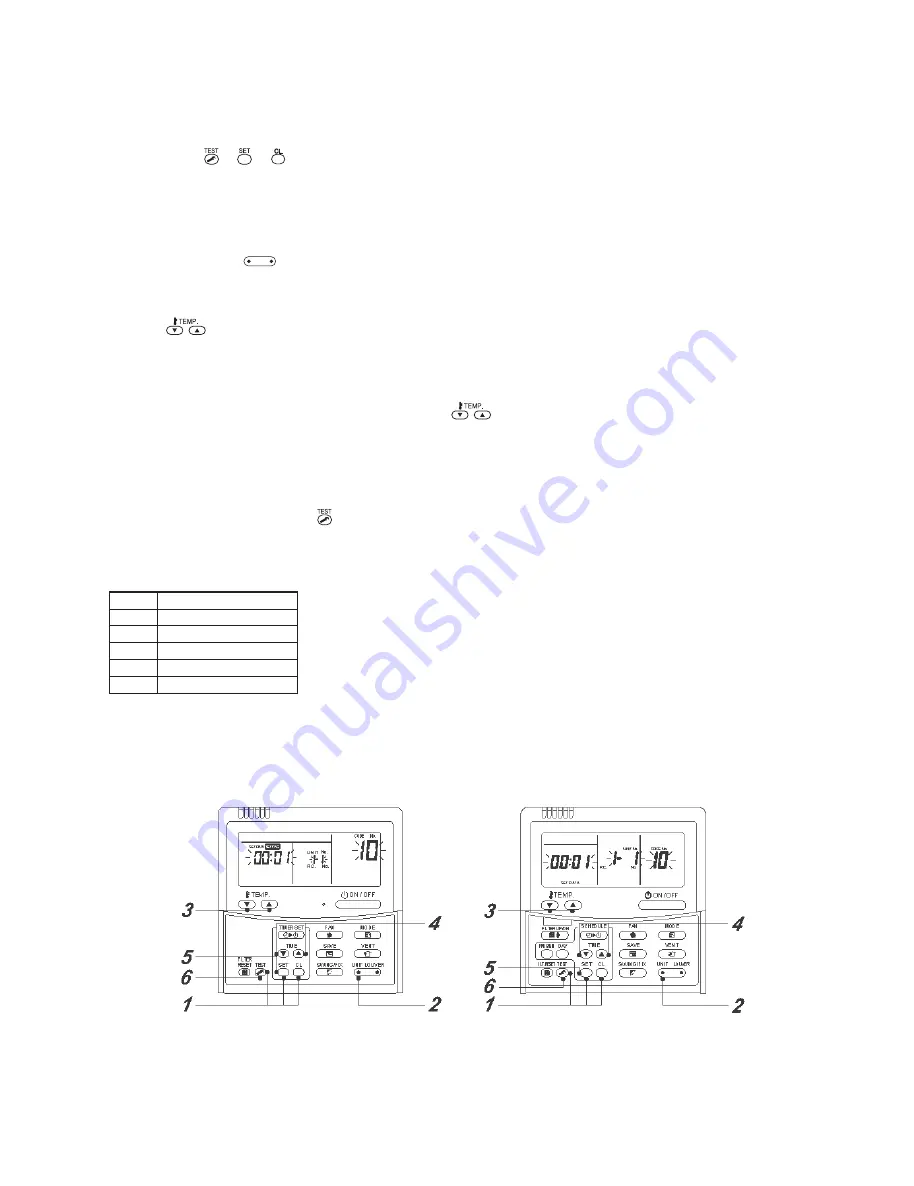
Push the + + buttons simultaneously and hold for at least 4 seconds. (This number
corresponds to the same number shown on the Remote Control Operation Diagram.)
* In the case of group control, the unit No. displayed first is the indoor unit No. of the header unit.
At the same time, the CODE No. (DN code) 10 is displayed, and the fan of the selected indoor unit
comes on, with the louver swinging, depending on the model.
2
Each time the
UNIT LOUVER
button (button of left side) is pushed, one of the indoor unit No. under
group control is displayed in turn.
* The fan of the selected indoor unit comes on, with the louvers swinging, depending on the model.
3
The
button allows you to move the CODE No. (DN code) up / down by one place.
4
First, change the CODE No. (DN code) from 10 to 01. (To set filter sign lighting time)
Jot down the setting data displayed.
5
Change the CODE No. (DN code) using the
button.
Again, jot down the setting data displayed.
6
Repeat step 5 until all the setting data has been jotted down. (See the CODE No. list.)
* CODE No. (DN code) go from 01 to FF with a few gaps along the way.
7
When finished, push the button to bring the system back to normal off state.
(It takes the system about 1 minute to become responsive to remote control operation.)
CODE No. (DN code) necessary at minimum
The type and capacity of the indoor unit are necessary for fan speed setting.
Remote control operation diagram
DN
10
11
12
13
14
Contents
Type
Indoor unit capacity
Line address
Indoor address
Group address
<Fig. 1 RBC-AMT32UL>
<Fig. 2 RBC-AMS41UL>
All manuals and user guides at all-guides.com


