– 13 –
3
Push the
button to confirm the
direction of the selected louver.
Each time you push the button, the indication
changes as follows:
* When cooling or drying, (4) and (5) are not
displayed.
◆
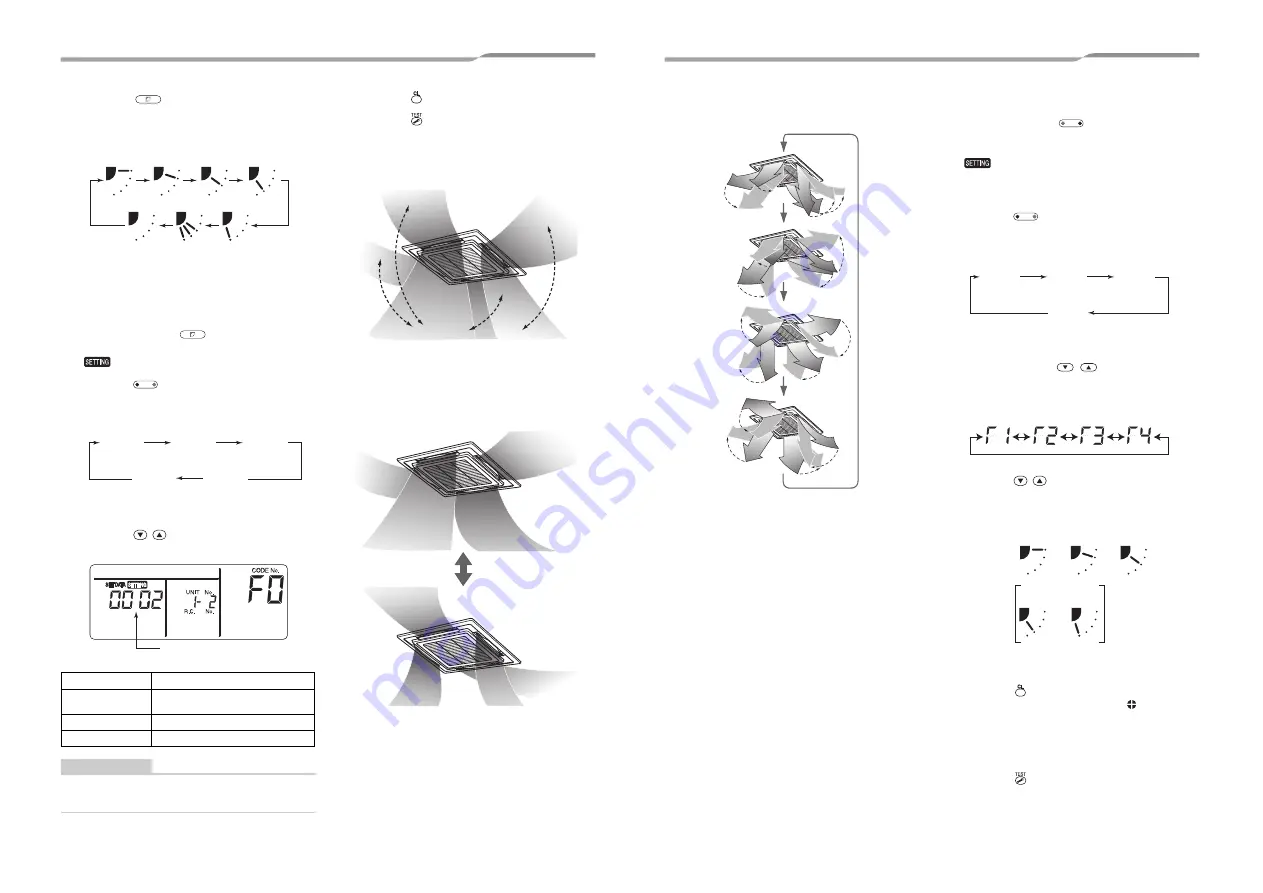
Setting the swing pattern
1
Push and hold the
FIX for at least 4
seconds while the operation is stopped.
blinks.
2
Push the
button (left side of the button)
to select a unit.
The unit number changes each time you push the
button.
The fan of the selected unit runs, and the louver
swings.
3
Push the
buttons to select a swing
type.
REQUIREMENT
Do not set “0000”.
(The louver may be damaged.)
4
Push the
button.
5
Push the
button to finish the setting.
▼
Standard swing
All four louvers swing simultaneously at the same
angle.
▼
Dual swing (Recommended for heating)
• Adjoining louvers alternately point horizontally and
downward to heat the room evenly.
• Air blown downward reaches the floor, and air blown
horizontally is spread to circulate heat.
Swing code
Movement pattern
0001
Standard swing
(factory default)
0002
Dual swing
0003
Cyclic swing
SWING/FIX
(1)
(2)
(3)
(4)
(7)
(6)
(5)
SWING/FIX
UNIT LOUVER
No
display
Unit No.
1-1
Unit No.
1-2
Unit No.
1-3
Unit No.
1-4
Swing code
Swing
Horizontal
Downward
Downward
Horizontal
Downward
Downward
Horizontal
Horizontal
▼
Cyclic swing (Recommended for cooling)
All four louvers swing at different times like waves.
◆
Setting the louver lock
1
Push and hold the
button (right side of
the button) for at least 4 seconds while
running is stopped.
blinks.
• When no unit number is displayed, all units are
selected.
2
Push the
button (left side of the button)
to select a unit.
The unit number changes each time you push the
button.
The fan of the selected unit runs, and the louver
swings.
3
Push the “TEMP.
” buttons to
display the number of the louver to fix its
direction.
The selected louver swings.
4
Push the
buttons to select the
direction of the louver you do not want to
swing.
* If (4) or (5) is selected, condensation may occur
during cooling.
5
Push the
button to confirm the setting.
When the setting is confirmed, the
mark lights
up.
(To set the louver lock of another unit, repeat from
Step 2. To set another louver lock of the same unit,
repeat from Step 3.)
6
Push the
button to finish the setting.
(3)
(2)
(1)
(1)
(4)
(2)
(3)
(2)
(3)
(4)
(1)
(4)
(3)
(2)
(1)
(4)
UNIT LOUVER
UNIT LOUVER
Unit No.
1-1
Unit No.
1-2
Unit No.
1-3
Unit No.
1-4
(1)
0001
(2)
0002
(3)
0003
(5)
0005
(4)
0004
25-EN
26-EN
Summary of Contents for MMY-MAP0501HT8-E
Page 22: ... 21 MEMO ...
Page 23: ... 22 MEMO ...


