MR-2019/2018/MY-1034 UNPACKING AND INSTALLATION 2 - 3
9)
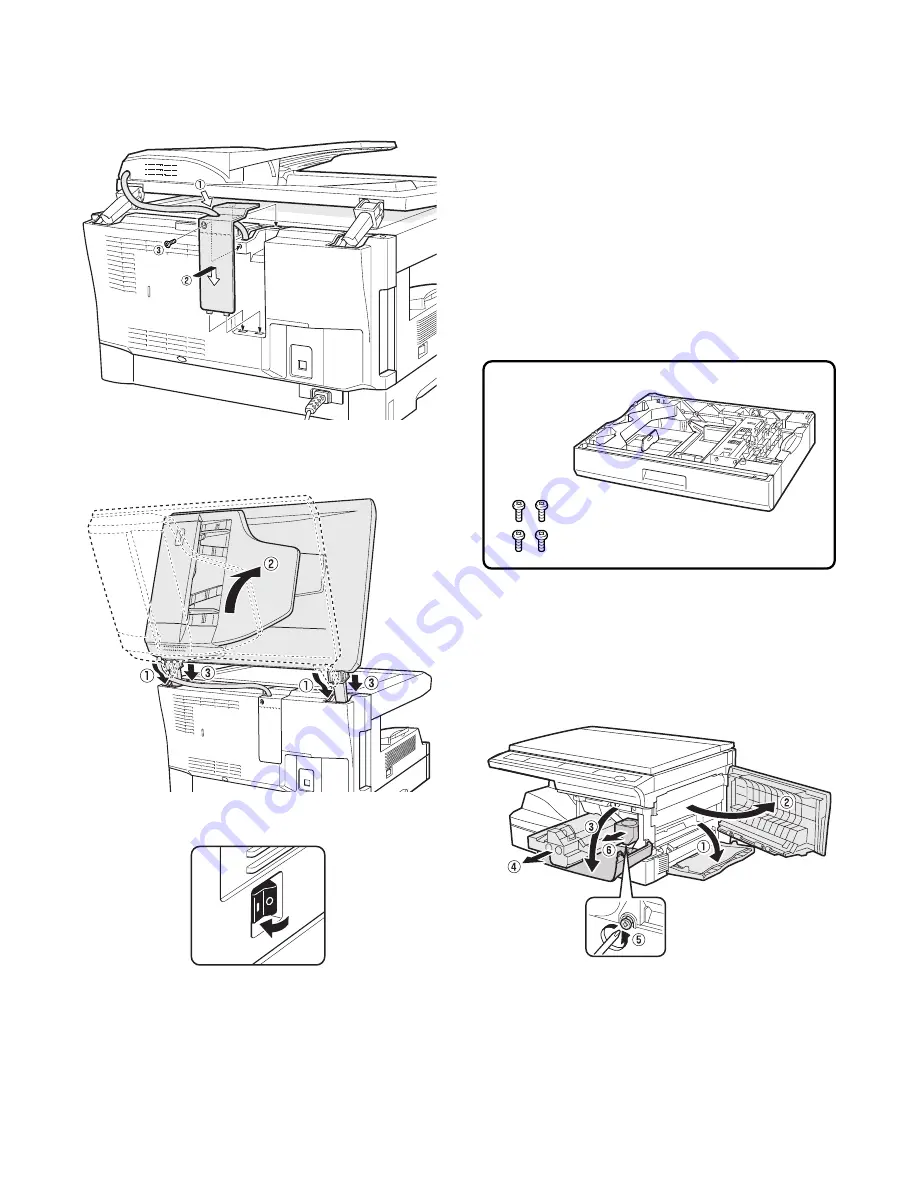
Attach the rear cabinet cover.
Fit the harness of the ADF into the cut-out portion of the rear
cabinet cover and secure the cover with the screw.
At this time, check that the three pawls of the rear cabinet cover
are fitted into the rear cabinet.
10) Attach the ADF to the copier.
Attach the ADF by inserting the hinge guide sections of the
ADF into the hinge guides L and R.
11) Insert the power plug into the outlet and turn the main switch of
the copier to the “ON” position.
12) Perform SIM setting.
[MR-2018]
Execute simulation [2] of [26] and enter [1].
[MR-2019]
Execute simulation [2] of [26] and enter [2].
13) Carry out automatic adjustment of ADF scanning position.
Use a black sheet and execute simulation [53]-[08] to carry out
automatic adjustment of ADF scanning position.
For details, see the service manual.
14) Adjust the floating detection level of ADF.
Close the ADF and use simulation code [41]-[06] to adjust the
floating detection level of ADF.
For details, see the service manual.
15) Check the copy ratio, and then check the center displacement
and leading edge image void.
Place an original on the document glass and make a copy.
Then, place an original in the document feeder tray and make a
copy.
If the center of the copy from the document glass is displaced
from the copy from the document feeder, adjust the center
referring to the service manual of e-STUDIO202S.
2. MY-1034 Installation
Turn the main switch to the “OFF” position and remove the power
plug from the outlet.
1)
Remove the DV cartridge and the drum cartridge from the
copier.
Open the tray, the side door, and the front cabinet, and then
remove the DV cartridge and the drum cartridge.
Note: Be sure to carry out the operation in the order of (1), (2),
(3), (4), (5), and (6).
"ON"
•
Parts included
Screws (M4
×
16): 4 pcs.


