16
CA
LL
PR
OG
RA
M
SP
EE
D
SL
EE
P
CA
NC
EL
MU
TE
PO
W
ER
CL
O
SE
D
CA
PT
IO
N
IN
PU
T
SE
LE
CT
CH
AN
NE
L
RE
TU
RN
ZE
RO
RE
TU
RN
TIM
ER
RE
C
0
8
7
9
6
5
4
3
2
1
ME
NU
EN
TE
R
DIG
ITA
L
TR
AC
KIN
G
PA
US
E
/ST
ILL
TR
AC
KIN
G
IN
DE
X
ST
OP
PL
AY
FF
RE
W
CO
UN
TE
R
RE
SE
T
TV
M
ON
ITO
R
SK
IP
SE
AR
CH
EJE
CT
VO
L+
+
+
–
–
VO
L–
CH
–
CH
+
RE
C
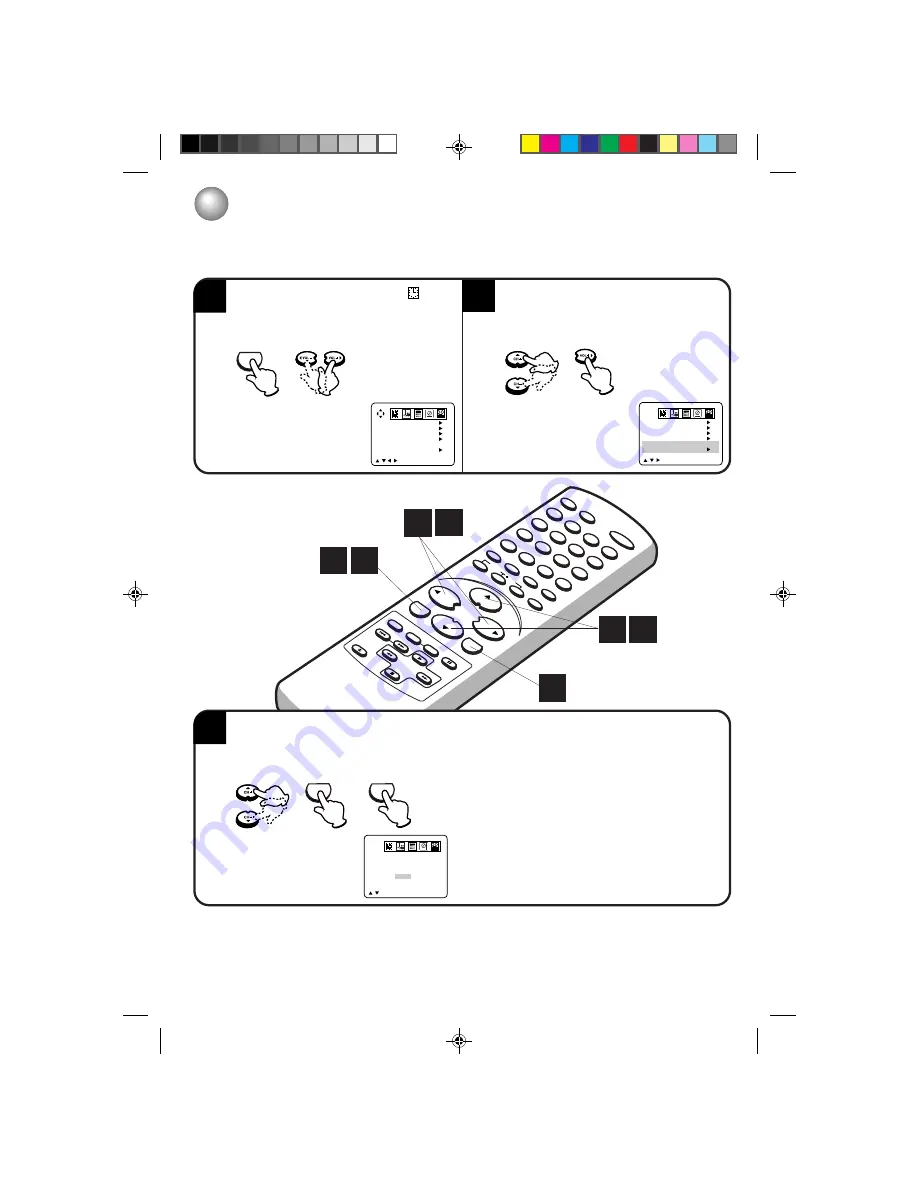
Press MENU. Press
B
or
A
to select
option.
2
Press
▲
or
▼
to select “DAYLIGHT SAVING
TIME”, then press
A
.
NOTES:
•
When shipped from factory, “DAYLIGHT SAVING TIME” is set to “AUTO”.
•
When the clock is not set, daylight saving time setting is not available.
•
When there is no daylight saving time in your area, always select “OFF” in step 3.
3
Press the
▲
or
▼
to select one of the options, then press ENTER. Press MENU repeatedly until the
menu screen is cleared.
When you want to set the daylight saving time manually,
on the first Sunday in April you set to “ON”, and on the last
Sunday in October you set to “OFF”.
DAYLIGHT SAVING TIME SETTING
You can set the daylight saving time automatically or manually.
ON:
OFF:
AUTO:
for manual setting
(forward one hour)
for manual setting
(back one hour)
for automatic setting
(read EDS in the signal)
1
3
AUTO CLOCK SETTING
(CONTINUED)
1
MENU
CLOCK SET
ON/OFF TIMER
AUTO CLOCK
STANDARD TIME
DAYLIGHT
SAVING TIME
/
/
/
/ MENU
ON
CLOCK SET
ON/OFF TIMER
AUTO CLOCK
STANDARD TIME
DAYLIGHT
SAVING TIME
/
/
/ MENU
ON
MENU
ENTER
1
3
2
3
DAYLIGHT SAVING TIME
ON
OFF
AUTO
/
/ ENTER/MENU
2
5L90101C P10-19
20/4/04, 16:32
16


