background image

- 22 -

Basic

Photography

Playing Back/

Erasing Images

Other

Applications

Additional

Information

Getting Ready

Names of Parts (continued)

Mode dial

Power OFF (     P. 35)

Switches the power OFF.

Auto Photography mode (     P. 41)

This is the most commonly used 
photography mode.
In this mode, exposure 
(combination of shutter speed and 
aperture) is automatically 
controlled to facilitate 
photography.

Manual mode (     P. 56)

Manually sets white balance, flash 
intensity, exposure and AF/AE 
(auto-focus/auto-exposure) 
position.

SET-UP mode (     P. 86)

Sets basic camera settings 
(power OFF time, sound, time, 
display language, screen color, 
image number, reset).

PC mode (     P. 95)

Transfers images to a PC.
For details, refer to the Manual 
for the Software Application.

Playback mode (     P. 65)

Selects the image playback or 
protect mode, resize, 
compression and other settings.

Summary of Contents for PDR PDR-M4

Page 1: ...INSTRUCTION MANUAL DIGITAL STILL CAMERA PDR M4 ...

Page 2: ... this Instruction Manual carefully before you start using the camera Once you have finished reading this Instruction Manual keep it handy at all times PDR M4 E N G L I S H In the space provided below please record the model and Serial No of your camera Model No PDR M4 Serial No Please retain this information for future reference ...

Page 3: ...Operation is subjected to the following two conditions 1 This device may not cause harmful interference and 2 this device must accept any interference received including interference that may cause undesired operation CAUTION This equipment has been tested and found to comply with the limits for a Class B digital device pursuant to Part 15 of the FCC Rules These limits are designed to provide reas...

Page 4: ...he same circuit as your computer Ensure that all expansion slots on the back or side of the computer are covered Also ensure that all metal retaining brackets are tightly attached to the computer If these suggestions don t help consult your computer dealer or experienced radio TV technician for help If you modify the camera in any way without getting approval from Toshiba Corporation your camera m...

Page 5: ...abbreviated term referring to the Microsoft Windows Operating System Other companies or product names are trademarks or registered trademarks of the respective companies Before Reading This Manual IMPORTANT Indicates items or details that you should observe to prevent loss of data malfunction and impaired performance Also indicates information relating to specifications and functions Memo Indicate...

Page 6: ... Removing SmartMedia 32 Write Protection 34 Turning the Power ON OFF 35 Turning the Power ON 35 Turning the Power OFF 35 LCD Monitor Display 36 In Photography Mode 36 In Playback mode 37 Basic Photography How to Hold Your Camera 38 How to Press the Shutter Button 39 About the Color of the Viewfinder LED 40 Photography Auto Photography 41 Using the Viewfinder 41 Using the LCD Monitor 42 Setting the...

Page 7: ...lay Back 77 Erasing Images Erase Frame 79 Erasing All Images in a Folder Erase All 81 Formatting the SmartMedia 82 Protecting Images 83 Protecting an Image 83 Removing the Protection 85 Other Applications Basic Photographic Settings SET UP mode 86 AUTO OFF 87 SOUND 88 TIME 88 LANGUAGE 88 SCREEN 89 IMAGE number 89 DEFAULT 90 Adjusting the LCD Monitor Brightness 91 DISP Button and LCD Monitor Displa...

Page 8: ...ould result in bodily injury 1 or property damage 2 Exemption Clauses Toshiba Corporation bears no responsibility in the case of damages arising from earthquakes fire not liable to Toshiba Corporation operating by third parties other accidents or use under abnormal conditions including erroneous or mistaken operation and other problems Toshiba Corporation bears no responsibility for incidental dam...

Page 9: ...nly the optional recommended battery charger Do not use any other battery charger Charging the battery by any other battery charger might cause it to rupture ignite or heat up resulting in fire or major injury Use the battery only for its originally intended purpose Using the battery for any other purpose might cause it to rupture ignite or heat up resulting in fire or major injury Do not carry th...

Page 10: ...lt the store of purchase If the camera has fallen or its case is damaged immediately turn the power OFF and remove the battery and AC adapter Continued use in this state might cause fire or electric shock For details on repair consult the store of purchase Do not place the camera on wobbly inclined or unstable surfaces This might cause the camera to fall or tilt over Do not use in areas near water...

Page 11: ...ult in a traffic accident Use only the specified batteries or the specified AC adapter Use of a battery or AC adapter other than specified might cause fire defects or malfunctions Keep the batteries out of the reach of children If a child swallows a battery this might result in poisoning If a child swallows a battery immediately consult a physician If battery fluid enters the eyes immediately rins...

Page 12: ...th or blankets This might cause heat to build up and deform the case resulting in fire Use the camera in a well ventilated place Before you move the camera disconnect cords and cables Failure to do this might damage cords and cables resulting in fire or electric shock Do not drop or subject the camera to strong impact This might cause fire electric shock or malfunctions Before you carry out mainte...

Page 13: ...insulating tape If stored or disposed of without doing this the batteries may make contact with metal objects resulting in fire or injury due to leaking of battery fluid overheating or bursting of the battery Do not subject the status display to impact If the status display is impacted the glass on the screen may be broken and internal fluid may leak If the internal fluid enters your eyes or stick...

Page 14: ...motors transformers or magnets Places contacting chemicals such as pesticides or next to rubber or vinyl products for long periods Do not expose the camera to sand The PDR M4 is particularly sensitive to sand If the camera comes into contact with sand not only will the camera become damaged it will also no longer be repairable Pay special attention when using the camera at the beach or where sand ...

Page 15: ...insecticide as these may react with the camera body and cause deformation or remove the coating Using the Camera Overseas This camera is designed for the domestic market So its warranty is limited If something should go wrong with your camera while you are traveling or should it malfunction bring it back to your country and consult your store of purchase Do not put your camera in baggage that is c...

Page 16: ...fully charged battery You can also increase the amount of power produced by putting the battery in your pocket or another warm place to heat it and then loading it into the camera just before you take a picture If you are using a heating pad do not place the battery directly against the pad Always keep the terminals in a clean state If the battery is used for a long time the camera body and the ba...

Page 17: ... time be sure to charge the battery before use The battery can be charged on the camera body using the PDR ACM1A AC adapter supplied with the PDR M4 see page 25 The battery takes about five hours to charge If you use the PDR CG1 battery charger sold separately the battery can be charged in about one hour This rechargeable battery does not need to be fully discharged or exhausted before being charg...

Page 18: ... plug into other terminals This might cause the camera to malfunction Before you disconnect the connector cable turn the camera OFF and then disconnect the cable holding it by its plug Do not disconnect the connector cable by pulling the actual cable Do not drop the AC adapter or subject it to strong impacts Do not use the AC adapter in very hot and humid locations Do not plug in the AC adapter wh...

Page 19: ... Self timer Burst mode 4 frames in 1 second Multi mode 16 frames displayed continuously Bulb mode for night photography Color Black and white photography etc Image size and quality easily selectable Size 1600 x 1200 800 x 600 pixels Quality FINE NORMAL BASIC Status display Settings can be verified even when LCD monitor is OFF SmartMedia Expandable up to 32MB Compatibility Image recording method co...

Page 20: ...4 Enlarging Photographed Images P 66 9 frame Playback P 67 Auto Playback P 68 Playback of Multi Image Pictures P 69 Let s play back photographed images You can choose various ways of playing back images on the LCD monitor Setting the Image Size and Quality P 44 Manually setting the PDR M4 P 56 Changing the Preset Conditions P 61 Let s change the photography settings You can change the settings for...

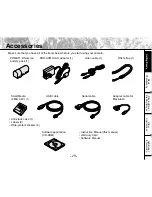
Page 21: ...the items below before you start using your camera PDR BT1 lithium ion battery pack 1 PDR ACM1A AC adapter 1 Video cable 1 SmartMedia 8MB 3 3V 1 Wrist strap 1 USB cable Serial cable Adapter cable for Macintosh Software application CD ROM Instruction Manual this manual Warranty Card Software Manual Anti static case 1 Labels 2 Write protect stickers 4 ...

Page 22: ...n Getting Ready Names of Parts Mode dial For enlarged view P 22 Viewfinder window Flash button Image Quality button Self timer button Status display P 23 Flash Self timer lamp Flash control sensor Connection terminal cover DIGITAL terminal VIDEO terminal DC IN 5V terminal Lens Shutter button ...

Page 23: ...ap mount SmartMedia cover SmartMedia cover release knob Battery cover Tripod mount DISP button Erase button LCD monitor Macro button MENU button Viewfinder Viewfinder LED ENTER button Press the center of the button Use this button to fix a selection cross pad button Press the button on the required side Use these buttons to select an item or an image ...

Page 24: ...eed and aperture is automatically controlled to facilitate photography Manual mode P 56 Manually sets white balance flash intensity exposure and AF AE auto focus auto exposure position SET UP mode P 86 Sets basic camera settings power OFF time sound time display language screen color image number reset PC mode P 95 Transfers images to a PC For details refer to the Manual for the Software Applicati...

Page 25: ...owing instances When the shutter button is pressed When one of the self timer image quality or flash buttons is pressed Remaining battery power Multi photography P 54 Flash photography P 49 No indication Auto Image size P 44 HALF 800 x 600 pixel FULL 1600 x 1200 pixel Image quality P 44 FINE NORMAL BASIC Self timer photography P 48 Macro photography P 47 SmartMedia loaded symbol Burst photography ...

Page 26: ...the Wrist Strap This wrist strap is handy for carrying your camera around To prevent your camera from dropping during photography pass your wrist through the wrist strap and then firmly grip the camera Pass the end of the wrist strap through the strap mount on the camera Pass the wrist strap through the loop and pull ...

Page 27: ...d page 14 Loading the Battery IMPORTANT Before you load or remove the battery be sure to turn the camera OFF If the battery is loaded or removed with the power ON the date setting may return to its default or the camera settings may be reset SET UP Page 86 Manual Photography Page 56 Remove the battery cover from the battery Store the battery cover in a safe place to prevent it from becoming lost S...

Page 28: ... continued Load the battery in the battery compartment making sure that it is loaded in the correct direction as shown in the figure on the right Insert the terminal metal colored part first when loading the battery Close the battery cover q and slide the battery cover w Make sure that the battery cover is firmly closed Q q Q w ...

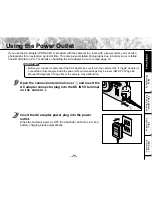
Page 29: ...used for a long time be sure to charge the battery before use The following describes how to charge the battery on the camera body Set the mode dial to Connect the AC adapter to the camera and to the power outlet Connecting the AC Adapter Page 29 While the battery is being charged the viewfinder LED turns red When the battery is fully charged the LED turns green Generally it takes about five hours...

Page 30: ...ollowing shows the approximate number of images that can be photographed continuously using a fully charged battery in room temperature with the flash used for half of the images Note however that these figures vary according to the operating temperature of the camera and the detail of the image being photographed With the LCD monitor on Approx 200 images With the LCD monitor off Approx 300 images...

Page 31: ...be sure to read page 16 IMPORTANT Before you connect or disconnect the AC adapter be sure to turn the camera OFF If the AC adapter is connected or disconnected with the power ON camera settings may be reset SET UP Page 86 Manual Photography Page 56 or the camera may malfunction Open the connection terminal cover q and insert the AC adapter connector plug into the DC IN 5V terminal on the camera w ...

Page 32: ...tMedia is exposed to static electricity or electrical noise When the SmartMedia is removed or the camera is then switched OFF during data recording data erasing frame advance when images are being played back or during formatting of the SmartMedia We recommend copying and saving important data onto another storage medium floppy disk hard disk MO disk etc Never remove the SmartMedia or switch the c...

Page 33: ...is charged with static electricity into your camera may cause it to malfunction If this occurs switch the camera OFF and then ON again The SmartMedia may feel warm when it is removed from the camera after the camera is used for a long time This is normal and not a malfunction The SmartMedia has a limited service life If images can no longer be written or erased buy a new SmartMedia Use the index l...

Page 34: ...ng the rear of the camera Firmly insert the SmartMedia as far as it can go Close the SmartMedia cover Before you use a new SmartMedia be sure to format the SmartMedia Page 82 Removing SmartMedia IMPORTANT Never open the SmartMedia cover or remove the SmartMedia while data is being recorded to the SmartMedia viewfinder is lit red This might damage the SmartMedia or corrupt the data on the SmartMedi...

Page 35: ...ia continued Slide the SmartMedia cover release knob in the direction of the arrow qto open the cover w Push the SmartMedia in as far as it can go and pull it out with your fingers If you push SmartMedia once in as far as it can go it will protrude slightly Pull it out with your fingers Close the SmartMedia cover Q q Q w ...

Page 36: ...vertently attach the write protect sticker at the write protect area Data can no longer be recorded or erased from SmartMedia To write or erase data from SmartMedia peel off the sticker IMPORTANT The write protection may not function if the write protect sticker becomes dirty Use a soft dry cloth to wipe away any dirt Once a sticker is peeled off it cannot be used again Write protect area Sticker ...

Page 37: ... Power OFF function starts to work IMPORTANT If no operation is carried out for a fixed amount of time default about 1 minute the power is turned OFF to prevent battery wear This is called Auto Power OFF To return to the normal state either change the mode dial or press the shutter down half way Page 39 About the Auto Power OFF Function Additional Information AUTO OFF page 87 Turning the Power OFF...

Page 38: ...ct image So the number of images that can be photographed after an image is recorded decreases Sometimes this amount decreases by two images The display is momentarily disrupted after recording an image or the mode is switched This does not affect photography 0024 NO CARD ZOOM 99 05 10 AM 10 10 Possible number of shots at currently preset size and quality Date year month day Time Self timer photog...

Page 39: ...k mode LCD Monitor Display continued Memo The image number sometimes differs from the display example if an image recorded on a different camera is played back 0003 100 NO IMAGE 99 05 10 AM 10 10 Mode dial setting Protected image Image size Date year month day Message P 103 Image number Folder number Time W1600 H1200 ...

Page 40: ...etting Ready How to Hold Your Camera When taking a photograph hold the camera firmly and prevent your finger or wrist strap from covering the lens flash or flash sensor Right Camera held with both hands with your arms firmly held against the sides of your chest Wrong Fingers held over the lens ...

Page 41: ...aken until AF and AE are locked To focus or expose a position outside the center of the screen frame move the subject you are taking to the center of the screen frame and press down the shutter button half way Now with the shutter button held down return to the original picture that you composed and press the shutter button down fully Moving the camera as you press the shutter button will result i...

Page 42: ...ing Green ON or AE or AF are locked with the shutter button held half down Standby mode Charging of battery is completed with AC adapter connected or Self timer in operation Power ON Writing to SmartMedia in progress Photographs can be taken however do not set the mode dial to Accessing of SmartMedia in progress Charging of battery in progress with AC Adapter connected Signal processing in progres...

Page 43: ...y controlled to facilitate photography There are two ways of taking photographs in this mode using the viewfinder and using the LCD monitor Using the Viewfinder Get ready to take the photograph Load the battery Page 25 and the SmartMedia Page 30 into the camera Set the mode dial to Press the DISP button to turn the LCD monitor OFF To reduce the amount of battery wear we recommend turning the LCD m...

Page 44: ... press it down fully w Pressing the shutter button down half way adjusts the exposure and pressing the shutter button down fully takes the shot When preview is set to ON Page 63 a preview image is displayed on screen for about two seconds The viewfinder LED turns red while image data is being recorded onto the SmartMedia Using the LCD Monitor Get ready to take the photograph Load the battery Page ...

Page 45: ...re and pressing the shutter button down fully takes the shot When the focus and exposure are adjusted the viewfinder lamp turns green When preview is set to ON Page 63 a preview image is displayed on screen for about two seconds The viewfinder LED turns red while image data is being recorded onto the SmartMedia Memo The LCD monitor sometimes displays bright dark or colored spots at all times This ...

Page 46: ... the status display Pressing the image quality button displays the available qualities and sizes in order Select from the available combinations of quality and size Q u a l i t y FINE 1 4 JPEG compression NORMAL 1 8 JPEG compression BASIC 1 16 JPEG compression The more stars there are the better the image quality becomes Higher quality images however take up more memory space reducing the number o...

Page 47: ...ograph For details on how to take photographs Photograph Page 41 Memo To make the image smaller it is more effective to reduce the size q and then reduce image quality w After you have taken a photograph you can change its size Page 70 and quality Page 72 The memory size of the image varies according to the subject The compression ratio is given for reference only ...

Page 48: ...ess the button ZOOM is displayed in the LCD monitor and the center of the screen is enlarged at twice the original size Look at the image on the LCD monitor to compose the picture Using the LCD Monitor Page 36 Press the shutter button down half way and press it down fully Page 39 To cancel zoom photography press the button Memo The image size is fixed to 800 x 600 pixel Note however that the size ...

Page 49: ...ge In the macro photography mode the LCD monitor automatically turns ON Take the photograph while viewing the LCD monitor Set the mode dial to or Press the macro button is displayed on the LCD monitor and the status display Look at the image on the LCD monitor to compose the picture Using the LCD Monitor Page 36 Press the shutter button down half way and press it down fully Page 39 To cancel macro...

Page 50: ...on is displayed on the LCD monitor and the status display Compose the picture Press the shutter button down half way and press it down fully Page 39 The self timer LED lights red and then flashes The photograph is then taken after the preset time two or ten seconds When photographs are taken using the LCD monitor the count down is displayed To cancel photography midway press the button Memo Burst ...

Page 51: ...e fired The effective firing distance of the flash is approximately 1 65 ft 0 5 m to 8 20 ft 2 5 m Set the mode dial to or Press the flash button to set to the desired mode while viewing the image on the LCD monitor or the status display Pressing the flash button displays the available flash modes in order The icon for the mode that you selected is displayed in the LCD monitor or the status displa...

Page 52: ...raphy Suppressed Flash Use the Suppressed Flash mode when you are taking pictures in indoor lighting at distances too great for the flash to have any effect such as theater performances or indoor sporting events Slow Synchro The flash is fired while the shutter speed is changed This flash mode is effective when shooting pictures so that not only the subject but also the background are both clearly...

Page 53: ... temporarily within the buffer memory After photography is finished check the images and record the selected ones to SmartMedia Set the mode dial to or Set the photography mode to BURST q Press the MENU button w Use the or buttons to select REC MODE and press the button e Use the or buttons to select BURST and press the ENTER button r Press the MENU button For details on the photography mode Page ...

Page 54: ... time that the DISP button is held down Use the or buttons to select the recording method q SELECT This setting is for saving and erasing the selected image Press the or button to select the image and press the ENTER button The selected image is indicated by the red frame Press the EXEC button w ALL SELECT This setting is for saving all images Press the EXEC button All images are selected and indi...

Page 55: ...The image is saved or erased and the camera is then ready to take photographs Memo You can also carry out steps 5 and 6 while verifying the image in step 4 Even if photography is canceled midway by releasing the shutter button images already photographed can be saved and erased by the above method Self timer photography and flash photography are not possible The camera is set to erase all images i...

Page 56: ... the MENU button For details on the photography mode Page 62 is displayed in the LCD monitor or the status display Compose the picture press the shutter button down half way and press it down fully Page 39 The shutter is opened and closed 16 times Memo Though zoom playback is not possible playback of multi image pictures Page 69 is possible Self timer photography and flash photography are not poss...

Page 57: ...he button e Use the or buttons to select BULB and press the ENTER button r Press the MENU button For details on the photography mode Page 62 and are displayed in the LCD monitor or the status display Compose the picture press the shutter button down half way and press it down fully Page 39 The camera takes the picture at the set exposure time During the exposure the viewfinder LED turns orange It ...

Page 58: ...alled manual photography Settings made in this mode are saved even if the camera is turned OFF IMPORTANT Do not remove or insert the battery or disconnect or connect the AC adapter while the camera is ON This might return the manual photography settings to their defaults If this happens manually set the conditions again Set the mode dial to Press the ENTER button The manual setup screen is display...

Page 59: ...y Page 59 AREA AF AE area Page 60 When you have finished the settings press the ENTER button The camera is ready to take photographs Compose the picture press the shutter button down half way and press it down fully Page 39 The camera takes the picture Memo Photography is also possible with the manual setup screen displayed Note however that the size and quality cannot be set and macro photography...

Page 60: ...tion Glossary This setting allows you to intentionally lighten or darken the entire screen Use this setting when the optimum brightness exposure cannot be obtained for example when there is a lot of contrast between the subject and the background or when the subject to photograph occupies only an extremely small part of the screen E V can be set in 11 stages Increasing E V lightens the screen whil...

Page 61: ...black paper 0 6 Scenes with low reflectivity such as shots of green or dark foliage 0 6 FLASH Flash intensity Use this setting to achieve the optimum image brightness exposure when the subject is very small in the picture or when the subject is much brighter or darker than the background for example flowers or business cards Flash can be set in four stages 0 default 0 3 0 6 0 9 The optimum brightn...

Page 62: ...itional Information Getting Ready Taking Photographs Manually Manual Photography AREA AF AE area This setting allows you to set which part of the screen to focus to when the shutter button is pressed half way to activate AF and AE Page 106 Center default Left Right Up Down ...

Page 63: ... button The REC MENU is displayed Use the or buttons to select the desired setting item q and press the button The tab menu w is displayed The image before the photograph is taken is displayed on the LCD monitor Photography mode Page 62 COLOR Page 63 BULB Page 64 LCD Page 64 PREVIEW Page 63 SHARPNESS Page 63 SELF TIMER Page 64 Use the or buttons to select the desired setting from the tab menu w an...

Page 64: ...Continuously Taking Photographs page 51 MULTI Continuously taking 16 photographs as a single image FULL size only Multi Image Photography page 54 BULB Taking photographs at a longer exposure time Taking Photographs at a Long Exposure page 55 Photography Mode and Functions You can combine photography modes and the various functions for extra enjoyment The following table shows the possible combinat...

Page 65: ...raphed image Note however that detailed areas are not sharp as the resolution of preview images is low To check detailed areas and focus record the image to SmartMedia and check it in the playback mode Page 65 To cancel preview press the shutter button half way down again OFF Do not display preview default O N Display preview COLOR Sets the color mode in which the image is to be recorded C O L O R...

Page 66: ...t 4 seconds default 8SEC Opens shutter for about 8 seconds SELF TIMER Sets the delay time for when the photograph is taken after the shutter button is pressed during self timer photography Page 48 10SEC Picture taken after a 10 second delay default 2SEC Picture taken after a 2 second delay LCD Adjusts the brightness of the LCD monitor This adjustment does not adjust the brightness of the image to ...

Page 67: ... last image frame appears on the LCD monitor To adjust the brightness of the LCD monitor Page 91 Changing the LCD monitor display Page 92 Press the or buttons to move forward and reverse Frame advance Frame reverse Holding down the or buttons moves forward or reverse continuously one frame at a time Memo Pressing the button at the final image displays the first image and pressing the button at the...

Page 68: ... the image by the same operation as for 9 frame playback Page 67 Press the button The image is displayed enlarged and a white frame and green frame are displayed on the LCD monitor The white frame indicates the entire image while the green frame shows the location of the currently enlarged area Use the or buttons to select the area to enlarge Adjust the display area to enlarge while viewing the wh...

Page 69: ...ed back from several others Set the mode dial to The last image frame appears on the LCD monitor Press the ENTER button Nine images are displayed simultaneously Use the or buttons to move the cursor to select the image to be displayed at regular size The cursor lies on top of the image surrounded by a blinking frame Pressing the buttons continuously moves the cursor continuously Press the ENTER bu...

Page 70: ...ess the MENU button The PLAY MENU is displayed Use the or buttons to select SLIDE and press the button The slideshow begins and is displayed on the LCD monitor The next image is displayed every three seconds To quit the slideshow press the ENTER button The LCD monitor displays the image when the ENTER button is pressed The slideshow is repeated until the ENTER button is pressed Memo The Auto Power...

Page 71: ...s back the 16 images photographed in the multi photography mode like an animation Set the mode dial to The last image frame appears on the LCD monitor Use the or button to select the images photographed in the multi photography mode You can also select the image by the same operation as for 9 frame playback Page 67 Press the button Automatic playback begins ...

Page 72: ... SmartMedia has run out of storage space during photography increases space on SmartMedia so that you can continue taking photographs The following images cannot be resized HALF size images images photographed on another camera images photographed in the multi photography mode protecting images Page 83 Images cannot also be resized when the SmartMedia is write protected Set the mode dial to The la...

Page 73: ...ENU Use the or buttons to select the image and press the ENTER button This fixes the image to be displayed and is displayed under the image To cancel the selection press the ENTER button again If you want to resize two or more images repeat the procedure for the necessary number of images Use the or buttons to select EXEC and press the ENTER button The screen indicating that the image is being res...

Page 74: ...ing photography increases space on SmartMedia so that you can continue taking photographs The following images cannot be compressed BASIC image quality images images photographed on another camera protected images Page 83 Images cannot also be compressed when the SmartMedia is write protected Set the mode dial to The last image frame appears on the LCD monitor Press the MENU button The PLAY MENU i...

Page 75: ...he current compression ratio quality is displayed under the image Each press of the ENTER button changes the number of stars as follows NORMAL BASIC Details of compression ratio Page 44 If you want to compress two or more images repeat the procedure for the necessary number of images Use the or buttons to select EXEC and press the ENTER button The screen indicating that the image is being compress...

Page 76: ...otographed images This feature is useful when you want to copy an image from one SmartMedia to another Set the mode dial to The last image frame appears on the LCD monitor Press the MENU button The PLAY MENU is displayed Use the or buttons to select COPY and press the button The COPY menu is displayed Copying Images ...

Page 77: ... the necessary number of images The bar at the bottom of the screen indicates the amount of buffer memory used to store the date of the images which have been selected and the remaining memory space The amount of memory space consumed is indicated in green Use the or buttons to select EXEC and press the ENTER button The screen indicating that the image is being read appears Load the SmartMedia for...

Page 78: ...CITY appears on the screen Replace the SmartMedia with another one When copying is completed the above screen is displayed When this screen is displayed you can swap the SmartMedia with the original SmartMedia The camera need not be turned OFF for this operation IMPORTANT Do not remove the SmartMedia or turn the camera OFF while images are being copied This might damage the SmartMedia Press the EN...

Page 79: ...two or more folders Set the mode dial to The last image frame appears on the LCD monitor Press the MENU button The PLAY MENU is displayed Use the or buttons to select FOLDER and press the button The names of the folders in the currently loaded SmartMedia are displayed Use the or buttons to select the folder to be displayed and press the ENTER button Selecting the Folder to Play Back ...

Page 80: ...ther camera is used on this camera the folder xxxTOSHI is created and the data of the photographed images is recorded to this folder XXXTOSHI Indicates that the folder is used on this camera The largest number is automatically assigned according to the status of the existing folders To view images photographed on this camera select xxxTOSHI Memo To play back images photographed by another camera s...

Page 81: ...mode dial to or When is selected the final image is displayed on the LCD monitor When is selected use the or buttons to select the image to be erased When or is selected the final image is selected Press the erase button FRAME or LAST is displayed at the bottom left of the screen Use the or buttons to select EXEC and press the ENTER button This erases the image and returns to the previous mode To ...

Page 82: ...LCD monitor cancel the protection Page 83 If you take a photograph after erasing an image a number continuing from the last photographed image is assigned as the image number Images can also be erased in the 9 frame playback multi playback mode In this case the camera enters the single frame playback frame playback mode and enters the 9 frame playback mode after the image is erased Erasing Images ...

Page 83: ... menu is displayed Use the or buttons to select ALL q Make sure that ALL at the bottom center of the image is displayed in yellow Use the or buttons to select EXEC w and press the ENTER button This erases the images and returns to the previous mode To cancel erasing of image data select CANCEL When is selected NO IMAGE is displayed after the images are erased unless the SmartMedia contains protect...

Page 84: ...a before use Set the mode dial to or When is selected the final image is displayed on the LCD monitor Hold down the erase button for two seconds The ERASE menu is displayed Use the or buttons to select FORMAT q Make sure that FORMAT is displayed in yellow at the bottom right of the screen Use the or buttons to select EXEC w and press the ENTER button To cancel formatting select CANCEL To reset the...

Page 85: ...m being erased IMPORTANT Formatting erases all the images on a SmartMedia regardless of whether they are protected or not To protect the entire SmartMedia see Write Protection Page 34 Protecting an Image Set the mode dial to The last image frame appears on the LCD monitor Press the MENU button The PLAY MENU is displayed Protecting Images ...

Page 86: ...the selection press the ENTER button again To write protect two or more images repeat this procedure for the necessary number of images Use the or buttons to select EXEC and press the ENTER button To quit write protection select CANCEL When write protection ends the screen returns to the PLAY MENU To quit the PLAY MENU press the MENU button Memo When the PROTECT setup screen is displayed again is ...

Page 87: ...d press the ENTER button This fixes the images whose protection is to be removed and under the image changes to To unprotect an image press the ENTER button again To remove the protection from two or more images repeat this procedure for the necessary number of images Carry out step 5 in Protecting An Image Memo To protect an image again write protection is simultaneously carried out if set at ste...

Page 88: ...elated settings This is called setup The following items can be set in the SET UP mode AUTO OFF SOUND LANGUAGE TIME SCREEN IMAGE number DEFAULT The details set here are held in memory even if the camera is turned OFF Set the mode dial to The SET UP menu appears Use the or buttons to select the item you want to set AUTO OFF Page 87 SOUND Page 88 TIME Page 88 LANGUAGE Page 88 SCREEN Page 89 IMAGE nu...

Page 89: ...dial setting AUTO OFF If no operation is carried out for a fixed amount of time default about one minute power consumption is set to its minimum state power almost turned OFF to prevent battery wear This is called the Auto Power OFF mode This setting allows you to set the time until the camera is set to the Auto Power OFF mode This function is not activated during automatic playback Page 68 or in ...

Page 90: ...y state TIME Sets the date and time Seconds cannot be set Using the or buttons to select the item you want to set and use the or buttons to set the value for each item Pressing the button advances the selection in the following order Year Month Day Hour Minute Setting Cancel Select SET and press the ENTER button To quit setting select the CANCEL button LANGUAGE Sets the display language for menus ...

Page 91: ...lso reset the folder number format the SmartMedia first and reset the image number About Image Numbers and Folder Numbers A running number continuing from the last photographed image is assigned as the image number regardless of whether or not only one image or all images were erased A folder is assigned as a running number in the same way The largest image number is 9999 When this number is reach...

Page 92: ...ons Additional Information Getting Ready Basic Photographic Settings SET UP mode continued DEFAULT Sets whether or not to return the settings in the SET UP menu to their defaults CANCEL Does not return settings to their defaults OK Returns settings to their defaults ...

Page 93: ...the MENU button The REC MENU or PLAY MENU is displayed You can set the LCD monitor brightness in either of these menus Use the or buttons to select LCD and press the button The image and the LCD menu are displayed Use the or buttons to adjust the brightness Press the button to darken the LCD monitor or the button to lighten the LCD monitor The LCD monitor can be adjusted within the range 5 to 5 De...

Page 94: ...y Page 36 Each press of the DISP button switches the display in the following order indicates default Note Monitor is blank during PC mode 99 05 10 AM 10 10 001 OFF monitor is blank Live image image before photography On screen display image details letters and icons are displayed Live image On screen display Live image only Live image On screen details display Playback image Image details Live im...

Page 95: ...n available IMPORTANT Before you connect your camera to other equipment be sure to turn all other connected equipment OFF If you connect your camera to other equipment with the power still ON the screen may flicker or the image may not be displayed normally Connect the plug of the video cable provided to the VIDEO terminal on the camera Connect the video cable plug to the VIDEO IN terminal on the ...

Page 96: ...back Details of operation are the same as taking photographs and playing them back on the LCD monitor How to take photographs Page 41 How to play back images Page 65 Memo Nothing is displayed on the TV when the LCD monitor is set to OFF by the DISP button Live images moving image before photography are less clear than playback images This is because they are displayed at a lower resolution ...

Page 97: ...or floppy disk adapter sold separately PDR FLP2 Page 96 To transfer images to a PC software must be installed and special cables connected For details refer to the User s Guides for your PC and the Software Manual Using SmartMedia on a PC When you use SmartMedia do not change or erase folders or file names image data on the SmartMedia Doing so might prevent the SmartMedia from being used on the ca...

Page 98: ... Devices page 98 For details on these accessories refer to the Instruction Manual for the accessory you are using information current as of June 1999 SmartMedia 3 3 V 8MB PDR NSM8 16MB PDR SM16 32MB PDR SM32 Lithium ion battery pack PDR BT1 Battery charger PDR CG1 This charger is connected to a household power outlet and charges the lithium ion battery pack PDR BT1 in a short time approx one hour ...

Page 99: ... PDR FLP2 FlashPath This adapter allows SmartMedia to be used as 3 5 floppy disk This adapter is inserted into the floppy disk drive on your PC allowing images recorded on the SmartMedia to be transferred to the PC An OS Windows 95 Windows 98 Windows NT4 0 IBM PC AT compatible machine compatible with the floppy disk adapter PDR FLP2 is needed to use this adapter ...

Page 100: ... Information Getting Ready Connecting to Other Devices SmartMedia Floppy disk adapter PC card adapter PC Printer Software application CD ROM provided Interface cable provided Video cable provided AC adapter provided Plug socket TV monitor PDR M4 yyyyy yyyyy yyyyy yyyyy yyyyy yyyyy ...

Page 101: ... range 0 33 ft 0 1 m to infinity Detection system Contrast detection system frame rate during detection 30 Hz TTL metering by image capture system Program AE exposure compensation available in Manual mode Model Recording medium Compression system Image file format Number of frames Top 1600 x 1200 pixels Bottom 800 x 600 pixels Conversion rules Scanning resolution Pickup elements Sensitivity Lens F...

Page 102: ...32C RS 422 or USB cable compatible NTSC system Rechargeable Lithium ion battery pack PDR BT1 or AC adapter provided PDR ACM1A 41 F 5 C to 104 F 40 C during operation 4 F 20 C to 140 F 60 C during storage 30 to 80 during operation no condensation 4 2 5 112 mm W x 2 2 3 68 mm H x 1 2 3 42 mm D excluding protrusions Approx 8 4 oz 240 g excluding accessories battery and SmartMedia Aperture Shutter Whi...

Page 103: ...mperature 14 F 10 C 158 F 70 C Dimensions 1 8 9 48 mm W x 1 1 4 26 mm H x 2 3 4 70 mm D Weight Approx 3 5 oz 100 g Connector Cable Length Approx 6 6 ft 2 m AC adapter PDR ACM1A Nominal voltage 3 7V Nominal capacity 1100mAh Operating temperature 32 F 0 C 104 F 40 C Dimensions 7 9 19 8 mm W x 4 5 20 4 mm H x 2 1 6 55 5 mm D Weight Approx 1 4 oz 40 g High speed charging Approx 1 hour Battery charger ...

Page 104: ...ameras SmartMediaTM Type of memory NAND flash memory Operating voltage 3 3V Operating conditions Temperature 32 F 0 C to 104 F 40 C Humidity 80 or less no condensation Dimensions 1 4 9 37 mm W x 3 100 0 76 mm H x 1 7 9 45 mm D Accessories Anti static case x1 index labels x2 write protect stickers x4 SmartMedia These specifications are subject to change without notice ...

Page 105: ...g is not possible Nothing is recorded to the SmartMedia The SmartMedia cover is open The SmartMedia cover must be closed The SmartMedia is not formatted A message prompting you to format the SmartMedia is displayed The SmartMedia is damaged The SmartMedia format is incorrect The SmartMedia is write protected An attempt was made to playback incorrectly recorded data An attempt was made to playback ...

Page 106: ... and quality to increase space on the SmartMedia Remove the write protection Format the SmartMedia Load a new SmartMedia Either press the shutter button half way down for at least two seconds or change the mode dial setting Causes The battery is exhausted The AC adapter plug has come out of the power outlet The mode dial is set incorrectly The battery is exhausted You are using the camera in extre...

Page 107: ...ck image is blurred I cannot format the SmartMedia I cannot erase all the frames Nothing happens when I use the buttons and switches Nothing is displayed even through the LCD monitor is set to ON The set date and time disappears See Page P 49 P 49 P 49 P 25 P 49 P 47 P 34 P 85 P 34 P 39 P 87 P 41 P 65 P 88 Remedy Set the mode dial to the correct setting Set the flash to Auto Red Eye Reduction or F...

Page 108: ...ted but the higher the compression ratio the worse image quality becomes This format is widely used in the paint software for PCs and on the Internet PC Card A generic term for cards that meet the PC Card Standard Red Eye Effect The phenomenon where people s eyes sometimes appear red in the picture when you use a flash to photograph them in low light conditions This is caused by the light of the f...

Page 109: ... 829 8318 5 00 a m to 5 00 p m PST Mon to Fri except holidays or e mail to dsc support tais toshiba com Repairs Within the Warranty Period We shall repair your camera in accordance with the details described on the Warranty Card Refer to your Warranty Card Repairs Outside the Warranty Period If your camera s functions can be sustained by repair we shall be able to repair the camera for a fee Repai...

Page 110: ...start and the camera will power off automatically Power on the camera again The LCD monitor will display Demo Mode You are now set for demonstrating the camera without the SmartMedia card How to return to the Normal Mode Follow step 1 to 3 again until the LCD monitor displays Changed to Normal Mode please restart and the camera will power down automatically Power on the camera again Memo Recorded ...

Page 111: ...Friday except holidays or e mail us at dsc support tais toshiba com TOSHIBA DIGITAL STILL CAMERA Toshiba America Information Systems Inc Imaging Systems Division 9740 Irvine Boulevard Irvine Carifornia 92618 1697 Address and telephone number are subject to change without notice 23563677 ...

Page 112: ...ploi Une fois votre lecture terminée gardez ce mode d emploi à proximité pour vous y reporter chaque fois que c est nécessaire PDR M4 F R A N Ç A I S Dans l espace ci dessous veuillez inscrire le numéro du modèle et le numéro de série de votre appareil photo No de modèle PDR M4 No de série Veuillez conserver ces informations pour référence future APPAREIL PHOTO NUMÉRIQUE ...

Page 113: ...ibles et 2 cet appareil doit supporter des interférences y compris des interférences pouvant provoquer des réactions indésirables ATTENTION Cet appareil a été testé et les résultats ont montré qu il répondait aux tolérances d un dispositif numérique de classe B conformément à la partie 15 du règlement de la FCC Ces tolérances sont destinées à assurer un niveau de protection raisonnable contre les ...

Page 114: ...ncher l ordinateur sur une prise secteur différente Ne raccordez pas votre radio ou téléviseur sur le même circuit que votre ordinateur S assurer que tous les logements d extension à l arrière ou à côté de l ordinateur sont recouverts S assurer aussi que toutes les attaches métalliques sont fermement attachées à l ordinateur Si ces suggestions n ont pas d effet positif consultez un revendeur de ma...

Page 115: ... les autres noms de compagnies ou de produits peuvent être des marques de fabrique ou des marques déposées de leurs fabricants respectifs Avant de lire ce mode d emploi IMPORTANT Indique des points ou détails qui doivent être observés pour éviter les pertes de données les dysfonctionnements et les baisses de performances Indique aussi des informations se rapportant aux spécifications et fonctions ...

Page 116: ...la carte SmartMedia 31 Retrait de la carte SmartMedia 32 Protection contre l écriture 34 Mise sous hors tension 35 Mise sous tension 35 Mise hors tension 35 Affichage du moniteur LCD 36 En mode de prise de vues 36 En mode de lecture 37 Photographie de base Comment tenir l appareil photo 38 Comment appuyer sur le déclencheur 39 A propos de la couleur du témoin du viseur 40 Prise de vues Prise de vu...

Page 117: ...e toutes les images d un dossier tout effacer 81 Formatage de la carte SmartMedia 82 Protection des images 83 Protection d une image 83 Annulation de la protection 85 Autres applications Réglages de prise de vue de base mode SET UP 86 AUTO OFF 87 SOUND 88 TIME 88 LANGUAGE 88 SCREEN 89 IMAGE No 89 DEFAULT 90 Réglage de la luminosité du moniteur LCD 91 Touche DISP et affichage du moniteur LCD 92 Pri...

Page 118: ...ut entraîner des blessures corporelles Cet affichage indique qu une utilisation incorrecte peut entraîner des blessures corporelles 1 ou des dommages à la propriété 2 Limites de responsabilité Toshiba Corporation rejette toute responsabilité en cas de dommages causés par un incendie un tremblement de terre l utilisation par un tiers ou tout autre accident ou par un emploi anormal erroné ou impropr...

Page 119: ...le chargeur d accumulateur conseillé disponible en option Ne pas utiliser d autre chargeur L accumulateur risque d éclater de fuir ou de chauffer et provoquer un incendie ou des blessures s il est chargé avec un autre chargeur Utilisez l accumulateur seulement pour son utilisation prévue L accumulateur risque d éclater de prendre feu ou de chauffer provoquant ainsi un incendie ou des blessures gra...

Page 120: ...i son boîtier a été endommagé éteignez le immédiatement enlevez l accumulateur et débranchez l adaptateur secteur L utilisation de l appareil photo dans ces conditions peut provoquer un incendie ou une électrocution Pour toute réparation adressez vous à votre revendeur Ne pas poser l appareil photo sur une surface inégale inclinée ou instable L appareil photo pourrait tomber ou basculer Ne pas uti...

Page 121: ...lement les accumulateurs spécifiés ou l adaptateur secteur spécifié L utilisation d un autre accumulateur ou d un autre adaptateur peut provoquer un incendie des défauts ou un dysfonctionnement Rangez les accumulateurs hors de portée des enfants En cas d ingestion il y a risque d empoisonnement Si un accumulateur est avalé faites immédiatement appel à un médecin Si vos yeux sont éclaboussés par l ...

Page 122: ...verture etc Une surchauffe de l appareil photo pourrait déformer le boîtier et provoquer un incendie Utilisez l appareil photo dans un endroit bien ventilé Avant de déplacer l appareil photo débranchez les cordons et les câbles Les cordons et les câbles pourraient être endommagés entraînant un risque d incendie ou d électrocution Ne pas laisser l appareil photo tomber ni le soumettre à un choc vio...

Page 123: ...t entrer en contact avec des objets métalliques avec un risque d incendie ou de blessures résultant de la fuite de l électrolyte des piles d une surchauffe ou de l explosion des accumulateurs Ne pas soumettre l écran LCD à un choc Si l écran LCD est soumis à un choc le verre de l écran risque de se briser et le fluide à l intérieur de s écouler Si le fluide pénètre dans vos yeux ou adhère à votre ...

Page 124: ...ximité d un moteur d un transformateur ou d un aimant par exemple Au contact de produits chimiques comme des insecticides ou à proximité de produits en caoutchouc ou vinyle pendant longtemps Ne pas exposer votre appareil photo au sable Le PDR M4 est particulièrement sensible au sable qui peut l endommager de manière irréversible Faites surtout attention quand vous utilisez l appareil photo à la pl...

Page 125: ...contact du boîtier de l appareil photo et le déformer ou endommager sa finition Utilisation de l appareil photo à l étranger Cet appareil photo a été conçu pour le marché intérieur Sa garantie est donc limitée Si votre appareil photo tombe en panne pendant un voyage à l étranger ou s il fonctionne mal rapportez le dans votre pays et contactez votre revendeur Ne placez pas l appareil photo dans les...

Page 126: ...re de photos pouvant être prises diminue Emportez avec vous un accumulateur supplémentaire complètement chargé Vous pouvez aussi augmenter la puissance produite en mettant l accumulateur dans votre poche ou dans un autre endroit tiède pour le réchauffer puis en l insérant dans votre appareil photo juste avant de prendre une photo Si vous utilisez une chaufferette ne placez pas l accumulateur à son...

Page 127: ...lateur avant de l utiliser L accumulateur peut être chargé dans le boîtier de l appareil photo à l aide de l adaptateur secteur PDR ACM1A fourni avec le PDR M4 voir page 25 Il faut environ cinq heures pour recharger un accumulateur Si vous utilisez le chargeur d accumulateur PDR CG 1 vendu séparément l accumulateur pourra se charger en une heure environ Il n est pas nécessaire que l accumulateur s...

Page 128: ...e débrancher le cordon de liaison mettez l appareil photo hors tension puis débranchez le cordon en le tenant par sa fiche Ne débranchez pas le cordon en tirant sur le cordon lui même Ne laissez pas tomber l adaptateur secteur et ne le soumettez pas à des chocs violents N utilisez pas l adaptateur secteur dans des endroits très chauds et humides Ne branchez pas l adaptateur secteur quand vous util...

Page 129: ...ale 4 images par seconde Lecture vue multiple 16 images affichées à la suite Pause B pour la prise de vues nocturne Photographie en couleur noir et blanc etc Sélection facile de la taille et de la qualité de l image Taille 1600 x 1200 800 x 600 pixels Qualité FINE NORMAL BASIC Afficheur LCD Les réglages peuvent être vérifiés même quand le moniteur LCD est éteint Carte SmartMedia Jusqu à 32 Mo util...

Page 130: ...imultanée de 9 images P 67 Lecture automatique P 68 Lecture d images multiples P 69 Reproduisez les images photographiées Vous pouvez choisir plusieurs façons de reproduire les images sur le moniteur LCD Réglage de la taille et de la qualité de l image P 44 Réglage manuel du PDR M4 P 56 Changement des préréglages P 61 Changez les réglages photographiques Vous pouvez changer les réglages pour la ph...

Page 131: ... utiliser votre appareil photo Accumulateur rechargeable lithium ion PDR BT1 1 Adaptateur secteur PDR ACM1A 1 Câble vidéo 1 Carte SmartMedia 8 Mo 3 3 V 1 Dragonne 1 Câble USB Câble série Câble adaptateur pour Macintosh Logiciel cédérom Mode d emploi cette brochure Carte de garantie Mode d emploi du logiciel Étui antistatique 1 Étiquettes 2 Autocollants de protection contre l écriture 4 ...

Page 132: ...s Pour une vue agrandie P 22 Fenêtre du viseur Touche de flash Touche de réglage de qualité d image Touche de retardateur Afficheur de statut P 23 Flash Témoin de retardateur Détecteur de commande de flash Cache bornes Borne DIGITAL numérique Borne VIDEO sortie vidéo Borne DC IN 5V alimentation CC Objectif Déclencheur Nomenclature ...

Page 133: ...sertion de carte SmartMedia Couvercle du logement de l accumulateur Monture de trépied Touche DISP affichage Touche d effacement Moniteur LCD Touche macro Touche MENU Viseur Témoin du viseur Touche ENTER Appuyez au centre de cette touche Utilisez cette touche pour valider une sélection Touche multipression Appuyez sur le côté souhaité de la touche Utilisez cette touche pour sélectionner une option...

Page 134: ...manuel P 56 Pour régler manuellement la balance des blancs l intensité du flash l exposition et l auto focus auto exposition position AF AE Mode SET UP configuration P 86 Pour régler les paramètres de base de l appareil photo temps avant mise hors tension son heure langue d affichage couleur de l écran nombre d images réinitialisation Mode PC P 95 Pour transférer les images à un PC Pour les détail...

Page 135: ...ffichage varie en fonction du réglage de la molette de modes Affichage de l heure en mode ou Synchronisation lente Nombre de vues disponibles en mode ou Indication PC en mode Anti yeux rouges Flash débrayé Flash forcé Nomenclature suite Afficheur de statut Cet afficheur indique le statut de l appareil photo Vous pouvez vérifier le statut de l appareil photo même si le moniteur LCD n est pas allumé...

Page 136: ... pratique pour porter votre appareil photo quand vous vous déplacez Pour éviter de faire tomber l appareil photo pendant que vous prenez des photos passez votre poignet dans la dragonne et saisissez fermement l appareil photo Faites passer l extrémité de la dragonne dans la monture de dragonne de l appareil photo Faites passer la dragonne dans la boucle et tirez ...

Page 137: ...l accumulateur IMPORTANT Avant de mettre en place ou retirer l accumulateur veillez à mettre l appareil photo hors tension Si vous mettez l accumulateur en place ou le retirez quand l appareil photo est sous tension l heure reviendra à sa valeur par défaut ou les réglages de l appareil photo seront réinitialisés SET UP Page 86 Prise de vues manuelle Page 56 Enlevez le couvercle de protection de l ...

Page 138: ...e Insérez l accumulateur dans son logement en veillant à ce qu il soit dans le bon sens comme indiqué sur l illustration à droite Insérez le connecteur partie métallisée en premier quand vous mettez l accumulateur en place Refermez le couvercle du logement de l accumulateur q et faites le glisser w Assurez vous que le couvercle est bien fermé Q q Q w ...

Page 139: ...emps veillez à charger l accumulateur avant de l utiliser La façon de charger l accumulateur dans le boîtier de l appareil photo est décrite ci après Réglez la molette de modes sur Branchez l adaptateur secteur sur l appareil photo et sur une prise secteur Raccordement de l adaptateur secteur Page 29 Pendant le chargement de l accumulateur le témoin du viseur s allume en rouge Quand l accumulateur...

Page 140: ... est utilisé Les chiffres suivant indiquent le nombre d images approximatif qui peuvent être prises en continu sur un accumulateur complètement chargé à la température ambiante d une pièce en utilisant le flash pour la moitié des images Notez néanmoins que ces chiffres varient en fonction de la température de fonctionnement de l appareil photo et des détails de l image Avec le moniteur LCD allumé ...

Page 141: ... la page 16 IMPORTANT Avant de brancher ou débrancher l adaptateur secteur veillez à mettre l appareil photo hors tension Si vous branchez ou débranchez l adaptateur secteur quand l appareil photo est sous tension les réglages de l appareil photo seront réinitialisés SET UP Page 86 Prise de vues manuelle Page 56 ou l appareil photo sera endommagé Ouvrez le cache bornes q et insérez la fiche de con...

Page 142: ... Quand la carte SmartMedia est enlevée de l appareil photo ou quand l appareil photo est mis hors tension pendant l enregistrement des données l effacement des données l avance d une image à l autre au cours de la lecture ou pendant le formatage de la carte SmartMedia Il est fortement conseillé de copier et de sauvegarder les données importantes sur un autre support disquette disque dur disque opt...

Page 143: ... un dysfonctionnement de ce dernier Dans ce cas éteignez puis rallumez l appareil photo La carte SmartMedia peut être tiède quand vous la retirez de l appareil photo après une utilisation prolongée C est normal et non pas un signe de dysfonctionnement La durée de vie de la carte SmartMedia n est pas illimitée Si les images ne peuvent plus être enregistrées ou effacées achetez une nouvelle carte Sm...

Page 144: ...o Insérez la carte SmartMedia en la poussant à fond Refermez le volet d insertion de carte SmartMedia Avant d utiliser une nouvelle carte SmartMedia veillez à formater la carte SmartMedia Page 82 Retrait de la carte SmartMedia IMPORTANT Ne jamais ouvrir le volet ou enlever la carte SmartMedia pendant l enregistrement de données sur la carte SmartMedia le témoin du viseur est allumé en rouge Vous p...

Page 145: ...lisser le verrou du volet d insertion de carte SmartMedia dans le sens de la flèche q pour ouvrir le volet w Poussez la carte SmartMedia à fond puis retirez la avec les doigts Si vous poussez la carte SmartMedia une fois aussi profondément que possible elle ressortira légèrement Retirez la avec les doigts Refermez le volet d insertion de carte SmartMedia Q q Q w ...

Page 146: ...e protection contre l écriture Les données ne pourront plus être enregistrées ou effacées de la carte SmartMedia Pour écrire ou effacer des données de la carte SmartMedia décollez l autocollant IMPORTANT La zone de protection contre l écriture peut ne pas fonctionner si l autocollant de protection contre l écriture est sale Utilisez un chiffon doux et sec pour essuyer toute saleté Une fois que l a...

Page 147: ...IMPORTANT Si vous n effectuez aucune opération pendant un certain temps par défaut environ 1 minute L appareil se mettra hors tension automatiquement pour éviter l usure de l accumulateur Cet état est appelé mode de veille Pour revenir à l état normal changez la position de la molette de modes ou bien appuyez sur le déclencheur à mi course Page 39 En ce qui concerne le mode de veille Informations ...

Page 148: ... Flash forcé Flash débrayé Synchronisation lente Avertissement en forme de main s agitant P 50 103 Le texte les nombres et les icônes affichés sur le moniteur LCD varient en fonction des réglages actuels Pour supprimer le texte affiché sur le moniteur LCD appuyez sur la touche DISP Page 92 Le moniteur LCD s allume automatiquement si nécessaire même quand il est réglé sur OFF éteint En mode de pris...

Page 149: ...age du moniteur LCD suite Mémo Le numéro d image diffère parfois de l affichage par exemple si une image enregistrée sur un autre appareil est reproduite 0003 100 NO IMAGE 99 05 10 AM 10 10 Réglage de la molette de modes Image protégée Taille de l image Date année mois jour Message P 103 Numéro d image Numéro du de dossier Temps W1600 H1200 ...

Page 150: ...ent tenir l appareil photo Quand vous prenez une photo tenez l appareil photo fermement et faites attention à ce que votre doigt ou la dragonne ne recouvre pas l objectif le flash ou le capteur du flash Bien L appareil photo est tenu à deux mains avec les bras serrés contre les flancs Mal Les doigts recouvrent l objectif ...

Page 151: ...ant que AF et AE ne seront pas verrouillés Pour faire la mise au point sur ou exposer une position à l extérieur du centre du cadre de l écran déplacez le sujet au centre de l écran et appuyez sur le déclencheur à mi course A ce moment le déclencheur étant toujours enfoncé revenez à votre composition précédente et appuyez à fond sur le déclencheur Si vous déplacez l appareil photo tout en appuyant...

Page 152: ... AF sont verrouillés avec le déclencheur maintenu enfoncé à mi course Mode d attente Le chargement de l accumulateur est terminé avec l adaptateur secteur raccordé ou Retardateur en service POWER ON Écriture sur la carte SmartMedia en cours Les images peuvent être prises mais ne réglez pas la molette de modes sur Accès à la carte SmartMedia en cours Chargement de l accumulateur en cours avec l ada...

Page 153: ...iquement pour faciliter la prise de vues Il y a deux façons de prendre des photos dans ce mode en utilisant le viseur et en utilisant le moniteur LCD Utilisation du viseur Préparez vous à prendre la photo Mettez l accumulateur Page 25 et la carte SmartMedia Page 30 en place dans l appareil photo Réglez la molette de modes sur Appuyez sur la touche DISP pour éteindre le moniteur LCD Pour réduire l ...

Page 154: ...course sur le déclencheur permet d ajuster l exposition et une pression complète de prendre la photo Si la prévisualisation est en service Page 63 une image prévisualisée sera affichée sur l écran pendant deux secondes environ Le témoin du viseur s allume en rouge pendant l enregistrement des données sur la carte SmartMedia Utilisation du moniteur LCD Préparez vous à prendre une photo Mettez l acc...

Page 155: ... de prendre la photo Quand la mise au point et l exposition sont ajustées le témoin du viseur s allume en vert Si la prévisualisation est en service Page 63 une image prévisualisée sera affichée sur l écran pendant deux secondes environ Le témoin du viseur s allume en rouge pendant l enregistrement des données sur la carte SmartMedia Mémo Le moniteur LCD affiche parfois des points brillants sombre...

Page 156: ...cheur de statut Une pression sur la touche de réglage de qualité affiche les qualités et tailles disponibles dans l ordre Sélectionnez une des combinaisons de qualité et de taille disponibles Qualité FINE Compression 1 4 JPEG NORMAL Compression 1 8 JPEG BASIC Compression 1 16 JPEG Plus il y a d étoiles meilleure est la qualité de l image Les images de haute qualité par contre occupent plus d espac...

Page 157: ...es détails sur la façon de prendre des photos Prise de vues Page 41 Mémo Pour diminuer la taille de l image il est plus effectif de réduire la taille q puis de réduire la qualité de l image w Après avoir pris une photo vous pouvez changer sa taille Page 70 et sa qualité Page 72 Le volume de données de l image varie en fonction du sujet Le taux de compression est donné pour référence seulement ...

Page 158: ...des sur ou Appuyez sur la touche Zoom est affiché sur le moniteur LCD et le centre de l écran est agrandi au double de la taille initiale Regardez l image sur le moniteur LCD pour cadrer Utilisation du moniteur LCD Page 36 Appuyez sur le déclencheur à mi course puis à fond Page 39 Pour annuler la prise de vues avec zoom appuyez sur la touche Mémo La taille de l image est fixée à 800 x 600 pixels N...

Page 159: ...e ces limites Dans ce mode le moniteur LCD s allume automatiquement Prenez la photo tout en regardant le moniteur LCD Réglez la molette de modes sur ou Appuyez sur la touche est affiché sur le moniteur LCD et l afficheur de statut Regardez l image sur le moniteur LCD pour cadrer Utilisation du moniteur LCD Page 36 Appuyez sur le déclencheur à mi course puis à fond Page 39 Pour annuler la prise de ...

Page 160: ...ez sur la touche de retardateur est affiché sur le moniteur LCD et l afficheur de statut Cadrez Appuyez sur le déclencheur à mi course puis à fond Page 39 Le témoin du viseur s allume en rouge puis clignote La photo est ensuite prise après le temps préréglé deux ou dix secondes Quand vous prenez des photos avec le moniteur LCD le décompte est affiché Pour annuler la prise de vues à mi chemin appuy...

Page 161: ...itions de prise de vues La portée effective du flash est de 0 5 m 1 65 pied à 2 5 m 8 20 pied environ Réglez la molette de modes sur ou Appuyez sur la touche de flash pour sélectionner le mode souhaité tout en regardant l image sur le moniteur LCD ou l afficheur de statut Une pression sur la touche de flash affiche les modes flash disponibles dans l ordre L icône correspondant au mode sélectionné ...

Page 162: ...ayé Utilisez ce mode quand vous prenez des photos sous un éclairage d intérieur à des distances trop grandes pour que le flash soit effectif comme pendant un spectacle ou un événement sportif en salle Synchronisation lente Le flash se déclenche pendant que vous changez la vitesse d obturation Ce mode de flash est effectif quand vous prenez des photos de telle façon que non seulement le sujet mais ...

Page 163: ...pon Après la prise de vues vérifiez les images et enregistrez les images sélectionnées sur la carte SmartMedia Réglez la molette de modes sur ou Réglez le mode de prise de vues sur BURST q Appuyez sur la touche MENU w Appuyez sur la touche ou pour sélectionner REC MODE et appuyez sur la touche e Appuyez sur la touche ou pour sélectionner BURST et appuyez sur la touche ENTER r Appuyez sur la touche...

Page 164: ...ner la méthode d enregistrement q SELECT Ce réglage est utilisé pour sauvegarder et effacer l image sélectionnée Appuyez sur la touche ou pour sélectionner l image et appuyez sur la touche ENTER L image sélectionnée est indiquée par le cadre rouge Appuyez sur la touche EXEC w ALLSELECT Ce réglage est utilisé pour sauvegarder toutes les images Appuyez sur la touche EXEC Toutes les images sont sélec...

Page 165: ...et l appareil photo est prêt à prendre des photos Mémo Vous pouvez effectuer les étapes 5 et 6 tout en vérifiant l image à l étape 4 Même si la prise de vues est annulée à mi chemin en relâchant le déclencheur les images déjà prises pourront être sauvegardées et enregistrées en appliquant la méthode ci dessous La prise de vues avec retardateur et la prise de vues au flash sont impossibles L appare...

Page 166: ...uche ENTER r Appuyez sur la touche MENU Pour les détails sur le mode de prise de vues Page 62 est affiché sur le moniteur LCD ou l afficheur de statut Cadrez appuyez sur le déclencheur à mi course puis à fond Page 39 L obturateur s ouvre et se ferme 16 fois Mémo Bien que la lecture avec zoom ne soit pas possible la lecture d images multiples Page 69 est possible La prise de vues avec le retardateu...

Page 167: ...ur la touche e Appuyez sur la touche ou pour sélectionner BULB et appuyez sur la touche ENTER r Appuyez sur la touche MENU Pour les détails sur le mode de prise de vues Page 62 et sont affichés sur le moniteur LCD ou l afficheur de statut Cadrez appuyez sur le déclencheur à mi course puis à fond Page 39 L appareil prend la photo au temps d exposition préréglé Pendant l exposition le témoin du vise...

Page 168: ... nom de prise de vues manuelle Les réglages effectués dans ce mode sont sauvegardés même si l appareil est mis hors tension IMPORTANT N enlevez pas et n insérez pas l accumulateur ne branchez pas et ne débranchez pas l adaptateur secteur quand l appareil photo est sous tension Les réglages de prise de vues manuelle pourraient revenir à leurs valeurs par défaut Dans ce cas réglez de nouveau manuell...

Page 169: ... FLASH Page 59 Zone AF AE AREA Page 60 Quand vous avez terminé les réglages appuyez sur la touche ENTER L appareil est prêt à prendre des photos Cadrez appuyez sur le déclencheur à mi course puis à fond Page 39 L appareil prend la photo Mémo La prise de vues est aussi possible avec l écran de réglage manuel affiché Notez néanmoins que la taille et la qualité ne peuvent pas être réglées et que la p...

Page 170: ...entaires Glossaire Ce paramètre vous permet d éclaircir ou d assombrir volontairement l écran tout entier Utilisez ce paramètre quand la luminosité optimale exposition ne peut pas être obtenue par exemple quand le contraste entre le sujet et l arrière plan est très fort ou quand le sujet à photographier occupe une partie très petite de l écran Les valeurs d exposition peuvent être réglées en 11 ét...

Page 171: ...ier noir 0 6 Scènes peu réfléchissantes telles que des vues de verdure ou de feuillages sombres 0 6 FLASH Intensité du flash Utilisez ce paramètre pour obtenir la luminosité d image optimale exposition quand le sujet est très petit dans l image ou quand le sujet est beaucoup plus lumineux ou sombre que l arrière plan par exemple des fleurs ou des cartes de visite Le flash peut être réglé en quatre...

Page 172: ...éparation Prise de vues manuelle suite AREA Zone AF AE Ce paramètre vous permet de choisir la partie de l écran sur laquelle sera effectuée la mise au point quand vous appuierez sur le déclencheur à mi course pour activer l autofocus et l exposition automatique Page 106 Centre défaut Gauche Droite Haut Bas ...

Page 173: ...C MENU est affiché Appuyez sur la touche ou pour sélectionner le paramètre souhaité q et sur la touche Le menu d onglets w est affiché L image avant la prise de vues est affichée sur le moniteur LCD Mode de prise de vues Page 62 COLOR Page 63 BULB Page 64 LCD Page 64 PREVIEW Page 63 SHARPNESS Page 63 SELF TIMER Page 64 Appuyez sur la touche ou pour sélectionner le réglage souhaité dans le menu d o...

Page 174: ...lle FULL 16 images à la taille HALF Prise de vues continue page 51 MULTI Prise de vues continue de 16 images comme une seule vue taille FULL seulement Prise de vues multiples page 54 BULB Prise de vues avec un temps d exposition plus long Prise de vues avec exposition lente page 55 Mode de prise de vues et fonctions Vous pouvez combiner des modes de prise de vues et des fonctions variées pour obte...

Page 175: ...détaillées ne sont pas nettes car la résolution des images prévisualisées est faible Pour vérifier les zones détaillées et la mise au point enregistrez l image sur une carte SmartMedia et vérifiez la en mode de lecture Page 65 Pour annuler la prévisualisation appuyez de nouveau sur le déclencheur à mi course OFF Ne pas afficher la prévisualisation défaut O N Afficher la prévisualisation COLOR coul...

Page 176: ... 8SEC Ouverture de l obturateur pendant 8 secondes environ SELF TIMER retardateur Pour régler le délai avant la prise de vues une fois que vous avez appuyez sur le déclencheur à mi course en mode de prise de vues avec retardateur Page 48 10SEC Photo prise après un délai de 10 secondes défaut 2SEC Photo prise après un délai de 2 secondes défaut LCD Pour régler la luminosité du moniteur LCD Ce param...

Page 177: ...Pour ajuster la luminosité du moniteur LCD Page 91 Changement de l affichage du moniteur LCD Page 92 Appuyez sur la touche ou pour vous déplacer vers l avant ou l arrière Avance Retour en arrière Appuyez en continu sur la touche ou pour vous déplacer vers l avant ou vers l arrière en continu une image à la fois Mémo Si vous appuyez sur la touche quand la dernière image est affichée la première ima...

Page 178: ...s pouvez aussi sélectionner l image en suivant la même procédure que pour la lecture simultanée de 9 images Page 67 Appuyez sur la touche L image est affichée agrandie avec un cadre blanc et un cadre vert sur le moniteur LCD Le cadre blanc indique l image toute entière tandis que le cadre vert indique l emplacement de la zone agrandie Appuyez sur la touche ou pour sélectionner la zone à agrandir A...

Page 179: ...mage à reproduire parmi plusieurs Réglez la molette de modes sur La dernière image apparaît sur le moniteur LCD Appuyez sur la touche ENTER Neuf images sont affichées simultanément Appuyez sur la touche ou pour déplacer le curseur sur l image à afficher à la taille normale Le curseur s arrête sur l image entourée d un cadre clignotant Appuyez en continu sur ces touches pour déplacer le curseur san...

Page 180: ... sur la touche MENU Le menu PLAY MENU est affiché Appuyez sur la touche ou pour sélectionner SLIDE et appuyez sur la touche Le diaporama commence et est affiché sur le moniteur LCD L image suivante est affichée trois secondes après Pour quitter le diaporama appuyez sur la touche ENTER Le moniteur LCD affiche l image quand vous appuyez sur la touche ENTER Le diaporama recommence à partir du début j...

Page 181: ...de de prise de vues multiples sous forme de dessin animé Réglez la molette de modes sur La dernière image apparaît sur le moniteur LCD Appuyez sur la touche ou pour sélectionner les images photographiées dans le mode de prise de vues multiples Vous pouvez aussi sélectionner l image en suivant la même procédure que pour la lecture simultanée de 9 images Page 67 Appuyez sur la touche La lecture auto...

Page 182: ... espace de stockage pendant la prise de vues augmente l espace disponible sur la carte SmartMedia de telle façon que vous puissiez continuer à prendre des photos La taille des images suivantes ne peut pas être changée Images de taille HALF Images photographiées sur un autre appareil photo Images photographiées dans le mode de prise de vues multiples Images protégées Page 83 La taille des images ne...

Page 183: ...ionner l image et appuyez sur la touche ENTER Le choix de l image à afficher est validé et est affiché sous l image Pour annuler la sélection appuyez de nouveau sur la touche ENTER Si vous souhaitez changer la taille de deux images ou plus répétez la procédure pour le nombre d images nécessaire Appuyez sur la touche ou pour sélectionner EXEC et appuyez sur la touche ENTER L écran indiquant que l i...

Page 184: ...te l espace disponible sur la carte SmartMedia de telle façon que vous puissiez continuer à prendre des photos Les images suivantes ne peuvent pas être comprimées Images dont la qualité est BASIC Images photographiées sur un autre appareil photo Images protégées Page 83 Les images ne peuvent pas non plus être comprimées quand la carte SmartMedia est protégée contre l écriture Réglez la molette de ...

Page 185: ... qualité est affiché sous l image A chaque pression sur la touche ENTER le nombre d étoiles change de la façon suivante NORMAL BASIC Détails sur le taux de compression Page 44 Si vous souhaitez comprimer deux images ou plus répétez la procédure pour le nombre d images nécessaire Appuyez sur la touche ou pour sélectionner EXEC et appuyez sur la touche ENTER L écran indiquant que l image est en trai...

Page 186: ...es photographiées Elle est utile quand vous souhaitez recopier une image d une carte SmartMedia sur une autre Réglez la molette de modes sur La dernière image apparaît sur le moniteur LCD Appuyez sur la touche MENU Le menu PLAY MENU est affiché Appuyez sur la touche ou pour sélectionner COPY et appuyez sur la touche Le menu COPY est affiché Copie d images ...

Page 187: ...cessaire La barre située au bas de l écran indique l espace de mémoire tampon utilisé pour le stockage des données des images qui ont été sélectionnées et l espace de mémoire restant L espace mémoire utilisé est indiqué en vert Appuyez sur la touche ou pour sélectionner EXEC et appuyez sur la touche ENTER L écran indiquant que l image est en train d être lue apparaît Mettez en place la carte Smart...

Page 188: ...l écran Remplacez la carte SmartMedia par une autre Quand la copie est terminée l écran ci dessus est affiché Quand cet écran est affiché vous pouvez remplacer la carte SmartMedia par la carte SmartMedia d origine La mise hors tension de l appareil photo pendant cette opération n est pas nécessaire IMPORTANT N enlevez pas la carte SmartMedia et ne mettez pas l appareil photo hors tension pendant l...

Page 189: ...s Réglez la molette de modes sur La dernière image apparaît sur le moniteur LCD Appuyez sur la touche MENU Le menu PLAY MENU est affiché Appuyez sur la touche ou pour sélectionner FOLDER et appuyez sur la touche Les noms des dossiers contenus dans la carte SmartMedia en place dans l appareil photo sont affichés Appuyez sur la touche ou pour sélectionner le dossier à afficher et appuyez sur la touc...

Page 190: ...t utilisée dans cet appareil photo le dossier xxxTOSHI est créé et les données des images photographiées sont enregistrées dans ce dossier XXXTOSHI Indique que le dossier est utilisé dans cet appareil photo Le numéro le plus grand est attribué automatiquement en fonction du statut des dossiers existants Pour voir les images photographiées sur cet appareil sélectionnez xxxTOSHI Mémo Pour reproduire...

Page 191: ... ou Quand est sélectionné la dernière image est affichée sur le moniteur LCD Quand est sélectionné appuyez sur la touche ou pour sélectionner l image à effacer Quand ou est sélectionné la dernière image est sélectionnée Appuyez sur la touche d effacement FRAME ou LAST est affiché en bas et à gauche de l écran Appuyez sur la touche ou pour sélectionner EXEC et appuyez sur la touche ENTER L image es...

Page 192: ... Si vous prenez une photo après avoir effacé une image le numéro suivant le numéro de la dernière photo prise lui sera attribué comme numéro d image Les images peuvent aussi être effacées dans le mode de lecture simultanée de 9 images lecture vue multiple Dans ce cas l appareil photo entre dans le mode de lecture d image unique lecture vue par vue et entre dans le mode de lecture simultanée de 9 i...

Page 193: ... affiché Appuyez sur la touche ou pour sélectionner ALL q Assurez vous que ALL en bas et au centre de l image est affiché en jaune Appuyez sur la touche ou pour sélectionner EXEC w et appuyez sur la touche ENTER Les images sont effacées et l appareil photo revient au mode précédent Pour annuler l effacement des données d image sélectionnez CANCEL Quand est sélectionné NO IMAGE est affiché après l ...

Page 194: ...e de modes sur ou Quand est sélectionné la dernière image est affichée sur le moniteur LCD Appuyez en continu sur la touche d effacement pendant deux secondes Le menu ERASE est affiché Appuyez sur la touche ou pour sélectionner FORMAT q Assurez vous que FORMAT au centre de l image est affiché en jaune au bas et à droite de l écran Appuyez sur la touche ou pour sélectionner EXEC w et appuyez sur la...

Page 195: ...nt IMPORTANT Le formatage efface toutes les images d une carte SmartMedia qu elles soient protégées ou non Pour protéger toute la carte SmartMedia voir Protection contre l écriture Page 34 Protection d une image Réglez la molette de modes sur La dernière image apparaît sur le moniteur LCD Appuyez sur la touche MENU Le menu PLAY MENU est affiché Protection des images ...

Page 196: ...otéger contre l écriture deux images ou plus répétez cette procédure pour le nombre d images nécessaire Appuyez sur la touche ou pour sélectionner EXEC et appuyez sur la touche ENTER Pour annuler la protection contre l écriture sélectionnez CANCEL Quand la protection contre l écriture est terminée l écran revient à PLAY menu Pour quitter PLAY MENU appuyez sur la touche MENU Mémo Quand l écran de r...

Page 197: ...a touche ENTER Les images dont la protection doit être annulée sont sélectionnées et sous l image est remplacé par Pour annuler la protection d une image appuyez de nouveau sur la touche ENTER Pour annuler la protection de deux images ou plus répétez cette procédure pour le nombre d images nécessaire Effectuez l étape 5 de Protection d une image Mémo Pour protéger de nouveau une image la protectio...

Page 198: ... avec l image Ce mode est appelé configuration Les paramètres suivants peuvent être réglés dans le mode SET UP AUTO OFF SOUND LANGUAGE TIME SCREEN IMAGE No DEFAULT Ces réglages sont maintenus en mémoire même si l appareil photo est mis hors tension Réglez la molette de modes sur Le menu SET UP apparaît Appuyez sur la touche ou pour sélectionner le paramètre à régler AUTO OFF Page 87 SOUND Page 88 ...

Page 199: ...lage de la molette de modes AUTO OFF Si aucune opération n a été effectuée pendant une durée fixée défaut environ une minute la consommation d électricité est réglée au minimum alimentation presque coupée pour éviter l usure de l accumulateur Cet état est appelé mode de veille Ce paramètre vous permet aussi de régler le temps avant le passage en mode de veille Le mode de veille n est pas activé pe...

Page 200: ...l heure Les secondes ne peuvent pas être réglées Appuyez sur les touches ou pour sélectionner le paramètre que vous souhaitez régler et appuyez sur les touches ou pour régler la valeur de chaque paramètre Chaque pression sur la touche fait avancer le paramètre dans l ordre suivant Année Mois Jour Heure Minutes Validation Annulation Sélectionnez SET et appuyez sur la touche ENTER Pour quitter le ré...

Page 201: ...de dossier formatez d abord la carte SmartMedia et réinitialisez le numéro d image A propos des numéros d image et de dossier Le numéro suivant le numéro de la dernière photo prise est attribué comme numéro d image qu une image seulement ou toutes les images aient été effacées ou non Le processus est identique pour les numéros de dossier Le numéro d image le plus grand est 9999 Quand ce numéro est...

Page 202: ...taires Préparation Réglages de prise de vue de base mode SET UP suite DEFAULT Permet de décider si les réglages du menu SET UP seront réinitialisés ou non à leurs valeurs par défaut CANCEL Pas de réinitialisation aux valeurs par défaut OK Les paramètres sont réinitialisé s à leur valeurs par défaut ...

Page 203: ...MENU ou PLAY MENU est affiché Vous pouvez régler la luminosité du moniteur LCD dans un de ces menus au choix Appuyez sur la touche ou pour sélectionner LCD et appuyez sur la touche L image et le menu LCD sont affichés Appuyez sur la touche ou pour ajuster la luminosité Appuyez sur la touche pour assombrir le moniteur LCD ou sur la touche pour éclaircir le moniteur LCD Le moniteur LCD peut être rég...

Page 204: ...la touche DISP commute l affichage dans l ordre suivant indique le réglage par défaut Remarque Rien n est affiché dans le mode PC 99 05 10 AM 10 10 001 Éteint rien n est affiché Image directe image avant la prise de vue Affichage à l écran détails de l image les lettres et les icônes sont affichées Image directe Affichage à l écran Image directe seulement Image directe Affichage à l écran des déta...

Page 205: ... appareil photo sur d autres appareils veillez à mettre tous les autres appareils raccordés hors tension Si vous raccordez votre appareil photo à d autres appareils alors qu il est sous tension l écran peut trembloter ou l image ne pas être affichée normalement Branchez la fiche du câble vidéo fourni sur la prise VIDEO de l appareil photo Branchez la fiche du câble vidéo sur la prise VIDEO IN du t...

Page 206: ...opération sont les mêmes que pour la prise de vues et la reproduction d images sur le moniteur LCD Comment prendre des photos Page 41 Comment reproduire des images Page 65 Mémo Rien n est affiché sur le téléviseur quand le moniteur LCD est éteint à l aide de la touche DISP Les images directes avant la prise de vues sont moins claires que les images de lecture parce qu elles sont affichées à une ré...

Page 207: ...2 vendu séparément Page 96 Pour transférer les images à un PC vous devez installer un logiciel et raccorder des câbles spéciaux Pour les détails reportez vous aux modes d emploi de votre PC et du logiciel Utilisation de la carte SmartMedia sur un PC Quand vous utilisez une carte SmartMedia ne changez pas et n effacez pas les noms de dossier ou de fichier données d image de la carte SmartMedia Vous...

Page 208: ...s appareils page 98 Pour les détails sur ces accessoires reportez vous au mode d emploi de l accessoire utilisé Informations à jour en juin 1999 Carte SmartMedia 3 3 V 8 Mo PDR NSM8 16 Mo PDR SM16 32 Mo PDR SM32 Accumulateur lithium ion PDR BT1 Chargeur d accumulateur PDR CG1 Ce chargeur est raccordé à une prise secteur pour recharger l accumulateur lithium ion PDR BT1 rapidement env une heure Étu...

Page 209: ...la carte SmartMedia d être utilisée comme une disquette 3 5 pouces Cet adaptateur est inséré dans le lecteur de disquette de votre PC permettant ainsi aux images enregistrées dans la carte SmartMedia d être transférées à un PC Un système d exploitation Windows 95 Windows 98 Windows NT4 0 machine compatible IBM PC AT compatible avec l adaptateur de disquette PDR FLP2 est nécessaire pour l utilisati...

Page 210: ...mentaires Préparation Raccordement à d autres appareils Carte SmartMedia Adaptateur de disquette Adaptateur de carte PC PC Imprimante Logieiel Cédérom fourni Câble d interface fourni Câble vidéo fourni Adaptateur secteur fourni Prise secteur Moniteur TV PDR M4 yyyyy yyyyy yyyyy yyyyy yyyyy yyyyy ...

Page 211: ...réglage de la mise au point 0 1 m 0 33 pieds à l infini Système de détection Détection par contraste fréquence d image pendant la détection 30 Hz Mesure TTL par système de capture d image Programme d exposition automatique correction d exposition disponible en mode manuel Modèle Support d enregistrement Système de compression Format de fichier d image Nombre de photos En haut 1600 x 1200 pixels En...

Page 212: ...lateur rechargeable lithium ion PDR BT1 ou adaptateur secteur fourni PDR ACM1A 5 C 41 F à 40 C 104 F pour le fonctionnement 20 C 4 F à 60 C 140 F pour le stockage 30 à 80 pour le fonctionnement sans condensation 112 mm 4 2 5 po x 68 mm 2 2 3 po x 42 mm 1 2 3 po L x H x P sans les saillies Env 240 g 8 4 oz sans les accessoires l accumulateur et la carte SmartMedia Ouverture Vitesse d obturation Bal...

Page 213: ... de stockage 10 C 14 F à 70 C 158 F Dimensions 48mm 1 8 9 po x 26 mm 1 1 4 po x 70 mm 2 3 4 po L x H x P Poids Env 100 g 3 5 oz Longueur du cordon d alimentation Env 2 m 6 6 pieds Adaptateur secteur PDR ACM1A Tension nominale 3 7 V Capacité nominale 1 100 mAh Température de fonctionnement 0 C 32 F à 40 C 104 F Dimensions 19 8mm 7 9 po x 20 4 mm 4 5 po x 55 5 mm 2 1 6 po L x H x P Poids Env 40 g 1 ...

Page 214: ...e mémoire Mémoire flash NAND Tension de fonctionnement 3 3 V Conditions de fonctionnement Température 0 C 32 F à 40 C 104 F Humidité 80 ou moins sans condensation Dimensions 37 mm 1 4 9 po x 0 76 mm 3 100 po x 45 mm 1 7 9 po L x H x P Accessoires Étui antistatique x1 étiquettes d index x2 autocollants de protection contre l écriture x4 Carte SmartMedia Ces spécifications sont susceptibles d être m...

Page 215: ...tré dans la carte SmartMedia Le volet d insertion de carte SmartMedia est ouvert Le volet d insertion de carte SmartMedia doit être fermé La carte SmartMedia n est pas formatée Un message vous demandant de formater la carte SmartMedia est affiché La carte SmartMedia est endommagée Le format de la carte SmartMedia est incorrect La carte SmartMedia est protégée contre l écriture Une tentative a été ...

Page 216: ...e et la qualité pour augmenter l espace disponible sur la carte SmartMedia Retirez la protection contre l écriture Formatez la carte SmartMedia Mettez une carte SmartMedia neuve en place Appuyez sur le déclencheur à mi course pendant au moins deux secondes ou changez le réglage de la molette de modes Causes L accumulateur est déchargé La fiche de l adaptateur secteur s est débranchée de la prise m...

Page 217: ...e SmartMedia Impossible d effacer toutes les vues Rien ne se passe quand les touches et les commutateurs sont enclenchés Aucune n image n est affichée même quand le moniteur LCD est allumé La date et l heure réglées disparaissent Voir page P 49 P 49 P 49 P 25 P 49 P 47 P 34 P 85 P 34 P 39 P 41 P 65 P 88 Solutions Réglez la molette de modes sur la position correcte Réglez l appareil sur le mode de ...

Page 218: ...ouleur Le taux de compression peut être sélectionné mais plus le taux est élevé plus la qualité de l image se détériore Ce format est largement utilisé dans les logiciels de peinture pour PC et sur Internet Carte PC Terme générique désignant les cartes conformes à la norme PC Card Effet yeux rouges Phénomène par lequel les yeux des gens apparaissent parfois rouges sur les photos prises au flash da...

Page 219: ...f les jours fériés ou envoyez un message électronique à dsc support tais toshiba com Réparations pendant la période de garantie Nous réparerons votre appareil photo conformément aux détails figurant sur la Carte de garantie Consultez votre Carte de garantie Réparations en dehors de la période de garantie Si les fonctions de votre appareil photo peuvent être remises en état grâce à des réparations ...

Page 220: ...onné veuillez redémarrer et l appareil se mettra hors tension automatiquement Remettez l appareil sous tension Le moniteur LCD affichera le mode de démonstration Vous êtes maintenant prêt à utiliser l appareil photo sans carte SmartMedia Comment revenir au mode normal Reprenez les étapes 1 à 3 jusqu à ce que le moniteur LCD affiche Changed to Normal Mode please restart Redémarrez et l appareil pho...

Page 221: ...edi sauf les jours fériés ou nous envoyer un message électronique à dsc support tais toshiba com APPAREIL PHOTO NUMÉRIQUE TOSHIBA Toshiba America Information Systems Inc Division Systèmes d Imagerie 9740 Irvine Boulevard Irvine California 92618 1697 L adresse et le numéro de téléphone sont sujets à modification sans préavis ...

Page 222: ......

Reviews: