4.2 HDD
4 Replacement Procedures
3.
Remove the HDD and 2
nd
HDD pack by pulling on the tab attached to the pack,
following the direction of the arrows.
NOTE: Do not disassemble the HDD pack when it is working normally. Disassemble
or replace the HDD pack only if it fails.
4.
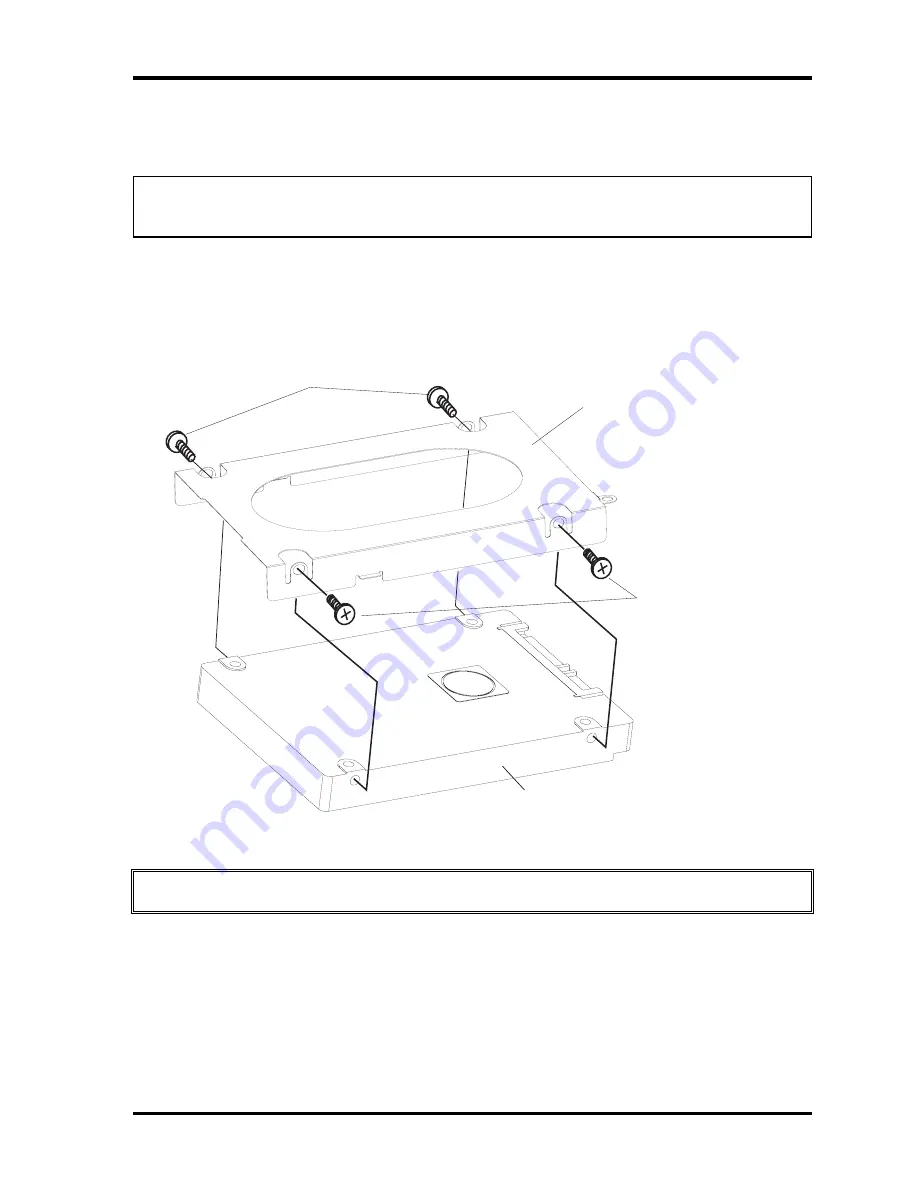
Place the HDD pack on a flat surface (such as a desk), and remove the two M3x4
black flat head screws with M3x4 black head screws.
5.
Place the HDD pack on a flat surface (such as a desk), and remove the chassis.
M3x4 black
flat head screw
HDD Chassis
HDD
M3x4 black
flat head screw
Figure 4-7 Removing the HDD chassis
CAUTION: Do not apply pressure to the top or bottom of the drive.
Qosmio F40/F45 Maintenance Manual
4-19
Summary of Contents for Qosmio F40
Page 6: ...Chapter 1 Hardware Overview ...
Page 7: ...1 Hardware Overview 1 1 Features Qosmio F40 F45 Maintenance Manual 2 ...
Page 29: ...1 Hardware Overview 1 5 HD DVD ROM Qosmio F40 F45 Maintenance Manual 24 ...
Page 35: ...2 Troubleshooting 2 概要 Chapter 2 Troubleshooting 2 i Qosmio F40 F45 Maintenance Manual ...
Page 64: ...Chapter 3 Diagnostic Programs ...
Page 67: ......
Page 119: ...3 Diagnostic Programs 3 10 Peripheral 52 QosmioF40 F45 dynabook Qosmio F40 Maintenance Manual ...
Page 131: ...Chapter 4 Replacement Procedures 4 1 ...
Page 132: ...4 Replacement Procedures 4 ii Qosmio F40 F45 Maintenance Manual ...
Page 215: ...6000 1 次 Appendices ...


