11
12
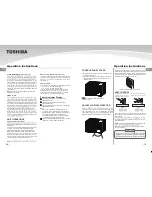
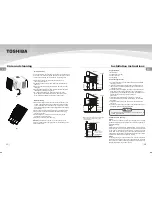
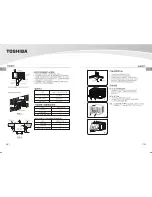
The air filter should be checked at least every two weeks to see
if cleaning is necessary. Trapped particles in the filter can build
up and cause an accumulation of frost on the cooling coils.
Ɣ+ROGWKHVORWXQGHUWKHIURQWSDQHOWKHQOLIWLWXSDQG
remove the front panel.
Ɣ*UDVSWKHKDQGOHRIWKHDLUILOWHUWKHQVOLGHLWGRZQZDUGVWR
remove it.
Ɣ:DVKWKHILOWHUXVLQJGHWHUJHQWDQGZDUPZDWHU5LQVHILOWHU
thoroughly.
Ɣ*HQWO\VKDNHH[FHVVZDWHUIURPWKHILOWHU%HVXUHWKHILOWHULV
thoroughly dry before putting back.
Ɣ2ULQVWHDGRIZDVKLQJ\RXPD\YDFXXPWKHILOWHUFOHDQ
Note: Never use hot water over 40°C to clean the air filter.
Never attempt to operate the unit without the air filter.
Ɣ%HVXUHWRXQSOXJWKHDLUFRQGLWLRQHUWRSUHYHQWVKRFNRUILUH
hazard. The cabinet and front may be dusted with an oil-free
cloth or washed with a cloth dampened in a solution of warm
ZDWHUDQGPLOGOLTXLGGLVKZDVKLQJGHWHUJHQW5LQVHWKRURXJKO\
and wipe dry.
Ɣ1HYHUXVHKDUVKFOHDQHUVZD[RUSROLVKRQWKHFDELQHWIURQW
Ɣ%HVXUHWRZULQJH[FHVVZDWHUIURPWKHFORWKEHIRUHZLSLQJ
around the controls.
Ɣ([FHVVZDWHULQRUDURXQGWKHFRQWUROSDQHOPD\FDXVH
damage to the air conditioner.
Ɣ3OXJLQDLUFRQGLWLRQHUDIWHUFOHDQLQJ
NOTE:
Never use water over 50°C
DOFRKROJDVROLQHDFLG
solvent or brush to clean the front panel as this will damage the
surface of the part.
Air Filter Cleaning
Cabinet Cleaning
(a)
(b)
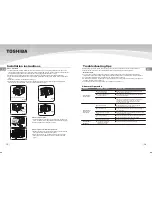
1. Screw driver
2. Tape measure or ruler
3. Knife or scissors
4. Level gauge
Step 1
5HPRYHWKHDLUFRQGLWLRQHUIURPLWVSDFNDJLQJUHPRYHIL[LQJ
VFUHZVDQGVOLGHWKHDLUFRQGLWLRQHURXWRILWVKRXVLQJ5HIHUWR
Installation Steps).
Step 2
3UHSDUHWKHKROHLQWKHZDOOVRWKDWWKHERWWRPRIWKHKRXVLQJLV
ZHOOVXSSRUWHGWKHWRSKDVPLQLPXPFOHDUDQFHDQGWKHDLULQOHW
ORXYHUVKDYHFOHDUDQFHDVVKRZQEHORZLQRSWLRQV$DQG%
+ROHVIURPWKHRXWVLGHWKURXJKWRWKHFDYLW\VKRXOGEHVHDOHG
The housing should slope down towards the rear by about 10mm
to allow water formed during operation to drain.
Step 3
,QVWDOOWKHKRXVLQJLQWRWKHZDOODQGVHFXUH(QVXUHWKHIRDP
VHDOVDUHQRWGDPDJHG)ODVKVHDORUILOOJDSVDURXQGWKHLQVLGH
and outside to provide satisfactory appearance and protection
DJDLQVWWKHZHDWKHULQVHFWVDQGURGHQWV
Suggested tools
7RDYRLGYLEUDWLRQDQGQRLVHPDNHVXUHWKHXQLWLVLQVWDOOHG
securely and firmly.
2. Install the unit where the sunlight does not shine directly on
WKHXQLW,IWKHXQLWUHFHLYHVGLUHFWVXQOLJKWEXLOGDQDZQLQJ
to shade the cabinet.
7KHUHVKRXOGEHQRREVWDFOHVXFKDVDIHQFHRUZDOOZLWKLQ
50cm from the back of the cabinet because it will prevent
KHDWUDGLDWLRQRIWKHFRQGHQVHU5HVWULFWLRQRIRXWVLGHDLUZLOO
greatly reduce the cooling efficiency of the air
conditioner.
4. Install the unit a little obliquely outward not to leak the
condensed water into the room (about 10mm or 1/4 bubble
with level).
5. Install the unit with its bottom portion 75~150cm above the
floor level.
6. The power cord must be connected to an independent circuit.
The yellow/green wire must be grounded.
Decide the right location
Installation of the Housing
$OOVLGHORXYHUVRIWKHFDELQHWPXVWUHPDLQH[SRVHGWRWKH
outside of the structure.
CAUTION
$:1,1*
$:1,1*
)(1&(
)(1&(
About 10mm
2YHUFP
About 10mm
7
5
~1
5
0
cm
7
5
~1
5
0
cm
2YHUFP
Note:
Unit must be supported by a solid frame
from below or by a hanger from a solid
overhead support.
)ODVKRUVHDODURXQGH[WHUQDO
wall frame or architrave
Sturdy timber
frame
all round unit
Drain pan
([WHUQDOVXSSRUWIUDPH
at balance point of a/c
$OWHUQDWLYHO\EUDFNHWV
as illustrated below
may be used.
Timber framed
wall or partition
3UHIHUUHGPHWKRGRILQVWDOODWLRQLQWRDWLPEHU
IUDPHGZDOOSDUWLWLRQRUZLQGRZ
Installation instructions
Care and cleaning
(1
(1
Summary of Contents for RAC-H07B
Page 10: ......
Page 11: ......
Page 12: ...H18CR H18B ...
Page 14: ...17 30ᓖRAC H CR ࡇ C B C B C B C B H07 H09 H12 H18 2 1 2 設定溫度范圍 選擇該功能ᖼ 16 31ᓖRAC H B ࡇ 攝氏 攝氏 ...
Page 15: ......
Page 17: ...H07B H07CR H09B H09CR H12B H12CR H18B H18CR H07B H07CR H09B H09CR H12B H12CR H18B H18CR ...
Page 18: ......

