background image

User Manual

Page 25

Setting the Timer

TIMER ON SETTING

TIMER OFF SETTING

TIMER ON & OFF setting (example)

Press TIMER ON button 
to initiate the ON time 
sequence.

Press TIMER OFF button 
to initiate the OFF time 
sequence.

Keep in mind that the time periods you set for both functions refer to hours after the current time.

Example: If current timer is 1:00PM, 
to set the timer as above steps, the 
unit will turn on 2.5h later (3:30PM) 
and turn o at 6:00PM.

Press up or down button for 
multiple times to set the desired 
time to turn on the unit.

Press up or down button for 
multiple times to set the desired 
time to turn off  the unit.

Point remote to unit and wait 
1sec, the TIMER ON will be 
activated.

Point remote to unit and wait 
1sec, the TIMER OFF will be 
activated.

TIMER ON/OFF

 - Set the amount of time after which the unit will automatically turn on/off.

x5

1

sec

xn

xn

xn

Current

time 1PM

2:00PM

3:00PM

4PM

5PM

6PM

Timer

starts 

Unit turns


ON

Unit turns


OFF

2.5 hours later

5 hours later

3:30PM

x10

1

sec

NOTICE

1.  When setting the TIMER ON or TIMER OFF, the time will increase by 30 minutes increments with each 

press, up to 10 hours. After 10 hours and up to 24, it will increase in 1 hour increments. (For example, 
press 5 times to get 2.5h, and press 10 times to get 5h,). The timer will revert to 0.0 after 24.

2.  Cancel either function by setting its timer to 0.0h.

Remot

e C

on

trol and

App Instruc

tions

Summary of Contents for RAC-PT1411HWRU

Page 1: ...RU Portable Type Room Air Conditioner Warning notices Before using this product please read this manual carefully and keep it for future reference The design and specifications are subject to change without prior notice for product improvement Consult with your dealer or the manufacturer for details version B 10 2020 us toshiba lifestyle com WARNING version E 03 2021 ...

Page 2: ...ecautions 3 Operating Instructions 8 Installation Instructions 12 Care and Cleaning 19 Troubleshooting Tips 20 Heat Pump Hose Insulation Foam 21 Remote Control and App Instructions 22 For support please call the Service Center at 1 855 204 5313 This appliance is not intended for use by persons including children with reduced physical sensory or mental capabilities or lack of experience and knowled...

Page 3: ...cess heat generation Do not modify power cord length or share the outlet with other appliances as it may cause electric shock or fire due to overheating Always ensure effective grounding Incorrect grounding may cause electric shock Unplug the unit if you notice unusual sounds or smells or smoke coming from it A damaged product may cause fire and electric shock Ventilate room before operating the a...

Page 4: ...e used in a properly grounded wall receptacle If the wall receptacle you intend to use is not adequately grounded or protected by a time delay fuse or circuit breaker have a qualified electrician install the proper receptacle Ensure the receptacle is accessible after the unit installation Be sure the electrical service is adequate for the model you have chosen This information can be found on the ...

Page 5: ...ck If water is spilled on the unit turn off the unit and switch off the circuit breaker Isolate the unit by taking the power plug out and contact customer service Do not use near gas stove or other gas burning appliances as air flow may affect gas combustion Do not use for any purpose other than room comfort Do not use this air conditioner to preserve precision devices food pets plants and art obj...

Page 6: ...ating gas appliance or an ignition source for example an operating electric heater close to the appliance The appliance shall also be stored in a room without ignition sources Do not pierce or burn Be aware that the refrigerants may not contain an odor Keep ventilation openings clear of obstruction Unit is only to be serviced by a Toshiba authorized servicer please call Customer Service at 1 855 2...

Page 7: ... Grounding type wall receptacle Do not under any circumstances cut remove or bypass the grounding prong Power supply cord with 3 prong grounding plug and current detection device The power supply cord contains a current measuring device that detects damage to the power cord Test your power supply cord as follows 1 Plug in the air conditioner 2 The power supply cord will have TWO buttons on the plu...

Page 8: ... 86 F 5 C 30 C OPERATING INSTRUCTIONS Operating Instructions Handle both sides Power plug storage Power cord storage Upper air filter behind the grille Inlet and outlet air hose Air inlet Drain Outlet dry mode Drain Outlet heating mode Power cord outlet Outlet louver automatic swing Caster Front Rear Control panel Panel Drain Outlet excess condensate ...

Page 9: ... control the fan speed in four steps LOW MID HIGH and AUTO The selected fan speed light except AUTO will illuminate NOTE Applicable to models with the Constant Fan feature In COOL or DRY mode press the Fan button for 3 seconds to turn on or off the constant fan function When the function is turned on the constant fan light will illuminate indicating the fan will run constantly When the function is...

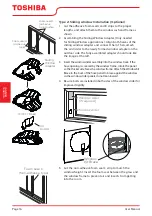
Page 10: ...ose the fan speed The temperature cannot be adjusted Do not connect the duct to a window TIMER Auto Start Stop Operation When the unit is on pressing the Timer button will initiate the Auto stop program The TIMER OFF indicator light illuminates Press the Up or Down button to select the desired time Press the TIMER button again within 5 seconds The Auto start program is initiated and the TIMER ON i...

Page 11: ...the C Sense button The remote s display will show the actual temperature at its location as long as it is within the 26 feet of the air conditioner The remote control will send this signal to the air conditioner every 3 minutes until the C Sense button is pressed again If the unit does not receive the Comfort Sense signal during any 7 minutes interval the unit will exit the Comfort Sense mode NOTE...

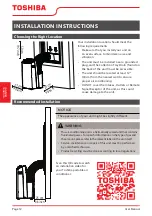
Page 12: ... conditioning DO NOT cover the Intakes Outlets or Remote Signal Receptor of the unit as this could cause damage to the unit Scan this QR code to watch an installation video for your Toshiba portable air conditioner NOTICE The appearance of your unit might be slightly different 25 cm 9 8 inch 25cm 9 8inch 9 8inch 25cm 50 cm 19 7 inch This air conditioning unit is a hermetically sealed unit that con...

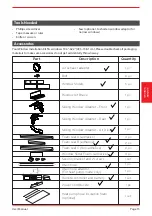
Page 13: ...r Window Sliders Window Kit Brace Sliding Window Adapter Front Sliding Window Adapter Rear Sliding Window Adapter Air Divider Bolt Foam seal A adhesive Foam seal B adhesive Foam seal C Non adhesive Security bracket and 2 screws Drain hose Drain hose adaptor For heat pump mode only Remote controller and battery 1 pc 1 pc 1 pc 1 pc 1 pc 8 pc 5 pc 2 pc 1 pc 1 pc 4 pc 2 pc 1 set 1 set Quantity 1 pc Po...

Page 14: ...t the size of the window slider Use the combination of panels that best fits your window opening 2 If the length of the window requires two or more window sliders use the bolt to fasten the window sliders once they are adjusted to the proper length 3 If installing in a sliding window bolts should be installed on both sides of the window sliders Hung Window Sliding Window Windows Type Window slider...

Page 15: ...ainst the window so the window slider panels do not lean inward Foam seal B Adhesive type shorter Foam seal A Adhesive type Window slider A Window slider B if required Installation Instructions Window Kit Brace Foam seal C Non adhesive type Security Bracket 2 Screws 3 Cut the non adhesive foam seal C strip to match the width of the window Insert the seal between the glass and the window frame to p...

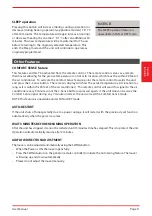
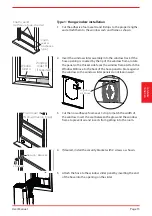
Page 16: ...oor side The fully assembled adapter should look like the image at the left 3 Insert the window slider assembly into the window track If the hose opening is covered by the window frame rotate the panel so the thicker side faces the window frame Attach theWindow Kit Brace to the back of the hose panel to brace against the window so the window slider panels do not lean inward 4 Be sure bolts are ins...

Page 17: ... Bracket 6 If desired install the security bracket with 2 screws as shown 7 Attach the Sliding Window Adapter to the hose by lining up the circles on the adapter the hose Insert the window slider adapter into the hole of the window slider Remove the upper drain plug Continuous drain hose During Dry modes remove the upper drain plug from the back of the unit and install the drain hose For models wi...

Page 18: ...rating in heat pump mode the unit will produce condensate that must be drained You must install the drain hose when operating in heat mode To install the drain hose remove the plug from the drain port and attach the included hose The universal drain adaptor can be attached to the end of the included hose A 3 4 hose not included can be attached to the adaptor if a longer hose length is required Pla...

Page 19: ...ode for 12 hours in a warm room to dry it and prevent mold Turn off the unit and unplug it Clean the air filter according to the instructions in the previous section Reinstall the clean dry filter before storing Remove the batteries from the remote control NOTICE Be sure to store the unit in a cool dark place Exposure to direct sunlight or extreme heat can shorten the lifespan of the unit Maintena...

Page 20: ...ease the set temperature Make sure all windows and doors are closed The room area could be too large doublecheck the cooling area Check the room for possible heat sources and remove them if possible The unit is noisy and or vibrates too much The floor is not level Place the unit on a flat level surface The air filter is blocked with dust or animal hair Turn off the unit and clean the filter accord...

Page 21: ...you are experiencing condensation on the outer section of the hose during heating operation apply the included heat pump insulation foam to the outside of the hose Use the included zip ties to secure the foam around the hose HEAT PUMP HOSE INSULATION FOAM ...

Page 22: ...e symbols inside the battery compartment 3 Slide the battery cover back into place Handling the Remote Control Inserting and Replacing Batteries Rated Voltage 3 0V Dry batteries R03 LR03x2 Signal Receiving Range 26 ft 8 m Environment 5 C 60 C 23 F 140 F CAUTION The air conditioner will not operate if curtains doors or other materials block the signals from the remote control to the unit Prevent an...

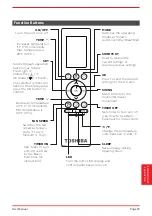
Page 23: ...des as follows AutoJCoolJDryJHeatJFan TIMER ON OK Press to send the desired settings to the AC unit TEMP Decreases temperature in 1 F 1 C increments Min temperature is 60 F 16 C TEMP Increases temperate in 1 F 1 C increments Max temperature is 86 F 30 C Sets timer to turn unit on see How to Use Basic Functions for instructions SET Scrolls through operation functions as follows Fresh J Follow Me J ...

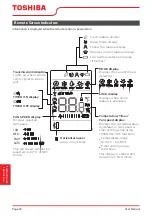
Page 24: ... Displays when LOCK feature is activated Lights up when remote sends signal to indoor unit Displays the current mode including TIMER ON display TIMER OFF display Displays the set temperature by default or fan speed or timer setting when using TIMER ON OFF functions Temperature range 16 30 C 60 86 F Timer setting range 0 24 hours This display is blank when operating in FAN mode LOW MED HIGH AUTO Di...

Page 25: ...red time to turn off the unit Point remote to unit and wait 1sec the TIMER ON will be activated Point remote to unit and wait 1sec the TIMER OFF will be activated TIMER ON OFF Set the amount of time after which the unit will automatically turn on off x5 1sec xn xn xn Current time 1PM 2 00PM 3 00PM 4PM 5PM 6PM Timer starts Unit turns ON Unit turns OFF 2 5 hours later 5 hours later 3 30PM x10 1sec N...

Page 26: ...ng of the QR code your smart phone must have at least a 5 megapixel camera 5 Due to unstable network connectivity requests may time out If this happens re run the network configuration 6 Due to unstable network connectivity commands may time out If this happens the smartphone app and the actual product may display conflicting information The information displayed on the actual product is always th...

Page 27: ...L THE APP Android QR code Apple QR code Scan to download app You can also go to Google Play or App Store and search for Toshiba NA AC For more information please refer to Toshiba Lifestyle website us toshiba lifestyle com All the images in this manual are for reference only your product and app may look slightly different The actual product and app instructions have to be considered NOTICE Remote ...

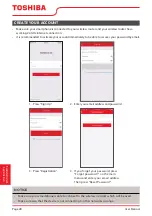
Page 28: ... recover your password by email 1 Press Sign Up 2 Enter your email address and password 3 Press Registration 4 If you forget your password press Forgot password on the main menu and enter your email address Then press Reset Password Make sure your smartphone is able to connect to the wireless network which will be used Make sure also that the device is not connecting to other networks in range NOT...

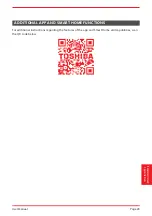
Page 29: ...anual Page 29 ADDITIONAL APP AND SMART HOME FUNCTIONS For additional instructions regarding the features of the app and Smart Home skill capabilities scan the QR code below Remote Control and App Instructions ...

Page 30: ......

Page 31: ...s de Problemas Mantenimento Y Limpieza RAC PT1411HWRU Warning notices Antes de usar este producto lea atentamente este manual y consérvelo para futuras referencias El diseño y las especificaciones están sujetos a cambios sin previo aviso para la mejora del producto Consulte con su distribuidor o fabricante para obtener más detalles versión B 11 2020 us toshiba lifestyle com WARNING versión E 03 20...

Page 32: ...ridad 33 Instrucciones de Operación 38 Instrucciones de Instalación 42 Mantenimiento y Limpieza 49 Soluciones de Problemas 50 Espuma Aislante para Manguera de Bomba de Calor 51 Instrucciones del Control Remoto y del App 52 Para obtener asistencia llame el Central de Servicio Técnico al 1 855 204 5313 Este aparato no está diseñado a ser utilizado por personas incluidos niños con capacidades físicas...

Page 33: ...un incendio debido a la excesiva generación de calor No modificar la longitud del cable de alimentación ni comparta la tomacorriente con otros aparatos ya que puede provocar una descarga eléctrica o un incendio debido al sobrecalentamiento Asegúrese siempre de una conexión a tierra eficaz Una conexión a tierra incorrecta puede provocar una descarga eléctrica Desenchufar la unidad si nota sonidos e...

Page 34: ...exión a tierra adecuada El cable de alimentación está equipado con un enchufe de conexión a tierra de tres clavijas para la protección contra los riesgos de choque Su acondicionador de aire debe utilizarse en una tomacorriente de pared correctamente conectado a tierra Si la tomacorriente de pared que tiene intención de utilizar no está adecuadamente conectada a tierra o protegida por un fusible de...

Page 35: ...ue el cable no esté comprimido De lo contrario hay peligro de incendio o descarga eléctrica Si hay agua derramada en la unidad apague la unidad y apague el disyuntor Aísle el suministro tomando el enchufe y contacte un personal de servicio técnico cualificado No lo use cerca de estufas de gas o otros aparatos de combustión de gas ya que el flujo de aire puede afectar a la combustión de gas No usar...

Page 36: ...ción comunes por ejemplo un calentador eléctrico en funcionamiento cerca del aparato El aparato también debe ser ubicado en una habitación sin cualquer otra fuente de ignición No perforar ni quemar Tenga en cuenta que los refrigerantes pueden no contener olor Mantenga las aberturas de ventilación libres de obstrucciones La unidad solo debe ser atendida por un centro de asistencia autorizada Toshib...

Page 37: ...condicionador de aire 2 El cable de energía tendrá DOS botones en el cabezal del enchufe Pulse el botón TEST Notará un clic a medida que aparezca el botón RESET 3 Pulse el botón RESET Notará un clic a medida que el botón se activa 4 El cable de energía ahora está energizando la unidad En algunos productos esto también se indica mediante una luz en el cabezal del enchufe RESET TEST Enchufe y pulse ...

Page 38: ... 55 F 95 F 13 C 35 C Calefacción Heat 41 F 86 F 5 C 30 C Mango de traslado ambos os lados Soporte del enchufe Soporte del cable Filtro de aire superior detrás de la rejilla Manguera de aire salida y entrada Entrada de aire Salida de drenaje modo dry Salida de drenaje modo heating Salida de drenaje exceso de condensado Salida del cable Deflector de aire oscilación automática Rodízio Frente Trasera ...

Page 39: ...á despues del ajuste seleccionado Consulte la página 38 para obtener instrucciones más detalladas Botón de Velocidad del Ventilador Fan Pulse para controlar la velocidad del ventilador en cuatro pasos LOW MID HIGH y AUTO La luz de velocidad del ventilador seleccionada excepto AUTO se iluminará NOTA Aplicable a modelos con la función de ventilación constante En el modo COOL o DRY pulse el botón Fan...

Page 40: ...ventilador ni ajustar la temperatura El motor del ventilador funciona en baja velocidad Mantenga las ventanas y puertas cerradas para un mejor efecto deshumidificante Funcionamiento Automático AUTO Al configurar el acondicionador de aire en el modo AUTO seleccionará automáticamente enfriamiento calefacción o el funcionamiento solo del ventilador dependiendo de la temperatura que haya seleccionado ...

Page 41: ...ión previamente establecida automáticamente cuando se reanude la alimentación AGUARDE 3 MINUTOS ANTES DE REANUDAR EL FUNCIONAMIENTO Después de que la unidad se haya detenido no se puede reiniciar hasta que haya transcurrido 3 minutos Esto es para proteger la unidad El funcionamiento se reanudará automáticamente después de 3 minutos AJUSTE DE LA DIRECCIÓN DEL FLUJO DE AIRE El deflector se puede aju...

Page 42: ...ciones locales 25 cm 9 8 inch 25cm 9 8inch 9 8inch 25cm 50 cm 19 7 inch Instrucciones de Instalación Su ubicación de instalación debe cumplir los siguientes requisitos Asegúrese de instalar la unidad en una superficie uniforme para minimizar el ruido y las vibraciones La unidad debe instalarse cerca de un enchufe conectado a tierra y el sistema de drenaje de la bandeja que se encuentra en la parte...

Page 43: ...uma aislante para manguera de bomba de calor opcional Descripción Pieza Deslizadores de ventana Soporte del Kit de ventana Adaptador delizante de ventana Frontal Adaptador delizante de ventana Trasero Adaptador delizante de ventana Divisor Junta de espuma A adhesivo Junta de espuma B adhesivo Espuma deslizante de ventana adhesivo Junta de espuma C no adhesivo Soporte de seguridad y 2 tornillos Man...

Page 44: ...pe AVISO Una vez preparado el conjunto de la manguera de escape y el deslizador de ventana ajustable elija uno de los dos siguientes métodos de instalación Hung Window Sliding Window Windows Type Window slider A Window slider A Deslizador de Ventana A Deslizador deVentana A Ventana de deslizar Ventana de colgar Tipo de Ventana 3 Aplicar aislamiento al deslizador de la ventana Después de ensamblar ...

Page 45: ...a no se incline hacia adentro Foam seal B Adhesive type shorter Foam seal A Adhesive type Sello de espuma B Adhesivo más corto Sello de espuma A Adhesivo Window slider A Window slider B if required Deslizador deVentana A Deslizador de Ventana B si necesario Window Kit Brace Soporte de kit de ventana 3 Corte el sello de espuma C no adhesiva para que coincida con el ancho de la ventana Inserte el se...

Page 46: ...ueso mire hacia el marco de la ventana Fije la abrazadera del kit de ventana a la parte posterior del panel de la manguera para sujetarla contra la ventana para que los paneles deslizantes de la ventana no se incline hacia adentro 4 Asegúrese de que los pernos estén instalados en ambos lados del deslizador de la ventana para mejorar la rigidez Window slider A Window slider B if required Deslizador...

Page 47: ...ón 2 Screws Security Bracket Soporte de seguridad 2 Tornillos 7 Conecte el adaptador de ventana de colgar a la manguera alineando los círculos en el adaptador de la manguera Inserte el adaptador del deslizador de la ventana en el orificio del deslizador de la ventana Retire el tapón superior de drenaje Manguera de drenaje Durante los ciclos de los modos DRY retire el tapón de drenaje superior de l...

Page 48: ...deje que el agua drene Vuelva a instalar el tapón de drenaje inferior y reinicie la máquina hasta que desaparezca el error P1 Si el error se repite llame al servicio técnico AVISO Asegúrese de volver a instalar firmemente el tapón de drenaje inferior para evitar fugas antes de usar la unidad Presione el soporte del cable de alimentación en la trasera del aparato Adaptador de la manguera de drenaje...

Page 49: ...piarla o repararla NO use líquidos o productos químicos inflamables para limpiar la unidad NO lavar la unidad con agua corriente Hacerlo causa peligro eléctrico NO opere la unidad si la fuente de alimentación se dañó durante la limpieza Un cable de alimentación dañado debe ser reemplazado por uno nuevo del fabricante Limpie con un paño húmedo que no suelte hilos y con detergente suave Sécala con u...

Page 50: ...s estén cerradas El área de la habitación puede ser demasiado grande vuelva a comprobar el área de enfriamiento Asegurese de que cualquier puerta o ventana estén abiertos lo que puede permitir que el aire frío escape Cierre las puertas y ventanas o registros La unidad hace ruido y o vibra demasiado El piso no está nivelado Coloque la unidad sobre una superficie plana y nivelada Filtro de aire suci...

Page 51: ...te exterior de la manguera durante la operación de calefacción aplique la espuma aislante de la bomba de calor incluida en la parte exterior de la manguera Utilice las bridas incluidas para asegurar la espuma alrededor de la manguera ESPUMA AISLANTE PARA MANGUERA DE BOMBA DE CALOR ...

Page 52: ...trol remoto hacia abajo exponiendo el compartimiento de la batería 2 Inserte las baterías prestando atención a hacer coincidir los extremos y de las baterías con los símbolos dentro del compartimiento de las baterías 3 Vuelva a colocar la tapa de la batería en su lugar PRECAUCIÓN El acondicionador de aire no funcionará si las cortinas puertas u otros materiales bloquean las señales del control rem...

Page 53: ...y los pitidos del panel de control LED Botón MODE Cambia los modos de funcionamiento de la siguiente manera AutoJCoolJDryJHeatJFan Botón OK Pulse para enviar la configuración deseada a la unidad de aire acondicionado Botón TEMP Disminuye la temperatura en incrementos de 1 F 1 C Temperatura min es 60 F 16 C Botón TEMP Aumenta la temperatura en incrementos de 1 F 1 C Temperatura max es 86 F 30 C Bot...

Page 54: ...o envía una señal a la unidad interior Muestra el modo actual que incluye Presenta TIMER ON Presenta TIMER OFF Muestra la temperatura establecida de forma predeterminada la velocidad del ventilador o el ajuste del temporizador cuando se utilizan las funciones TIMER ON OFF Rango de temperatura 16 30 C 60 86 F Rango de ajuste del temporizador 0 24 horas El visor está en blanco cuando funciona en mod...

Page 55: ...tones arriba o abajo varias veces para configurar el tiempo deseado para encender la unidad Pulse los botones arriba o abajo varias veces para configurar el tiempo deseado para apagar la unidad Apunte el control remoto a la unidad y espere 1 segundo el TIMER ON se activará Apunte el control remoto a la unidad y espere 1 segundo el TIMER OFF se activará Tiempo actual 1PM 2 00PM 3 00PM 4PM 5PM 6PM E...

Page 56: ...o QR su smart phone debe tener al menos una cámara de 5 megapíxeles 5 Debido a la conectividad de red inestable las solicitudes pueden agotar el tiempo de espera Si esto sucede vuelva a ejecutar la configuración de red 6 Debido a la conectividad de red inestable los comandos pueden agotar el tiempo de espera Si esto sucede la aplicación del Smartphone y el producto actual pueden presentar informac...

Page 57: ...roid Código QR de Apple Escanear para descargar la aplicación También puede ir a Google Play o App Store y buscar Toshiba NA AC Para obtener más información consulte la página web de Toshiba Lifestyle us toshiba lifestyle com Todas las imágenes de este manual son solo para referencia su producto y aplicación pueden tener un aspecto ligeramente diferente Las instrucciones reales del producto y de l...

Page 58: ...istrarse 2 Introduzca su dirección de correo electrónico y contraseña 3 Pulse Registro 4 En caso de que olvide su contraseña pulse Olvidó su contraseña en el menú principal e introduzca su dirección de correo electrónico A continuación pulse Restablecer contraseña Asegúrese de que su Smartphone es capaz de conectarse a la red inalámbrica que se utilizará Asegúrese también de que el dispositivo no ...

Page 59: ...NALES DE LA APLICACIÓN Y SMART HOME Para obtener instrucciones adicionales sobre las características de la aplicación y las capacidades del sistema Smart Home escanee el código QR a continuación Instrucciones del control remoto y del App ...

Page 60: ......

Reviews: