background image

Maintenance Tips

Main Body

·Wipe dust off the Power Plug regularly.
·Remove stubborn dirt with soft cloth and neutral kitchen detergent.
·Clean Control Panel only with a dry cloth, and use no water.
·Do not use gasoline, thinners, alcohol, cleansing powder, or brush to

prevent deforming or scratching the Unit.

1

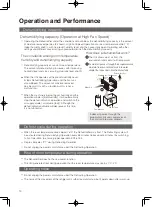
Remove the Water Tank Lid.

Clean the interior and the Lid of the Tank.

Pull out the Water Tank 
from the Unit.

3

 Do not brush the Tank to prevent scratches.

4

Wipe dry the exterior of the Water Tank, put 
the Lid back on and insert the Water Tank into 
the Unit.Press down the Water Tank Handle and 

Lid to ensure proper installation.

Water Tank Lid

Water Tank Lid

Water Tank Handle

Water Tank Handle

Water Tank

5

Insert the Water Tank back into the Unit.

No Wet Hand

Unplugging

Do not plug in or unplug the Dehumidifier with wet hand. 
Doing so could result in electric shock.

Turn off the Unit and unplug the power cord 
before cleaning it to prevent electric shock.

Prohibited

Do not remove the Float from the Water Tank.  
Doing so could result in inoperability, leakage, 
dampening surrounding objects, electric shock, and electric leakage. 

Use soft and slightly damp cloth to wipe the Unit.

2

Lift the Lid to open.

Float

Water Tank

Float

Water Tank

Warning

Caution

    Hold the Water Tank horizontally and push it 

 inside gently to install the Tank.

13

Summary of Contents for RAD-X200H

Page 1: ......

Page 2: ......

Page 3: ......

Page 4: ......

Page 5: ...浮子不可取下及拆卸 若取下浮子 就燕法椋知满水 若漏水可能含尊致榄醴 不能正常勤作 4 軗置塌所 恙了使抽渭榄有效的逼作 言青按右圈放置 如果空阁不足 可能曾尊致除渭榄能力下降 oo 鹃勤抽淉榄前 言青将水箱中的水清空 抽淉榄暹作晇講减少鹃阿窗 迼棵做可以第省能源 安放抽淉榄的位置 矜必在榄醴周圉预留 定的空阁 要求上方最小50厘米 前俊左右最小20厘米 如右圈 本榄在使用峙娶瑰噪音大峙 建講在本榄下塾上塾子或减震橡腮板等 迼棵可以减少振勤和噪音 遠能减少木地 板或地毯的凹陷 展少 20cm 最少 20cm 晟少 20cm 缅 5 勹 三 厂 ...

Page 6: ......

Page 7: ......

Page 8: ...置 厚衣服 雅乾 正面迎厘吹 牛仔裸或裙子 易斡 遠誰榄醴的地方吹斡 薄衣服 男斡 遠誰榄醴的地方吹 衣服乾燥俊要蛊快收起 潮渭季箭或下雨天氯 已乾燥的衣服需盄早收起 否削曾再次受潮 提示 以下情况峙 黑衣服比较雅乾 衣服多 衣服厚 嗯衣服的房陨大 衣服排放阁距小 房闹的溫度低 4 準借及榷韶 1 水箱的安装 I 三 水箱没有装好或满水峙 榄醴将不能湮韓 取出方法 安装方法 婴手分别放在水箱俊凹 入的把手位 轻轻向俊 拉出水箱 水箱排水口榷蛁盔好 水箱呈水平状怹 轻轻推入内侧 把水箱轻轻地装回原位 水箱把手 講把水 箱把手整理好 把水 箱 轻轻 地 装 回 原 位 oo 水箱盔 水箱排水口唯蛁已装好 否剧可能曾漏水 8 勹 三 厂 ...

Page 9: ......

Page 10: ......

Page 11: ......

Page 12: ... 箭省倒掉水箱 水 的 峙阴 準侮之排水管 市面上的塑腮管 畏 度 外接水管不可遏畏 建講畏度小於 0 6米 水管末端离度项低於榄身排水口高度10厘米以 上 水管要保持顺畅 否削可能燕法正常排水 排水管直径 内径9毫米 外径13毫米 虔理以下步眯前 先停止迵棘 亚把霍源插顽徙插座上拔掉 1 除下榄背俊面的排 水口水盖 2 除下榄背俊面的排 水口水盔 拔出水塞 将9 0毫米水 管湮接 袚出水塞 将樑準螺纹 的花圆 到排 水口上 软管装 在螺纹排 水口上 00 耦不要使用伸缩管 曾粤致水 稹在管内 不能排出 4 4 雹 00 y X X 如果您不想经常去倒水箱梩的水 可以在本榄俊面遴接 佪排水管 管的内径湍9 0毫米 排水 用户需自行瞒黄排水管 也可使用 具有樑準螺纹的花圆软管 其具有11 6英时 1 0625英寸或26 98毫米 的外径和11 STPI的螺距 4 12 勹 三 厂 ...

Page 13: ......

Page 14: ......

Page 15: ......

Page 16: ......

Page 17: ......

Page 18: ...ock or injury Stop using the Dehumidifier immediately if abnormality or malfunction takes place Abnormal operation of the Dehumidifier may result in fire electric shock or injury that the Unit should be switched off and unplugged immediately then contact Toshiba Repairing Service Parts Centre for check up and repair Examples of abnormality Short circuit Foreign objects or liquid inserted Water lea...

Page 19: ...Do not operate the Dehumidifier in the following abnormal situations Prohibited Do not plug in or unplug the Dehumidifier with wet hand Doing so could result in electric shock No Wet Hand A place where it is likely to come into contact with water such as bathroom This could cause electric shock electric leakage and fire Where the unit may be subject to oil or flammable gas leakage The flammable ga...

Page 20: ...floor and ruin surrounding items Do not wash the Dehumidifier with water This may cause electric leakage and electric shock Check the Drainage Hose during the Continuous Drainage Operation Wetting furniture may result in electric shock electric leakage and fire Check to ensure the drain hose is free of bent and properly inserted Do not put objects filled with water such as vase on the Unit This ma...

Page 21: ...cording to the specifications shown in the diagram to the right Insufficient space may impact on the performance of the Dehumidifier Drain the Water Tank before use Minimise the frequency of opening and closing doors and windows to save energy Keep enough space around the Dehumidifier Allow at least 50cm of air space above the Unit and at least 20 cm on four sides as shown in the diagram Operating...

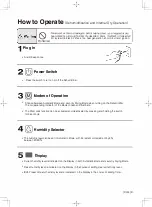
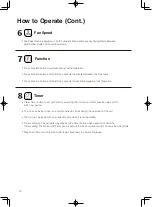
Page 22: ...Cont Control panel Function Internal Dry Operation and Negative Ions Fan Speed Fan Speed setting Display Humidity Indicator showing the current and the selected humidity level Humidity Selector Setting of humidity level from the range of 30 to 80 Modes of Operation Automatic Mode Laundry Drying Mode Power Switch Switch the Unit on and off 6 ...

Page 23: ...The bottom part of the Unit heats up as a result of the operation of the compressor ...

Page 24: ...ld be placed further away from the Unit Take down the laundry as soon as it is dry On humid or rainy days laundry should be taken down as soon as it is dry or otherwise it will absorb moisture from the air Tips The drying time will be longer in the following situations The laundry is of a large volume Insufficient space between the laundry The laundry is of heavyweight clothing The room for drying...

Page 25: ...e Dehumidifier The corresponding indicator of the Mode chosen will illuminate The Child Lock function can be activated and deactivated by pressing and holding the switch for 3 seconds 4 4 Humidity Selector The hum心ty level can be set in Automatic Mode with increment or decrement by 5 between 30 80 5 Display Current hum昢ty level is indicated on the Display in both Automatic Mode and Laundry Drying ...

Page 26: ...mer Press Timer button to set up Timer for switching the Unit on and off at specific times within a 24 hour period The Unit can be set to turn on and off at specific times during the operation of the unit The Unit can be set to turn on at specific time when it is not operating Timer setting can be cancelled by pressing the Timer button when asked to confirm the Timer setting The On and Off Timer c...

Page 27: ...Coil up the power cord when moving the Dehumidifier ...

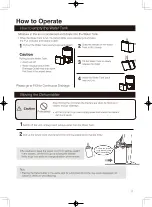
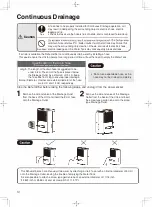
Page 28: ...er 0 6 m The end of the hose is placed below the DraInage OutIet by a mImmum of 10 cm keep 1 Do not use expandab e hose as the the hose free from clog to ensure proper drainage I hose may not be drained completely Internal Diameter Internal and external diameter of the hose are 9 mm and 13 mm respectively Stop the Dehumidifier before taking the following steps and unplug it from the power socket 1...

Page 29: ...own the Water Tank Handle and Lid to ensure proper installation Water Tank Lid Water Tank Lid Water Tank Handle Water Tank Handle Water Tank 5 Insert the Water Tank back into the Unit No Wet Hand Unplugging Do not plug in or unplug the Dehumidifier with wet hand Doing so could result in electric shock Turn off the Unit and unplug the power cord before cleaning it to prevent electric shock Prohibit...

Page 30: ...ing increases with increasing humidity level and vice versa Eg Humidity level at 60 When the Unit operates at the preset Humidity Level it stops Dehumidifying Operation and the Fan runs at Low Speed The amount of moisture removed may be small in such a situation but this is not a malfunction How does a dehumidifier work The Unit draws moist air from the environment and cools it with evaporator 1 2...

Page 31: ...e Is the Air Intake blocked Clear the items blocking the Air Intake The sound of flowing water This is caused by the flow of refrigerant inside the Unit The drain hose is loosely attached Securely insert the drain hose The Drainage system is blocked Unclog the hose Frosted up This is not a malfunction that defrosting operation could be activated by the Drying Inside Operation 2 Error message code ...

Page 32: ......

Reviews: