background image

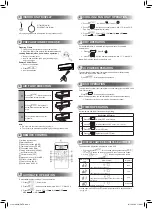
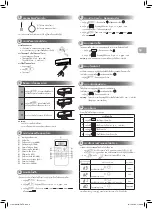
     INDOOR UNIT DISPLAY

1

1

2

1


TIMER (White)

2


OPERATION (White)

●  Display brightness can be adjusted, follow procedure on 

!

.

     REMOTE CONTROL

4

1

2

3

7
9
8
@

4

6
5
0
!

1

 Infrared signal emitter

2

 Start/Stop button

3

 Mode select button (MODE)

4

 Temperature button (TEMP)

5

 Fan speed button (FAN)

6

 Swing louver button (SWING)

7

 Set louver button (FIX)

8

 Off timer button (OFF)

9

 High power button (HI POWER)

0

 Economy button (ECO)

!

 Clear button (CLEAR)

@

 Check button (CHECK)

     PREPARATION BEFORE USE

2

Preparing Filters


1.  Open the air inlet grille and remove the air filters.

  2.  Attach the filters. (

see detail in the Installation Manual

).

Loading Batteries (when use wireless operation.)


1.  Remove the slide cover.

  2.  Insert 2 new batteries (AAA type) following the (+) 

    and (–) positions.

Remote Control Reset


1.  Remove the batteries.

  2.  Press


  3.  Insert the batteries.

     AIR FLOW DIRECTION

3

Note:


●  Do not move the louver manually by others.

  ●  The louver may automation positioning by some operation mode.

1

Press 

  : Move the louver in

the desired vertical direction.

2

Press 

  : Swing the air

automatically and press again to 

stop.

3

For horizontal direction, adjust

manually.

     COOLING / FAN ONLY OPERATION

6


1.  Press 

  : Select Cool 

 or Fan only 

.


2.  Press 


: Set the desired temperature. 

Min. 17°C, Max. 30°C, 


Fan Only: No temperature indication

  3.  Press 


: Select AUTO, LOW  , LOW+  , MED 

,

    MED+ 

, or HIGH 

.

     DRY OPERATION

7

For dehumidification, a moderate cooling performance is controlled 

automatically. 
 

1.  Press 


: Select Dry 

.


2.  Press 


: Set the desired temperature. Min. 17°C, Max. 30°C

Note:

 Dry mode fan speed is set to Auto only.

     Hi POWER OPERATION

8

To automatically control room temperature and airflow for faster cooling

(except in DRY and FAN ONLY mode)


   Press 

  : Start and stop the operation.

     ECO OPERATION

9

To automatically control room temperature to save energy (except in DRY and 

FAN ONLY mode)
  Press 

  : Start and stop the operation.

Note:

 Cooling operation; the set temperature will increase automatically 

          1 degree/hour for 2 hours (maximum 2 degrees increase).

Set the timer when the air conditioner is operating.

     TIMER OPERATION

10

Setting the OFF timer

1

Press


for enter OFF timer setting.

2

Press


for select desired OFF timer. (0.5 - 12 hrs)

3

Press


for set OFF timer.

4

Press


again for cancel OFF timer.

     AUTOMATIC OPERATION

5

To automatically select cooling or fan only operation

  1.  Press


  : Select 

Auto A

.


2.  Press 

  : Set the desired temperature. Min.

17°C, Max. 30°C

  3.  Press


  : Select AUTO, LOW  , LOW+  , MED 

,

    MED+ 

, or HIGH 

.

  In the examples of   and 

, the lamp illuminates for 5 seconds before

  going off.

To decrease the display lamp brightness or turn it off.


1.  Press and hold 

  for 3 seconds until brightness level (

,  ,

    or 

) is shown on remote control LCD then release the button.

  2.  Press 


Rise

 or 

Decrease 


to adjust brightness in 4 levels


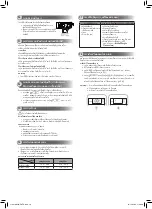
DISPLAY LAMP BRIGHTNESS ADJUSTMENT

11

Remote control

LCD

Operation display

Brightness

 Lamp illuminates full brightness.

100%

 Lamp illuminates 50% brightness.

50%

 Lamp illuminates 50% brightness and the operation lamp

 is turned off.

50%

 All lamps are turned off.

All turned off

1144180207-EN,TH.indd   4

21/12/2564   17:26:37

Summary of Contents for RAS-18G3ACV2G-T

Page 1: ...NUAL ENGLISH ภาษาไทย AIR CONDITIONER SPLIT TYPE For general public use Indoor unit RAS 10 13 16 18 24 28G3KCV2G T Outdoor unit RAS 10 13 16 18 24 28G3ACV2G T 1144180207 1144180207 EN TH indd 1 21 12 2564 17 26 36 ...

Page 2: ...ing ignition sources for example open flames an operating gas appliance or an operating electric heater In order to avoid fire explosion or injury do not operate the unit when harmful gases e g flammable or corrosive are detected near the unit Do not expose your body directly to cool or warm air for a long time Do not insert your finger or any article into the air inlet outlet When an abnormality ...

Page 3: ... an odour Do not pierce or burn as the appliance is pressurized Do not expose the appliance to heat flames sparks or other sources or ignition Else it may explode and cause injury or death Appliance and pipe work shall be installed operated and stored in a room with a floor area larger than Amin m2 How to get Amin m2 Amin M 2 5 x 0 22759 x h0 2 M is the refrigerant charge amount in appliance in kg...

Page 4: ...ress Select Dry 2 Press Set the desired temperature Min 17 C Max 30 C Note Dry mode fan speed is set to Auto only Hi POWER OPERATION 8 To automatically control room temperature and airflow for faster cooling except in DRY and FAN ONLY mode Press Start and stop the operation ECO OPERATION 9 To automatically control room temperature to save energy except in DRY and FAN ONLY mode Press Start and stop...

Page 5: ...e 2 Remove the air filters 3 Vacuum or wash and then dry them 4 Reinstall the air filters and close the air inlet grille OPERATION AND PERFORMANCE 16 1 Three minute protection feature To prevent the unit from being activated for 3 minutes when suddenly restarted or switched to ON 2 Some minor cracking sound may occur when unit operating This is normal because the cracking sound may be caused by ex...

Page 6: ... ชำ นาญงานในการประกอบการดังกล าว การป ดเครื องปรับอากาศไม ได เป นการป องกันไฟฟ าช อตซึ งอาจเกิดขึ นได ควรติดตั งเครื องปรับอากาศตามข อกำ หนดการเดินสายไฟ วิธีการตัดกระแสไฟจากตัวจ ายไฟหลักที มีระยะห างหน าสัมผัสของขั วต อทุกขั วอย างน อย 3 มม ต องใช ร วมในการเดินสายแบบตายตัว จะต องเก บอุปกรณ ไว ในห องที ไม มีองค ประกอบให เกิดไฟ เช น เปลวไฟ อุปกรณ ที ใช ก าซ หรือ เครื องทำ ความร อน เพื อหลีกเลี ยงไม ...

Page 7: ...ปกติในส วนของวงจรการทำ ระบบความเย น ซึ งอาจทำ ให เครื องไม สามารถ ทำ งานได หรือการระเบิด หรือการบาดเจ บต อร างกายของและทรัพย สิน ห ามใช วิธีการเร งการละลายนํ าแข งหรือวิธีการกำ จัดนํ าแข ง อื นๆ นอกเหนือจากคำ แนะนำ โดยผู ผลิต อุปกรณ จะต องเก บไว ในห องที ไม มีองค ประกอบให เกิดไฟ เช น เปลวไฟ อุปกรณ ที ใช ก าซ หรือ เครื องทำ ความร อน โปรดทราบว าปกตินํ ายาทำ ความเย นจะไม มีกลิ น ห ามแทงหรือทุบเพราะว ...

Page 8: ...มผัสครีบอลูมิเนียมเพราะอาจทำ ให เกิดการบาดเจ บ ก อนการทำ ความสะอาด ให ป ดสวิตซ หลักและป ดอุปกรณ ตัดต อวงจร เมื อไม ได ใช อุปกรณ เป นเวลานาน ให ป ดสวิตซ หลักและป ดอุปกรณ ตัดต อวงจร แนะนำ ว าให บำ รุงรักษาอุปกรณ นี โดยผู เชี ยวชาญเมื อใช งานมาเป นระยะเวลานาน ผู ผลิตจะไม รับผิดชอบใดๆ หากเกิดความเสียหาย ที เกิดจากการไม อ านข อมูลโดยละเอียดจากคู มือนี ข อควรระวัง ข อควรระวังเพื อความปลอดภัย 1144180207 ...

Page 9: ...วามชื น และพัดลมอย างเดียว กดปุ ม เริ มและหยุดการทํางาน ระบบประหยัดพลังงาน 9 ใช เมื อต องการควบคุมอุณหภูมิห องแบบประหยัดพลังงาน ยกเว นในระบบลดความชื น และพัดลมอย างเดียว กดปุ ม เริ มและหยุดการทํางาน หมายเหตุ ในระบบทําความเย น อุณหภูมิที ตั งจะเพิ มขึ นโดยอัตโนมัติ 1 องศา 1 2 ชั วโมง เพิ มสูงสุด 2 องศาเซลเซียส ระบบตั งเวลา 10 ตั งเวลาที จะให เครื องปรับอากาศทํางาน การตั งเวลาป ด 1 กดป ุม เพื อเข าส...

Page 10: ...หน วยความจํา รูปที 2 หมายเหตุ 1 ทําตามขั นตอนด านบนเพื อตั งค ารีโมทคอนโทรลเป นรีโมทคอนโทรล A 2 รีโมทคอนโทรล A จะไม แสดง A ขึ นบนจอ 3 ค าตั งจากโรงงานสําหรับรีโมทคอนโทรลคือ A การเลือกรีโมทคอนโทรล A B 18 การตั งค าระบบเริ มทำ งานใหม โดยอัตโนมัติ 13 ผลิตภัณฑ นี ถูกออกแบบมาให สามารถเริ มทำ งานใหม หลังไฟฟ าขัดข อง เครื อง จะเริ มงานอีกครั งในสภาวะเดิมได โดยอัตโนมัติ รายละเอียด ผลิตภัณฑ นี จัดส งมาโดยท...

Page 11: ...1144180207 EN TH indd 11 21 12 2564 17 26 38 ...

Page 12: ...1144180207 1144180207 EN TH indd 12 21 12 2564 17 26 38 ...

Reviews: