background image

FILE NO. SVM-06021

– 53 –

9-5. How to Diagnose Faulty Parts

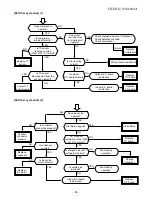
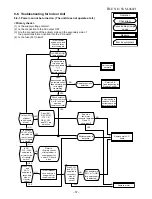
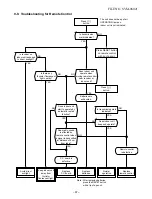
[04 Serial signal error]

[08 Four-way valve error]

Does outdoor

unit operate?

Are 1, 2 and 3 crossover

wires connected properly?

Is connector

connected properly?

Does LED (Orange) on

outdoor P.C. board blink?

Does LED (Green) on

outdoor P.C. board blink?

Connect crossover

wires properly.

Outdoor P.C. board

is defective.

Replace

P.C. board.

YES

NO

YES

NO

 YES

NO

YES

NO

YES

NO

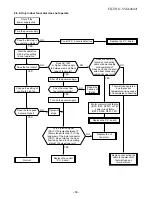
Does four-way valve

operate properly?

Is TC sensor resistance

value (10k

 at 25°C)

normal?

Does coil terminal

have 220 – 240 V

in heating operation?

Are circuit

wires normal?

Is outdoor P.C. board

normal?

Four-way valve

is defective.

Outdoor P.C. board

is defective.

Replace

Four-way valve

Circuit check/modification

Replace TC sensor.

YES

NO

YES

NO

YES

YES

NO

NO

YES

NO

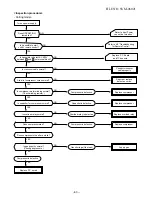
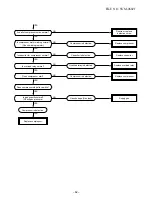
Indoor P.C. board

is defective.

Replace

P.C. board.

Indoor P.C. board

is defective.

Replace

P.C. board.

Replace

P.C. board.

Connect crossover

properly.

Operation

Measure

Item by symptoms

Check item

Conceivable principle 

cause

Summary of Contents for RAS-18GA-ES2

Page 1: ... MANUAL AIR CONDITIONER UNDER CEILING CONSOLE TYPE RAS 18GFHP ES2 RAS 18GAH ES2 RAS 18GFP ES2 RAS 18GA ES2 RAS 24GFHP ES2 RAS 24GAH ES2 RAS 24GFP ES2 RAS 24GA ES2 FILE NO SVM 06021 June 2006 24 Class 18 Class ...

Page 2: ...oor Unit RAS 24GA ES2 5 REFRIGERATION CYCLE DIAGRAM 5 1 RAS 18GFHP ES2 RAS 18GAH ES2 5 2 RAS 18GFP ES2 RAS 18GA ES2 5 3 RAS 24GFHP ES2 RAS 24GAH ES2 5 4 RAS 24GFP ES2 RAS 24GA ES2 6 CONTROL BLOCK DIAGRAM 6 1 RAS 18GFHP ES2 RAS 24GFHP ES2 6 2 RAS 18GFP ES2 RAS 24GFP ES2 7 OPERATION DESCRIPTION 7 1 Outline of Air Conditioner Control 7 2 Description of Operation Circuit 7 3 Hi POWER Mode 7 4 High Tem...

Page 3: ... RAS 18GAH ES2 RAS 18GA ES2 11 EXPLODED VIEWS AND PARTS LIST 11 1 Indoor Unit E Parts Assy 11 2 Indoor Unit 11 3 Outdoor Unit RAS 24GAH ES2 11 4 Outdoor Unit RAS 18GAH ES2 11 5 Outdoor Unit RAS 24GA ES2 11 6 Outdoor Unit RAS 18GA ES2 This air conditioner is charged with HFC R 410A that does not deplete the Ozone layer This air conditioner requires special service tools for the refrigerant R 410A F...

Page 4: ...id side size mm 6 35 Interconnection Connection type Flare connection pipe Maximum length m 15 1 One way 20 2 25 2 Maximum height m 8 10 difference INDOOR UNIT RAS 18GFHP ES2 RAS 18GFP ES2 RAS 24GFHP ES2 RAS 24GFP ES2 Width mm 1093 Dimensions Height mm 633 Depth mm 208 Net weight kg 23 Evaporator type Finned tube Indoor fan type Multi blade fan High fan m3 h 800 800 800 900 930 900 Air volume Medi...

Page 5: ...AS 24GFHP ES2 RAS 24GAH ES2 RAS 18GFP ES2 RAS 18GA ES2 RAS 24GFP ES2 RAS 24GA ES2 1 No need to charge 15m or less 15m or less refrigerant 2 Need to charge Over 15m up to 20m 20g m Over 15m up to 25m 30g m refrigerant Temperature Condition JIS B615 1 Cooling Heating Indoor unit inlet air temperature DB 27 C 20 C WB 19 C 15 C Outdoor unit inlet air temperature DB 35 C 7 C WB 24 C 6 C ...

Page 6: ...t system For stud bolt 8 10 For stud bolt 6 Grille air inlet Back Body Installation plate Mount plate M10 Suspention bolt Wireless remote control Knock out system 200 Min 1093 1015 742 450 20 20 330 165 7 4 70 Min 633 460 57 18 160 633 208 1093 UNDER CEILING CONSOLE INSTALLATION ...

Page 7: ... 28 321 86 A 124 109 600 or more Air out let 321 600 Air inlet 4xØ11 Long holes For Ø8 Ø10 anchor bolt Gas side Flare Ø 12 7 Liquid side Flare Ø 6 35 90 600 90 69 342 321 Z 50 36 R15 B Detail Drawing Front leg Ø 436 FAN GUARD 715 290 275 600 or more 84 129 5 4 Electrical part cover 321 307 100 or more 100 or more Installation dimension 2 2 Outdoor Unit 24 Class FILE NO SVM 06021 6 ...

Page 8: ...d side Flare 6 35 Ø Ø Gas side Flare 12 7 Service port 4x 11 Long holes For 8 10 anchor bolt Installation dimension Air outlel 100 or more 100 or more 600 or more 600 or more Air intlel Ø Ø Ø Ø6 hole 86 Ø6 hole Ø11x14 hole R15 28 A 321 R5 5 36 109 124 50 129 84 5 4 600 321 90 600 90 275 290 550 Ø 436 Z R15 50 36 2 321 342 69 Ø Ø Ø 2 3 Outdoor Unit 18 Class FILE NO SVM 06021 7 ...

Page 9: ...U BLU BLU BLU BLU BLU WHI LOUVER MOT OR C15 R405 C501 R Y401 L01 MAIN PCB R Y501 CR502 DC12V DC5V CR501 IC03 R506 CN10 BLK BLK BLK CN03 THERMO SENSOR TA C01 R01 DB01 C02 POWER SUPPLY CIRCUIT R22 F01 T6 3A BLK CN30 CN31 CN23 FOR FLOA T SWITCH OPTION GRN YEL FOR DRAIN PUMP OPTION BR W GR Y BLK RED RED WHI WHI FAN MOTOR PUR BLU GR Y YEL When you use float switch you should cut J401 CN402 CN401 CN1 1 ...

Page 10: ...N07 CN13 BLU BLU BLU BLU BLU BLU BLU BLU BLU WHI LOUVER MOT OR C15 R405 C501 R Y401 L01 MAIN PCB R Y501 CR502 DC12V DC5V CR501 IC03 R506 CN10 BLK BLK BLK CN03 THERMO SENSOR TA C01 R01 DB01 C02 SWITCH PCB MCC 865B POWER SUPPLY CIRCUIT R22 F01 T6 3A BLK CN30 CN31 CN23 FOR FLOA T SWITCH OPTION GRN YEL FOR DRAIN PUMP OPTION BR W GR Y BLK RED RED WHI WHI FAN MOTOR PUR BLU GR Y YEL When you use float sw...

Page 11: ...N30 CN27 CN31 FOR FLOAT S WITCH OPTION GR N YE L FOR DR AIN PUMP OPTION BR W GR Y BLK R E D R E D WHI WHI FAN MOTOR PUR BLU GR Y YE L CN402 CN401 CN11 WHI R E D FUS E 250VAC R 21 CR 02 R Y04 MCC 865A CR 401 2 1 1 1 2 3 2 1 1 3 3 3 1 2 3 6 5 4 6 5 4 3 2 1 3 2 1 1 2 3 1 2 3 4 5 6 4 5 6 7 8 9 7 8 9 10 10 CN25 INFR AR E D R AYS R E CE IVE AND INDICATION PAR TS 1 2 3 1 2 3 4 5 6 4 5 6 7 8 9 7 8 9 10 10...

Page 12: ...50V AC R21 CR02 R Y04 MCC 865A CR401 2 1 1 1 2 3 2 1 1 3 3 3 1 2 3 6 5 4 6 5 4 3 2 1 3 2 1 1 2 3 1 2 3 4 5 6 4 5 6 7 8 9 7 8 9 10 10 CN25 INFRARED RA YS RECEIVE AND INDICA TION P AR TS 1 2 3 1 2 3 4 5 6 4 5 6 7 8 9 7 8 9 10 10 5 3 5 3 1 1 1 1 1 1 2 2 CN100 WHI GR Y GR Y CN101 1 1 2 2 3 3 1 2 3 3 3 6 6 3 3 2 2 1 1 BLK BLK CN01 HEA T EXCHANGER SENSOR TC 1 1 2 2 COLOR IDENTIFICA TION BR W BROWN RED R...

Page 13: ...TF AC 220 240V for 4 way valve 6 Thermo sensor TE TD 10kΩ at 25 C 50kΩ at 25 C 7 Magnetic contactor CLK 35J 220 240V 50Hz 8 Transformer TT 05 220 240V 9 Microcontroller TMP47C840N 10 Varistor R73 R74 15G471K 470V 11 Fuse F01 TSCR T6 3A 250V 12 No Parts name Type Specifications 1 Fan motor for indoor AFP 220 50 4A Output Rated 50W 220 240V 2 Thermo sensor TA sensor 10kΩ at 25 C 3 DC DC transformer ...

Page 14: ...er TT 05 220 240V 9 Microcomputer TMP47C840N No Parts name Type Specifications 10 Varistor R73 R74 15G471K 470V 11 Fuse F01 TSCR T6 3A 250V 4 4 Indoor Unit RAS 24GFP ES2 RAS 18GFP ES2 No Parts name Type Specifications 1 Fan motor for indoor AFS 220 31 4A AC 200 240V 31W 2 Thermo sensor TA sensor 10 kΩ at 25 C 3 Micro Power Module M01 µRM1260V DC 390 V Secondary DC 12 V 4 Microcontroller TMP87CM40A...

Page 15: ... 4 Running capacitor RS44B506U0218S AC 440V 50µF for compressor 5 Magnetic contactor CLK 35J 220 240V 50Hz 4 6 Outdoor Unit RAS 18GA ES2 No Parts name Type Specifications Output Rated 1500W 2poles 1 phase 220 240V 50Hz 1 Compressor PA225X2CS 4KU1 Winding resistance Ω Red Black White Black at 20 C 1 54 2 48 Output Rated 42W 6poles 1 phase 220 240V 50Hz 2 Fan motor for outdoor WLF 240 42A 1 Winding ...

Page 16: ...load the high temperature limit control operation is included 50Hz Standard pressure P MPaG Surface temp of heat exchanger interchanging pipe T C Fan speed indoor Ambient temp conditions DB WB C Indoor Outdoor Evaporator Indoor unit Multi blade fan Cooling Heating Muffler 4 way valve Heating Cooling Compressor Condenser Propeller fan Outdoor unit Capillary tube 2 0x1200S P225X2CS 4KU1 Accumulator ...

Page 17: ...eed indoor Ambient temp conditions DB WB C Indoor Outdoor Standard pressure P MPaG Surface temp of heat exchanger interchanging pipe T C Indoor unit Multi blade fan Compressor Condenser Propeller fan Outdoor unit PA225X2CS 4KU1 O D 6 35 mm Packed valve 12 70 Packed valve T P Refrigerant R 410A 1 26 Kg Evaporator 0 49m Connecting pipe 6 35 mm Mark means check points of Gas Leak O D 12 70 mm 0 39m C...

Page 18: ... 19 35 24 Cooling Overload 4 02 12 1 High 32 23 43 26 Low temperature 2 1 0 3 Low 21 15 21 15 Standard pressure P MPaG Surface temp of heat exchanger interchanging pipe T1 C Fan speed indoor 50Hz Heat exchanger Indoor unit Cross flow fan Cooling Heating 4 way valve Heating Cooling Compressor Condenser Propeller fan Outdoor unit PA290X3CS 4MU1 Cooling Heating Mark means check points of Gas Leak O D...

Page 19: ...or Ambient temp conditions DB WB C Indoor Outdoor Standard pressure P MPaG Surface temp of heat exchanger interchanging pipe T C Evaporator Indoor unit Multi blade fan Compressor Condenser Tank Propeller fan Outdoor unit Capillary tube 2 0x900S PA290X3CS 4MU1 Cooling O D 6 35 mm Packed valve 12 70 Packed valve 6 35 0 49m Connecting pipe 6 35 mm T P Refrigerant R 410A 1 70 Kg Mark means check point...

Page 20: ...trol 3 minute Delay at Restart for Compressor Motor Revolution Control Processing Temperature Processing Timer Drain Pump ON OFF Serial Signal Communication Remote Control Infrared Rays 36 7 kHz 8 MHz M C U Indoor Unit Control Panel OPERATION Display Indoor Fan Motor Louver Motor Float Switch Drain Pump From Outdoor Unit Serial Signal Transmitter Receiver Operation Operation Remote Control Operati...

Page 21: ...ute Delay at Restart for Compressor Motor Revolution Control Processing Temperature Processing Timer Drain Pump ON OFF Compressor ON OFF Remote Control Infrared Rays 36 7 kHz 8 MHz M C U Indoor Unit Control Panel OPERATION Display Indoor Fan Motor Louver Motor Float Switch Drain Pump Power Supply Circuit Noise Filter Driver Operation Operation Remote Control Operation Mode Selection AUTO COOL DRY ...

Page 22: ... motor are mounted in the outdoor unit 660 The air conditioner is mainly controlled by the indoor 410 unit controller Model 830 The controller operates the indoor fan motor based upon commands transmitted by the remote control and tr RAS 18GFP Series ansf r ers the operation commands p to the outdoor unit controller m Air flo The outdoor unit controller receiv w v RAS 24GFP Series es oper olume m ...

Page 23: ... marked with 1 are calculated and controlled by the difference in motor speed between M and L 7 2 2 Cooling operation MODE button on the remote control is set to the cooling operation 1 The compressor 4 way valve outdoor fan and operation display on the remote control are controlled as shown in Fig 7 2 2 Fig 7 2 2 2 When FAN button is set to AUTO the indoor fan motor operates as shown in Fig 7 2 3...

Page 24: ... are controlled as shown in Fig 7 2 4 Fig 7 2 4 2 The microcontroller turns the compressor on and off at the regular intervals 4 to 6 minutes While the compressor is turning off the indoor fan motor operates in the SUPER LOW position The pattern of operation depending on the relation between room temperature and preset temperatures is shown in Fig 7 2 5 Fig 7 2 5 3 FAN button on the remote control...

Page 25: ...rature reaches a level at which another mode is selected 2 Temporary Auto When the TEMPORARY button on the indoor unit is pushed the preset temperature is fixed at 24 C and the indoor unit is controlled as shown in Fig 7 2 9 Fig 7 2 9 4 0 1 Room temp Preset temp C Cooling operation The louver moves to the position same as Hi POWER operation Cooling operation Fan only operation Heating operation RA...

Page 26: ...ure 7 3 Hi PO 2 Cooling operation The setting temperature drops 3 C The value of the setting temperature on the remote control does not change If the room temperature is higher than the setting temperature by 3 5 C or more the horizontal louver moves to the Hi POWER position automatically Then when the room temperature is 1 C less than the setting temperature the horizontal louver returns automati...

Page 27: ...5 min ofter operation C Zone If 2ºC Teo 10 C defrost will start when 7 6 2 Defrost finish condition 1 If Te 3 C at least 60 sec 4 way value on 2 If Te 8 C 4 way value on Timing Fig 7 6 2 Operation time 4 Loops Tt Td1 Td2 FILE NO SVM 06021 26 Teo Te 3 C at least 20 sec or 60 min after operation Td3 Td4 Finish time record Start time record Defrost time rate Td Tt x 100 Heating time rate Tt Td x Tt ...

Page 28: ... not set if the power is off Push the TEMPORARY button located in the center of the front panel continuously for three seconds The unit receives the signal and beeps three times The unit then restarts operating automatically in the event of power supply being accidentally shut down When the unit is on standby Not operating When the unit is in operation Operation Motions Push TEMPORARY button for m...

Page 29: ...ton on the indoor unit Note If TEMPORARY button is pushed while the filter check lamp is not indicating the indoor unit will start the Automatic Operation When the unit is on standby Not operating Operation Motions Push TEMPORARY button for more The unit is on standby than three seconds The unit starts to operate The orange lamp is on After approx three seconds The unit beeps three times The lamp ...

Page 30: ...olor When AUTO RESET is ON or green color When AUTO RESTART is OFF Hold down the TEMPORARY button for more than 20 seconds The air conditioner will stop suddenly when the TEMPORARY button is pressed but keep holding it continue Then will beep 3 times is the first 3 seconds but it is not related to Self Cleaning function After holding about 20 seconds the air conditioner will beep 5 times and OPERA...

Page 31: ...apacity 7 11 1 Cooling mode The fan speed of indoor unit operates automatically it relates with the compressor s operation Compressor s Operation Fan Speed ON L OFF SL The preset temperature will increase 1 C after the Comfort sleep mode has operated for 1 hour and automatically the temperature will increase another 1 C after the comfort sleep mode has operated for 2 hour The value of the preset t...

Page 32: ... are also required Accordingly special tools are required for the new refrigerant R 410A as shown below For connecting pipes use new and clean piping materials with high pressure withstand capabilities designed for R 410A only and ensure that water or dust does not enter Moreover do not use any existing piping as its pressure withstand may be insufficient and may contain impurities New Refrigerant...

Page 33: ...properly earthed Appliance shall be installed in accordance with national wiring regulations If you detect any damage do not install the unit Contact your TOSHIBA dealer immediately CAUTION Exposure of unit to water or other moisture before installation could result in electric shock Do not store it in a wet basement or expose to rain or water After unpacking the unit examine it carefully for poss...

Page 34: ...sting polyethylene foam Console Installation 6 Bio enzyme Gingko filter 7 Sasa zeolite Air filter 5 Filter frame 2 Wireless remote control 4 Remote control holder 9 Pan head wood screw 200 mm or more 8 Mounting screw Hook 70 mm or more 200 mm or more 1 Installation plate 3 3 3 3 3 Batteries Cover 2 2 2 2 2 Wireless remote control Vitamin C filter 100 mm or more 600 mm or more 100 mm or more 600 mm...

Page 35: ...ipe insulating material polyethylene foam 6 mm thick Putty PVC tapes Air inlet Air outlet Drain outlet 600 mm 90 mm 124 mm 109 mm 28 mm 86 mm 116 mm 321 mm 2 5 Æ Secure the outdoor unit with fixing bolts and nuts if the unit is likely to be exposed to a strong wind Use 8 mm or 10 mm anchor bolts and nuts If it is necessary to drain the defrost water attach drain nipple 10 to the bottom plate of th...

Page 36: ...x 2 Remote control holder x 1 Part name Q ty Filter frame x 2 Bio enzyme Gingko filter x 1 Sasa zeolite Vitamin C filter x 1 Mounting screw 4 x 25 s x 8 Part No 5 6 7 8 Part name Q ty Pan head wood screw 3 1 x 16 s x 2 Drain nipple x 1 Packaged with the outdoor unit Flexible pipe x 1 Pipe shield x 1 Part No 9 Others Owner s manual Installation manual ...

Page 37: ...gerant from being charged each port diameter has been changed Charge hose In order to increase pressure withstand strength hose materials and port size have been changed to 1 2 UNF 20 threads per inch When purchasing a charge hose be sure to confirm the port size Electronic balance As pressure is high and gasification speed is fast for refrigerant charging it is difficult to read the indicated val...

Page 38: ...ch as a curtain that may block the signal from the indoor unit Do not install the remote control in a place exposed to direct sunlight or close to a heating source such as a stove Keep the remote control at least 1 m apart from the nearest TV set or stereo equipment This is necessary to prevent image disturbances or noise interference The location of the remote control should be determined as show...

Page 39: ...ove the Panel arms from the Front panel Fig 8 4 4 1 1 2 2 5 3 3 8 4 3 After installation Install the Air inlet grille 1 Insert the three Panel arms on the Air inlet grille and fix each securely by screws Fig 8 4 5 CAUTION The screws that fixed with Panel arms must not be loose 2 Set the Air inlet grille arm to the axis of the Front panel 3 Insert the Grille stopper to the correct position and fix ...

Page 40: ...sion bolts into the metal fittings of the indoor unit 3 Set to nuts spring washers and washers on both sides of the metal fittings and then move the indoor unit backward 4 Secure it with the M10 Nuts 4pcs 5 Attach the Side covers to the unit Fig 8 4 9 Condition for installation The unit must not decline more than 15 mm in either axis Fig 8 4 10 240 mm or more 235 mm or more 15 mm 15 mm 140 330 101...

Page 41: ...hose installation The piping direction can be 4 ways as illustrated The Drain hose is only one way Fig 8 4 11 How to install the Drain hose 1 Remove the two screws and the Drain band 2 Cut a slit for the drain hose hole Fig 8 4 12 3 Place the Drain hose on the U shape space and secure it with the Drain band and two screws Fig 8 4 13 Rear piping hole 80 Ceiling Wall Ceiling 175 mm or more 140 mm Sl...

Page 42: ...l Insert clip anchors for appropriate Mounting screws 8 NOTE Secure four corners and lower parts of the Installation plate 1 with 6 to 8 mounting screws to install it 390 mm or more 375 mm or more Rear piping hole 80 Floor REMOCON INSTALL A C B F 140 633 320 160 742 1093 60 Projection 15 mm or less 8 8 8 8 8 Mounting screw 4 x 25 s s s s s Clip anchor local parts 5 mm dia hole Anchor bolt Install ...

Page 43: ...5 1 Remove the Terminal cover and the Cord clamp 2 Insert the connecting cable into the pipe hole on the wall 3 Insert the connecting cable fully into the Terminal block and secure it tightly with the screw Tightening torque 1 2 N m 0 12kgf m 4 Fix the connecting cable by the Cord clamp with two screws 5 Fix the Terminal cover Stripping length of the connecting cable Fig 8 4 26 NOTE Use strand wir...

Page 44: ...0 3 When connecting the Extension drain hose insulate the connecting part of Extension drain hose with the Pipe shield Fig 8 4 31 CAUTION Arrange the drain pipe for proper drainage from the unit Improper drainage can result in dew dropping Provided by customer Extension drain hose Inside the room Drain hose Pipe Shield 8 4 7 Pipe shield for flare nut connection Joints in liquid and gas pipes of th...

Page 45: ...ION 1 Install the outdoor unit without anything blocking the air discharging 2 When the outdoor unit is installed in a place always exposed to strong wind like a coast or on a high storey of a building secure the normal fan operation using a duct or a wind shield 3 Especially in windy area install the unit to prevent the admission of wind 4 Installation in the following places may result in troubl...

Page 46: ...ecurely tighten the caps on the packed valves Fig 8 5 6 Tightening connection Align the centers of the connecting pipes and tighten the flare nut as far as possible with your fingers Then tighten the nut with a spanner and torque wrench as shown in the figure CAUTION Do not apply excess torque otherwise the nut may crack depending on the conditions Tightening torque of flare pipe connections The o...

Page 47: ...e 6 35 mm Service port 4 mm Same as Gas side Pipe side A Tightening torque 50 to 62 N m 5 0 to 6 2 kgf m 16 to 18 N m 1 6 to 1 8 kgf m 9 to 10 N m 0 9 to 1 0 kgf m No need to charge refrigerant Need to charge refrigerant 15 m or less Over 15 m up to 20 m 20g m 15 m or less Over 15 m up to 25 m 20g m A Hexagonal wrench is required Stripping length of connecting cable Fig 8 5 9 CAUTION Wrong wiring ...

Page 48: ...etting the selector switch 2 Remove the Air inlet grille Refer to page 35 8 4 2 Fig 8 6 1 3 Select the terminal of selector switch from A position to B position Fig 8 6 2 REMOCON INSTALL A C B F 2 Set the remote control selector switch with the remote control B is indicated on the liquid crystal display when setting remote control selector switch to B A is not indicated on the display even if the ...

Page 49: ... beeper will make a short beep Fig 8 8 2 8 8 3 Auto restart setting This product is designed so that after a power failure it can restart automatically in the same operating mode as before the power failure Information The product was shipped with Auto Restart function in the off position Turn it on as required How to set the auto restart Press and hold the TEMPORARY button for about 3 seconds Aft...

Page 50: ... operation starts 6 The outdoor fan motor stops in the Heating operation 7 The compressor is not turned on even though the room temperature is in the range that the compressor is turned on 8 The operation mode changes in the Auto matic operation 9 The Fan only operation continues in the Automatic operation 10 The Hi POWER operation does not work No Operation of Air Conditioner Descriptions The OPE...

Page 51: ...mpressor is defective Symptom Check Primary judgement 9 3 Primary Judgement 9 3 1 Role of indoor unit controller The indoor unit controller receives the operation commands from the remote control and executes them Temperature measurement at the air outlet of the indoor heat exchanger by the indoor temperature sensor Temperature setting of the indoor heat exchanger by the heat exchanger sensor Louv...

Page 52: ...s continuously 5 times per 1 sec 2 Press TIMER 8 button If there is no fault with a code the indoor unit will beep once Pi and the display of the remote control will change as follows Check the unit with all 35 check codes 00 to 22 as shown in Table 9 4 1 Press TIMER 9 button to change the check code backwards If there is a fault the indoor unit will beep for 10 seconds Pi Pi Pi Note the check cod...

Page 53: ... errors The lamp on the indoor unit blinks when error is defected The lamp on the indoor unit blinks when error is defected The lamp on the indoor unit blinks when error is defected And it returns to the normal condition when recovering from errors The lamp on the indoor unit blinks when error is defected The lamp on the indoor unit blinks when error is detected 1 Check the indoor thermo sensor TA...

Page 54: ...ES NO YES NO YES NO Does four way valve operate properly Is TC sensor resistance value 10kΩ at 25 C normal Does coil terminal have 220 240 V in heating operation Are circuit wires normal Is outdoor P C board normal Four way valve is defective Outdoor P C board is defective Replace Four way valve Circuit check modification Replace TC sensor YES NO YES NO YES YES NO NO YES NO Indoor P C board is def...

Page 55: ...erload Check compressor Outdoor P C board is defective Replace compressor Wiring check modification Replace P C board YES NO YES NO YES NO YES NO YES NO YES NO YES NO NO YES Connect connector properly Replace condenser Replace fan motor Is connector connected properly Is condenser normal Is indoor fan motor normal Does indoor fan operate Are filters clogged Is TC sensor resistance value 10kΩ at 25...

Page 56: ... TA sensor Replace P C board Connect CN03 properly Is TE sensor connector connected properly Is TE sensor resistance value 10 kΩ at 25 C normal Is CN01 TC sensor connector connected properly YES NO YES NO Is TC sensor resistance value 10 kΩ at 25 C normal Indoor P C board is defective Replace TC sensor Replace P C board Connect CN01 properly YES NO YES NO Indoor P C board is defective Replace TE s...

Page 57: ...ler such as discharge thermostat normal Is charged amount of refrigerant normal Is overload relay normal Is TD sensor resistance value 50 kΩ at 25 C normal Are wires connected to connector properly Outdoor P C board is defective Connect wires to connector properly Check and modify charged amount of refrigerant Unit operates normally Replace TD sensor Replace P C board YES NO Replace TD sensor Repl...

Page 58: ...as remote controller Select switch to remocon A B for correct same as remote controller Remote control is defective Refer to 9 9 Troubleshooting for Remote Control Unit operates normally Is fuse F01 of indoor control board blown Parts R21 R22 SG01 C15 C01 DB01 C02 and T01 are defective Does the fan motor connector between 1and 3 short circuit Is voltage DC 12V or 5V indicated on rear of indoor con...

Page 59: ...ted connecting Does the cross flow fan rotate normally Is the rotation signal DC 5V 0V output between 3 Brown lead wire and 2 Gray lead wire of the motor connector CN11 when rotating the cross flow fan by hand in no operating status 3 pulses one turn Turn on the power supply Repair the bearing of the fan NO YES YES NO NO YES YES YES NO Turn the power supply Shut off the power supply once NO NO Doe...

Page 60: ...on Is it possible to detect AC 220 240V between 2 and 3 on terminal block Are all of compressor cords normal Is compressor motor winding normal Check winding resistor Is capacitor for compressor normal Is overload relay normal Does compressor start Does compressor stop after a while Is gas quantity normal Check gas pressure Compressor is defective NO YES YES YES Replace P C board Gas shortage Gas ...

Page 61: ...ng normal Check winding resistor NO Compressor is defective YES Replace compressor Is capacitor for compressor normal NO Capacitor is defective Is it possible to detect AC 200V between 2 and 3 on terminal block Is crossover cable normal YES Is overload relay normal Does compressor start Does compressor stop after a while Is gas quantity normal Check gas pressure Compressor is defective Replace P C...

Page 62: ... 61 Inspection procedure Heating model Replace transformer FILE NO SVM 06021 AC 70 100V outdoor P C board ...

Page 63: ... compressor motor winding normal Check winding resistor Is gas quantity normal Check gas pressure Is capacitor for compressor normal Is overload relay normal Does compressor start Does compressor stop after a while Replace compressor Compressor is defective Compressor is defective NO Capacitor is defective NO Overload relay is defective NO Compressor is defective NO Gas shortage Gas leak FILE NO S...

Page 64: ...o restart the unit 2 1 3 Terminal block on indoor side Terminal block Tester Red White 2 The outdoor unit stops once it would not operate until the power is turned on again 3 The outdoor unit stops between 10 minutes to 1 hour after starting and a check code is indicated on the remote control Check code 03 1E Refer to Table 9 4 1 Measure gas pressure Gas shortage Pipe clogging Compressor is turned...

Page 65: ...ndoor fan motor drive circuit and control circuit C P U and peripheral circuits buzzer drive circuit and buzzer b Infrared rays parts Infrared rays receiving circuit Check the defects of the P C board with Table 9 8 1 Check whenther or not the fuse F01 is blown Check power supply voltage 1 Between TP3 and TP4 of CN30 and CN31 220 240V AC 2 Between and of C02 DC310 340V 3 Between 12V and GND 4 Betw...

Page 66: ...sor operates 2 Check whether or not the OPERATION lamp blinks 1 Check it is impossible to detect the voltage between 2 and 3 of the CN11 2 The motor does not operate But it is possible to receive the signal from the remote control 2 The motor rotates but vibrates strongly 1 The temperature of the indoor heat exchanger is extremely high 2 The connector of the heat ex changer sensor short circuited ...

Page 67: ...FILE NO SVM 06021 66 9 8 4 P C board layout Top View Bottom View ...

Page 68: ...s indoor unit beep and operate Remote control is defective Does indoor unit start to operate by automatic restart function Does radio sound is affected by remote control when a signal is transmitted at distance of 5 cm from radio P C board is defective Keep indoor unit away from thyristor fluorescent light Avoid direct sunlight Replace P C board Replace batteries Normal operation Replace remote co...

Page 69: ...r from the axis of the Front panel After that remove the Air inlet grille 6 Remove the Panel arms from the Front panel How to install the Air inlet grille 1 Insert three Panel arms on the Air inlet grille and fix each securely by screws 2 Set the Air inlet grille arm to the axis of the Front panel Refer to page 34 8 4 3 3 Insert the Grille stopper to the correct position and fix it securely with s...

Page 70: ...through the Front panel Remove the Drain band from the Front panel Cut away the Opening base for piping from Front panel and keep parts 3 Open 3 Cap screws and remove the screws 4 Remove 5 screws fixing the Front panel 5 Remove the hooks of the Panel LED nearly side from the Drain pan Front panel Continue Drain band Drain panel Cap screws Front Panel Screws ...

Page 71: ...t 3 Fix 5 hooks around the Front panel with conformation the Guide rib is inserting into the Back body 4 Fix 8 screws and close 3 Cap screws 5 Install the Drain band into the Front panel 6 Check the gap between the Front panel and the Back body 3 How to remove the Drain pan 1 Remove the Air inlet grille and the Front panel 1 2 2 Remove the Louver motor from the Drain pan 3 Remove the shaft of Hori...

Page 72: ... Remove the Electrical parts assembly NOTE When install the electrical parts assembly fix the screw after the Back body is fixed 5 How to remove the Refrigeration assembly 1 Remove the Air inlet grille the Front panel and the Drain pan assembly 1 2 3 2 Stop the gas at the Outdoor unit 3 Remove 2 pipes from the Refrigeration assembly 4 Remove the TC sensor from holder 5 Remove the pipe holder 6 Rem...

Page 73: ...tor 1 Remove the Air inlet grille and the Front panel 1 2 2 Disconnect 2 connectors 3 Remove the Fan covers 4 Remove the Motor band with holding the Fan motor and then remove the Fan motor with the Multi blade fans 5 Unfasten the Set screw and remove the Multi blade fans Refrigeration assembly Multiblade fan and Fan motor Fan cover Motor band Motor 2 Connectors Multi blade fan 2 Screws ...

Page 74: ...erminal block and 1 ground screw on the electrical parts base 1 Common procedure No Part name Procedures Remarks Front cabinet Side cabinet 2 Remove the packed valve cover and the electrical parts cover 2 screws 4 x 10L 4 Remove the top cabinet 7 screws 4 x 10L Pulling out upward 5 Remove the top cabinet 2 screws 4 x 10L Pull the front right portion toward you and remove it pulling out upward Top ...

Page 75: ...mon procedure 1 2 Remove the fixing screw 2 screws 4 x 16L 3 Disconnect the lead wires from the terminal 1 Perform the common procedure 1 2 Remove the fixing screw 1 screws 4 x 10L 3 Disconnect the lead wires from the terminal 2 Running capacitor for compressor 3 Running capacitor for fan motor 4 Magnetic contactor 5 Spark killer Cooling only model Spark killer Running capacitor for compressor Run...

Page 76: ... 1 Perform the common procedure 1 2 Remove the fixing screw 2 screws 4 x 10L 3 Disconnect the lead wires from the terminal 1 Perform the common procedure 1 2 Remove the fixing screw 1 screw 4 x 10L 3 Disconnect the lead wires from the terminal 1 Common procedure 2 Running capacitor for compressor 3 Running capacitor for fan motor 4 Magnetic contactor 7 Spark killer No Part name Procedures Remarks ...

Page 77: ...4GFP ES2 406 43T50302 TEMPERATURE SENSOR 401 43T69562 PC BOARD FOR RAS 18GFHP ES2 407 43T69560 PC BOARD FOR RAS 24GFHP ES2 401 43T69563 PC BOARD FOR RAS 18GFP ES2 407 43T69561 PC BOARD FOR RAS 24GFP ES2 402 43T50004 SENSOR HEAT EXCHANGER 407 43T69562 PC BOARD FOR RAS 18GFHP ES2 403 43T60002 TERMINAL BLOCK 3P 407 43T69563 PC BOARD FOR RAS 18GFP ES2 404 43T62003 CORD CLAMP 408 43T08349 SWITCH COVER ...

Page 78: ...Y R 207 43T00433 CAP SCREW C 226 43T19327 BUSH BODY D 208 43T00434 CAP SCREW LR 227 43T82308 INSTALLATION PLATE 209 43T20303 FAN COVER 228 43T60314 TERMINAL COVER 210 43T20304 MOTOR BAND ASSY 229 43T62303 CONNECTOR COVER 211 43T20317 FAN ASSY MULTIBLADE FAN 230 43T83003 HOLDER REMOTE CONTROLLER 212 43T19309 SCREW SET D T 231 43T69421 WIRELESS REMOCO 213 43T21369 FAN MOTOR FOR RAS 18 24GFHP ES2 214...

Page 79: ...T60352 TERMINAL BLOCK 6P 10 43T46335 VALVE PACKED 12 7 DIA H4 35 43T19331 FIN GUARD 11 43T47331 BONNET 6 35 DIA 36 43T00456 UPPER FRONT CABINET A 12 43T47333 BONNET 12 70 DIA 37 43T00457 UPPER FRONT CABINET B 13 43T47013 CAPILLARY TUBE 2 0 DIA 38 43T71301 HANDLE 14 43T00468 FRONT CABINET 39 43T46337 4 WAY VALVE 15 43T00474 LEFT CABINET 40 43T46339 COIL V 4WAY AC220 240V 50Hz 16 43T00454 RIGHT CABI...

Page 80: ... AC220 240V50Hz 9 43T46332 VALVE PACKED 6 35 DIA 30 43T55340 MF CAPACITOR 10 43T46335 VALVE PACKED 12 7 DIA H4 31 43T55341 CAPACITOR PLASTIC FILM 11 43T47331 BONNET 6 35 DIA 32 43T60352 TERMINAL BLOCK 6P 12 43T47333 BONNET 12 70 DIA 34 43T61305 MAGNETIC RELAY BASE 13 43T47013 CAPILLARY TUBE 2 0 DIA 35 43T19331 FIN GUARD 14 43T00468 FRONT CABINET 39 43T46337 4 WAY VALVE 15 43T00473 LEFT CABINET 40 ...

Page 81: ... FIXING PLATE VALVE 27 43T62325 ELECTRIC PART COVER 9 43T46332 VALVE PACKED 6 35 DIA 28 43T61306 ELECTRIC PARTS BASE 10 43T46335 VALVE PACKED 12 7 DIA H4 29 43T52301 SWITCH MAGNET CLK 35J 11 43T47331 BONNET 6 35 DIA 30 43T55340 MF CAPACITOR 12 43T47333 BONNET 12 70 DIA 31 43T55341 CAPACITOR PLASTIC FILM 13 43T47013 CAPILLARY TUBE 2 0 DIA 32 43T60352 TERMINAL BLOCK 6P 14 43T00468 FRONT CABINET 33 4...

Page 82: ...CABINER ASSEMBLY 8 43T00448 FIXING PLATE VALVE 26 43T96305 BUSHING 9 43T46332 VALVE PACKED 6 35 DIA 27 43T62325 ELECTRIC PART COVER 10 43T46335 VALVE PACKED 12 7 DIA H4 28 43T61304 ELECTRIC PART BASE 11 43T47331 BONNET 6 35 DIA 29 43T52302 MAGNETICCONTACTOR AC220 240V50Hz 12 43T47333 BONNET 12 70 DIA 30 43T55340 MF CAPACITOR 13 43T47014 CAPILLARY TUBE 1 7DIA 31 43T55324 CAPACITOR PLASTIC FILM 14 4...

Page 83: ... 75 FILE NO SVM 03009 1 TOSHIBA CARRIER THAILAND CO LTD 144 9 MOO 5 BANGKADI INDUSTRIAL PARK TIVANON ROAD TAMBOL BANGKADI AMPHUR MUANG PATHUMTHANI 12000 THAILAND ...

Reviews: