8
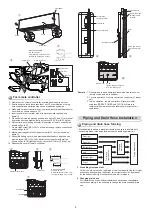
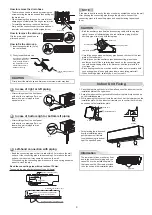
Piping and Drain Hose Installation
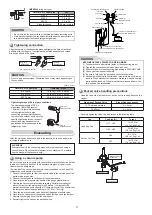
* Since dewing results in a machine trouble, make sure to insulate both
connecting pipes. (Use polyethylene foam as insulating material.)
Piping and drain hose forming
1. Die-cutting front panel slit
Cut out the slit on the left or right side of the front panel for the left or right
connection and the slit on the bottom left or right side of the front panel
for the bottom left or right connection with a pair of nippers.
Rear right
Rear left
Bottom left
Left
Bottom right
Right
Die-cutting
front panel slit
Changing
drain hose
Piping preparation
2. Changing drain hose
For leftward connection, bottom-leftward connection and rearleftward
connection’s piping, it is necessary to change the drain hose and drain
cap.
1. Remove cover of remote controller by sliding down and take it out.
2. If batteries are exist, please take them out. The combination of using
wire controller and batteries may cause of batteries explosion.
3. Make hole for insert control wire by use screwdriver break the plastic for
cover hole as shown on
fi
gure
4
.
4. Insert control wire from rear side of remote controller as shown on
fi
gure
5
.
5. Fix control wire which arrange as shown on
fi
gure
6
and
7
to terminal
by provided screws (tighten
fi
rmly but not over 0.25 N·m (0.03 kgf·m)).
6. Set control wire through gutter way at rear side of remote controller as
shown on
fi
gure
8
.
7. Fix provided screw (Ø3.1×16L) on the wall to hang remote controller as
shown on
fi
gure
9
.
8. Mark and arrange hole for
fi
x below screw (Ø3.1×25L) as shown on
fi
gure
9
.
9. Assembly battery cover which provided with accessory bag then use
provide screw (Ø3.1×25L) to
fi
x battery cover together with wall as
shown on
fi
gure
!
(tighten
fi
rmly but not over 0.15 N·m (0.02 kgf·m)).
10. Reassembly cover of remote controller.
For remote controller
*
Remark
: 1. Recommend to use double insulation lead wire for connect
remote control and air conditioner.
2. For wire operation, 1 remote control can control only 1 indoor
unit.
3. In wire operation, remote controller will return to initial
condition (PRESET, TIMER and CLOCK will return to
initial condition) when user shutdown power supply of air
conditioner.
2
3
* Wire size 28-22AWG
or 0.08-0.32 mm
2
Outer diameter not over 4.7 mm,
control wire length 30 m. or less.
70 mm
5 mm
Terminal
Control wire
Notch for wire out
Control wire
Display unit
1
Screw
Screw cap
Screw
Front panel
1.5V
1.5V
1.5V
1.5V
4
5
Plastic for cover hole
Control wire
6
7
Control wire
Terminal
* Wire size 28-22AWG
or 0.08-0.32 mm
2
Outer diameter not over 4.7 mm,
control wire length 30 m. or less.
30 mm
20 mm
Control wire
Hole for hang
remote controller
Remote controller
Control wire
Screw (Ø3.1×16L)
for hang remote
controller
Wall
Screw (Ø3.1×25L)
for
fi
x battery cover
Remote controller
8
9
!
Battery cover Screw
Tighten
fi
rmly but not over
0.15 N·m (0.02 kgf·m)
5 mm
Summary of Contents for RAS-18J2AVSG-E
Page 20: ......
Page 40: ......
Page 60: ......
Page 80: ......
Page 100: ......
Page 120: ......
Page 140: ......
Page 160: ......
Page 199: ......
Page 219: ......
Page 239: ...18 ...
Page 259: ......
Page 298: ...18 ...
Page 318: ......
Page 338: ......
Page 358: ......
Page 378: ......
Page 398: ......
Page 418: ......
Page 438: ......
Page 458: ......
Page 478: ......


