– 98 –
10-6-3. Attaching the Moving Panel
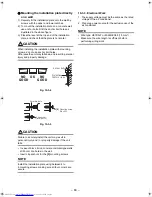
1) Grasp both sides of the moving panel, and insert
the right-side joint first.
Fig. 10-6-8
2) Insert the left-side joint, raise the panel stopper
upwards, and secure with the screw.
Fig. 10-6-9
3) Insert the top edge of the lead wire cover into the
front panel, and secure with a screw.
Fig. 10-6-10
10-6-4. Removing the Vertical Air Flow Louver
CAUTION
The horizontal air flow louvres cannot be released
from the vertical air flow louver.
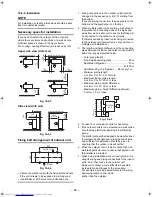
1) Open the moving panel, and support it with the
panel support.
2) Open the vertical air flow louver.
3) Insert a flathead screwdriver into the gap of the
louver fixture on the right and left ends of the
vertical air flow louver, and turn in the
counterclockwise direction to remove.
Fig. 10-6-11
4) After pushing in the right and left connector joints,
remove the vertical air flow louvres.
Push in the right-side joint first before pushing in the
left-side joint.
10-6-5. Attaching the Vertical Air Flow
Louvres
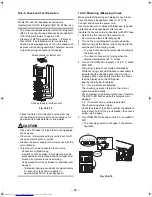
1) Attach the vertical air flow louvres by inserting the
connector joints in the order of left, right, and
centre.
2) Secure the horizontal air flow louvres to the
connector joints.
Fig. 10-6-12
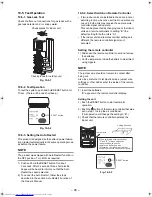
3) After pushing in the connector joints, align the
positions of the connector joints and connectors.
4) Push the louver fixture downwards to lock it into
place.
5) After attaching, move the louver fixture from side to
side to check that the connector joint does not come
off.
t
n
i
o
j
e
d
i
s
-t
h
g
i
R
t
n
i
o
j
e
d
i
s
-t
f
e
L
Panel stopper
Screw
Screw
Lead wire cover
Louver fixture
Horizontal air flow louvers
Air flow louver
Flathead screwdriver
Louver fixture
Horizontal air flow louvers
Air flow louver
Flathead screwdriver
Removing the louver fixture
(Left side)
Removing the louver fixture
(Right side)
Louver fixture
Connector joints
Connectors
Horizontal air flow louvers
Air flow louver
Louver fixture
Connector joints
Connectors
Horizontal air flow louvers
Air flow louver
+00A10-023_01EN.book Page 98 Wednesday, April 6, 2011 2:43 PM

