– 124 –
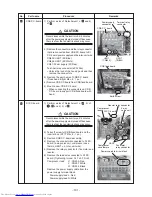
12-1-6. Heat Exchanger
1) Perform work of Detachment
12-1-1. Removing
the Front Panel and Moving Panel
and
12-1-2. Fixing Frame Assembly
.
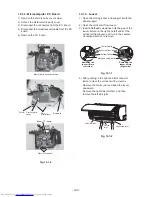
2) Remove the pipe holder at the rear of the unit.
3) Remove the two fixing screws (10 mm) at the left
of the heat exchanger.
4) Remove the fixing screw of the heat exchanger
fixing holder (upper).
5) Remove the fixing screw of the heat exchanger
fixing holder (lower).
6) Release the end plate hook and the claw at the
right of the heat exchanger, pull up the heat
exchanger, and then remove the fixing holder
(lower) from the guide of the indoor unit.
12-1-7. Fan Motor
1) Perform work of Detachment
12-1-1. Removing
the Front Panel and Moving Panel
and
12-1-3. Electric Parts Cover Detached.
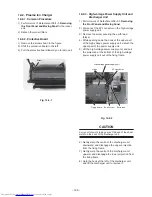
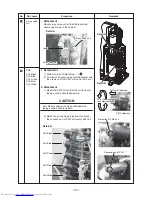
2) Loosen the hexagon socket set screw of the
cross flow fan from the air outlet.
3) Remove the two fixing screws of the motor band
(right).
4) Pull the motor band (right) and the fan motor out
of the unit.
Fig. 12-1-9
CAUTION
Check that the claw is engaged with the end plate
hook, and then secure the heat exchanger with screws.
Fig. 12-1-10
CAUTION
Install the fan motor while positioning it so that the
fan motor connector comes between the positioning
ribs on the motor band (right).
Be sure to tighten the hexagon socket set screw so
that it touches the D-cut surface of the fan motor shaft.
Pipe holder
Screw
(10 mm)
Heat exchangerfixing holder
(upper)
Heat exchangerfixing holder
(lower)
Hexagon socket set screw
Fixing screws
Motor band (right)
Motor band (right)
Motor connector
Positioning ribs


