background image

Toshiba XXXXXXX(<SanSerif1>X/X)

7

Outdoor Unit

Installation Manual

7

ELECTRICAL WORK

WARNING

• Be sure to comply with local regulations/codes when running the wire from 

the outdoor unit to the indoor unit.

(Size of wire and wiring method etc.) 

• A lack of electrical capacitance or incorrect wiring may cause an electric 

shock or a fire.

• To make sure that the wiring connection are secure, use designated 

cables.

Fix the cables securely so that no external force applied to the cables may 

effect the terminals.

• If wiring connections are incomplete or cables are not fixed securely, it may 

cause a fire.

• Be sure to ground the outdoor unit.

• Incomplete grounding may lead to an electric shock.

CAUTION

• Use a circuit breaker of a type that is not tripped by shock waves.

• Incorrect/incomplete wiring will cause electrical fires or smoke.

• Prepare the power source for exclusive use with the air conditioner.

• This product can be connected to the main power.

Fixed wire connections:

A switch that disconnects all poles and has a contact separation of at least 

3 mm must be incorporated into the fixed wiring.

„

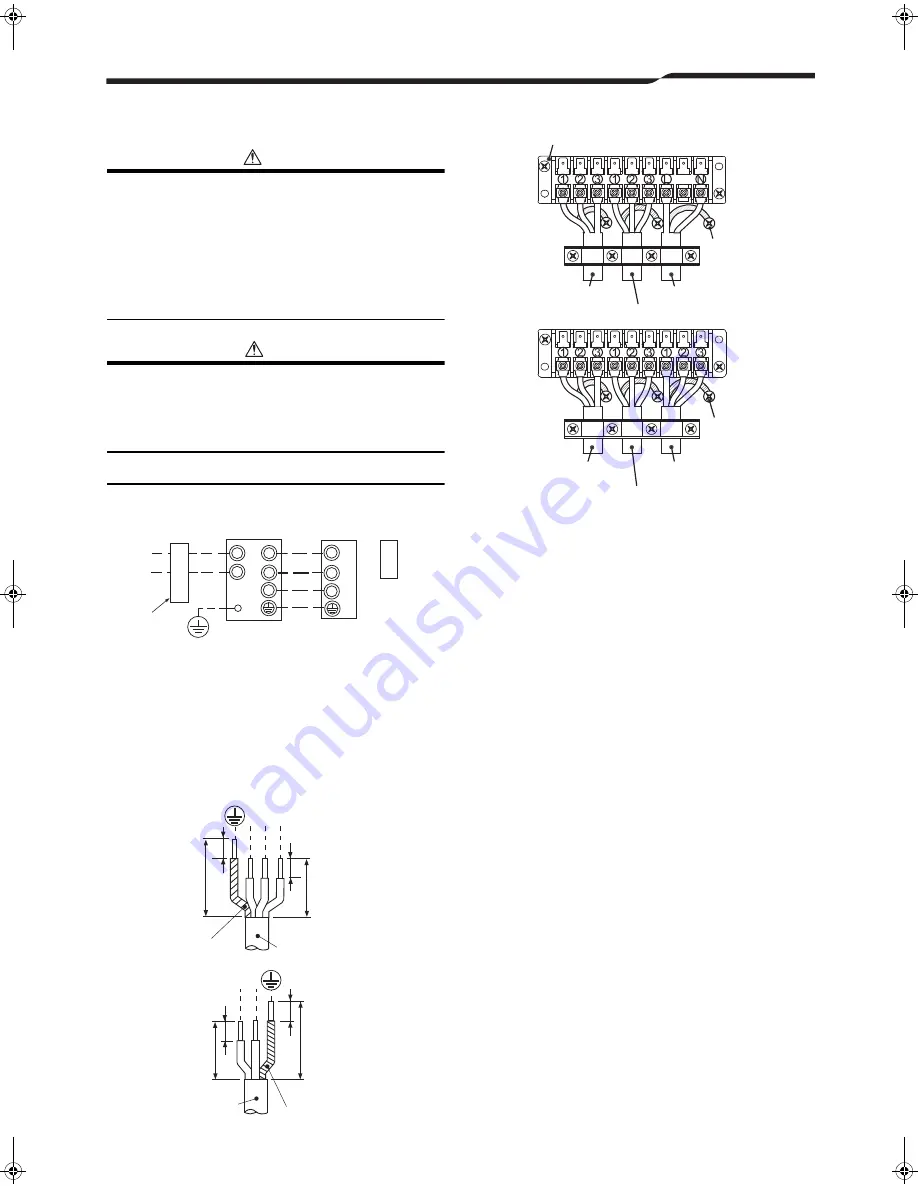
Wire Connection

• The dash lines show on-site wiring.

• Connect the indoor/outdoor connecting cables to the identical terminal 

numbers on the terminal block of each unit.

• Incorrect connection may cause a failure.
1. Detach the front panel from the outdoor unit.

2. Remove the cord clamp.

3. Connect the wires for the power source and each indoor unit.

• Connect the connecting cable to the terminal as identified by the matching 

numbers on the terminal block of the indoor and the outdoor unit.

4. Fix the wiring connections for the power source and each indoor unit 

securely using a cord clamp.

5. Attach the front panel to the outdoor unit.

8

GROUNDING

This air conditioner must be grounded without fail.

• Grounding is necessary not only to safeguard against the possibility of 

receiving an electric shock but also to absorb both static, which is generated 
by high frequencies and held in the surface of the outdoor unit, and noise 
since the air conditioner incorporates a frequency conversion device (called 
an inverter) in the outdoor unit.

• If the air conditioner is not grounded, users may receive an electric shock if 

they touch the surface of the outdoor unit and that unit is charged with static.

1

2

L

N

3

1

2

3

Input power

(Main circuit)

(Indoor/outdoor 

connecting wires)

Remote 

controller

Indoor unit

Earth

Leakage 

breaker

30

30

10

L N

10

1 2 3

10

10

40

40

Earth line

Connecting cable

Power cord

Earth line

Stripping Length of connecting cable for outdoor unit

Terminal block (Connecting cable)

Screw

Connecting cable (A unit)

Power cord

Connecting cable (B unit)

Screw

Connecting cable (C unit)

Connecting cable (E unit)

Connecting cable (D unit)

+00EG44206701_01EN.book  Page 7  Tuesday, July 20, 2010  9:32 PM

Summary of Contents for RAS-5M34UAV-E1

Page 1: ...Model name RAS 5M34UAV E1 Installation Manual Installation Manual Outdoor Unit 2 English For OUTDOOR USE only Manuel du proprietaire Unité hydroélectrique 16 Français Betriebsanleitung Wassergerät 30 Deutsch Installation Manual Outdoor Unit English ...

Page 2: ...ONE LAYER R410A refrigerant is apt to be affected by impurities such as water oxidizing membranes and oils because the pressure of R410A refrigerant is approx 1 6 times of refrigerant R22 As well as the adoption of this new refrigerant refrigerating machine oil has also been changed Therefore during installation work be sure that water dust former refrigerant or refrigerating machine oil does not ...

Page 3: ...sed it may cause overpressure and result in compressor damage At the same time if there is a leak in the connection part it may cause air suction and overpressure resulting in burst or injury The following must be certainly done during pump down Do not incorporate air into the refrigeration cycle Close the 2 service valves Stop the compressor and remove the refrigerant pipe If the refrigerant pipe...

Page 4: ...me DAISEIKAI 5 DFS 1 DFS 2 class abbreviation 10 13 16 18 10 13 16 18 07 10 13 16 22 24 10 13 16 10 13 16 10 13 18 Model name RAS M10PKVP E RAS M13PKVP E RAS M16PKVP E RAS M18PKVP E RAS M10PKVP ND RAS M13PKVP ND RAS M16PKVP ND RAS M18PKVP ND RAS M07SKV E RAS M10SKV E RAS M13SKV E RAS M16SKV E RAS M22SKV E RAS M24SKV E RAS M10GDV E RAS M13GDV E RAS M16GDV E RAS M10SMUV E RAS M13SMUV E RAS M16SMUV E...

Page 5: ...e Water from the Outdoor Unit Install 5 waterproof rubber caps and the drain nipple to drain off the water from the outdoor unit Seal the knock out holes and screw thread areas tightly using a silicon adhesive or a caulking compound Use a drain pan to apply a centralized drain Installation in Regions with Snowfall and Cold Temperatures Do not use waterproof rubber caps or a drain nipple If you nee...

Page 6: ... in then tighten the nut If you find air is not taken in make sure that the charge hose is connected to the port s securely Perform extraction for about 40 minutes and make sure that the compound pressure gauge reading is 101kPa 76cmHg If the compound pressure gauge reading is not 101kPa 76cmHg there is a possibility air is being taken in from the port s Make sure that the charge hose is connected...

Page 7: ...Leak Inspection Perform a gas leak inspection for the flare nut connections valve stem connection and service port cap without fail Use a leak detector exclusively manufactured for R410A Performing Additional Installation of an Indoor Unit 1 Collect refrigerant from the outdoor unit 2 Turn off the circuit breaker 3 Perform additional installation referring to the procedure from Refrigerant Piping ...

Page 8: ...ion may cause a failure 1 Detach the front panel from the outdoor unit 2 Remove the cord clamp 3 Connect the wires for the power source and each indoor unit Connect the connecting cable to the terminal as identified by the matching numbers on the terminal block of the indoor and the outdoor unit 4 Fix the wiring connections for the power source and each indoor unit securely using a cord clamp 5 At...

Page 9: ...ed to the other units When you start running the indoor unit or change the operation mode the unit starts running after 3 minutes This is due to the protection function of the unit not a malfunction When the external temperature becomes low the pre heating of the compressor starts to protect it Keep the circuit breaker on for use The electricity consumption during pre heating is about 100W If the ...

Page 10: ...EG44206701 ...

Reviews: