– 108 –
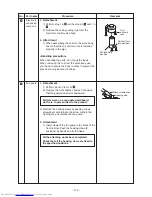
12-3. Outdoor Unit
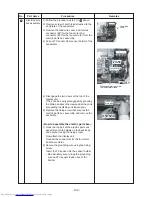
Insert the bent part
into the rear panel
of the inverter
Bring into contact
against these parts
How to mount the water-proof cover
Align the stitch line
with the top edge
of the front cabinet
Bend downward, and align
with the inside surface
of the front cabinet
Upper cabinet
Water proof cover
Valve cover
No.
1
Part name
Common
procedure
Procedure
1. Detachment
NOTE
Wear gloves for this job.
Otherwise, you may injure your
hands on the parts, etc.
1) Stop operation of the air conditioner,
and turn off the main switch of the
breaker for air conditioner.
2) Remove the valve cover.
(ST1TØ4 × 8L
1 pc.)
• After removing screw, remove the
valve cover pulling it downward.
3) Remove wiring cover
(ST1TØ4 × 8L
2 pcs.), and then
remove connecting cable.
4) Remove the upper cabinet.
(ST1TØ4 × 8L
5 pcs.)
• After removing screws, remove the
upper cabinet pulling it upward.
2. Attachment
1) Attach the water-proof cover.
NOTE
The water-proof cover must be
attached without fail in order to
prevent rain water, etc. from
entering inside the indoor unit.
2) Attach the upper cabinet.
(ST1TØ4 × 8L
5 pcs.)
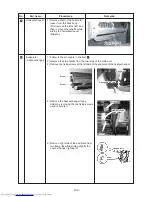
3) Perform cabling of connecting cable,
and attach the wiring cover.
• Place the wiring cover over the
opening used to work on the
connecting wires of the side
cabinet, and secure it using the two
fixing screws (ST1TØ4 × 8L
2 pcs.).
At this point, the top cushion of the
wiring cover must be on the inside
of the opening.
4) Attach the valve cover.
(ST1TØ4 × 8L
1 pc.)
• Insert the upper part into the square
hole of the side cabinet, set hook
claws of the valve cover to square
holes (at three positions) of the main
unit, and attach it pushing upward.
Remarks


