background image

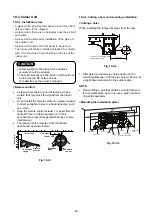
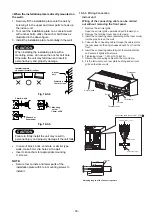
<In case of right or left piping>

After scribing slits of the back body with a knife or a

making-off pin, cut them with a pair of nippers or an

equivalent tool.

Fig. 10-3-1

1

<In case of bottom right or bottom left piping>

After scribing slits of the back body with a knife or

a making-off pin, cut them with a pair of nippers or

an equivalent tool.

NOTE

If the pipe is bent incorrectly, the indoor unit may

unstably be set on the wall.

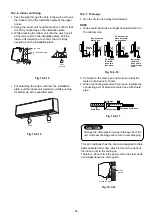
After passing the connecting pipe through the pipe

hole, connect the connecting pipe to the auxiliary pipes

and wrap the facing tape around them.

Fig. 10-3-1

2

CAUTION

Bind the auxiliary pipes (two) and connecting

cable with facing tape tightly. In case of leftward

piping and rear-leftward piping, bind the auxiliary

pipes (two) only with facing tape.

Carefully arrange pipes so that any pipe does not

stick out of the rear plate of the indoor unit.

Carefully connect the auxiliary pipes and

connecting pipes to each other and cut off the

insulating tape wound on the connecting pipe to

avoid double-taping at the joint, moreover, seal

the joint with the vinyl tape, etc.

Since dewing results in a machine trouble, make

sure to insulate both the connecting pipes. (Use

polyethylene foam as insulating material.)

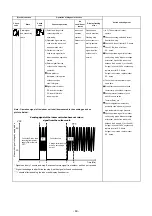
When bending a pipe, carefully do it, not to crush it.

Installation plate

Auxiliary pipes

Indoor unit

Connecting cable

Slit

Slit

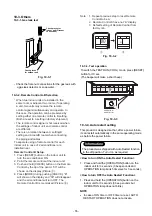
Bend the connecting pipe within a radius of 30 mm. 

To connect the pipe after installation of the unit (figure)

80

260 mm

210 mm


43 mm

Liquid side

Gas side

(To the forefront of 

fl

 are)

Outward form of indoor unit

R 30 mm (Use polisin (polyethylene)

core or the like for bending pipe.)

Use the handle of screwdriver, etc.


<

Left-hand connection with piping

>

Bend the connecting pipe so that it is laid within 43 

mm above the wall surface. If the connecting pipe 

is laid exceeding 43 mm above the wall surface, 

the indoor unit may unstably be set on the wall.

When bending the connecting pipe, make sure to 

use a spring bender so as not to crush the pipe.

Fig. 10-3-1

3

- 53 -

Summary of Contents for RAS-M05J2KVSG-E

Page 1: ...SERVICE MANUAL Revised on March 2020 R32 SPLIT TYPE RAS M05J2KVSG E RAS M05N4KVSG E FILE NO SVM 20014 2 ...

Page 2: ...IEWS 15 5 WIRING DIAGRAM 16 6 SPECIFICATIONS OF ELECTRICAL PARTS 17 7 REFRIGERANT CYCLE DIAGRAM 18 8 CONTROL BLOCK DIAGRAM 19 9 OPERATION DESCRIPTION 20 10 INSTALLATION PROCEDURE 46 11 HOW TO DIAGNOSE THE TROUBLE 56 12 HOW TO REPLACE THE MAIN PARTS 73 13 EXPLODED VIEWS AND PARTS LIST 79 2 ...

Page 3: ...prevent mixing of refrigerant or refrigerating machine oil the sizes of connecting sections of charging port on main unit and installation tools are different from those used for the conventional refrigerant units Accordingly special tools are required for the new refrigerant R32 units For connecting pipes use new and clean piping materials with high pressure fittings made for R32 only so that wat...

Page 4: ... IT MAY RESULT IN THE PIPE BURSTING AND POSSIBLE PER SONNEL INJURIES IN THE EVENT THAT THE REFRIGERANT GAS LEAKS OUT OF THE PIPE DURING THE SERVICE WORK AND THE INSTALLATION WORK IMMEDIATELY LET FRESH AIR INTO THE ROOM IF THE REFRIGERANT GAS IS HEATED SUCH AS BY FIRE GENERATION OF POISONOUS GAS MAY RESULT WARNING Never modify this unit by removing any of the safety guards or bypassing any of the s...

Page 5: ...lectric shock Do not store it in a wet basement or expose to rain or water After unpacking the unit examine it carefully for possible damage Do not install the unit at place where leakage of flammable gas may occur In case gas leaks and accumulates at surrounding of the unit it may cause of fire Do not install in a place that can increase the vibration of the unit Do not install in a place that can ...

Page 6: ...t model Dimension Height mm 1 Width mm 1 Depth mm 1 Net weight kg 1 Compressor Motor output W 1 Type Model 1 Fan motor output W 1 Air flow rate Cooling Heating m3 min 1 Piping Type Flare connection connection Indoor unit Liquid side mm 6 35 Gas side mm 9 52 Outdoor unit Liquid side mm Gas side mm Maximum length m Maximum charge less length m Maximum height difference m Refrigerant Name of refriger...

Page 7: ...ers in places where installation repairs or similar work on air conditioning equipment is performed 3 If a refrigeration gas leakage occurs during installation servicing be sure to ventilate fully If the refrigerant gas comes into contact with fire a poisonous gas may occur 4 When installing or removing an air conditioner do not allow air moisture dust or oil to remain in the refrigeration cycle O...

Page 8: ...s of socket joints Nominal diameter 1 4 3 8 1 2 5 8 Reference outer diameter of copper pipe jointed mm 6 35 9 52 12 70 15 88 Minimum joint thickness mm 0 50 0 60 0 70 0 80 3 2 2 Processing of Piping Materials When performing the refrigerant piping installation care should be taken to ensure that water or dust does not enter the pipe interior that no other oil than lubricating oils used in the inst...

Page 9: ...ype 0 to 0 5 0 to 0 5 0 to 0 5 0 to 0 5 Conventional flare tool Clutch type Wing nut type 1 0 to 1 5 1 5 to 2 0 1 0 to 1 5 1 5 to 2 0 1 0 to 1 5 2 0 to 2 5 1 0 to 1 5 2 0 to 2 5 Table 3 2 4 Dimensions related to flare processing for R22 Nominal diameter 1 4 3 8 1 2 5 8 Outer diameter mm 6 35 9 52 12 70 15 88 Thickness mm 0 8 0 8 0 8 1 0 A mm Flare tool for R22 clutch type 0 to 0 5 0 to 0 5 0 to 0 ...

Page 10: ...ning torque for R32 is the same as that for conventional R22 Incidentally when the torque is weak the gas leakage may occur When it is strong the flare nut may crack and may be made non removable When choosing the tighten ing torque comply with values designated by manufacturers Table 3 2 7 shows reference values NOTE When applying oil to the flare surface be sure to use oil designated by the manu...

Page 11: ...ifold Charge hose Vacuum pump adapter Electronic balance for refrigerant charging Leakage detector Usage Pipe flaring Flaring by conventional flare tool Connection of flare nut Evacuating refrigerant charge run check etc Vacuum evacuating Refrigerant charge Gas leakage check R32 R410A air water heat pump installation Existence of new equipment for R32 Yes Yes Yes Yes Yes Yes Yes Whether conven tio...

Page 12: ...er and the connecting port of the electronic balance and charge liquid refrigerant Indoor unit Outdoor unit Opened Opened Refrigerant cylinder with siphon Check valve Open close valve for charging Electronic balance for refrigerant charging Opened Closed Service port 3 4 Recharging of Refrigerant When it is necessary to recharge refrigerant charge the specified amount of new refrigerant according ...

Page 13: ...ler Phosphor bronze brazing filler is generally used to join copper or copper alloy 3 Low temperature brazing filler Low temperature brazing filler is generally called solder and is an alloy of tin and lead Since it is weak in adhesive strength do not use it for refrigerant pipes 1 Phosphor bronze brazing filler tends to react with sulfur and produce a fragile compound water solution which may cau...

Page 14: ... use a flux which does not contain chlorine 3 When adding water to the flux use water which does not contain chlorine e g distilled water or ion exchange water 4 Remove the flux after brazing 3 5 3 Brazing As brazing work requires sophisticated techniques experiences based upon a theoretical knowledge it must be performed by a person qualified In order to prevent the oxide film from occurring in t...

Page 15: ...ation plate hanger 131 131 140 131 120 24 Installation plate hanger Drain hose 0 4m Installation plate hanger Connecting pipe 0 35m Flare 9 52mm Connecting pipe 0 40m Flare 6 35mm Remote controller holder 149 63 17 5 57 Wireless remote controller 18 193 800 Knock out system 50 7 55 226 Air filter Air filter Air outlet 293 Heat exchanger Front panel Grille inlet 50 7 55 66 5 50 50 55 66 5 50 24 97 ...

Page 16: ...5 WIRING DIAGRAM YEL YELLOW BLK BLACK WHI WHITE COLOR RED RED INDICATION GREEN YELLOW GRN YEL 16 ...

Page 17: ...t Type 1 Fan Motor for indoor 2 Room temp sensor TA sensor 10kΩ at 25 C 3 Heat exchanger temp sensor TC sensor 10kΩ at 25 C 4 Heat exchanger temp sensor TCJ sensor 10kΩ at 25 C Parts name SJM 240 25 AC 220 240V 25W 24BYJ48 ST Output Rated 4 phase DC12V Louver motor 5 17 ...

Page 18: ...ide A Liquid side B RAS M05J2KVSG E RAS M05N4KVSG E 9 52 6 35 Indoor unit T1 Temp measurement INDOOR UNIT Indoor heat exchanger Cross flow fan Refrigerant pipe at gas side A Outer dia 6 35mm Thickness 0 8mm Sectional shape of heat insulator TC TA TCJ Refrigerant pipe at liquid side B To outdoor unit To outdoor unit 18 ...

Page 19: ... Signal Communication Functions M C U Indoor Unit Control Panel Power Supply Remote Control Heat Exchanger Sensor Temperature Sensor Infrared Rays Signal Receiver Infrared Rays Initiallizing Circuit Clock Frequency Oscillator Circuit Louver Motor 36 7KHz Power Supply Circuit Noise Filter Indoor Fan Motor Timer Display Operation Display Louver Driver Louver ON OFF Signal Serial Signal Communication...

Page 20: ... of operation command signal Serial signal from outdoor unit controller to indoor unit controller The following signals are sent from the outdoor unit controller The current operation mode The current compressor revolution Outdoor temperature Existence of protective circuit operation For transferring of these signals the indoor unit controller monitors the contents of signals and judges existence ...

Page 21: ...elf Cleaning function 29 7 Remote A or B selection 28 9 3 Auto Restart Function 9 3 1 How to Set the Auto Restart Function 34 9 3 2 How to Cancel the Auto Restart Function 35 9 3 3 Power Failure During Timer Operation 35 9 4 Remote Controller and Its Fuctions 9 4 1 Parts Name of Remote Controller 36 9 4 2 Operation of remote control 36 11 Hi POWER Mode 32 9 4 3 Name and Functions of Indications on...

Page 22: ...WER SEL ON timer setup OFF timer setup Hi POWER Indoor unit control Command signal generating function of indoor unit operation Calculation function temperature calculation Activation compensation function of indoor fan Cold draft preventive function Timer function Indoor heat exchanger release control Indoor fan motor Louver motor Outdoor unit Outdoor unit control Frequency control of inverter ou...

Page 23: ...ting the operation mode the fan speed is controlled by the previous operation mode 4 DRY operation DRY operation is performed according to the difference between room temperature and the setup temperature as shown below In DRY operation fan speed is controlled in order to prevent lowering of the room temperature and to avoid air flow from blowing directly to persons 1 Detects the room temperature ...

Page 24: ... in Fig 1 2 When setting the fan speed to AUTO on the remote controller revolution of the fan motor is controlled to the fan speed level shown in Fig 2 and Table 1 according to the setup tempera ture room temperature and heat exchanger temperature Fig 1 Fig 2 2 5 Ta C 2 0 1 5 1 0 0 5 Tsc a b c d e M WC 3 4 5 L W7 Air volume AUTO L L M M H W7 L M 2 WA M H 2 WD Indication Fan speed Fan speed setup C...

Page 25: ...f compressor motor winding Detection of motor speed and rotor position Inverter output change Commutation timing change Change of compressor speed Remote controller Indoor unit Ts Ta Correction value of Hz signal Operating Hz According to difference between the setup value of tempera 4 Release protective control by temperature of indoor heat exchanger In cooling dry operation Prevent freezing cont...

Page 26: ...he air direction of the indoor unit Description 2 Air directionadjustment The angle of the louver is indicated as the louver closes fully is 0 1 Louver position The position is automatically controlled according to the operation mode The set louver position is stored in memory by the microcomputer and the louver returns to the stored position when the next operation is performed The louver positio...

Page 27: ...Lower Limit Position 30o 5 o Swing range 35o SWING button during operation the louver starts swinging Upper Limit Position Lower Limit Position Fixed Position before start swing 17 5 o 17 5 o Swing range 35 o 4 HADA CARE Position Air flow upward to the ceiling provide indirect air flow to body and homogenize room temperature HADA care Louver position Initial setting of Cooling storage position Lou...

Page 28: ...where two indoor units have been installed in the same room or nearby rooms this operation prevents the remote controller signal from being received simultaneously by both units thus preventing both units from operating 3 Operation The indoor unit on which the remote controller selection has been set to B receives the signal of the remote controller also set to B At the factory the remote controll...

Page 29: ... prior to the reception of the stop code 3 After the Self Cleaning operation has been performed for the specified period the unit stops operating Unit now performing cooling or dry operation Press STOP button Only timer indicator lights and Self Cleaning operation starts Time set now elapses Operation stops function During Self Cleaning operations The louver opens slightly The indoor fan operates ...

Page 30: ...roller to confirm setting Note Table above will show current status of Self Cleaning function Set or Cancel Self Cleaning function by push the RESET button on air conditioner When setting is changed the sound warning will alarm Beep The setting is changed following below 8 1 2 Self Cleaning function release How to set cancel Self Cleaning function To set cancel the Self Cleaning function proceed a...

Page 31: ...ge every speed after setting ECO operation 3 The compressor speed is controlled as shown in the left figure The principles of comfort sleep mode are Remarks Comfort sleep mode will not operate in dry mode and fan only mode Quietness for more comfortable When room temperature reach setting temperature Save energy by changing room temperature automatically The air condition can shut down by itself a...

Page 32: ...controller does not change The indoor unit s fan speed level increase 1 tap 3 The Hi POWER mode can not be set in Dry operation 12 Display lamp brightness adjustment To decrease the display lamp brightness or turn it off Press and hold 1 FAN for 3 seconds until brightness level or is shown on remote control LCD then release the button 2 Pre Rise or Decrease to adjust brightness in 4 levels Remote ...

Page 33: ...eat min Hz 20 Quiet cool Hz 31 Quiet Heat Hz 31 button is The Quiet mode is canceled by pressed to select other speed Fireplace Operation Keep indoor unit s fan blowing continuously during thermo off to circulate heat from other sources over the room There are three setting parameters Default setting Fireplace 1 Fireplace 2 Fireplace 1 During thermo off period the indoor unit s fan will continue t...

Page 34: ...te controller to turn it on 9 3 Auto Restart Function This indoor unit is equipped with an automatic restarting function which allows the unit to restart operating with the set operating conditions in the event of a power supply being accidentally shut down The operation will resume without warning three minutes after power is restored This function is not set to work when shipped from the factory...

Page 35: ... to operate at this time press RESET button once more or use the remote controller to turn it on 9 3 2 How to Cancel the Auto Restart Function To cancel auto restart function proceed as follows Repeat the setting procedure the unit receives the signal and beeps three times The unit will be required to be turned on with the remote controller after the main power supply is turned off When the system...

Page 36: ...tton RESET Note The provided Remote Controller is a wireless type which also can be used as a wire Please see How to Connect The Remote Controller for Wired Operation located in installation instruction in case of wired control is required In wire operation remote controller will return to initial condition PRESET TIMER and CLOCK will return to initial condition when user shutdown power supply of ...

Page 37: ... PG 1 appears on the LCD Press to change the program number in the sequence program 1 to program 4 PG 1 PG 2 PG 3 4 PG 4 Press or to select the desired time The time can be set between 0 00 and 23 50 in 10 minute intervals Press and hold the button to change setting time for 1 hr Only one of ON or OFF timer can be set on each program ON timer display OFF timer display OFF timer is used to stop the...

Page 38: ...desired fan speed 8 Add operations if required 6 Press 7 Press Press to use 8 C operation Notes Fireplace cannot select and memorize in weekly function Press Press Press to use ECO operation to use Hi POWER operation to use Silent operation 9 Adding or editing the program The program can be set to perform on all the required days until is pressed to confirm the setting 10 If adding or editing a pr...

Page 39: ...r to be Resetting the operation 1 Press 2 Press press confirmed 3 Press to exit confirming mode Deactivating WEEKLY TIMER operation Press while WEEKLY is displayed on the LCD The WEEKLY indicator will disappear from the LCD However the program will remain in the remote control The TIMER lamp goes off To reactivate the WEEKLY TIMER operation again press again LCD shows the next program The program ...

Page 40: ...ll blink to delete the program 2 Press deleted 3 Press 4 Press Press while the LCD is blinking The program has now been deleted All programs The day of the week and the program number will be displayed 1 Press 2 Press and hold for 3 seconds All programs will be deleted and LCD displays current operation Notes Make sure the remote control receiving module on the air conditioner receives the signal ...

Page 41: ...r low speed programmed from factory 8 C Heating Operation 8 C Heat mode operation for keep room temperature 5 13 C with less of energy usage Fireplace and 8 C Heating Operation 8 C FIREPLACE 1 FIREPLACE 2 Normal operation Note While Fireplace operation on heating mode indoor unit fan always runs and cold air breezing might be occurred Fireplace and 8 C will operate in Heating mode only 4 COOLING H...

Page 42: ...MFORT SLEEP OPERATION For comfortable sleep automatically control air flow and automatically turn OFF Except in DRY mode 1 Press Select 1 3 5 or 9 hrs for OFF timer operation Note The cooling operation the set temperature will increase automatically 1 degree hour for 2 hours maximum 2 degrees increase For heating operation the set temperature will decrease 2 Press to cancel the comfort sleep opera...

Page 43: ...will have a tight sleep in nighttime By this feature the heating capacity will be optimized to deliver such silent experience The silent operation can be selected from one of two purposes Silent 1 and Silent 2 There are three setting parameters Standard level Silent 1 Silent 2 Silent 1 Though operating silently the Heating or Cooling capacity is still prioritized to ensure having sufficientcomfort...

Page 44: ...r the next same operation 12 PRESET OPERATION Set your preferred operation for future use The setting will be memorized by the unit for future operation except air flow direction 1 Select your preferred operation for 3 seconds to memorize the setting The P mark 2 Press and hold displays 3 Press Operate the preset operation 13 AIR FLOW DIRECTION 1 Press FIX Move the louver in the desired vertical d...

Page 45: ...he Hi POWER button to start and press it again to stop the operation 8 PRESET indicator Flashes for 3 seconds when the PRESET button is pressed during operation The mark is shown when holding down the button for more than 3 seconds while the mark is flashing Press another button to turn off the mark 9 POWER SEL 10 A B change indicator remote controller When the remote controller switching function...

Page 46: ...er 6 mm thick heat resisting polyethylene foam 1 3 Batteries 7 Flat head wood screw 4 Remote control holder Wireless remote control Shield pipe Attach to the front panel Air filter Hook Installation plate Hook 65 mm or more 300 mm or more 300 mm or more Make sure to run the drain hose sloped downward Do not allow the drain hose to get slack Cut the piping hole sloped slightly The provided Remote C...

Page 47: ... dust go out through the filter 2 If necessary to use water to clean simply use the plain water to wash the filter dry with the sunlight for 3 4 hours or until it completely dry Nevertheless use hair drier to dry it However washing with water it may reduce the performance of the filter 3 Replace every 2 years or sooner contact your dealer to purchase new filter P N RB A622DA Note Filter life depen...

Page 48: ...ort size have been changed to 1 2 UNF 20 threads per inch When purchasing a charge hose be sure to confirm the port size As pressure is high and gasification speed is fast it is difficult to read the indicated value by means of charging cylinder as air bubbles occur The size of opposite sides of flare nuts have been increased Incidentally a common wrench is used for nominal diameters 1 4 and 3 8 B...

Page 49: ...utting a hole and mounting installation Cutting a hole When installing the refrigerant pipes from the rear 1 After determining the pipe hole position on the mounting plate A drill the pipe hole 65 mm at a slight downward slant to the outdoor side NOTE When drilling a wall that contains a metal lath wire lath or metal plate be sure to use a pipe hole brim ring sold separately Mounting the installat...

Page 50: ...ase of block brick concrete or similar type walls make 5 mm dia holes in the wall Insert clip anchors for appropriate mounting screws Mounting screw 4mm x 25 s s s s s 6 6 10 3 3 Wiring Connection Indoor unit Wiring of the connecting cable can be carried out without removing the front panel Cord clamp Terminal cover Screw Screws Air inlet grille Front panel 3 Connecting cable connect to 1 2 3 Eart...

Page 51: ... hole for insert control wire by use screwdriver break the plastic for cover hole as shown on figure 4 4 Insert control wire from rear side of remote controller as shown on figure 5 5 Fix control wire which arrange as shown on figure 6 and 7 to terminal by provided screws tighten firmly but not over 0 25 N m 0 03 kgf m 6 Set control wire through gutter way at rear side of remote controller as show...

Page 52: ...m left or right connection with a pair of nippers 2 Changing drain hose For leftward connection bottom leftward connection and rear leftward connection s piping it is necessary to change the drain hose and drain cap How to remove the drain hose Fig 10 3 8 The drain hose can be removed by removing the screw securing the drain hose and then pulling out the drain hose When removing the drain hose be ...

Page 53: ...ry pipes and connecting pipes to each other and cut off the insulating tape wound on the connecting pipe to avoid double taping at the joint moreover seal the joint with the vinyl tape etc Since dewing results in a machine trouble make sure to insulate both the connecting pipes Use polyethylene foam as insulating material When bending a pipe carefully do it not to crush it Installation plate Auxil...

Page 54: ...ide Fig 10 3 16 2 Put water in the drain pan and make sure that the water is drained out of doors 3 When connecting extension drain hose insulate the connecting part of extension drain hose with shield pipe Fig 10 3 17 CAUTION Arrange the drain pipe for proper drainage from the unit Improper drainage can result in dew dropping This air conditioner has the structure designed to drain water collecte...

Page 55: ...setting Both are set to A setting in factory shipment The remote control signal is not received when the settings of indoor unit and remote control are different There is no relation between A setting B setting and A room B room when connecting the piping and cables To separate using of remote control for each indoor unit in case of 2 air conditioner are installed near Remote Control B Setup 1 Pre...

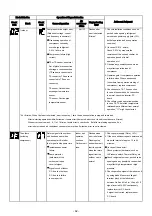
Page 56: ...g of compressor motor speed stops approx 30 seconds after operation started and then compressor motor speed increases again approx 30 seconds after In AUTO mode the operation mode is changed In HEAT mode the compressor motor speed does not increase up to the maxi mum speed or decreases before the temperature arrives at the set temperature Description The OPERATION lamp of the indoor unit flashes w...

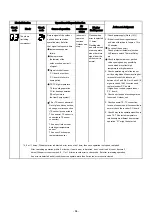
Page 57: ...em B and a part of item E occur concurrently priority is given to the block of item B 3 The check codes can be confirmed on the remote controller for servicing OPERATION Flashing display 1 Hz OPERATION TIMER Flashing display 5 Hz OPERATION Flashing display 5 Hz OPERATION TIMER White Flashing display 5 Hz OPERATION Flashing display 5 Hz Protective circuit operation for indoor P C board Protective c...

Page 58: ...dicatesthe in formation of the self diagnosison the display of the remote controller with the check codes If a fault isdetected all lampson the indoor unit will flash at 5Hz and it will beep for 10seconds Beep Beep Beep The timer lamp usually flashes 5Hz during self diagnosis is indicated on the display of the remote controller Press ON OFF button to change the check code backward 2 digits alphanu...

Page 59: ...tion Flashes when continues error is detected TA sensor The room temperature sensor is short Circuit or disconnection 1 Check the sensor TA and connection 2 In case of the sensor and its connection is normal check the P C board Operation Flashes when continues error is detected 1 Check the sensor TC and connection 2 In case of the sensor and its connection is normal check the P C board TC sensor T...

Page 60: ...ard outdoor unit open 4 The outdoor unit abnormal stop at circuit of signal some time Signal circuit of indoor If the other check codes are found P C board or outdoor concurrently check them together P C board is failure Check protector hardware such in some period as Hi Pressure switch Thermal Relay etc Check refrigerant amount or any possibility case which may caused high temperature or high pre...

Page 61: ...Flashes after Even if trying to operate again all inverter P C board error error is detected operations stop replace inverter 4 times P C board All OFF Flashes after error is detected 4 times 1 Check sensors TE TS connection In case of sensors and it s connection is normal check the inverter P C board 2 Check 4way valve operation position In case TE TS detected temperature relationship are differe...

Page 62: ... when including unit has been sent when operates error is detected compressor operation start But after continue Flashing stop that signal is stop some time Outdoor unit and outdoor unit Instantaneous power stop start to operate failure when the return Some protector signal from the hardware of the outdoor unit is outdoor unit open normal circuit of signal Signal circuit of indoor P C board or out...

Page 63: ...rror is detected 4 times 1 Check sensors TD 2 Check refrigerant amount 3 In case of P M V exists Check P M V by measure the resistance of the coil and confirm its operation sound of initial operation etc 4 Observe any possibility cause which may affect high temperature of compressor Compressor is high current All OFF Flashes after though operation Hz is error is detected decreased to minimum limit...

Page 64: ...ed error is count as 1 time then once operation is stop and re started After re starting operation within 6 minutes if same error is detected error count is add count become 2 times When error count comes 4 8 11 or 18 times record error to check code But after re starting operation if no error is detected and air conditioner can operate more than 6 minutes error count is cleared The others includi...

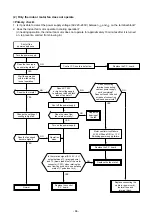
Page 65: ...linking NO YES NO NO YES YES Is it possible to turn on power supply by pressing button on remote control Does transmission mark on remote control flash normally and is its signal transmitted properly Remote control is defective Refer to 4 Remote Control Is fuse F01 of indoor control board blown Is voltage DC 12V or 5V indicated on rear of indoor control board normal Microcomputer is defective Repl...

Page 66: ...fan rotate Change the setting of cooling to high fan Operation stops Shut off the power supply Motor control circuit failure IC03 Q39 and D01 or 12 V Switching power supply failure Does the cross flow fan rotate normally Is the rotation signal DC 5 V 0 V output between 2 gray lead wire and 3 brown lead wire of the motor connector CN11 when rotating the cross flow fan by hand in no operating status...

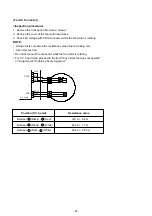
Page 67: ...ing coil Use a thin test rod 1 3 5 1 2 3 2 1 3 2 1 3 CN10 CN11 P C board WHI BLK RED BRW GRY YEL For AC fan motor Do not disconnect the connector while the fan motor is rotating For P C board side proceed to the item Only indoor fan does not operate of Judgment of Trouble by Every Symptom Resistance value Position P C board Between 3 Black 1 Red Between 3 Black 5 White Between 1 Red 5 White 120 6 ...

Page 68: ...g within 5 cm distance from the radio P C board is failure Replace P C board Is operation possible when the transmitter is moved nearer to the infrared signal receiver of the air conditioner Battery life Replace the batteries Dose the transmission indicator light Is there any beep and operation Normal Remote control is failure Replace remote control Push the button YES There is no beep from the in...

Page 69: ...oard hold the whole housing Do not pull at the lead wire 2 Inspection procedures 1 When a P C board is judged to be defective check for disconnection burning or discoloration of the copper foil pattern or this P C board 2 The P C board consists of the following 2 parts a Main P C board part DC power supply circuit Indoor fan motor control circuit CPU and peripheral circuits buzzer and Driving circ...

Page 70: ...ION TIMER HI POWER ECO Wi Fi are lit for 3 seconds and they return to normal 3 seconds later 1 Check whether or not the compressor operates 2 Check whether or not the OPERATION indicator flashes 1 Check whether or not the compressor operates 2 Check whether or not the OPERATION indicator flashes 1 Check it is impossible to detect the voltage AC120V or higher voltage between red and black 2 The mot...

Page 71: ...0 50 60 70 80 90 20 10 0 0 10 20 30 40 5 60 0 Resistance value k Temperature C TA TC TCJ 1 Sensor characteristic table 11 6 2 P C Board Layout TA Room temp sensor TC TCJ Heat exchanger temp sensor 5V 12V GND 71 ...

Page 72: ...emperature Sensor TA TC TCJ kΩ 10 C 20 C 25 C 30 C 40 C 20 7 12 6 10 0 7 9 4 5 5 4 3 2 1 White Yellow Yellow Yellow Yellow 5 4 3 2 1 Refer to 11 5 1 3 Measure the resistance value of each winding coil by using the tester Under normal temp 25 C Position 1 to 2 1 to 3 1 to 4 1 to 5 Resistance value 200Ω 7 Refer to 11 5 1 2 2 3 Remote controller Louver motor 24BYJ48 ST 4 Indoor fan motor at 25 C 72 ...

Page 73: ... ventilated 3 Do not bring welding equipment near flammable objects Flames from the equipment may cause the flammable objects to catch fire If keeping the power on is absolutely unavoidable while doing a job such as inspecting the cir cuitry wear rubber gloves to avoid contact with the live parts Electric shocks may be received if the live parts are touched High voltage circuits are contained insi...

Page 74: ...em 3 2 Remove screw holding the electric part cover 3 Disconnect the connectors for the fan motor and louver motor from P C board assembly 4 Remove the earth screw and earth line from evaporator 5 Pull out TC and TCJ sensor from sensor holder of the evaporator 6 Remove the 2 fixing screws that secures the electric parts box assembly unit display assembly and remove the electric parts box assembly ...

Page 75: ...ew Fan motor Body back Horizontal louver 6 1 Remove shaft of the horizontal louver from the back body First remove 2 the center shafts then remove the other shafts To re installation Check the type name of fan motor Keep connector position and arrange fan motor wires follow figure For SJM 240 25 4 5 Fan motor connector Fan motor wires Hexagon screw driver Vertical louver Cross flow fan Fan motor S...

Page 76: ...pan from the back body Louver motor connector P C board To re installation Press the drain pan into the back body Please make sure ribs of drain pan in left and right side must be install to lock position Press the center arm of drain pan to back body Connectors Electric part cover Screw Unit display Screw Louver motor connector Center arm of drain pan Back body Drain pan Back body Drain pan Rib o...

Page 77: ... the Cross flow fan is keep 3 5mm from closed wall of the main unit Holding the set screw install the cross flow fan so that flat area on shaft of the fan motor comes to the mounting hole of the set screw 4 Lift up the heat exchanger follow the figure Pull out the left hand side until the cross flow fan is released from the shaft of the fan motor and then pull out the lower side of heat exchanger ...

Page 78: ...otor cover then pull out the upper side of heat exchanger To re installation Put the evaporator hins seal on the body back before assembly the heat exchanger Please keep assembly heat exchanger follow figure as below Cross flow fan Heat exchanger Evaporator hins seal Please make sure that the hook of motor cover must be installed into the locking slot of heat exchanger Hook Heat exchanger Motor co...

Page 79: ...4 43T62360 210 43T21478 225 43T66403 211 43T21462 226 43T83305 212 43T20344 227 43T91305 213 43T39365 228 43T91395 214 43T22312 229 43T91396 MOTOR BAND BACK MOTOR BAND FRONT REFRIGERATION CYCLE ASSY EVAPORATOR HINS SEAL HOLDER SENSOR PIPE SHIELD INSTALLATION PLATE PIPE HOLDER TERMINAL COVER ASSY WIRELESS REMOCO HOLDER REMOTE CONTROL PACKING SLEEVE PACKING CUSHION RIGHT PACKING CUSHION LEFT 215 43T...

Page 80: ... 405 43T6W727 402 43T6V695 406 43T6W726 403 43T50392 407 43T60480 404 43T62340 TEMPERATURE SENSOR TERMINAL 3P SENSOR THERMOSTAT CORD CLAMP 408 43T50306 PC BOARD ASSY WRS LED PC BOARD ASSY HOUSING WiFi TEMPERATURE SENSOR Description Description 402 404 405 406 401 403 407 408 80 ...

Page 81: ...144 9 MOO 5 BANGKADI INDUSTRIAL PARK TIVANON ROAD TAMBOL BANGKADI AMPHUR MUANG PATHUMTHANI 12000 THAILAND ...

Reviews: