background image

– 21 –

7

Electrical work

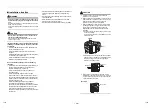
WARNING

WARNING

1.

Using the specified wires, ensure that the wires 
are connected, and fix wires securely so that the 
external tension to the wires does not affect the 
connecting part of the terminals. 

Incomplete connection or fixation may cause a fire, 
etc.

2.

Be sure to connect the earth wire. (Grounding 
work) 
Incomplete earthing may lead to electric shock. 

Do not connect earth wires to gas pipes, water pipes, 
lightning rods or earth wires for telephone wires.

3.

The appliance shall be installed in accordance 
with national wiring regulations. 

Capacity shortages of the power circuit or an 
incomplete installation may cause an electric shock 
or fire.

CAUTION

• An installation fuse must be used for the power supply 

line of this air conditioner.

• Incorrect / incomplete wiring may lead to an electrical 

fire or smoke.

• Prepare an exclusive power supply for the air 

conditioner.

• This product can be connected to the mains power.

Fixed wire connections:
A switch that disconnects all poles and has a contact 
separation of at least 3 mm must be incorporated in 
the fixed wiring.

• Be sure to use the cord clamps attached to the 

product.

• Do not damage or scratch the conductive core or inner 

insulator of the power and indoor/outdoor connecting 
wires when peeling them.

• Use the power and indoor/outdoor connecting wires 

with specified thicknesses, specified types and 
protective devices required. 

<GP56>

<GP80>

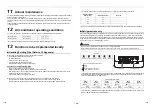
1. Remove the service panel, and the terminal cover.
2. A conduit pipe can be installed through the hole for 

wiring. If the hole size does not fit the wiring pipe to be 
used, drill the hole again to an appropriate size.

3. Be sure to clamp the power wires and indoor/outdoor 

connecting wires with a cord clamp along the 
connecting pipe so that the wires do not touch the 
compressor or discharge pipe. 
(The compressor and the discharge pipe become hot.)

Valve cover

Indoor/outdoor

connecting wires

Power wire

1. Remove valve cover screw.
2. Pull the valve cover downward to remove it.

Terminal cover

Service panel

Valve fixing plate

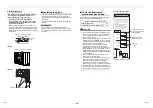
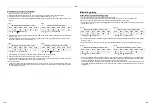
Wiring between indoor unit and outdoor unit

The dashed lines show on-site wiring.

Connect the indoor/outdoor connecting wires to the identical terminal numbers on the terminal block of each unit.
Incorrect connection may cause a failure.

Power and wiring specifications

Power wiring

• Decide nominal cross sectional area of conductor, depend on the field fuse rating.

* Wires must comply with design H07 RN-F or 60245 IEC 66 or applicable legislation.

Model

GP56

GP80

Power supply

220-240 V ~ 

50 Hz

Maximum running current

13.1 A

20.8 A

Recommended field fuse

16 A

25 A

Indoor / outdoor connecting wires

1.5 mm

2

 or more

2

1

3

2

1

3

Β

Α

N

L

Outdoor Unit

Indoor unit

Input power

220-240 V ~, 50 Hz

Leakage circuit breaker

Remote controller

41-EN

42-EN

Summary of Contents for RAV-GP561ATW-E

Page 1: ...Outdoor Unit Model name RAV GP561ATW E RAV GP801ATW E AIR CONDITIONER SPLIT TYPE Installation Manual R32 English For commercial use ...

Page 2: ... of the installer or user of the equipment to ensure by consultation with the distribution network operator if necessary that the equipment is connected only to a supply with a short circuit power Ssc greater than or equal to Ssc 1 Ssc 1 Ssc 1 kVA Model Single system Twin system RAV GP801ATW E 840 1500 Contents 1 Precautions for safety 4 2 Accessory parts 10 3 Installation of R32 refrigerant air c...

Page 3: ...quainted with the knowledge related to this work Qualified service person 1 The qualified service person is a person who installs repairs maintains relocates and removes the air conditioners made by Toshiba Carrier Air conditioning Europe Sp z o o He or she has been trained to install repair maintain relocate and remove the air conditioners made by Toshiba Carrier Air conditioning Europe Sp z o o ...

Page 4: ... case that refrigerant type is R32 this unit uses a flammable refrigerant If refrigerant leaks and comes in contact with fire or heating part it will create harmful gas and there is risk of fire Read the OWNER S MANUAL carefully before operation Service personnel are required to carefully read the OWNER S MANUAL and INSTALLATION MANUAL before operation Further information is available in the OWNER...

Page 5: ...r is set to ON by mistake WARNING Only a Qualified installer 1 or Qualified service person 1 is allowed to undertake work at heights using a stand of 50 cm or more Wear protective gloves and safety work clothing during installation servicing and removal Do not touch the aluminum fin of the outdoor unit You may injure yourself if you do so If the fin must be touched for some reason first put on pro...

Page 6: ...d the packing carton You may injure yourself if the bands should break Do not place any combustion appliance in a place where it is directly exposed to the wind of air conditioner otherwise it may cause imperfect combustion Do not install the air conditioner in a poorly ventilated space that is smaller than the minimum floor area Amin This applies to Indoor units without a refrigerant leakage sens...

Page 7: ...on manual and the stipulations in the local regulations and laws Install the circuit breaker where it can be easily accessed by the agent When installing the circuit breaker outdoors install one which is designed to be used outdoors Under no circumstances must the power cable be extended Connection trouble in the places where the cable is extended may give rise to smoking and or a fire Test run Be...

Page 8: ...a Qualified installer 1 or Qualified service person 1 is allowed to relocate the air conditioner It is dangerous for the air conditioner to be relocated by an unqualified individual since a fire electric shocks injury water leakage noise and or vibration may result When carrying out the reclaim work shut down the compressor before disconnecting the refrigerant pipe Disconnecting the refrigerant pi...

Page 9: ...ply by means of a switch with a contact separation of at least 3 mm Do not wash air conditioners with pressure washers Electric leaks may cause electric shocks or fires Precautions for recovery of refrigerant when servicing or relocating unit When removing refrigerant from a system either for servicing or decommissioning it is recommended good practice that all refrigerants are removed safely When...

Page 10: ...rs or compressor oils are to be removed ensure that they have been evacuated to an acceptable level to make certain that flammable refrigerant does not remain within the lubricant The evacuation process shall be carried out prior to returning the compressor to the suppliers Only electric heating to the compressor body shall be employed to accelerate this process When oil is drained from a system i...

Page 11: ...ing materials with high pressure fittings made for the R32 or R410A only so that water and or dust does not enter When using existing piping refer to 15 Appendix 1 Existing piping Required tools equipment and precautions for use Prepare the tools and equipment listed in the following table before starting the installation work Newly prepared tools and equipment must be used exclusively Symbol Conv...

Page 12: ...as Air purge To purge air use a vacuum pump Do not use refrigerant charged in the outdoor unit to purge air The air purge refrigerant is not contained in the outdoor unit Electrical wiring Be sure to fix the power wires and indoor outdoor connecting wires with clamps so that they do not come to contact with the piping sharp edges and the cabinet etc Earthing WARNING WARNING Make sure that proper e...

Page 13: ...ding inverter equipment private power generator medical equipment and communication equipment is used Installation in such a location may cause malfunction of the air conditioner abnormal control or problems due to noise from such equipment A location in which the discharged air of the outdoor unit blows against the window of a neighboring house A location where the operating noise of the outdoor ...

Page 14: ... there is an obstacle on the back side Front sides and top are free When there are obstacles on the back and top sides Front and sides are free When there is an obstacle on the front side Back sides and top are free When there are obstacles on the back and sides Front and top are free The height of the obstacle should be lower than that of the outdoor unit When there are obstacles on the front and...

Page 15: ...rt the bottom surface of the fixing leg that is in contact with and underneath the bottom plate of the outdoor unit 15 or less When water is to be drained through the drain hose attach the following drain nipple and waterproof rubber cap and use the drain hose Inner dia 16 mm sold on the market Also seal knockout hole and the screws securely with silicone material etc to prevent water from leaking...

Page 16: ... side panel Right side claws Left side claws Rear direction Pipe cover Side direction Down direction Front direction Supplied passage hole guard material Attach the guard material securely so that it does not come loose Supplied protective bush Optional installation parts Locally procured GP56 GP80 Refrigerant piping connection CAUTION Take note of these 4 important points below for piping work 1 ...

Page 17: ...tening torque On the other hand use a single crescent wrench to loosen or tighten the flare nut of the valve on the liquid side Unit N m GP56 CAUTION Do not put the crescent wrench on the cap The valve may break If applying excessive torque the nut may break according to some installation conditions Outer dia of copper pipe Tightening torque 6 4 mm 14 to 18 9 5 mm 33 to 42 12 7 mm 50 to 62 15 9 mm...

Page 18: ...t a nitrogen gas cylinder and pressurize the pipes with nitrogen gas as follows to conduct the airtight test Gas leak check Step 1 Pressurize to 0 5 MPa 5 kg cm2G for 5 minutes or longer Step 2 Pressurize to 1 5 MPa 15 kg cm2 G for 5 minutes or longer Step 3 Pressurize to 4 15 MPa 42 kg cm2 G for 24 hours Micro leaks can be discovered However note that when the ambient temperature differs during p...

Page 19: ...e valve Fully open the valves of the outdoor unit First fully open the valve on the liquid side and then fully open the valve on the gas side Do not open or close the valves when the ambient temperature is 20 C or less Doing so may damage the valve O rings and result in refrigerant leakage Liquid side Open the valve with hexagon wrench Gas side GP56 Service valve Open the valve with hexagon wrench...

Page 20: ...mm GP56 33 to 42 N m 3 3 to 4 2 kgf m Service valve Dia 15 9mm GP80 33 to 42 N m 3 3 to 4 2 kgf m Service valve Charge port 14 to 18 N m 1 4 to 1 8 kgf m Service valve To charge additional refrigerant Formula for calculating the amount of additional refrigerant Formula will differ depending on the diameter of the liquid connecting side pipe 1 to 3 are the lengths of the pipes shown in the figures ...

Page 21: ...re CAUTION 1 Stick the enclosed refrigerant label adjacent to the service ports for charging or recovering location and where possible adjacent to existing nameplates or product information label 2 Clearly write the charged refrigerant quantity on the refrigerant label using indelible ink Then place the included transparent protective sheet over the label to prevent the writing from rubbing off 3 ...

Page 22: ...wer and indoor outdoor connecting wires with specified thicknesses specified types and protective devices required GP56 GP80 1 Remove the service panel and the terminal cover 2 A conduit pipe can be installed through the hole for wiring If the hole size does not fit the wiring pipe to be used drill the hole again to an appropriate size 3 Be sure to clamp the power wires and indoor outdoor connecti...

Page 23: ... incomplete wiring may lead to an electrical fire or smoke Prepare a dedicated power supply for the air conditioner GP56 Stripping length power supply wire and indoor outdoor connecting wires Model Material Flame retardant grade Manufacturer T50R HSW Nylon 66 UL94V 2 Hellermann Tyton 1 2 3 L N Power supply wire Indoor outdoor connecting wires Screw Terminal block Cord clamp L N 1 2 3 40 30 30 40 1...

Page 24: ...nd drain pipe have been connected cover them with finishing tape and clamp them to the wall with off the shelf support brackets or their equivalent Keep the power wires and indoor outdoor connecting wires off the valve on the gas side or pipes that have no heat insulator 10 Test run Turn on the leakage circuit breaker at least 12 hours before starting a test run to protect the compressor during st...

Page 25: ...mp 15 C to 52 C Heating operation Wet bulb temp 27 C to 15 C The existing pipe must have a wall thickness equal to or larger than the following thicknesses Do not use any pipe with a wall thickness less than these thicknesses due to insufficient pressure capacity Refrigerant recovery When recovering the refrigerant in situations such as when relocating an indoor unit or outdoor unit the recovery o...

Page 26: ... step 5 is taken LED displays indicated when step 6 is taken D800 D801 D802 D803 D804 D805 D800 D801 D802 D803 D804 D805 Existing piping Steps taken to support existing piping 1 Set the circuit breaker to the ON position to turn on the power 2 Check that the LED displays are placed in their initial status If not place them in the initial status 3 Hold down SW01 for at least 5 seconds and check tha...

Page 27: ...lays indicated when step 3 is taken LED displays for existing piping settings D800 D801 D802 D803 D804 D805 D800 D801 D802 D803 D804 D805 LED displays indicated when step 2 is taken LED displays restored to factory defaults D800 D801 D802 D803 D804 D805 D800 D801 D802 D803 D804 D805 LED displays indicated when step 4 is taken D800 D801 D802 D803 D804 D805 Night operation Sound reduction The air co...

Page 28: ... There is no dust inside of the pipes 3 Tight There are no refrigerant leaks Restrictions for use of existing pipes In the following cases the existing pipes should not be reused as they are Clean the existing pipes or exchange them with new pipes 1 When a scratch or dent is heavy be sure to use new pipes for the refrigerant piping works 2 When the existing pipe thickness is thinner than the speci...

Page 29: ... opening the indoor or outdoor unit for a long time cure the pipes as follows Otherwise rust may be generated when moisture or foreign matter due to condensation enters the pipes The rust cannot be removed by cleaning and new pipes are necessary Placement location Term Curing manner Outdoors 1 month or more Pinching Less than 1 month Pinching or taping Indoors Every time Are there scratches or den...

Page 30: ... 2 66 60 71 6 75 4 52 2 68 61 63 6 85 4 58 Max 2 70 62 55 6 95 4 65 Total refrigerant quantity Floor standing unit Wall mounted unit Ceiling mounted unit h0 0 6 1 8 2 2 M kg Amin m 3HP 1 90 30 98 3 44 2 30 1 92 31 63 3 51 2 35 1 94 32 29 3 59 2 40 1 96 32 96 3 66 2 45 1 98 33 64 3 74 2 50 2 00 34 32 3 81 2 55 2 02 35 01 3 89 2 60 2 04 35 71 3 97 2 66 2 06 36 41 4 05 2 71 2 08 37 12 4 12 2 76 2 10 ...

Page 31: ... o ul Gdańska 131 62 200 Gniezno Poland TCF holder Toshiba Carrier Air conditioning Europe Sp z o o ul Gdańska 131 62 200 Gniezno Poland Hereby declares that the machinery described below Generic Denomination Air Conditioner Model type RAV GP561ATW E RAV GP801ATW E Commercial name Super Digital Inverter Series Air Conditioner Complies with the provisions of the Machinery Directive Directive 2006 4...

Page 32: ...ely Suffocation from leakage of R32 is almost non existent If a conditioner system is to be installed in a small room select a suitable model and installation procedure so that if the refrigerant accidentally leaks out its concentration does not reach the limit and in the event of an emergency measures can be made before injury can occur In a room where the concentration may exceed the limit creat...

Page 33: ...2H30050201 ...
Reviews: