– 21 –
9
Test run
Before test run
• Before turning on the power supply, carry out the following procedure.
1) By using tester (500 VM
Ω
), check that resistance of 1 M
Ω
or more exists between the terminal block 1 to
3 and the earth (grounding).
If resistance of less than 1 M
Ω
is detected, do not run the unit.
2) Check the valve of the outdoor unit being opened fully.
• To protect the compressor at activation time, leave power-ON for 12 hours or more before operating.
Execute a test run
Operate the unit with the remote controller as usual.
For the procedure of the operation, refer to the attached Owner’s Manual.
A forced test run can be executed in the following procedure even if the operation stops by thermostat-OFF.
In order to prevent a serial operation, the forced test run is released after 60 minutes have passed and returns to
the usual operation.
CAUTION
• Do not use the forced test run for cases other than the test run because it applies an excessive load to the devices.
• Be careful of fan operation when the circuit breaker is turned on. If the refrigerant leak detection sensor detects the
refrigerant leak, a fan automatically rotates even while an air conditioner stops. Be careful not to be injured by the fan.
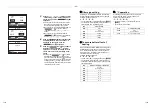
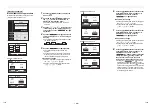
1
Push the [
MENU] button to display the
menu screen.
2
Push and hold the [
MENU] button and
the [
∨
] button at the same time to
display the “Field setting menu”.
Push and hold the buttons for more than 4
seconds.
3
Push the [
∧
] / [
∨
] button to select
“1. Test mode” on the “Field setting menu”
screen, then push the “
Set” [
F2] button.
Pushing the “
Yes” [
F1] button
sets the test mode and the screen returns to the
“Field setting menu” screen.
Push [
CANCEL] twice, the screen (2)
appears.
1.Test mode
2.Register service info.
3.Alarm history
4.Monitor function
5.Setting louver position
Field setting menu(1/2)
Return
Set
1.Test mode
2.Register service info.
3.Alarm history
4.Monitor function
5.Setting louver position
Field setting menu(1/2)
Return
Set
Set
Yes
Return
Test mode start.
No
Yes
Test mode
◆
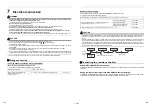
Measures when a check code “E18” appears at the time of simultaneous
(twin, triple, or double twin) connection
1
Reconnect the wires between indoor unit and indoor unit correctly.
2
Change each indoor unit into correct address.
• Change the address of each indoor unit into correct one according to “Manual address setup procedure” in
the previous page when the check code “E18” appears on the remote controller.
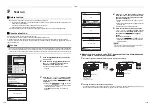
4
Push the [
ON / OFF] button to start the
test mode. The screen
(1)
shown in the left
appears. (The screen
(2)
appears when the
operation is stopped.)
Perform the test mode in the “Cool” or “Heat”
mode.
Temperature setting cannot be adjusted during
the test mode.
Check codes are displayed as usual.
5
When the test mode is finished, push the
[
∧
] / [
∨
] button to select “1. Test
mode” on the “Field setting menu” screen,
then push the “
Set” [
F2]
button.
The screen
(3)
appears.
Pushing the “
Yes” [
F1] button
stops the test mode screen and continues the
normal operation.
NOTE
The test mode stops after 60 minutes and the screen
returns to the normal / detailed display.
Test
(1)
Room A
12:00
Mode
Fan Speed
Cool
Set
Yes
Test
(2)
Room A
12:00
Return
Test mode stop.
No
Yes
Test mode
(3)
A
1
2
3
B
1
2
3
A
1
2
3
B
A
1
2
3
B
1
2
3
A
1
2
3
B
Incorrect connection
Indoor unit
Outdoor unit
Remote
controller
Correct connection
Indoor unit
Outdoor unit
Remote
controller
Disconnect the
connection
➂
-
➂
between indoor units.
41-EN
42-EN


