– 9 –
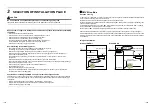
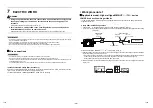
Installation space
• Make space for installation and service. (Make space to the electrical parts box cover side for service.)
• When installing the unit inside the ceiling, be sure to create a check port.
The check port is required when the unit is installed and serviced. (Check port: 450 × 450 or more)
• Keep a clearance of 20 mm or more between the top panel of the unit and the ceiling.
• The length of a connection pipe to the indoor unit should be 2 m to 10 m.
Installation space
55
200 or more
200 or more
RBM-PMV0901U-E
(When attached joint is used)
20 or mor
e
50
o
r m
ore
Box cover
Check port
450 × 450
119
200 or more
119
200 or more
RBM-PMV0361U-E, RBM-PMV0901U-E
500
o
r more
Unit (mm)
20 or mor
e
55
50
o
r m
or
e
50 or mo
re
4
INSTALLATION OF PMV KIT
WARNING
Install the unit securely in the place to sufficiently withstand the weight of the unit.
If the foundation is not sturdy enough, the unit may fall and cause personal injury.
Perform a specified installation work to guard against earthquake.
Improper installation may cause the unit to fall.
REQUIREMENT
To prevent damage on the PMV Kit or personal injury, follow the instructions below.
• Do not step, or put any heavy object on the packed PMV Kit.
• When carrying the PMV Kit, hold the two hanging brackets and be careful not to apply excessive force to
the refrigerant pipes.
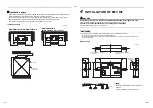
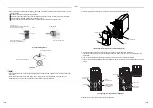
External view
36
76
30
76
226
161
55
58
55
30
26
Refrigerant pipe connecting port
(Liquid pipe)
INCORRECT
Refrigerant pipe connecting port
(Liquid pipe)
CORRECT
NOTE
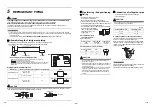
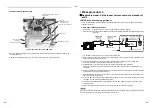
• Do not connect two indoor units or more to one
PMV Kit.
• Connect one PMV Kit to one indoor unit.
Connection cable
(accessory)
PMV Kit
PMV Kit
Indoor unit
Indoor unit
Unit (mm)
17-EN
18-EN

