background image

40

Recording

Programming a recording (REC MENU) (Continued)

Optional settings on REC MENU

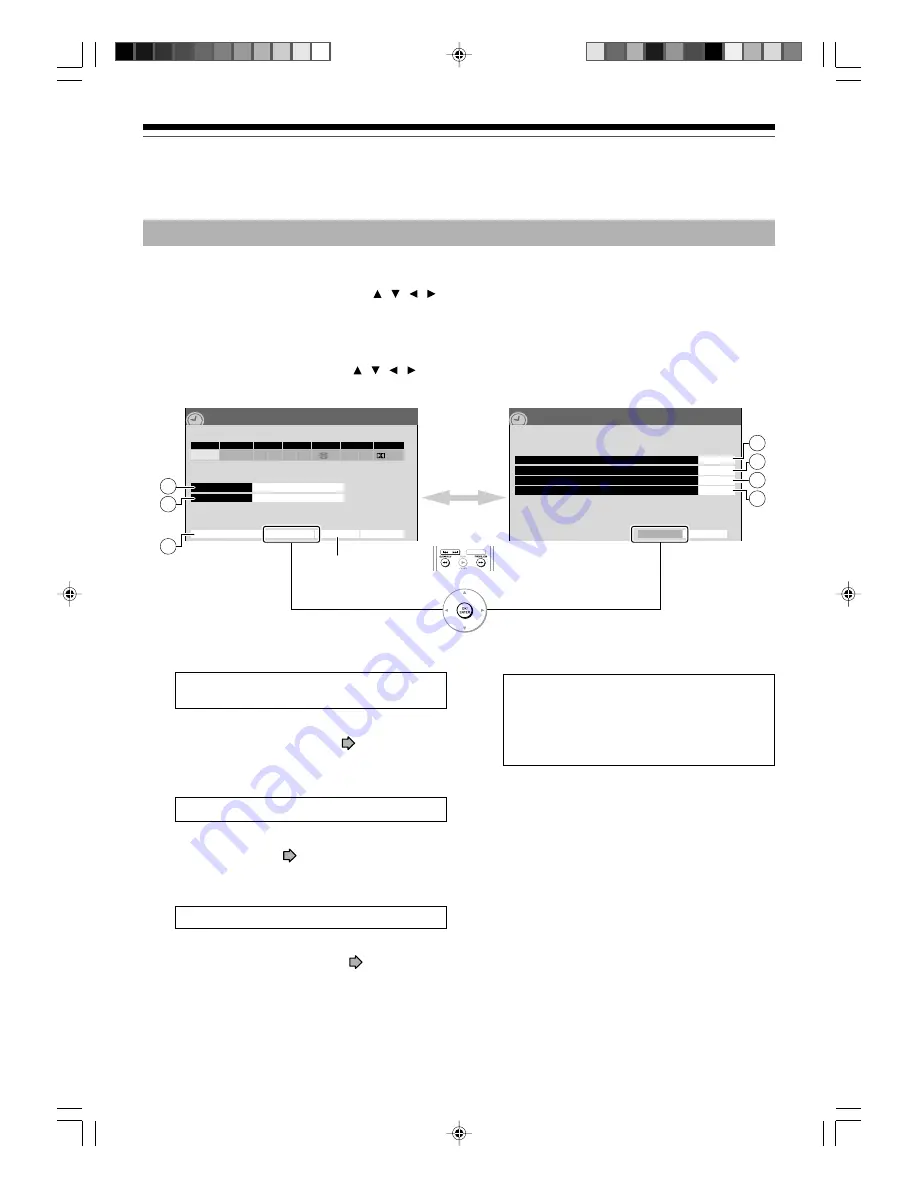
The following setting options are available for each timer programme. Follow steps 1) to 3).

1) Select a desired one (

1

 - 

7

) using   /   /   /  , then press OK/ENTER.

A sub menu (or keyboard) appears.

2) Make the setting.

Refer to the descriptions below.

3) Finally select “Set timer” using   /   /   /  , then press OK/ENTER.

The settings are saved.

4/23(Su)17:50

Basic

REC

MENU

Ch

Date

Rec folder

Rec time – h – – m/ HDD remaining (excluding above)    51h 24m

Genre

Start

End

Media

Pict.

Audio

1

SP

4.6

D/M1

10/30(Su)  7

00

 8

30

HDD

Edit title name

Advanced

Cancel

Set timer

ROOT

No genre

Maximum quality rate and space saving mode

Off

4:3

4/23(Su)17:50

Advanced

REC

MENU

Basic

Set timer

Picture ratio when recording DVD-Video

Auto chapter division when there is no sound

Off

Chapter division when DVD-Video 

Off

or

1
2

3

Switches by 
either way.

To cancel the current 
timer prrogramme.

6

5

7

4

1

Rec folder

To select a folder into which the programme is
saved.

Available folders appear. Select one from them.

For the folder function, see 

 page 58.

2

Genre

To select a genre of the programme.

Available genres appear. Select one from them.

For genres, see 

 page 132.

3

Edit title name

To enter a name of the timer programme.

A keyboard appears.

For keyboard operation, see 

 page 136.

4

Maximum quality rate and space saving mode

Use this feature when you want to save space
while using the best picture quality rate for
recording. This will use 9.2 Mbps for recording
and reduce the rate temporarily for the portion
where the high rate is not required where picture
is fairly constant.

Off: This feature is disabled and the normal

recording is performed.

On: This feature is enabled.

Notes

• When the audio quality is set to “L-PCM”, the picture

quality is set to “MN 8.0 (Mbps)”. When the audio
quality is set to any other selection, the picture
quality is set to “MN 9.2 (Mbps)”.

• “On” returns to “Off” if you change “Pict.” setting.
• The space used may not change, depending on the

picture contents.

 RD-85DT_Ope_E_p031-044

3/27/06, 19:40

40

Summary of Contents for RD-85DTSB

Page 1: ...ion Editing OPERATIONS Read INSTALLATION GUIDE first TOSHIBA HDD DVD VIDEO RECORDER RD 85DTSB Printed in China HDD DVD VIDEO RECORDER RD 85DTSB 2006 Toshiba Corporation DIGITAL VIDEO OWNER S MANUAL N PM0025461010 RD 85DT_Ope_E_p001 146 3 28 06 16 44 1 ...

Page 2: ...Playback Playing recorded contents CONTENT MENU 54 Playing at various speeds 56 Folder function 58 Creating folders 59 Moving into GARBAGE 60 Emptying GARBAGE 60 Moving a recorded title into a folder 61 Changing the order of folders 62 Removing a folder 62 Using LOCK 63 Playing a DVD video disc 64 Locating a title using the top menu 64 Other playback functions 66 Playing a TV programme currently b...

Page 3: ...ion settings 122 DVD player settings 123 Picture Audio settings 126 Display settings 128 Operational settings 129 DVD recorder operation 130 Management settings 132 Others Entering characters 136 Before calling service personnel 138 Output sound conversion table 140 Error codes on the display window 141 Recording duration 142 Language code list 143 Table of languages and their abbreviations 143 Sp...

Page 4: ...4 Introduction Introduction Caution for safety Read SAFETY PRECAUTIONS IMPORTANT SAFETY INSTRUCTIONS Precautions and others of the INSTALLATION GUIDE first RD 85DT_Ope_E_p002 013 3 27 06 19 39 4 ...

Page 5: ...n reduce these risks by using high quality DVD recordable discs and checking their playability from time to time If it becomes necessary to service your DVD recorder it may be necessary to delete some or all of the programs on the HDD Playback Restrictions This owner s manual explains the basic instructions for this recorder Some DVD video discs are produced in a manner that allows specific or lim...

Page 6: ...ecorded with another manufacture s equipment or PC contain a large number of titles or have little remaining capacity Also a DVD RAM disc may not be edited or recorded if its title contains still pictures DVD RAM discs formatted in UDF2 0 on a PC are not compatible with this recorder Before using these discs initialize them on this recorder Select a DVD RAM disc that shows a statement on its packa...

Page 7: ...it can be played on this recorder Recommended discs JVC 2X 4X PROTECT On DVD R discs Standards DVD R for General Ver 2 0 discs can be used for recording and playback Discs compatible with the following recording speeds can also be used Ver 2 0 2X Ver 2 0 4X Ver 2 0 8X Select discs labeled for video for recording 120 min etc Recording conditions Video mode cannot record contents with restrictions o...

Page 8: ... be played on this recorder If you encounter please contact TOSHIBA customer service Toshiba cannot assure that all discs bearing the DVD or CD logos will operate as expected Please see the discussion of compatibility on page 5 The region number of this DVD recorder is 2 If region numbers corresponding to a specific playable area are printed on your DVD video disc and you do not find 2 or ALL or t...

Page 9: ...will display them in the pan scan style one or both sides of pictures are cut Actual picture shape may vary depending on the aspect ratio or mode selection of the TV Structure of disc contents Normally DVD video discs are divided into titles and the titles are subdivided into chapters VIDEO CDs audio CDs are divided into tracks Title Divided contents of a DVD video disc Roughly corresponds to a st...

Page 10: ...ny type of solvent such as thinner benzine commercially available cleaners or antistatic spray for vinyl LPs It may damage the disc On storing discs Do not store discs in a place subject to direct sunlight or near heat sources Do not store discs in places subject to moisture and dust such as a bathroom or near a humidifier Store discs vertically in a case Stacking or placing objects on discs outsi...

Page 11: ...re less on DVD RAM Copy once contents can be recorded onto CPRM compatible DVD RAM Please note that DVD RAM may not be played on other DVD devices such as DVD players Before playing DVD RAM on other DVD device confirm that it is compatible with DVD RAM To play on other DVD devices such as DVD players DVD R Video mode Select DVD R Video mode as the compatibility is wider If you start using a disc w...

Page 12: ...s DVD RW Ver 1 1 1 2 Video mode initialized 1 Erasing and repeat recording is possible DVD R Ver 2 0 Once you record contents you cannot erase them to record others again When you copy contents from the HDD to a DVD R Video mode be sure to record the contents with DVD compatible mode set to On Otherwise there may be some errors in dubbing such as mixing both sounds of bilingual contents Editing fu...

Page 13: ...cord onto DVD R RW in VR mode be sure to make the disc initializing logical format page 32 in VR mode before recording If you do not initialize a DVD R recording onto the disc will be in Video mode To record copy once contents select a new disc labeled CPRM compatible Even if a disc is labeled CPRM compatible or VR mode recording compatible be sure to initialize it before using on this recorder So...

Page 14: ...tandby mode 2 STOP button page 46 55 Stops playback or recording 3 PLAY button page 64 Starts playback 4 REC button page 45 48 Starts recording 5 HDD button page 45 54 Press this to operate the HDD 6 DVD button page 45 54 64 Press this to operate a disc inside the disc tray 7 Disc tray page 20 Loads a disc into the disc drive 8 Front panel display page 15 9 OPEN CLOSE button page 20 Opens and clos...

Page 15: ...des are XP High Quality SP Standard Play LP Long Play MN Manual XP SP LP MN Auto 3 Multi display Displays the current time elapsed time or remaining time etc 2 1 3 4 6 5 7 4 Channel indicator Displays the current channel or other numbers such as bit rate or input selection 5 DUB Dubbing indicator Illuminates when copying 6 Programme recording indicator Illuminates when the recorder holds a timer p...

Page 16: ...r equipment that has a terminal of this type 8 AV2 SAT DECODER IN OUT socket SCART page 47 Use this socket when connecting the video or other equipment that has a terminal of this type 1 Power cord page 15 in INSTALLATION GUIDE Connects the supplied power cord 2 Ventilation fan 3 RF IN FROM ANT input socket page 14 in INSTALLATION GUIDE Connects to an aerial 4 RF OUT TO TV output socket page 14 in...

Page 17: ...p Others Introduction 9 DIGITAL BITSTREAM PCM COAXIAL AUDIO OUTPUT jack page 20 in INSTALLATION GUIDE Use this to connect the recorder to an audio receiver equipped with a coaxial digital audio input jack RD 85DT_Ope_E_p014 019 3 27 06 19 40 17 ...

Page 18: ...n Remote control 1 2 3 4 5 6 7 8 9 10 11 12 13 14 15 16 17 18 19 20 21 22 23 24 25 26 27 28 29 30 31 32 33 34 35 36 37 38 39 40 41 42 43 44 45 46 47 Remote control lid 21 24 and 44 47 are in the remote control lid RD 85DT_Ope_E_p014 019 3 28 06 10 44 18 ...

Page 19: ... ANGLE button page 65 SEARCH button page 69 DELETE button page 50 Number buttons page 45 69 ZOOM button page 68 EXTEND button page 42 PROGRESSIVE button page 17 in INSTALLATION GUIDE SETUP button page 122 ON STANDBY button page 20 21 TV DVD selector page 34 in INSTALLATION GUIDE DVD button page 45 54 64 TOP MENU button 2 page 64 QUICK button page 23 78 OK ENTER button page 122 EXIT button page 43 ...

Page 20: ...nels through this recorder After turning the power on the recorder will output TV channel signals to the connected TV also in the stop mode You can select a desired channel by pressing the PROGRAM or the number buttons Loading a disc Check disc compatibility beforehand page 6 and use a proper playable disc Caution Keep your fingers well clear of the disc tray Neglecting this may cause serious pers...

Page 21: ...the formatting function of the recorder may refresh it However all contents stored on the disc will be completely erased by this initialization process This recorder may indicate alert messages with some DVD RAM discs right after insertion If such a disc is used for playback or recording on other equipment all data in the disc may be damaged and the disc will not be played By executing an initiali...

Page 22: ...e the status of the recorder e g Main on screen displays Depending on the disc some of these may not appear Playback Pause Stop Fast forward Fast reverse Forward skip Reverse skip Forward slow motion Reverse slow motion Forward frame by frame playback Reverse frame by frame playback Recording Recording pause When title playback is completed Instant skip Instant replay Chapter division Forward skip...

Page 23: ...er is turned on If you want to disable this feature change the setting page 128 To display Quick Menu a list of functions which are available in the current mode See page 78 as well Press to select an item then press OK ENTER Timer recording Item Function Page A list of timer programmes appears 36 54 90 95 32 122 Recorded contents are listed in a thumbnail view A menu of editing functions appears ...

Page 24: ...c Programme Guide Watching TV Select a channel to watch the TV programme using the buttons then press the OK ENTER button Recording a programme from EPG page 43 Select a channel to record the TV programme using the buttons then press the OK ENTER button From the EPG screen you can set timer recording as well as get programme information 2 TEXT To display the teletext screen Pressing the TEXT butto...

Page 25: ... displayed they are also recorded as they are on the programme When you select a programme from on screen services which you displayed by the or TEXT button The front panel display may not follow the channel change showing the one you have viewed before you displayed the on screen service If you record the programme by pressing the REC button the recorded programme may have information e g title n...

Page 26: ...TV MENU button to back up from any menu function or pop up window Pressing several times will exit the menu completely If you do not make any operation for a minute the recorder automatically returns to the TV screen SETUP MENU LANGUAGES You can set the audio language and subtitle from the LANGUAGES item LANGUAGES EXIT DTV MENU OFF Subtitles ENGLISH Audio Language Watch TV Back Press the buttons t...

Page 27: ...K ENTER button on the main screen of the SETUP MENU page the tuning screen appears Selecting a channel by the number buttons starts the manual tuning operation The progress of manual tuning 1 The recorder starts searching for channels 2 The recorder displays received channels 3 The recorder completes finding channels and saves the data 4 You can exit the menu mode by pressing EXIT PROGRAMMES If yo...

Page 28: ... FEATURE MENU page the PARENTAL CONTROL window appears You can select the parental lock mode or change your PIN Personal Identification Number Press the buttons to select between the items Mode and Change PIN PARENTAL CONTROL EXIT DTV MENU Change PIN ON Mode Watch TV Back OK Mode Press the buttons to select a desired option from ON LOCK MENU LOCK INSTALL or OFF Change PIN By pressing the OK ENTER ...

Page 29: ...on While the Favourites item is selected press the buttons to select a desired option from ALL PROGS TV RADIO FAV 1 FAV 2 FAV 3 or FAV 4 FEATURE MENU DTV MENU Favourite and Locked Programmes Parental Control Watch TV OK OK Softwear Upgrade Favourites OK Enter All PROGS Notes A favourite list which is not set i e no programmes is selected is not included in the options for the Favourites item If no...

Page 30: ...upgrading starts DOWNLOADING NEW SOFTWARE Version 5 0 for your TV is available Call 0800 888999 or visit www toshiba co uk if you experience any problems Loading EXIT Cancel Upgrade While searching for new software audio and video signals are muted the power indicator is lit in red and the HDD and DVD indicators are unlit Notes To cancel upgrading in progress press the EXIT button Upgrading will s...

Page 31: ... on remote control operation unless otherwise noted You can use the buttons on the remote control and those on the main unit as well when they have the same function If copy protection signal is detected during recording on this recorder the recording automatically pauses and a message appears In this case the PAUSE button cannot release the recording It is possible to end the recording by pressin...

Page 32: ...esignate sides A and B on a double sided disc 1 Press the buttons to select Edit of Disc Number then press the OK ENTER button 2 Press the buttons to enter digits 3 Press the OK ENTER button DVD format 0 0 1 Disc Number Disc Name Start Cancel Edit Edit DVD mode Unformat Edit VR mode DVD format Disc Number Disc Name Start Cancel Edit Edit DVD mode Unformat Video mode DVD format 0 0 1 Disc Number Di...

Page 33: ... Press BACK RETURN then to select Management settings and press OK ENTER 4 Press to select DVD RAM physical format then press OK ENTER 5 Read the message and press to select Yes then press OK ENTER 6 Ask the question on shutting down using then press OK ENTER Notes The physical format process may fail if executed to a dirty DVD RAM Also the disc may be difficult to record even it is finished Befor...

Page 34: ...he setting to divide a title into some chapters It is convenient to skip scenes Off Chapter dividing is not available 5 min 10 min 15 min 20 min Select an interval for chapter dividing Note When the number of chapters reaches a limit chapters are not divided anymore The limit number of chapters is dependent on conditions of a DVD R RW disc Note This setting is not effective in dubbing 1 Press SETU...

Page 35: ...t the drive by pressing HDD or DVD CONTENT MENU appears Pressing the same button turns it off 2 Press REC MODE repeatedly to select the recording mode Each time you press the button the recording mode display on the front panel changes e g When a 4 7GB single sided DVD RAM is used Note You cannot change the recording mode while recording Recording time Picture quality XP About 1 hour Superior to S...

Page 36: ...Timer recording then press OK ENTER 3 Press OK ENTER Ch is ready for setting 4 Select an item by pressing then press ADJUST to set the item For details of the setting items see page 39 4 23 Su 17 50 Basic REC MENU Ch Date Rec time h m HDD remaining excluding above 51h 24m Start End Media Pict Audio 1 SP 4 6 D M1 HDD e g 4 23 Su 17 50 Basic REC MENU Ch Date Rec folder Rec time h m HDD remaining exc...

Page 37: ...If you want to turn off the power press the ON STANDBY button Note The disc tray does not close automatically even when the recording start time arrives Set the recorder and load a DVD RAM R RW disc beforehand 4 23 Su 17 50 Basic REC MENU Ch Date Rec time h m HDD remaining excluding above 51h 24m Start End Media Pict Audio 1 SP 4 6 D M1 4 30 Su 7 00 8 30 HDD e g Rec folder Genre Edit title name Ad...

Page 38: ... budget calculation then press OK ENTER The Disc budget calculation menu appears 3 Press to select a timer program then press OK ENTER The recorder calculates on a bar graph how much a specific program identified by a check mark will occupy on the disc Pressing the ADJUST button can display or remove the check mark 4 Correct the parameters of the timer program if necessary Skip to step 6 if you do...

Page 39: ...applicable to a recording for 2 5 hours or longer Not applicable when XP SP LP or Auto is selected You can set a rate from 1 0 1 4 and at intervals of 0 2Mbps from 2 0 to 9 2 The upper limit of the value depends on the Audio setting Standard setting Superior to D M1 Recommended for recording music programmes Uncompressed original digital audio Equal quality to audio CD but recordable time will be ...

Page 40: ...me 6 5 7 4 1Rec folder To select a folder into which the programme is saved Available folders appear Select one from them For the folder function see page 58 2Genre To select a genre of the programme Available genres appear Select one from them For genres see page 132 3Edit title name To enter a name of the timer programme A keyboard appears For keyboard operation see page 136 4Maximum quality rat...

Page 41: ...created at different positions A division for a chapter may be created within a music clip Depending on the specification made for the recording sound level a division for a chapter may not be created or it may be created at different positions Setting On may create chapters and their number may reach the maximum allowed At that point no more chapters can be created In this case decrease the chapt...

Page 42: ... recording end time cannot be changed in the following cases within 1 minute before the recording end time advancing the recording end time during recording in Auto mode Even if you extend the recording end time the recording will stop when the HDD is filled up Also at 8 hours from the start time the recording will stop Relief recording If you set a timer programme to a loaded DVD disc but the dis...

Page 43: ...ppears to show the programming data of the selected programme 3 Confirm the programming data and press OK ENTER Programming is complete The programme guide EPG returns If you correct the data 1 Press repeatedly until the programming data is selected then press OK ENTER 2 Select the item by then change the parameter by or ADJUST For details of the setting items see page 39 3 When complete press OK ...

Page 44: ...edure press the BACK RETURN button instead of the OK ENTER button at step 3 If the number of timer programmes reaches the maximum a message will appear to tell you that your selection cannot be accepted Press the OK ENTER button to exit RD 85DT_Ope_E_p031 044 3 27 06 19 40 44 ...

Page 45: ...OGRAM to select a channel to record The number buttons are also available 3 Press REC Recording starts Preparation When you record on a DVD RAM R RW disc load it into the recorder Load a disc which has sufficient space available to record the programme Make sure the loaded disc is not write protected When you record on a DVD R RW Video mode or when you record contents which will be copied to a DVD...

Page 46: ... the recording Off Power will turn off after the recording 4 Press OK ENTER Notes By setting an end time it is memorized as a programmed one and the indicator in the front panel display illuminates to indicate that the recorder holds a timer program of recording The programmed end time must be set for 5 minutes later than the current time Recording a TV programme Continued Recording Notes The numb...

Page 47: ...tput sound you want to record if selectable such as multiplex broadcasting as the recorder records sounds of external source in stereo onto a DVD R RW disc DVD R RW discs Video mode cannot record contents with copy restriction signal embedded copy protected or copy once contents the HDD DVD RAM disc CPRM compatible DVD R RW VR mode can record copy once contents Some satellite programmes via a conn...

Page 48: ... connected to the AV1 AUDIO VIDEO IN OUT socket on the rear panel AV2 To record pictures from equipment connected to the AV2 SAT DECODER IN OUT socket on the rear panel 2 Press HDD or DVD to select a recording media HDD To record on the HDD DVD To record on a DVD RAM R RW disc 3 Press REC on this recorder to start recording 4 Start playback of the source content on the connected equipment 5 When r...

Page 49: ...the connected device to automatically start and finish recording according to the device s signals This function can record onto the HDD only You can use this LINE AUTO function in the following conditions The recorder is powered on The recorder s clock setting is finished The recorder is not playing or recording Note Depending on the device this function may not be available To record satellite p...

Page 50: ... Cat show Fishing lesson Natures 001 002 003 03 004 005 006 e g Singing birds Deleting multiple specified parts 1 During play or stop press MENU 2 Press to select Edit programme then press OK ENTER 3 Press HDD or DVD to select a disc that contains titles or chapters you want to delete 4 Press to select Del rec programme then press OK ENTER EDIT MENU Del Selected items appears 5 Select a part a tit...

Page 51: ...ilar bit rates the difference may be insignificant Generally when you set the bit rate low for longer recording time the data volume shortage will result in a lack of detail information As a result the picture quality is decreased more noticeable with dynamically moving images For example square noises block noise may occur in a scene with fast action or a scene with light and shadows such as a wa...

Page 52: ...RD 85DT_Ope_E_p050 056 3 27 06 19 41 52 ...

Page 53: ...Playback Play your favorite contents Playing recorded contents CONTENT MENU Folder function Playing a DVD video disc Other playback functions RD 85DT_Ope_E_p050 056 3 27 06 19 41 53 ...

Page 54: ... order from the oldest one respectively To turn off the CONTENT MENU press the EXIT button Absence of operations for longer than about 15 minutes also turns off the CONTENT MENU The mark is displayed in every thumbnail when HDD RAM title play page 129 is set to Title resume When set to Serial playback it is displayed in a thumbnail last operated You can change a thumbnail picture See page 114 You ...

Page 55: ...to resume playback You can select the interval per press of the button See Instant replay interval page 129 Notes This operation may not work for some discs Depending on the structure of a disc some operations may be limited Depending on playback conditions some operations may not work Erasing content 1 At step 2 on page 54 select an unnecessary title chapter 2 Press DELETE A message appears Selec...

Page 56: ...1 frame at a time Depending on scenes some frames may not be played When playing a VIDEO CD reverse frame by frame playback is not available Skipping to the next previous chapter or track Press SKIP repeatedly until the chapter or track number you want appears Playback starts from the selected chapter or track Playback starts from the beginning of the next chapter or track Playback starts from the...

Page 57: ...The resuming function will not work if the write protect tab is set to PROTECT page 7 To play a recorded title while recording another on the same disc Recorded Title Play HDD DVD RAM During recording you can play a title recorded on the same disc 1 While recording press HDD or DVD 2 Press to select a desired title then press OK ENTER Playback of the selected title starts Pressing the STOP button ...

Page 58: ...1 5 0 53 45 0 00 00 1 25 30 0 29 50 0 55 00 0 00 00 Play List 0 54 30 0 51 28 0 52 40 0 30 08 HDD VR Title Thumbnail Page CONTENT MENU 1 5 GARBAGE Summer day Singing birds Cruise Cat show Cat show Fishing lesson Country life LOCK Natures Natures 1 25 30 0 00 00 HDD 01 001 03 02 001 002 003 03 004 005 006 Title Thumbnail on which GARBAGE is placed is called ROOT To open the folder press to select t...

Page 59: ...the copied contents will be put in the folder of the same name When copying from DVD RAM or DVD R RW VR mode to the HDD the folder of the same name is created automatically A DVD RAM or DVD R RW VR mode which contains folders created on this recorder may lose the folder assortment or the titles may move onto the ROOT if it is used on other players including TOSHIBA products or PC etc To change the...

Page 60: ...elect Yes then press OK ENTER To cancel select No then press OK ENTER The lid of GARBAGE opens when a title is put in Emptying GARBAGE Titles in GARBAGE can be deleted collectively Once you execute the deleting process it cannot be cancelled You cannot execute in the following situations While preparing for a timer recording While recording a programme 1 Press HDD 2 Press to select GARBAGE 3 Press...

Page 61: ...Folder function then press OK ENTER 3 Press to select Move multiple to folder then press OK ENTER 4 Press to select a title you want to move then press OK ENTER 5 Press to select a folder in which you want to move the title then press OK ENTER An icon with the folder number appears e g When set to be moved to folder 03 002 03 To cancel the title press the QUICK button while selecting the title the...

Page 62: ... You cannot remove the following folders LOCK GARBAGE Folders which contain a protected title Cancel the protection 1 Press HDD or DVD to select the drive HDD Contents in the HDD DVD Contents in a loaded disc 2 Press to select a folder you want to remove then press QUICK 3 Press to select Folder function then press OK ENTER 4 Press to select Remove folder then press OK ENTER 5 Press to select Yes ...

Page 63: ...e security code or you want to cancel it press the STOP button 4 times then press the OK ENTER button Notes It you change the setting from On show or On hide to Off all the titles which are in LOCK will move onto the ROOT Even though parts of a Playlist are in LOCK the Playlist can be played Operating LOCK LOCK changes its status as follows Locked You can open this folder To play the title you nee...

Page 64: ...he top menu are assigned a number you can directly locate a specific title by pressing its designated number with the number buttons 3 Press OK ENTER Notes The instructions above describe basic procedures which may vary depending on the contents of the DVD video disc If different instructions appear on the TV screen follow those instructions If you display the top menu during playback and press th...

Page 65: ...isplayed e g 2 Press ANGLE while the angle number is displayed on the TV screen You can also select the camera angle by pressing the ANGLE button several times The angle icon disappears after about 3 seconds if no further selections are made Notes You can also change the camera angle during still playback The camera angle changes to the new setting when you resume normal playback If you pause a pi...

Page 66: ...Y button You can play in fast forward to within 10 seconds prior to the current broadcast 4 Press TIMESLIP to exit The current broadcast returns Notes Time slip recording playback stops when the disc is filled up You can play up to a location where the recorder stopped the recording The time slip recording playback cannot begin if the disc is full The playback picture may appear after a delay of s...

Page 67: ... press the SLOW button Forward reverse frame by frame play First press the PAUSE button then press the ADJUST button To resume normal playback press the PLAY button You can play in fast forward to within 10 seconds prior to the current broadcast 3 Press TIMESLIP to exit this mode The recorder stops storing the broadcast on the HDD A message appears and asks you whether you will save the stored dat...

Page 68: ...f the picture Notes Some discs may not respond to zoom feature During some scenes the buttons may not work as described The zoom feature is canceled when the disc menu is operated The magnification level varies depending on the picture size you select page 32 in INSTALLATION GUIDE The zoom feature is not available while displaying on the screen menu The zoom feature is canceled when you stop playb...

Page 69: ...advance by a factor of 1 Locating a specific point by entering its elapsed time Time Search 1 Press SEARCH You may have to press repeatedly depending on a disc Press the button until the following display appears e g 2 Press the number buttons and to enter the desired time location on the disc e g To enter 1 hour 25 minutes and 30 seconds 0 1 2 5 3 0 hour minute second 3 Press OK ENTER Notes Some ...

Page 70: ...on of channels depends on the disc or the type of TV broadcast HDD DVD RAM DVD RW VR DVD R VR TV channel signals Stereo sound Stereo left channel and right channel Stereo L left channel Stereo R right channel Back to Stereo The following discs can be switched by pressing the AUDIO button DVD RW Video DVD VIDEO DVD R Video Language name sound recording system No of channels e g VCD Stereo Stereo L ...

Page 71: ...e appropriate language from the selections on the disc menu When you turn on the recorder or replace a disc the recorder returns to the initial default setting page 123 Depending on the disc the sound that is specified the disc is played back Immediately after you have switched sounds there may be a temporary discrepancy between the display and actual sound RD 85DT_Ope_E_p068 074 3 27 06 19 42 71 ...

Page 72: ...ome files may not display their own entire images depending on the size JPEG picture playback is not available during recording on the HDD Operation to JPEG file will be disabled at about 5 minutes before a programmed recording starts To stop playback slide show Press STOP If you press the PLAY button after pressing the STOP button playback will start from the photo you stopped To pause playback s...

Page 73: ...tep 2 repeat steps 2 and 3 until your favorite file appears The selected photo appears in full screen Notes The CONTENT MENU Picture List cannot show all the files in a disc but only ones regarded as objects of regular play of the disc The larger the file size is the longer the thumbnail takes time to appear Letters of a file folder name overflowing the given space are not displayed Direct input o...

Page 74: ...ith this recorder See page 75 Set Priority contents page 129 to Audio 1 Press DVD 2 Load a CD that contains MP3 files Playback starts from the first track of a current folder If playback does not start press the PLAY button To stop playback Press STOP If you press the PLAY button after pressing the STOP button playback will start from the beginning of the track To pause playback Press PAUSE To res...

Page 75: ...taining MP3 files Given the fact that technology in this area is still maturing Toshiba cannot guarantee that all genre of recordable discs will produce optimal playback quality The technical criteria set out in this owner s manual are meant as a guide only Customers should also note that permission is required in order to download MP3 files and music from the internet Toshiba has no right to gran...

Reviews: