


User's Manual
8-8
O
PTIONAL
D
EVICES
External monitor
An external analog monitor can be connected to the external monitor port on the
computer. The computer supports VGA and Super VGA video modes. To connect a
monitor, follow the steps below.
1. Turn the computer off.
2. Connect the monitor to the external monitor port.
3. Turn the monitor’s power on.
4.
Turn the computer on.
When you turn on the power, the computer automatically recognizes the monitor
and determines whether it is color or monochrome.
To change the display settings, press
Fn + F5
. If you disconnect the monitor
before you turn the computer off, be sure to press
Fn + F5
to switch to the internal
display. Refer to Chapter 5,
The Keyboard
, for details on using hot keys to change
the display setting.
TV
Some models are equipped with TV out port.You can connect a television set to the
TV out jack on the computer. Follow the steps below.
1. Turn the computer off.
2. Use the TV adaptor cable's S-Video plug (not supplied) to connect the
television to the TV out port.
3. Turn the television on.
4. Turn the computer on.
You can use the hot keys
Fn
+
F5
to change the display device. Refer to Chapter 5,
The Keyboard
.
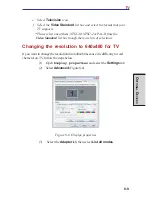
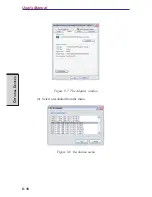
NOTE: If a television is connected to the computer, set the TV type in
Display Properties. Follow the steps below.
a.
Click
start
and click
Control Panel
.
b.
Double-click the
Display
icon to open the Display Properties
window.
c. Click the
Settings
tab and click the
Advanced
button.
d.
Click
Intel
®
Extreme Graphics
tab, click
Graphics
Properties...
button and click
Devices
tab.
Summary of Contents for Satellite A10 Series
Page 1: ...TOSHIBA Satellite A10 Series Portable Personal Computer User s Manual ...
Page 29: ...xxix Appendix I PartsNumbers I 1 Glossary Index ...
Page 30: ...xxx ...
Page 34: ...xxxiv ...
Page 38: ...I NTRODUCTION ...
Page 50: ...1 12 User s Manual I NTRODUCTION ...
Page 52: ...T HE G RAND T OUR ...
Page 68: ...G ETTING S TARTED ...
Page 82: ...O PERATING B ASICS Moving the computer 4 23 Heat dispersal 4 24 ...
Page 108: ...T HE K EYBOARD ...
Page 118: ...User s Manual 5 10 T HE K EYBOARD ...
Page 120: ...P OWER AND P OWER U P M ODES ...
Page 138: ...HW S ETUP ...
Page 150: ...O PTIONAL D EVICES ...
Page 162: ...User s Manual 8 12 O PTIONAL D EVICES ...
Page 164: ...T ROUBLESHOOTING ...
Page 192: ...User s Manual T ROUBLESHOOTING 9 28 ...
Page 194: ...A PPENDIXES ...
Page 206: ...User s Manual B 10 A PPENDIX B ...
Page 226: ...User s Manual D 8 A PPENDIX D ...
Page 230: ...User s Manual E 4 A PPENDIX E ...
Page 254: ...Glossary 14 G LOSSARY Glossary ...
Page 259: ...Index Index 5 I NDEX WirelessLAN1 7 problems9 25 using4 19 ...


