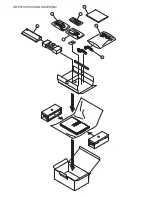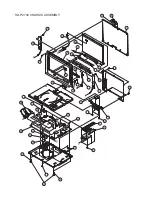
PARTS LIST
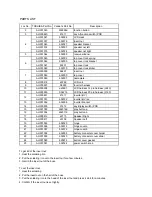
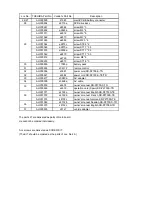
Loc No. TOSHIBA Part No. Vender's Part No.
Description
2
AH301040
b32298d
function button
3
AH300840
21611
key A(function switch) PCB
AH301041
b32292
LCD mask
AH301037
b32318
insert nut
AH301043
b32327
speaker bracket
AH301074
b32303
speaker net left
AH301075
b32304
speaker net right
5
AH301044
b32299
receive window
AH301045
b32302
top cover lock spring
AH301046
b32309
top cover lock bracket
AH301047
b3231
top cover lock
AH301048
b32310
top cover lock limiter
AH300009
b8497
insert nut
AH301049
b32290
top cover
AH301050
b32307
nameplate
8
AH300418
a7262
LCD unit
9
AH300937
S3900
Inverter harness
10
AH300938
es3901
LCD harness 14 pin harness (L240)
11
AH300935
S3421b
LCD harness 20 pin harness (L160)
AH300851
21617
inverter(HV)
AH301051
b32332
inverter(HV) pc
13
AH301052
b32296
inverter bracket
14
AH300850
21612
key B(play switch) PCB
15
AH301053
b32316d
play button a
16
AH301054
b32317d
play button b
17
AH300412
s5110
Speaker Right
18
AH300411
s5109
Speaker Left
19
AH301055
b32323
hinge
20
AH301056
b32314
hinge cover a
21
AH301057
b32312
hinge cover b
22
AH301058
b32295
battery connecter cover holder
23
AH301059
b32320
battery connecter cover slider
24
AH301060
b20914
bottom cover gasket
25
AH301061
b32324
power switch knob
12
6
7
4
To get rid of the insert nut:
1. Heat the soldering iron.
2. Put the soldering iron onto the insert nut for a few minutes.
3. Get rid the insert nut of the boss.
To set the insert nut:
1. Heat the soldering.
2. Put the insert nut on the hall of the boss.
3. Put the soldering iron to the head of the insert nut and press it a bit for a minutes.
4. Confirm if the insert nut is set tightly.

