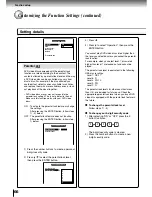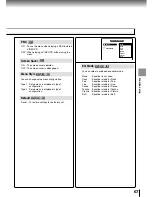
background image

Advanced playback

52

DVD-V

VCD

CD

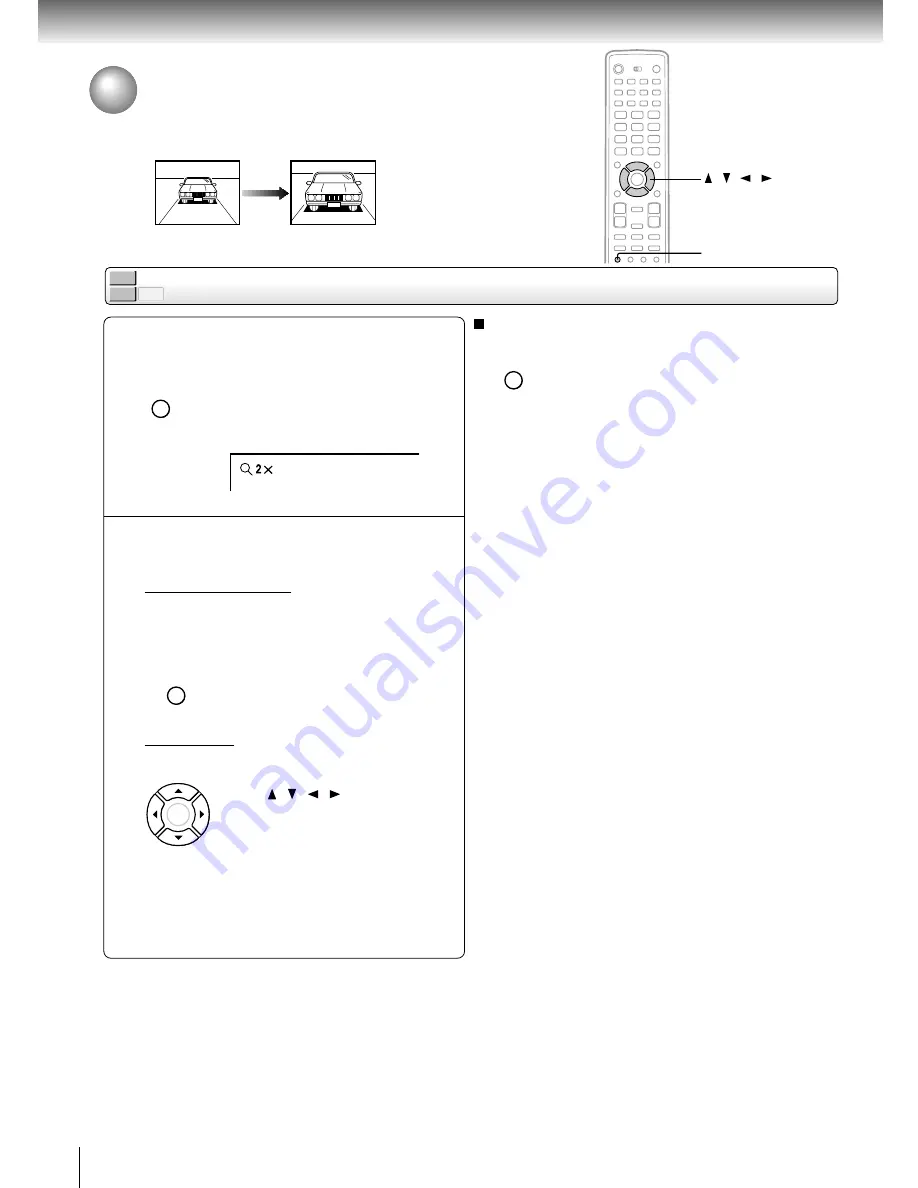
Zooming a picture

During normal, slow, still, fast reverse
or fast forward playback, press ZOOM.

The unit enters the zoom playback
mode, and the zoom icon appears.

e.g.

Select the zoom point and
magnification level.

Magnification level

You can select from the following.
– Magnification
– Image reduction
– Normal playback

Press the 

ZOOM

 button repeatedly.

Zoom point

To shift:

Press   /   /   /   in the zoom in
mode.

Zooming a Picture

You can magnify areas within a picture.

To exit zoom playback

Press 

ZOOM

 repeatedly until the zoom icon disappear.

You can also use 

STOP

 to exit zoom playback.

Notes

• Some discs may not respond to zoom feature.
• During some scenes, the buttons may not work as

described.

• Zooming does not work on characters selected on menus.

1

2

/    /    /

ZOOM

ZOOM

ZOOM

ENTER

ZOOM

Summary of Contents for SD-P5000

Page 1: ...LCDTV DVD COMBINATION SD P5000 OWNER S MANUAL 2004 TOSHIBA CORPORATION DIGITAL VIDEO 2 22 33 47 61 Introduction Function setup TV Viewing Basic playback Advanced playback 69 Connections 79 Others ...

Page 2: ...ntenna Increase the separation between the equipment and receiver Connect the equipment into an outlet on a circuit different from that to which the receiver is connected Consult the dealer or an experienced radio TV technician for help WARNING Only peripherals complying with the FCC class B limits may be attached to this equipment Operation with non compliant peripherals or peripherals not recomm...

Page 3: ...cation of the required label 3A LCD TV DVD COMBINATION 5000 In the spaces provided below record the Model and Serial No located on the bottom of your unit Model No Serial No Retain this information for future reference ...

Page 4: ...paratus has been damaged in any way such as power supply cord or plug is damaged liquid has been spilled or objects have fallen into the apparatus the apparatus has been exposed to rain or moisture does not operate normally or has been dropped ADDITIONAL SAFETY INSTRUCTIONS 12 When you use headphones keep the volume at a moderate level If you use the headphones continuously with high volume sound ...

Page 5: ...or other vehicle Note doing so is illegal in many jurisdictions NEVER place a apparatus within the eyesight of a driver while he she is driving an automobile vehicle Note an apparatus located in the front seating section of a vehicle is illegal in many jurisdictions Failure to observe the above instructions could result in the driver s inattention to and or distraction from road hazards b NEVER pl...

Page 6: ...ings could cause smoke fire burns and or electric shock k ALWAYS locate the apparatus on a level and secure surface If placed on an uneven shaky unsecured or unstable surface apparatus may fall Failure to observe the above warning could result in the apparatus striking a person l When using the adapter insert the plug of the adapter into the cigarette lighter socket or power port fully The incompl...

Page 7: ...nit damage and malfunction Do not use the unit in a place subject to vibration Neglecting this may cause malfunction of the unit or damage to the disc Do not leave the unit in a vehicle Rise or drop in temperature may result in malfunction of the unit When transporting the unit the original shipping carton and packing materials come in handy For maximum protection repack the unit as it was origina...

Page 8: ...ore discs in a place subject to direct sunlight or near heat sources Do not store discs in places subject to moisture and dust such as a bathroom or near a humidifier Store discs vertically in a case Stacking or placing objects on discs outside of their case may cause warping Notes on copyright It is forbidden by law to copy broadcast show broadcast on cable play in public and rent copyrighted mat...

Page 9: ...spond to all operating commands This is not a defect in the unit Refer to instruction notes of discs may appear on the screen during operation A means that the operation is not permitted by the unit or the disc Playable discs This unit can play the following discs You cannot play discs other than those listed above You cannot play discs of DVD RAM or non standardized discs etc even if they may be ...

Page 10: ...se or inability to use of this unit Toshiba Corporation is not liable for any damage caused by neglect of the instructions described in the owner s manual Toshiba Corporation is not liable for any damage caused by misuse or malfunction through joint use of this unit and connected equipment or software On disposal This product contains mercury Disposal of this material may be regulated due to envir...

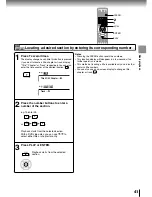
Page 11: ...location 39 Locating a Specific Title Chapter or Track 40 Locating a title using the top menu 40 Locating a desired section by entering its corresponding number 41 Locating a specific chapter or track 42 Playing MP3 WMA Files 43 Viewing JPEG Files 44 Advanced playback Directly Accessing a Specific Location 48 Repeat Play 49 Repeating a title chapter or track 49 Repeating a specific segment 49 Play...

Page 12: ...age in for details Main unit OPEN CLOSE STOP VOLUME PLAY PAUSE CHANNEL AV SOURCE Disc cover LCD monitor Speakers 34 PLAY PAUSE button 36 STOP button 26 CHANNEL buttons OPEN button 19 VOLUME buttons 26 AV SOURCE button 23 42 SKIP button 42 SKIP button 36 ...

Page 13: ...CTURE button 60 16 VHF UHF 75Ω jack 70 AUDIO IN jack Left 70 AUDIO IN jack Right 74 BITSTREAM PCM OUT jack 70 VIDEO IN jack 70 S VIDEO jack BITSTREAM PCM OUT S VIDEO IN VIDEO IN AUDIO IN L R AUDIO OUT COMPONENT VIDEO IN POWER R L 70 COMPONENT VIDEO IN 71 AUDIO OUT Left 71 AUDIO OUT Right 22 POWER button ...

Page 14: ... 27 MUTE button 26 CHANNEL buttons 31 DIMMER button MENU button see below T button Direction buttons 23 42 58 60 62 41 TOP MENU SKIP VOLUME CHANNEL SKIP MUTE PLAY PAUSE FWD REV STOP SLOW FWD SLOW REV ZOOM ANGLE SUB TITLE RETURN MENU ENTER POWER SET UP SLEEP DIMMER E A M MEMORY REPEAT REPEAT A B AUDIO RANDOM 10 CLEAR DISPLAY CAP TEXT MONO STEREO SAP PICTURE INPUT SELECT RMTCODE 1 2 Remote control I...

Page 15: ...orrectly or if the operating range is reduced replace all batteries with new ones If battery leakage occurs wipe the battery liquid from the battery compartment then insert new batteries 1 Operating with the remote control Point the remote control at the remote sensor on the unit and press the buttons Distance About 7 m 23 feet from the front of the remote sensor Angle About 30 in each direction o...

Page 16: ... Converter Descrambler box you may wish to use a two set signal splitter sometimes called a two set coupler and an A B Switch box from the cable installer or an electronics supply store Follow the connections shown below With the switch in the B position you can directly tune any nonscrambled channels on your TV With the switch in the A position tune your TV to the output of the Converter Descramb...

Page 17: ...Doing so may cause electric shock Do not use an AC adapter other than one specified as it can cause a fire or damage to the unit When the AC adapter is in use its temperature may increase However it is not a malfunction Make sure that the power cord is disconnected and the temperature decreases before carrying it To the DC IN jack AC adapter Connect the supplied AC adapter and the power cord firml...

Page 18: ... the LCD monitor Raise the switch located on the back of the LCD monitor Push the LCD monitor forward 2 Open the LCD monitor Firmly press down on the main unit to setup the LCD monitor Open the LCD monitor If the LCD monitor is opened more than 90 degrees the main unit may overturn so be careful 90 degrees 1 2 ...

Page 19: ...or is not moved to the upward position and the disc cover is opened the disc cover will hit against the LCD monitor and may break OPEN How to use when hanging it on a wall You can use the main unit with the LCD monitor bent back 180 degrees A professional will perform the wall installation If you want to install the main unit this way contact your local Toshiba sales department ...

Page 20: ......

Page 21: ...TV Viewing Settings for watching TV Channel Setting Selecting the Channel Settings the Sound Closed caption function V CHIP function Adjusting the Picture ...

Page 22: ... indicator on the unit illuminates in green Turning on the power during standby Press the POWER button on the remote control During standby the POWER indicator lights up red POWER POWER Antenna Connection 16 Power Connection 17 Selecting the TV mode 23 Selecting the Display Language 23 Channel setting 24 Watch TV POWER AUDIO OUT COMPONENT VIDEO IN POWER R L POWER button ...

Page 23: ...12 Press SETUP The following on screen display appears Press to select LANGUAGE then press ENTER Each time you press ENTER the language changes Press SETUP The on screen display disappears 1 2 3 4 SET UP ENTER ENTER ENTER SET UP To skip the external input mode 1 While selecting the external input mode COMPONENT S VIDEO or VIDEO press SETUP 2 Press to select the mode to skip then press ENTER You ca...

Page 24: ...ct CH PROGRAM then press ENTER 1 2 3 SET UP LCD SETUP TV SETUP LANGUAGE ENGLISH CC MODE SETUP V CHIP SETUP TV CABLE TV AUTO CH PROGRAM MANUAL CH PROGRAM ENTER ENTER ENTER ENTER 4Press to select PROGRAM START then press ENTER Channel setting starts To return to the previous screen select RETURN and press ENTER To cancel the channel setting select STOP and press ENTER Press SETUP The screen disappea...

Page 25: ...annel press to select SET then press ENTER The changed channel is memorized To cancel the change select RESET then press ENTER ENTER ENTER 1 2 3 ENTER ENTER 4 ENTER ENTER Press SETUP The on screen display disappears 5 SET UP To fine tune the channel Press to select ADJUST then press to change the frequency To skip unnecessary channels 1 Press to select SKIP 2 Press ENTER to select ON or OFF ON Pre...

Page 26: ... add or erase channels manually 2 5 100 10 CHANNEL CHANNEL To check the status of the screen being broadcasted Press DISPLAY The status of the channel currently being broadcasted is displayed e g DISPLAY MONO SAP CABLE12 To set the sleep timer You can set the TV so it turns off automatically Each time you press the SLEEP button the sleep timer changes The clock will count up 30 minutes SLEEP OFF 3...

Page 27: ...AP You can enjoy watching TV while you listen to high fidelity stereo sound with the Multi channel TV Sound feature Multi channel TV Sound can also transmit a second audio program SAP containing a second language or other audio information Press the MONO STEREO SAP button to select the desired sound MONO broadcasting Not changed STEREO broadcasting MONO SAP broadcasting STEREO SAP broadcasting STE...

Page 28: ...o set with the CAP TEXT button Each time you press the CAP TEXT button the CAP TEXT mode changes as follows SET UP OFF CC1 CC2 TEXT1 TEXT2 To set CC BACK When you choose the CC MODE you can select back of the text 1 In CC MODE SETUP press and select CC BACK 2 Each time you press the ENTER button the CC Back changes BLACK The text screen appears as a block box LUCIDITY Only characters are displayed...

Page 29: ...ldren G General audience Appropriate for all ages Youth TV Ratings Y7FV Y7 Y Directed to older children This program is designed for children age 7 and above Programs in which fantasy violence may be more intense or combative than other programs in this category are designated TV Y7 FV Y All children This program is designed to be appropriate for all children TV Ratings MA Mature audience only Thi...

Page 30: ...o set TV RATING 1 Press to select the TV RATING then press ENTER 2 Press to select the setting you want to change then press ENTER PASSWORD SETUP ENABLE BLOCKING ON CHANGE PASSWORD OK RETURN V CHIP SETUP PASSWORD SETUP TV RATING MPAA RATING MPAA UNRATED OFF TV NONE RATING OFF RETURN TV RATING YOUTH DIALOG LANGUAGE SEX VIOLENCE NO DLSV RETURN MA Y7FV Y Y7 Yx 14 PG G X X X X X X X X X X X X X X X V ...

Page 31: ...ies OFF To unblock unrated movies TV NONE RATING Some programs are not rated You can block these programs using the V CHIP 1 Press to select the TV NONE RATING 2 Press ENTER repeatedly to select ON or OFF ON To block program with a rating of TV NONE OFF To unblock program with a rating of TV NONE When you select ON the message NOTICE ENABLE THIS OPTION MAY BLOCK EMERGENCY MESSAGES appear V CHIP SE...

Page 32: ...ure PICTURE 2 DIMMER Press PICTURE Alternatively press PICTURE on the main unit The picture setting display appears Press or to adjust the value BRIGHTNESS 0 Darker to 30 Brighter TINT 0 Reddish to 30 Greenish COLOR 0 Paler to 30 Deeper CONTRAST 0 Lower to 30 Higher SHARPNESS ON or OFF Adjusting the picture 1 2 ENTER PICTURE PICTURE BRIGHTNESS 15 15 15 15 OFF 15 TINT COLOR CONTRAST PICTURE SHARPNE...

Page 33: ...es About this manual The numbers indicated by lines on the illustrations correspond to the associated steps of the operation Aside from the section Playing a Disc explanations of operations only include illustrations of the corresponding buttons on the remote control The buttons sharing the same name on the main unit can also be used in an identical manner ...

Page 34: ...o the following screen is displayed By pressing the PLAY button you can also switch to the DVD mode Open the disc cover Press OPEN on the main unit The disc cover opens The disc cover will not open over a certain range Do not force the cover open further as it may cause damage to the unit Set a disc Place a disc with the playback side down and push gently on the center of the disc to affix it to t...

Page 35: ...ode Press PLAY Notes Do not put an unplayable disc or any objects other than discs in the disc holder In many instances a menu screen will appear after playback of a movie is completed Prolonged display of an on screen menu may damage your television set permanently etching that image onto its screen To avoid this be sure to press the STOP button once the movie is completed 1 Press SETUP The follo...

Page 36: ... To remove the disc Press the OPEN button on the main unit to open the disc cover Remove the disc from under the rim while gently pressing down on its center Close the disc cover after removing the disc CAUTION Do not touch the spindle immediately after prolonged play as it may have become hot Be careful in loading removing a disc To adjust the volume of the speakers or the connected headphones Tu...

Page 37: ...lude certain pixels that do not operate properly that do not light that remain lit constantly etc We do our best to keep the number of these defective pixels to a minimum but please understand that they cannot be completely eliminated even with the most advanced manufacturing technologies available today The fluorescent tube which illuminates the panel from the inside will deteriorate with use The...

Page 38: ...ld SKIP on the main unit during playback During the fast forward or fast reverse playback you can vary the speed by holding down the button Playing in fast reverse or fast forward directions To resume normal playback Press PLAY Notes The unit mutes sound and omits subtitles during reverse and forward scan of DVD video discs The playback speed may differ depending on the disc Press PAUSE STEP durin...

Page 39: ... regardless of the location where you stopped playback 1 Press STOP twice The unit s memory is cleared 2 Press PLAY Playback starts from the beginning of the titles Playback starts from the beginning of the disc If you want to return to the beginning of a DVD video disc turn the power off and on and then start playback Notes The unit s memory is also cleared when you use a PBC featured VIDEO CD wh...

Page 40: ... selected title Notes The instructions above describe basic procedures which may vary depending on the contents of the DVD video disc If different instructions appear on the screen follow those instructions If you display the top menu during playback and press the TOP MENU button again without selecting any title the unit may resume playback from the point where you first pressed the TOP MENU butt...

Page 41: ...mber of the section e g To enter 25 or Playback starts from the selected section With a DVD video disc you can use to select either title or chapter for entry Press PLAY or ENTER Playback starts from the selected section Notes Pressing the CLEAR button resets the numbers This location display will disappear in a few seconds if no further operation is made This method of locating a title is availab...

Page 42: ...ack Press SKIP repeatedly to locate the chapter or track you want Playback starts from the selected chapter or track To locate succeeding chapters or tracks Playback starts from the beginning of the current chapter or track When you press twice playback starts from the beginning of the preceding chapter or track SKIP SKIP ...

Page 43: ...AT and RANDOM functions are also available This unit requires discs recordings to meet certain technical standards in order to achieve optimal playback quality Pre recorded DVDs are automatically set to these standards There are many different types of recordable disc formats including CD R containing MP3 WMA files Given the fact that technology in this area is still maturing Toshiba cannot guaran...

Page 44: ...ntered To pause the slide show Press PAUSE STEP during playback To resume the slide show press the PLAY button To switch pictures Press SKIP during playback Switch to the previous picture Switch to the next picture Notes You may not be able to load a JPEG file exceeding 2MB If you press the MENU button when no menu is displayed a menu is displayed Preparation Prepare a disc that contains JPEG file...

Page 45: ...n will enter the thumbnail mode To rotate a picture Press during playback A picture is vertically reversed A picture is horizontally reversed Rotate counterclockwise by 90 Rotate clockwise by 90 To zoom in a picture 1 Press ZOOM during playback You will enter the zoom mode 2 Press FWD or REV FWD Magnification REV Image reduction Each time you press the FWD or REV button the magnification level cha...

Page 46: ...iscs CD ROM CD R CD RW File system ISO9660 UDF without interleave File name File names are limited to eight characters or less and must incorporate JPG extension e g JPG File names cannot contain special characters such as etc File size Less than 10M bytes File format BASELINE PROGRESSIVE Resolution Baseline JPG 3072x2048 Progressive JPG width height 128 3300000 Files with size 20M bytes are teste...

Page 47: ...ssing a Specific Location Repeat Play Playing in a Favorite Order Playing in Random Order Zooming a Picture Selecting the Sound Enhancement E A M Selecting a Camera Angle Selecting Subtitles Selecting a Language Operating in the On screen Display Mode Adjusting the Picture ...

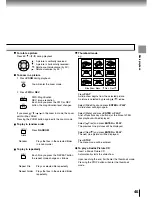
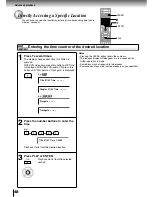
Page 48: ...ired location Press PLAY or ENTER Playback starts from the selected section Directly Accessing a Specific Location You can access a specific location by entering its corresponding time hours minutes seconds 2 1 Notes Pressing the CLEAR button resets the numbers This location display will disappear in a few seconds if no further operation is made Some discs may not respond to this process Some scen...

Page 49: ...ration You can also use an on screen display to perform a repeat playback 58 Press A B RPT at the beginning of the segment point A you want to play repeatedly Press A B RPT again at the end of the segment point B The unit automatically returns to point A and starts repeat playback of the selected segment A B 2 1 To resume normal playback Press A B RPT again You can also use STOP to exit A B repeat...

Page 50: ...ge the selection following the instructions in step 2 To cancel the programmed selections 1 While the display appears on the screen press to move the highlighted bar to the item you want to cancel 2 Press CLEAR To resume normal playback from memory playback 1 Press MEMORY to display the programming display 2 Since Stop is selected press ENTER You can also exit memory playback by pressing STOP Note...

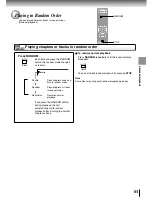
Page 51: ...ring playback the unit automatically starts random playback after finishing the current chapter or track To resume normal playback Press RANDOM repeatedly until the random display disappear You can also exit random playback by pressing STOP Note Some discs may not permit random playback operation Plays chapters once on a disc in random order Plays chapters or tracks in random order Resumes normal ...

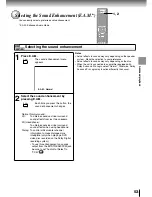
Page 52: ...ing Magnification Image reduction Normal playback Press the ZOOM button repeatedly Zoom point To shift Press in the zoom in mode Zooming a Picture You can magnify areas within a picture To exit zoom playback Press ZOOM repeatedly until the zoom icon disappear You can also use STOP to exit zoom playback Notes Some discs may not respond to zoom feature During some scenes the buttons may not work as ...

Page 53: ...elect Normal Otherwise Dolby Surround Pro Logic may function differently than usual Select the sound enhancement by pressing E A M Each time you press the button the sound enhancement changes Normal Normal sound 3D To obtain expansive virtual surround sound effects from just two speakers 3D Headphone To obtain expansive virtual surround sound effects when using headphone Dialog To control critical...

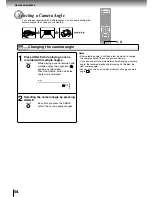
Page 54: ...era angle changes DVD V VCD CD Changing the camera angle 1 5 Selecting a Camera Angle If a scene was recorded with multiple angles you can easily change the camera angle of the scene you are viewing Notes After selecting angle it will take a few moments to change the camera angle of the scene you are viewing If you pause a picture immediately after changing a camera angle the resumed playback pict...

Page 55: ...ss SUBTITLE several times during playback until Turn off subtitles is displayed Notes Some DVD video discs display subtitles automatically and you cannot turn them off even if you set the subtitle function to off Some DVD video discs will allow you to make subtitle selections and turn subtitles on or off only via the disc menu You can also use an on screen display to change a subtitle 58 Notes Whe...

Page 56: ...from those included on the disc 1 2 Selecting sound channels of VIDEO CDs During playback press AUDIO repeatedly to select the sound channel Notes Some discs allow you to change audio selections only via the disc menu If this is the case press the MENU button and choose the appropriate language from the selections on the disc menu If you select a sound track which is not included on the disc the u...

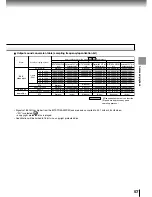
Page 57: ...D video discs Linear PCM Dolby Digital Bitstream 48 kHz 20 bit 48 kHz 20 bit Bitstream Bitstream Bitstream Bitstream Noise 44 1 kHz 16 bit 44 1 kHz 16 bit 48 kHz 16 bit 48 kHz 16 bit 44 1 kHz 16 bit 44 1 kHz 16 bit 44 1 kHz 16 bit 44 1 kHz 16 bit 48 kHz 16 bit 48 kHz 16 bit 48 kHz 16 bit 48 kHz 16 bit 48 kHz 20 bit 48 kHz 24 bit 96 kHz 16 bit 96 kHz 20 bit 96 kHz 24 bit Bitstream 48 kHz 20 bit Bit...

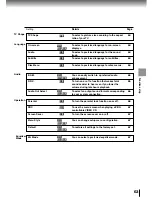
Page 58: ...ay Operation CLEAR DISPLAY When playing a DVD video disc 1 2 3 ENTER ENTER To turn off the display Press DISPLAY or CLEAR Note Doing nothing for approx 10 seconds will eliminate the display Note Some discs may not be compatible with a set of these operations To select a title To select a chapter To select a playback audio setting To select a subtitle language To change the camera angle To repeat a...

Page 59: ...Some discs may not be compatible with a set of these operations To select a track To select the audio channel Stereo Mono L R Left Right To select a playback audio setting To repeat a track or entire disc Elapsed time of the current track Current track number e g ...

Page 60: ...picture Adjusting the picture 1 2 ENTER PICTURE 2 DIMMER PICTURE PICTURE BRIGHTNESS 0 Darker to 30 Brighter TINT 0 Reddish to 30 Greenish COLOR 0 Paler to 30 Deeper CONTRAST 0 Lower to 30 Higher SHARPNESS ON or OFF BRIGHTNESS 15 15 15 15 OFF 15 TINT COLOR CONTRAST PICTURE SHARPNESS Adjust or To set the screen brightness The screen brightness can be switched from 4 levels Press the DIMMER button re...

Page 61: ...Function setup You can change the default settings to customize performance to your preference Customizing the Function Settings ...

Page 62: ...ze performance to your preference Press SETUP during stop The following on screen display appears Press to select the setting you want to change then press ENTER See the next page Press to select the setting you want to change then press 2 3 1 5 6 Note The SETUP button is functional even during the playback or during the stop time STOP button pressed once for resuming the playback Some operations ...

Page 63: ...ge for on screen displays To select a preferred language for the sound track To select a preferred language for subtitles To select a preferred language for disc menus You can easily switch to a preferred audio enhancement To turn on or off a function that makes faint sounds easier to hear even if you lower the volume during late hours playback To select an output sound format corresponding to you...

Page 64: ...riate subtitle language from the selection on the disc menu Disc Menu DVD V English To display disc menus in English French To display disc menus in French Spanish To display disc menus in Spanish Note Some DVD video discs may not include your pre selected language In this case the unit automatically displays disc menus consistent with the disc s initial language setting TV Shape DVD V 4 3 Normal ...

Page 65: ...em E A M VCD DVD V CD You can obtain expansive virtual surround sound effects from just two speakers Normal Normal sound 3D To obtain expansive virtual surround sound effects from just two speakers 3D Headphone To obtain expansive virtual surround sound effects when using headphone Dialog To control critical center channel information to make dialogue more intelligible only when playing a DVD vide...

Page 66: ...security code 2 Press to select the parental lock level then press the ENTER button Customizing the Function Settings continued Setting details PASSWORD CHECK Security Code Parental Level 3 Press 4 Press to select Operation then press the ENTER button You cannot play DVD video discs rated higher than the level you selected unless you cancel the parental lock function For example when you select le...

Page 67: ...CD You can change setup menu configuration Type1 Setup menu is displayed in type1 configuration Type2 Setup menu is displayed in type2 configuration Default VCD DVD V CD Reset To restore settings to the factory set EQ Mode VCD DVD V CD You can select a preferred equalizer mode None Equalizer is not used Rock Equalizer mode for Rock Pop Equalizer mode for Pop Live Equalizer mode for Live Dance Equa...

Page 68: ......

Page 69: ...ct the unit to a TV or audio system Also you can connect a battery pack to power the unit Connecting from other equipment Connecting to Headphones Connecting to Audio Equipment Using the automobile vehicle adapter or power port ...

Page 70: ...EO mode INPUT SELECT TV DVD COMPONENT S VIDEO VIDEO VIDEO is displayed on the LCD monitor Press the INPUT SELECT button repeatedly to select the COMPONENT mode INPUT SELECT TV DVD COMPONENT S VIDEO VIDEO COMPONENT is displayed on the LCD monitor Connecting to a COMPONENT VIDEO IN jack Clear video can be viewed by using the VIDEO jack and the S VIDEO jack External equipment S VIDEO OUT AUDIO OUT wh...

Page 71: ...ted equipment as well When you connect the unit to other equipment be sure to turn off the power and unplug all of the equipment from the wall outlet before making any connections If you place the unit near a tuner or radio the radio broadcast sound might be distorted In this case place the unit away from the tuner and radio The output sound of the unit has a wide dynamic range Be sure to adjust t...

Page 72: ...he volume with the headphone volume control Readjust to your preference when playback starts Turn off the unit before you connect or disconnect the headphone cable Possible shakes produced by plug connecting disconnecting may cause damage to the disc You can connect up to 2 headphones Caution When you use headphones keep the volume at a moderate level If you use the headphones continuously with hi...

Page 73: ...Notes DO NOT connect the BITSTREAM PCM DIGITAL AUDIO OUT jack of the unit to the AC 3 RF input of a Dolby Digital Receiver This input on your A V Receiver is reserved for Laserdisc use only and is incompatible with the BITSTREAM PCM DIGITAL AUDIO OUT jack of the unit Connect the BITSTREAM PCM DIGITAL AUDIO OUT jack of the unit to the DIGITAL OPTICAL or DIGITAL COAXIAL input of a Receiver or Proces...

Page 74: ...d mark 62 65 57 Dolby Digital Connecting to Audio Equipment continued To BITSTREAM PCM Coaxial cable or optical digital cable not supplied To digital audio input optical coaxial Amplifier equipped with a Dolby Digital decoder Dolby Surround Pro Logic You can enjoy the dynamic realistic sound of Dolby Surround Pro Logic by connecting an amplifier and speaker system right and left front speakers a c...

Page 75: ...REAM PCM OUT S VIDEO IN VIDEO IN AUDIO IN L R To digital audio input optical coaxial Amplifier equipped with a DTS decoder To BITSTREAM PCM Coaxial cable or optical digital cable not supplied Connecting to an amplifier equipped with an MPEG2 audio decoder MPEG2 sound You can enjoy motion picture and live concert DVD video discs with dynamic realistic sound by connecting an amplifier equipped with ...

Page 76: ...th a digital audio input and speaker system right and left front speakers Make the following setting On screen display Select Page PCM Audio Out Select 62 65 Connecting to Audio Equipment continued BITSTREAM PCM OUT S VIDEO IN VIDEO IN AUDIO IN L R Amplifier equipped with a digital audio input To BITSTREAM PCM To digital audio input optical coaxial Coaxial cable or optical digital cable not suppli...

Page 77: ... this adapter with a DC 24V configured automobile vehicle Consult your vehicle owner s manual before using this adapter ALWAYS use caution when touching the adapter cigarette lighter socket or power port The adapter lighter socket and power port may become heated after prolonged use Do not touch the adapter with wet hands Do not liquid over the adapter Notes Never operate the unit in a moving vehi...

Page 78: ...ighter socket or power port fully 4 Turn on the vehicle engine so that the cigarette lighter socket or power port is powered In some vehicles the cigarette lighter socket or power port is powered even when the vehicle s engine is not running It is important that the vehicle owner s manual be consulted 5 When disconnecting the unit first remove the adapter pin plug from the unit and then the power ...

Page 79: ...Others Before Calling Service Personnel Specifications LIMITED WARRANTY PORTABLE DVD PLAYER ...

Page 80: ...tions or other abnormalities such as static electricity may interrupt correct operation Correction Connect the AC adapter or power plug securely Press any button Select the correct input mode of the audio receiver so you can listen to the sound from the unit Adjust the volume by turning the volume control Turn on the equipment connected with the audio video cable Select the proper audio setting Ej...

Page 81: ...rom the player The batteries in the remote control are exhausted The player s remote sensor is exposed to a strong light source such as direct sunlight or other illumination Correction Point the remote control at the remote sensor of the player Operate the remote control within about 3 m Replace the batteries with new ones Avoid the player from being exposed to a strong light source ...

Page 82: ... 75 Ω negative sync Ø3 5mm mini jack 1 C 0 286 V p p 75 Ω Component input COMPONENT VIDEO IN Component video connector 1 Audio input AUDIO IN 2 0 V rms 680 Ω pin jacks L R 1 Headphone terminal Ø3 5mm stereo mini jack 2 Antenna input VHF UHF VHF UHF 75 Ω F connector Liquid crystal display Panel size 15 inches Projection system TN color transmission Driving system Amorphous silicon TFT active matrix...

Page 83: ...ts and labor Owner s Manual You should read the owner s manual thoroughly before operating this product You should complete and mail the enclosed Demographic card within ten 10 days after you or the person who has given you this product as a gift purchased this product This is one way to enable TACP TCL to provide you with better customer service and improved products Failure to return the card wi...

Page 84: ...time within which an action must be commenced to enforce any obligation of TACP arising under the warranty or under any statute or law of the United States or any state thereof is hereby limited to ninety 90 days from the date you discover or should have discovered the defect This limitation does not apply to implied warranties arising under state law This warranty gives you specific legal rights ...

Reviews: