Installation
Install CTX WinAdmin Software
3-2
Strata CTX Programming - Part 2: CTX WinAdmin Programming 6/04
•
Windows 2000 Service Pack 2 (SP2) – If not found, follow the steps given on the CTX WinAdmin CD-
ROM to install SP2.
•
Internet Explorer (IE)
– If IE 5.5 or greater is not found, follow the steps given on the CTX
WinAdmin CD-ROM and install it from there.
Note
Windows XP Professional automatically installs IE 6.0 so installing IE 5.5 is not needed.
CAUTION!
Toshiba recommends not to install MS Network Monitor on WinAdmin PCs because
MS Network Monitor software which is provided on the Microsoft System
Management Server (SMS) production CD-ROM causes problems with the Windows
WMI SNMP component needed to run WinAdmin.
Step 1: Install CTX WinAdmin Software
1. Insert the CTX WinAdmin CD-ROM into your CD-ROM drive. Click “Install CTX WinAdmin...”. The
CD-ROM runs a Pre-installation check, determines the OS you have, then checks for all other software
requirements.
If the correct OS and all requirements were found on your PC, the “Pre-installation Check Complete!”
screen displays. This enables you to perform any of the following:
•
First-time installation:
click “Install Now”. Follow the prompts. Choose “Custom” to browse to the
drive on which you want to install the software or “Complete” to install immediately on the C: drive.
•
If upgrading from a previous version:
click “Upgrade Now”. Select “Complete” to install the new
version on the C drive, select Custom to select another drive. The CTX WinAdmin Custom Profile
folders will remain on the C drive or copied to the selected drive.
•
If installing over the same version:
click Install Now. You will be prompted to “Repair” or “Remove.”
Repair fixes corrupted files and registry entries. Remove removes the existing version to enable you to
reinstall the same version as a new clean install.
•
If your PC did not pass the Pre-installation check and a requirement was not found:
see the details
in
“Requirements Not Found” on page 3-3
.
CAUTION!
Do not open and/or run other applications during installation as this may corrupt the
installation and/or other software on your PC. Installation takes several minutes.
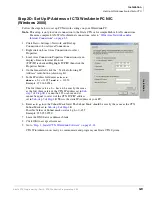
2. Once installation is complete, if the Windows Internet Wizard displays when you click on the CTX
WinAdmin icon, enter the settings below if using a NIC or modem connection. This establishes a
preliminary path to bring up the CTX WinAdmin log-in screen.
•
Windows XP Pro:
If the Windows “Welcome to the New Connection Wizard” comes up, you have not
yet configured your Internet connection. Follow the prompts and select: Next > Connect to Internet >
Next > Set up my connection manually > Next > Connect using broadband connect that is always on >
Finish. Exit the wizard screen.
•
Windows 2000:
If the Windows “Welcome to the Internet Connection Wizard” comes up, you have not
yet configured your Internet connection. Follow the prompts and select: I want to set up my Internet
connection manually > Next > I want to connect through a local area network > Next > Automatic
discovery of Proxy server > Next and No to Setup Your Internet Email Account > Next > Finish.
3. Go on to
“Step 1: Install CTX WinAdmin Software” on page 3-5
.
Summary of Contents for Strata CTX 100-S
Page 20: ......
Page 40: ......
Page 324: ......
Page 445: ...726 Digital Solutions Division June 2004 Part 4 Appendices Digital Business Telephone Systems ...
Page 446: ......
Page 574: ...Record Sheets Services D 56 Strata CTX Programming Part 4 Appendices 6 04 ...


