48
MOTION SETUP
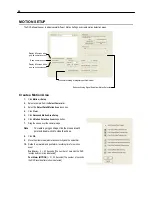
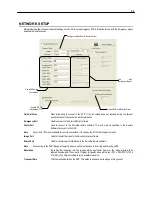
The DVR allows the user to adjust several different Motion Settings and create motion detection areas.
Create a Motion Area
1.
Click Motion in Setup.
2.
Select a camera from the Select Camera list.
3.
Select the Detect Detail Motion Area check box.
4.
Click Clear.
5.
Click Advanced Motion Area Setup.
6.
Click a Motion Detection Area shape button.
7.
Drag the mouse over the camera image.
Note
To create a polygon shape, click the mouse at each
point and double-click to close the shape.
8.
Click OK.
9.
Move the sliders to adjust motion sensitivity and the noise filter.
10.
Define the pre-alarm and post-alarm recording time for a motion
event.
Pre Alarm – 0 > 50 Seconds [The number of seconds the DVR
records before motion is detected]
Post Alarm (MOTION) – 0 > 50 Seconds [The number of seconds
the DVR records after motion is detected]
Schedule recording at a regular specified interval
Display full screen video
pop up on motion event
Beep on motion event
Display full screen video
pop up on sensor event
Reduces Analog Signal Noise from Motion Detection
Summary of Contents for Surveillix NVS
Page 2: ...ii ...
Page 16: ...16 ...
Page 18: ...18 ...
Page 20: ...20 ...
Page 38: ...38 ...
Page 80: ...80 NOTES ...
Page 88: ...88 NOTES ...
Page 94: ...94 NOTES ...
Page 97: ...97 LDAP INTEGRATION This chapter includes the following information Installing LDAP ...
Page 100: ...100 NOTES ...
Page 104: ...104 ...
Page 116: ...116 ...

