45
44
Operations
W.BALANCE
OVERLAY
LOCK
STORE
IMAGE
ARM LIGHT
CAMERA
CAMERA
GAIN
W.BALANCE
OVERLAY
LOCK
STORE
IMAGE
ARM LIGHT
CAMERA
CAMERA
GAIN
W.BALANCE
OVERLAY
LOCK
STORE
IMAGE
ARM LIGHT
CAMERA
CAMERA
GAIN
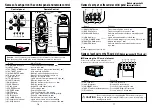
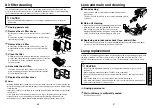
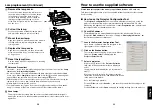
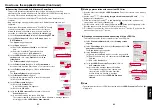
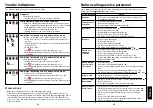
Please read this chapter if the model you purchased includes a document camera.
■
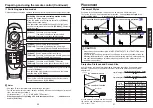
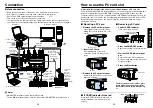
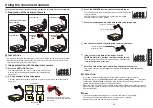
Preparation of the document camera
ON
ON/S
TAND
BY
INPU
T
MEN
U
AUTO
SET
FAN
TEM
P
LAM
P
VOL.
+
VOL.
-
AUT
O
KEYS
TONE
ON/S
TAND
BY
INPU
T
FAN
TEM
P
LAM
P
ON
VOL.
+
VOL.
-
AUT
O
KEYS
TONE
W.BAL
ANCE
OVER
LAY
LOCK
STORE
IMAGE
ARM L
IGHT
CAME
RA
CAME
RA
GAIN
MEN
U
AUTO
SET
CAM
ERA
ON/S
TAND
BY
INPU
T
FAN
TEM
P
LAM
P
ON
VOL.
+
VOL.
-
AUT
O
KEYS
TONE
W.BAL
ANCE
OVER
LAY
LOCK
STORE
IMAGE
ARM L
IGHT
CAME
RA
CAME
RA
GAIN
MEN
U
AUTO
SET
ON/S
TAND
BY
INPU
T
FAN
TEM
P
LAM
P
ON
VOL.
+
VOL.
-
AUT
O
KEYS
TONE
W.BAL
ANCE
OVER
LAY
LOCK
STORE
IMAGE
ARM L
IGHT
CAME
RA
CAME
RA
GAIN
MEN
U
AUTO
SET
ON/S
TAND
BY
INPU
T
FAN
TEM
P
LAM
P
ON
VOL.
+
VOL.
-
AUT
O
KEYS
TONE
W.BAL
ANCE
OVER
LAY
LOCK
STORE
IMAGE
ARM L
IGHT
CAME
RA
CAME
RA
GAIN
MEN
U
AUTO
SET
ON/S
TAND
BY
INPU
T
FAN
TEM
P
LAM
P
ON
VOL.
+
VOL.
-
AUT
O
KEYS
TONE
W.BAL
ANCE
OVER
LAY
LOCK
STORE
IMAGE
ARM L
IGHT
CAME
RA
CAME
RA
GAIN
MEN
U
AUTO
SET
PRECAUTIONS
• Do not jolt or force the camera head or camera arm. Doing so could cause malfunction.
• Note that when extending or rotating the camera arm, the arm moves in an arc. Take
care not to bump yourself or others with it.
■
Image projection with the document camera
1
Press the ARM LIGHT button.
The arm light comes on. (Press it again to turn off the light.
Use the light as needed, depending on the indoor lighting
conditions.)
2
Set up document to be photographed.
Place the document or other material on or near the camera, and point the camera
head at it.
Using the document camera
5) Rotate
camera
head
Status before preparation
(When stowed)
1) Set up arm
2) Extend arm
3) Rotate arm
4) Extend
camera
head
3
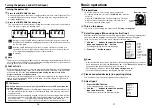
Press the CAMERA button, and select camera input.
• The input returns to the previous input when the CAMERA button
is pressed again.
• Camera input can also be selected by pressing the remote
control or camera’s INPUT button.
4
Move the camera head up and down to adjust the image size.
ON/S
TAND
BY
INPU
T
MEN
U
AUTO
SET
FAN
TEMP
LAM
P
ON
VOL.
+
VOL.
-
AUT
O
KEYS
TONE
W.BAL
ANCE
OVER
LAY
LOCK
STORE
IMAGE
ARM L
IGHT
CAME
RA
CAME
RA
GAIN
123
5
Use the camera head’s focusing ring to adjust the focus.
6
If the screen is too dark or too bright, use the
CAMERA GAIN (+/–) buttons to make it easier to see.
The Sharpness of the camera image can also be adjusted using
the
Image adjustment menu
.
7
After use, turn off the light, and fold up the document camera.
Fold up the camera using the opposite order from
Preparation of the document
camera
.
PRECAUTION
• If the room’s fluorescent lighting causes the image to flicker, either turn off the
fluorescent light, or set the
Shutter speed
from the
Auto setting menu
. Note that
changing the
Shutter speed
setting may not eliminate the flicker, depending on the
lighting, state of the document, or image adjustment.
• When arm light is used, document camera image of paper/object with reflective surface
may have bright spots. In this case, turn off the arm light and have an adequate lighting
from the room light.
Notes
• The camera light automatically goes off when the camera arm is collapsed.
• The camera will not output images when the camera arm is stowed.
• No audio is output when camera input is selected.
Closer: Larger image
Farther: Smaller image
Turn the focusing ring
to adjust the focus.
123
123
123
123
ON/S
TAND
BY
INPU
T
MEN
U
AUTO
SET
FAN
TEMP
LAM
P
ON
VOL.
+
VOL.
-
AUT
O
KEYS
TONE
W.BAL
ANCE
OVER
LAY
LOCK
STORE
IMAGE
ARM L
IGHT
CAME
RA
CAME
RA
GAIN
123
Move the arm and camera head to
place the document beside or behind
the camera.
Screen image
Set direction

