Central remote controller
Owner’s Manual
27
-EN
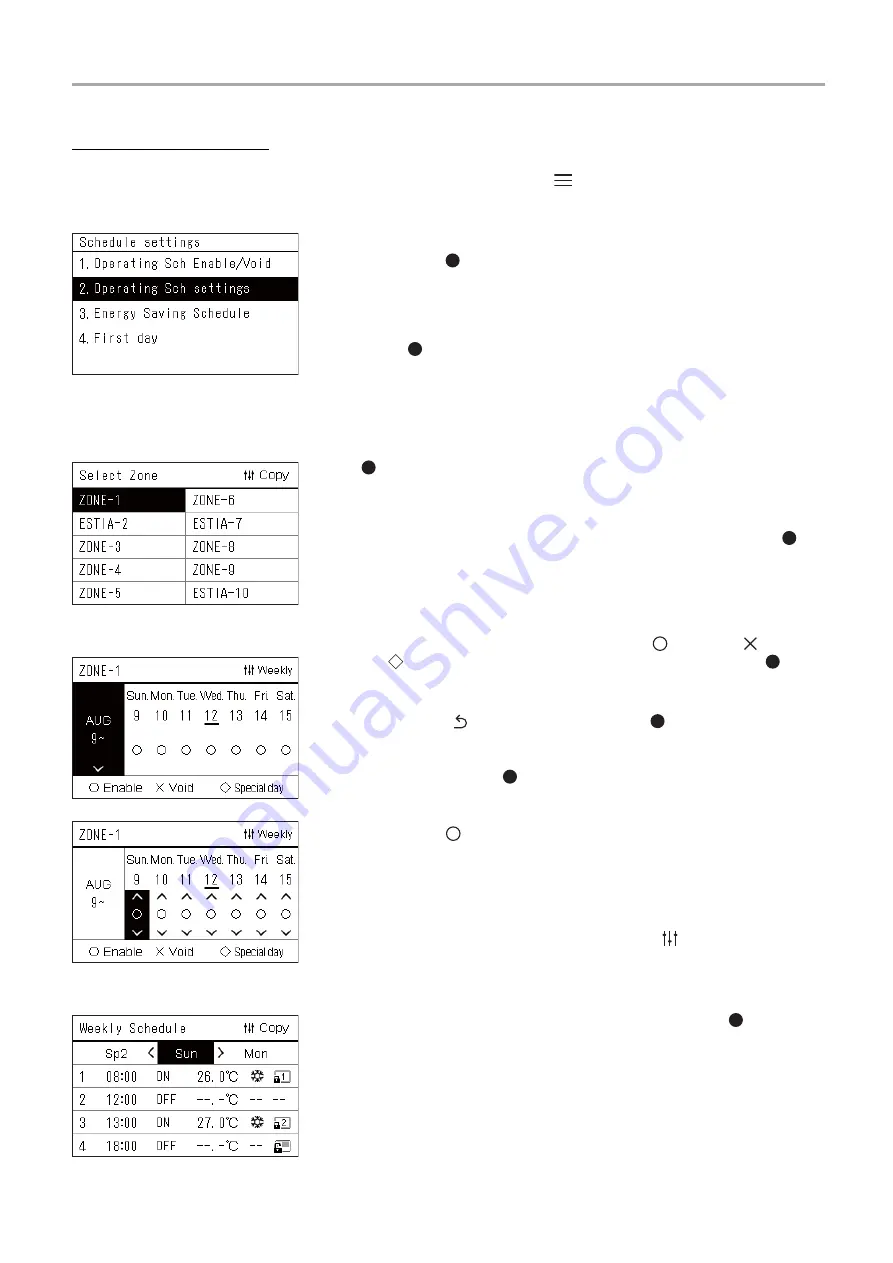
Operating Sch settings
1
In the “All” screen, press [
] (Menu).
The “Settings Menu” is displayed.
2
In the “Settings Menu” screen, select “Schedule settings” and
then press [
] (Confirm).
The “Schedule settings” screen is displayed.
3
Select “Operating Sch settings” using [
∧
] and [
∨
], and then
press [
] (Confirm).
The “Select Zone” screen is displayed.
• The zones for which no air conditioner is registered are not
displayed.
Select Zone
4
Select the zone to set using [<], [
∧
], [
∨
], and [>], and then press
[
] (Confirm).
The “Weekly display” screen of the selected zone is displayed.
5
Select week to change using [
∧
] and [
∨
], and then press [
]
(Confirm).
The cursor moves to the first day of the selected week.
Weekly display
6
Select the date using [<] and [>], change (Enable),
(Void),
and
(Special day) using [
∧
] and [
∨
], and then press [ ]
(Confirm).
The cursor moves to the week of the “Weekly display”.
• If you press [
] (Return) without pressing [
] (Confirm), the setting
is cancelled and the screen returns to the state it was in before the
change was made.
• If you do not press [
] (Confirm) after making the change, you
cannot switch to the “Weekly Schedule” screen.
• You can make the settings for up to 5 weeks ahead.
• By default,
(Enable), is set for all days.
• For information about the setting of special days, see “Changing the
details of the special day schedule settings” (P.31).
7
Place the cursor on the Weekly display (left end) or the day of
the week you want to set, and the press [
] (Control).
The “Weekly Schedule” screen is displayed.
Weekly Schedule
8
Select the day of week to set using [<] and [>] and the
schedule to set using [
∧
] and [
∨
], and then press [
]
(Confirm).
The “Schedule editing” screen is displayed.
• No more than 8 schedules can be set a day.


